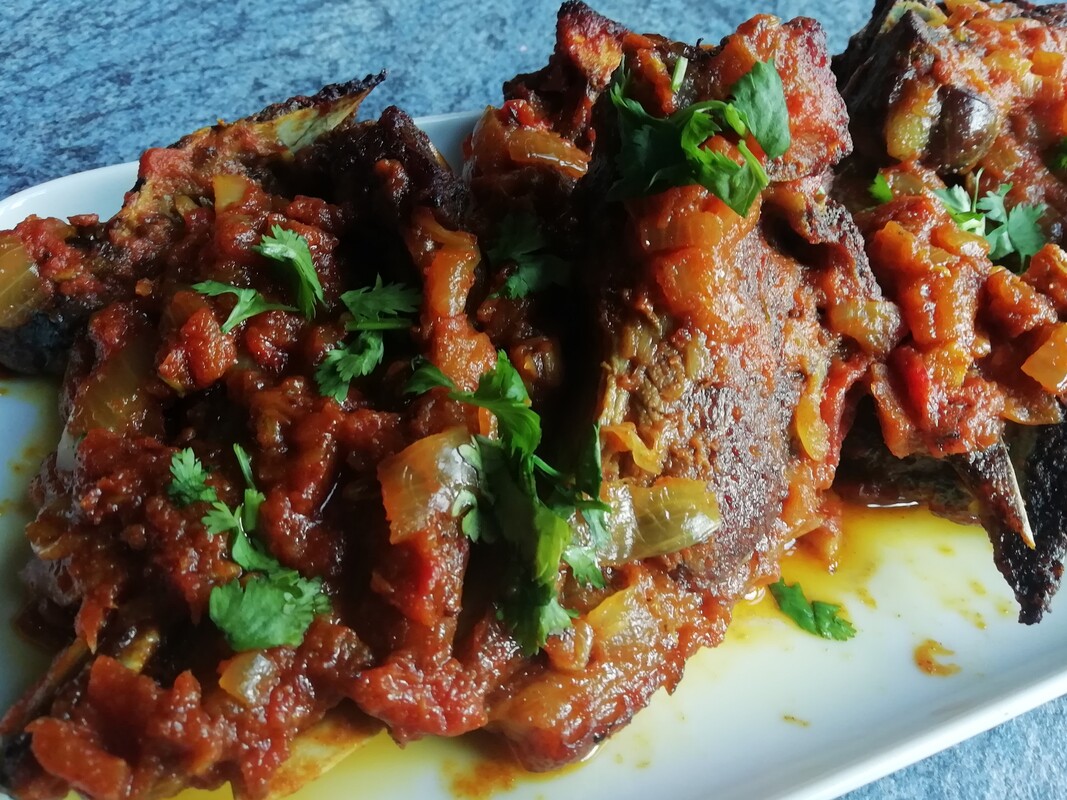
 Goat chops, oven cooked in a tangy masala sauce Amme’s Chops – Punjabi Masala oven cooked chops
This is a recipe from my friend and neighbour. Her mother, Amme, was originally from a Punjabi family who came to India in the partition, among great distress and difficulty. The few things they could bring included their traditions of food. I am privileged to have it passed on to me, over the garden wall. The masala sauce recipe has vinegar in it, which gives a real tang and depth to the flavour as you slow cook the chops. It’s almost a curry/barbeque mixture as it has that sweet and sour background to the tomato and onion sweetness. A truly delicious recipe, and very easy to prepare. You can make the masala sauce ahead of time, then just pour it over the chops as you put them in the oven. You can also freeze the cooked dish and re-heat. Serves 6 Timings: 1 hour for the sauce, 1 ½ hours cooking – which can be done later
Cook the onions for about 15 minutes in a little oil – you are looking for them to become transparent and start to brown slightly – not so mildly cooked as if you were caramelising them. Add the garlic and ginger and stir to release the aromas. Put the ground spices in a small glass and add water to make into a paste, mix, then add the paste to the pan. This is to avoid burning dry spices and is a technique I learned in India. Stir and cook. Add in the vinegar, tomatoes and ketchup. Simmer for about 10 minutes to cook the masala properly. Test the seasoning and add salt. You may need a squeeze of lemon to bring the flavour up. At this stage, you can cool the masala and it will keep in the fridge for 2 days. You can also freeze it. Pre heat your oven to 190°C. Brown the chops in a hot pan for a few minutes in a little oil and transfer them to a metal baking tray where you can lay them all down in one layer. Pour the sauce over the chops and cover the tray with kitchen foil, tucking it down well to make a good seal. Cook in the oven for an hour. Test the chops with the point of a knife – they should be tender. Turn them over to coat them in the sauce, remove the foil from the baking tray and cook at 200°C for another 15 minutes to reduce the sauce. You should end up with a very thick sauce. If you still have quite a liquid sauce - which can depend on the amount of juice the chops release – then keep the chops warm and reduce the sauce on the hob for a few minutes to boil off the extra liquid. The end result should be quite thick and with delicious brown bits where it has started to catch. Add the chops back in and stir to coat them with the tangy meaty sauce. Serve with roti, rice or Bombay potatoes, and some fresh relishes and chutneys.
0 Comments
 Cool and creamy summer lunch - Avocado and goat's cheese tart Avocado and Goats Cheese Tart (vegetarian)
Sometimes only something pale, chilled and creamy will do. We can hope for the weather to go with it. This avocado tart is elegant and light. You can make the pastry well ahead and keep it in an airtight tin but the filling should be made and then the tart served straightaway, we all know how avocado goes brown in the air. Not a good look. Serve alongside a chopped tomato salsa and a light green salad and you have the perfect summer garden lunch for a favoured friend, maybe with a glass of rose alongside? I made a full pie, which I think looks very nice sliced up, but you could use the same recipe to make individual tartlets which might be easier to serve if you have a garden party for six lovely people. For the pastry:
For the filling:
Using either your fingertips or the pastry paddle of your mixer, blend the butter into the flour until you have a fine crumb. Add the powdered spices and mix well, then add the egg and bring the dough together. Mix quickly, don’t knead, then wrap the dough and leave in the fridge to chill for 30 minutes. Heat your oven to 180°C. Grease a 21cm metal quiche tin, loose bottom is best. Roll out the dough to fit the tin, drape it over and trim the edges slightly. Line the pastry shell with greaseproof paper and fill with baking beans. Bake the pastry shell blind for about 20-30 minutes until very crisp and light golden. You can remove the baking beans and paper for a few minutes to really crisp the bottom but prick the pastry with a fork to prevent bubbles rising. Leave the shell to cool. Keep in an airtight container if not using straight away. For the filling: Halve the avocados and remove the stones. Remove the flesh from the shells with a spoon. Reserve one half (if using the large ones) for the top – slice this one finely. Using a stick blender, puree the flesh from the other avocados with the cream cheese and sour cream, adding a pinch of salt and a squeeze of lime juice. Spread the puree over the base of the tart and add the sliced avocado to top it. Crumble over the goat’s cheese and serve straightaway with your simple tomato salsa. Enjoy the sunshine!  Easy Genoese sponge flavoured with orange and with an orange/mango/white chocolate buttercream filling. Sumptuous. May Cake – Orange and Mango Sponge Cake
For the week we start off in May, I made an orange and mango cake with a bright coloured icing to reflect the sunlight and new feeling of optimism. This is another variation on the One True Sponge Cake – the Genoese sponge which is the only cake recipe you really need to know. My Mum made a 2-egg sized one of these, every few days and baked them in what we would see now as very tiny cake tins. We usually had cake and a cup of tea when we came home from school, but it was a small slice. The buttercream icing I use in the recipe below was reserved for birthdays, so we had four buttercream-iced cakes in the year, and all the rest of the time we had jam in the cake and it was dusted with icing sugar. As always, when using a genoese recipe, I need to acknowledge Pam Corbin, @the_pam_the_jam, in the River Cottage Cakes book of infallible cake recipes. This variation is lightly flavoured with orange in the sponge and has an orange and mango buttercream filling enriched with white chocolate. For the juice used in the filling and icing, I bought a small bottle of mixed orange and mango juice, which had a good flavour of both fruits. Our Seniors Lunch Club had its second week back meeting in person. The members were more confident now they knew what they were doing. We were going to discuss Poetry, as it was Poem in Your Pocket Day this week, but in fact we got into such a nice gossip about what we’d been up to and the new arrangements for meeting up that we never got to the poetry debate. We’ve saved that for another time. People are feeling more positive about meeting friends and relatives but everyone was amazed at how tiring being social again can be – we’re learning to pace ourselves and not do too much all at once. Makes 16 squares. Timings: 1 hour to prepare and bake the cake, another hour to cool and ice.
For the filling: 200g salted butter, 50g white chocolate, 200g icing sugar, 10ml orange/mango juice For the water icing: 200g icing sugar, 10ml orange/mango juice, orange food colouring Pre-heat the oven to 180°C. Prepare a 24cm square cake tin, grease it and line with baking parchment. Make a simple Genoese sponge: whisk the eggs and sugar together either with a mixer or over a bowl of hot water, until thick and creamy texture. This takes only about 3-4 minutes in the mixer. While these are beating up, melt the butter and sieve the flour and grate the orange zest. Turn the mixer down to low and add the flour to the egg/sugar foam gradually, adding the orange zest at the same time. Turn off the mixer and using a metal spoon, stir in the melted butter. Spoon the mixture into the prepared cake tin and bake about 30 minutes till golden on top and a skewer comes out clean. Cool 5 minutes in the tin and turn out onto a rack, remove the parchment. Leave to cool. When cool, cut the cake in half through the equator carefully using your biggest breadknife. The cake will keep fresh in a sealed tin for at least a day at this stage. It also freezes very well wrapped up in cling film, so it can be made well ahead of time. Ice the top of the cake with water icing. Make the orange icing with most of the icing sugar, the fruit juice and the orange food colouring and make up a white icing in a small bowl with the rest of the sugar. Ice the cake with the orange icing and then drizzle lines of white icing vertically. Use a skewer to drag the white icing attractively through the orange and leave to set. For the buttercream icing, start to melt the white chocolate in a bowl above hot water. Whisk the softened butter thoroughly and start to add the icing sugar one spoonful at a time. You will need to cover your mixer with a tea towel to stop the icing sugar rising up in clouds and covering your kitchen. Keep adding the sugar and add a little of the fruit juice. When you’ve added all the sugar, scrape down the sides of the bowl to make sure you’ve got all the butter into the icing and no lumps left on the side. Then pour in the melted chocolate and whisk again. Even the small amount of melted chocolate gives a lovely mousse-y texture to the buttercream. Fill the cake with the buttercream and pat a little round the outside too for decoration. Cut into 16 squares and serve. Eat within 2 days of icing, or keep in the fridge. |
Some Changes - April 2022
Thanks to my friends and followers for your patience, and for your encouragement to start blogging again. Archives
April 2022
Categories
All
|
 RSS Feed
