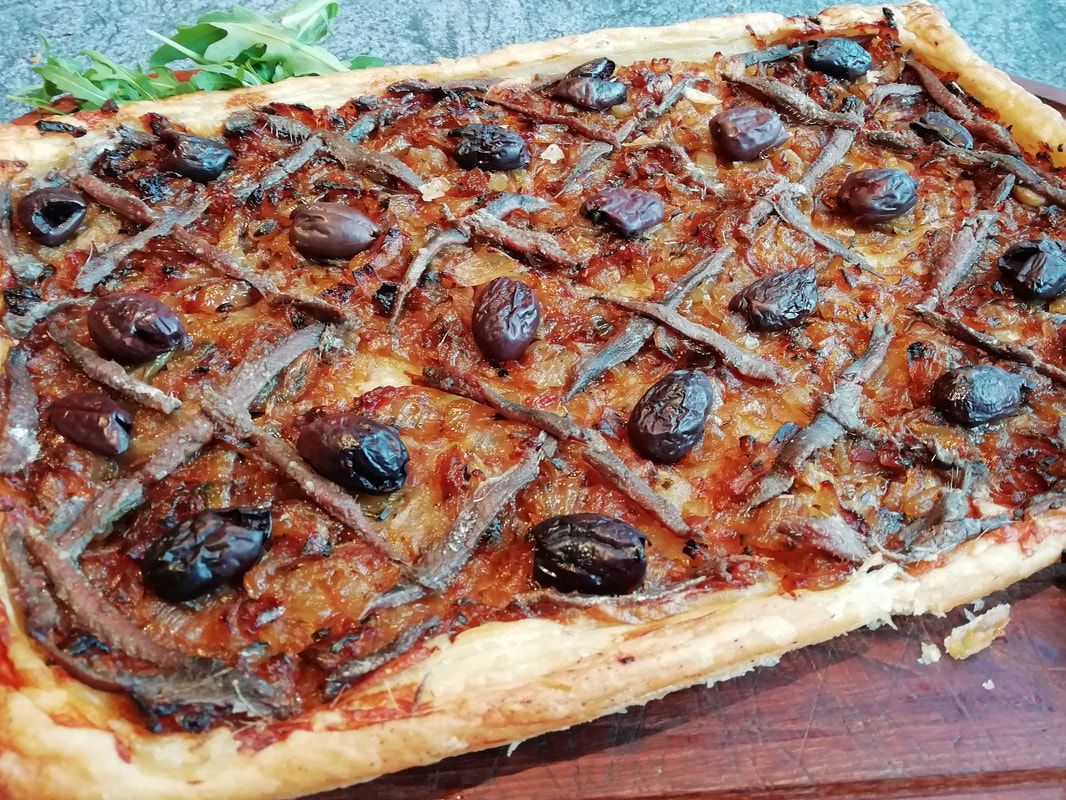
 All the flavours of Provence - onions, olives, anchovies, thyme Pissaladiere – caramelised onion and anchovy pastry
Not a tart, no top. Not a pizza, no cheese. Not a quiche, no eggs. “Pissaladiere” is dough topped with caramelised onions, salty anchovies, rich olives and a smidge of mustard, flavoured with thyme. Provence on a plate. Originating somewhere between Nice and Marseille, perhaps even having migrated from Genoa, the recipe uses local specialities to give a true taste of the region. The name comes from “pissalat” – a condiment that’s difficult to find now and is probably related to the Roman “garum” a sort of fermented fish sauce. The “pissalat” consisted of salted anchovies and other small fish left to marinate and liquefy with some woody herbs over several weeks, but you can substitute a good brand of anchovies out of a tin and still get that deep salty flavour. I met it on the streets of Marseille, where the savoury scent wafts from the bakeries in the mornings, although regional purists will probably say that the best examples come from further east along the coast, in Nice. You eat it warm, not hot; munching from your hand as you wander through the markets, rather than formally at a table. The base can be a flaky bread dough or an even flakier pastry. I prefer the pastry version and am not above using ready made puff pastry for an easier life. It’s a great garden party food for summer gatherings. You’ll probably need to offer plates rather than serving it into people’s hands as the flaky pastry can be a bit unstructured and will tend to disintegrate. Serves 8 Timings: 90 minutes to prep and cook, 30 minutes to cool
Fry the onions very gently in a heavy pan in the vegetable oil, stirring all the time, until they soften and caramelise. This takes longer than you think – about 30-40 minutes. Add a little more oil if needed and add the butter after about 10 minutes. Add the dried thyme and some salt and pepper. Skin the tomato (by dunking it in boiling water and then running under the cold tap), discard the seeds, and chop the flesh very finely. Add this to the pan of onions and continue to fry until the tomato pieces disintegrate. Add the chopped parsley and the tablespoon of vinegar. Stir in and let it cook and reduce further – this gives a lovely deep sweetness to the onion mix. Pre heat your oven to 210°C. Roll out the pastry on a metal baking tray, keeping it on its backing paper. Use a sharp knife and score round the edge of the pastry about 1cm inside the edge, but not going through the pastry sheet. This means the edge will rise up slightly above the rest, giving you that flaky crunchy outside. Spread the pastry (not the edge) with a thin layer of mustard. Spread the onion mixture over the pastry (not the edge) evenly. Criss cross the anchovies over the onion mix and dot the olives in between to make an attractive pattern. Brush the edge of the pastry with some of the oil from the anchovies. Bake for 20-25 minutes until the tart looks cooked and the edges are nicely browned. Cool before slicing and eat lukewarm. If you feel the need for green, some rocket leaves scattered on top would go well.
0 Comments
 Fresh and lovely, minestrone soup Minestrone (vegetarian option)
A favourite soup, and one you can make at any time of the year, and it’ll be different but just as delicious. The constants in a Minestrone are that you need a mix of soup vegetables; onions & carrots, leeks & celery in a base broth, to which you add the flesh of a tomato and very important: the rind of a piece of Parmesan (or other hard Italian cheese). The cheesey rind melts down into the soup as you simmer it, giving a deep almost meaty flavour. It doesn’t disappear completely and after half an hour’s cooking it looks like an unattractive deep sea creature, so you take it out before serving. You wouldn’t buy Parmesan just for this; but keep the rind when you have some in the house for your pasta, wrap it up and keep it in the cheese box - it keeps for weeks and you just pop it in the soup. To this basic soup, you can add anything in season – courgette, turnip, peas, little beans, and at the end, add a handful of some green leafy vegetable – cabbage or broccoli or something, and a handful of chopped fresh parsley. It’s a real meal in a bowl. The Italians have several words for soup, which is an idea I find attractive. A creamy thin soup is a “zuppa”. A “minestra” is a chunky soup with pieces of vegetable in it. So, a “Minestrone” is a specially chunky, even loaded soup. Because the vegetables are all chopped, do try to cut them to a similar size, it looks very smart. I have not given weights for the vegetables as it is so flexible, jut use what you have. Traditionally Minestrone is made with a chicken broth – simple country cooking using up all the goodness of whatever meat you have to hand – but you can use a vegetable stock if you’d prefer. If you are making this for a vegetarian friend, please note that Parmesan cheese is NOT vegetarian, as it is made with rennet from the stomach of a calf. You can buy vegetarian hard cheese in most major supermarkets and use it just like Parmesan in this recipe and others. Serves 4 Timings: 1 hour
Fry the onion, celery, carrot and leek gently in a little vegetable oil for a few minutes to soften them. Add the stock, the tomato and the Parmesan rind and any other harder vegetables you are using – such as turnips or courgettes. Simmer for about 30 minutes. Taste and adjust the seasoning. Remove the rind of cheese. Add the peas, cabbage and any other delicate green vegetables. Simmer for about 5 minutes, stir in the parsley, and serve with crusty bread.  Sparkly citrus flavoured cupcakes iced with lemon curd buttercream Sparkly Citrus Cup Cakes
Lemon is always a popular flavour for baking; I added a bit of lime for some additional tingle and baked some lemon curd in with the cake mixture for that extra softness. The lemon curd slightly inhibited the rise, I think, which made the cakes come out flatter than they sometimes do which made them easier to ice, so winner all round! They were still very spongy and delicious. At our Seniors Lunch Club this week we had a very exciting event – the West Didsbury Astronomical Society came in to give us a talk. They were great, each of the three speakers had a demonstration to make and told us some facts about a) our galaxy b) our solar system c) our moon – so progressing inwards to our world from the vast distances of the Universe. We made some lovely mess: we drew a representation of the galaxy in salt on a black cloth on the floor and made moon craters by throwing marbles into a tray of flour and cocoa powder. It brought it all very much alive. Our members enjoyed, took it all in and will now be looking up at the skies and identifying constellations, planets and moon craters with expert eyes. It’s so nice to be getting back to being able to have people in to talk to us again; we used to have a speaker about once a month to give the Lunch Club members a stimulating boost of something local, personal or new and give them a change from my quizzes and worksheets. The Citrus Cup Cakes added to the jollity – of course I should have tried to do galaxy swirl mirror icing on something – I will have to give that a try for the next visit of the Astronomical Society. Makes 20 cup cakes Timings: 1 hour, then time to cool, and 30 minutes to ice
For the icing: 200g softened butter, 2 tablespoons lemon curd, 2 tablespoons lemon juice, 300g icing sugar. Food colouring as required – optional. Pre heat the oven to 180°C and lay out cupcake cases in the bun tins. Whisk the butter and sugar together until combined and quite fluffy. Whisk in the lemon curd and add the eggs in one by one with a spoonful of flour each time. Add the rest of the flour and the zest and combine well. Spoon the mixture into the bun tins and bake each tray for about 20 minutes until cooked. Cool on a wire rack. For the icing, beat the butter and lemon curd until soft and add the icing sugar a spoonful at a time (putting a tea towel over your mixer to avoid the icing sugar covering your kitchen) and add the lemon juice as you go. I then divided the mixture into two, adding yellow colouring to one part and green colouring to the other. Spoon the mixture into a piping bag and ice the cup cakes. I tried to fill the bag half with green and half with yellow, going for a swirl sort of pattern but it didn’t really work, although it looks nice anyway! Decorate with starry sprinkles and edible glitter if you like. 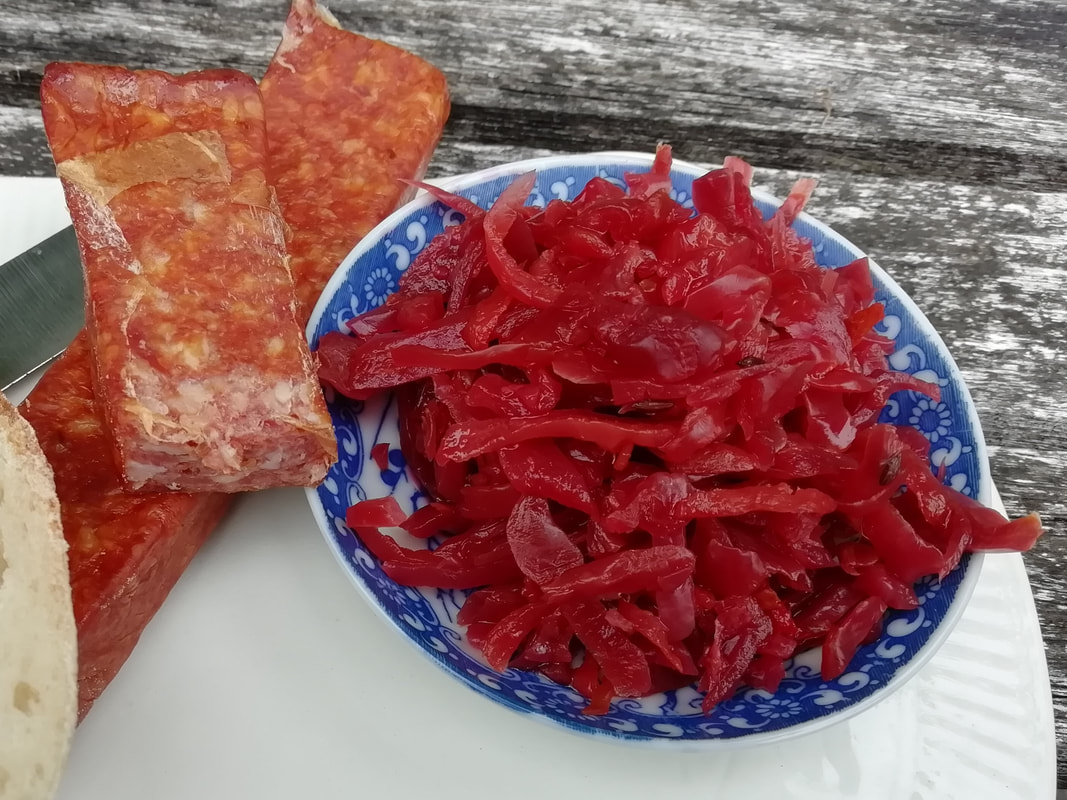 Add some glowing red sauerkraut to your salad or your sandwich! Ruby Sauerkraut (vegan)
OK, so there are as many recipes for Sauerkraut as there are German grandmothers in the world, and every single one of them believes their way is best. Never mind, unless you are in possession of a German grandmother, then you need a recipe. The basics of sauerkraut are simple – cut some firm cabbage up very finely, massage it with salt until the juices run, pack it into a jar so that it ferments and burps away happily, and when that’s over, you have sauerkraut. Most grandmothers add a couple of teaspoons of caraway seeds and no other seasoning. Teeming with beneficial microbes and packed full of cabbagey nutrition, this is a genuine home-made superfood. Fermented foods are proven to improve your gut microbiome. A healthy gut not only means you digest your food comfortably and thoroughly; it has effects on mental wellbeing. I’m not big on making or believing nutritional claims for any one sort of food; I believe in a good mixed diet and no supplements or pills for most of us. But in this case, I do believe the evidence – some sort of fermented food really does do you a lot of good. And of course, home made is the best way. It’s extremely cost effective and means you can get the end result you want. I love making ruby sauerkraut with red cabbage instead of white, just for the beauty of it. I add some spices, turmeric and ginger for the tingle; if you’re being healthy you might as well go the whole hog. But please play around with the basic recipe and let me know if you come up with some delicious variations. The only other thing to get right is the size of your jars. To keep the cabbage below the surface of the liquid, you need to press it down. I have a fermenting jar with a valve in the lid and quite a wide mouth. A standard jam jar fits inside this so when I screw the lid down, the jam jar presses inside on the cabbage. You can keep a whole cabbage leaf aside, to put under the little jar to hold the mixture down more efficiently. You don’t have to use a fermenting jar, it just helps to avoid accidents if you forget to check on your bubbling cabbage and the gas builds up, but you do need a fairly wide glass jar for the fermentation and another smaller one to fit inside. Play around with them before you start, as its quite annoying to have your salted cabbage ready to be packed away and you’re still fitting jars inside each other like a toddler in kindergarten. Might give rise to a toddler style tantrum and that would never do. Makes 2 medium jars Timings: About an hour preparation, 30 minutes mixing and then 1 week fermenting.
Very finely chop the cabbage – as thin slivers as you can get. This does take quite a while but put the radio on and keep going. Grate the carrot and add that in, along with all the rest of the ingredients. Sprinkle the salt over the mix. With your hands, not a spoon (but you can wear plastic gloves if you have to) knead and massage the salt into the mixture for about 10 minutes. In this time you should see the liquid start to come out of the vegetables. Keep going and add a bit more salt if you think it needs it – the amount does depend on the firmness of the cabbage so it can be variable. Let it rest for 10 minutes and then knead/massage again for another 10 minutes. Clean your jars thoroughly with boiling water – the only microbes you want in this mixture are the ones already in the cabbage that can live through all that salting – those are the ones that will ferment and preserve the vegetables. Pack the mixture into your fermentation jar, firming it down with a spoon. The liquid should be visible and will rise up over the next couple of days. If it doesn’t, you can top up the jar with some brine made from mixing water and salt together. Press the cabbage down using your jar and inside-jar arrangement and leave the whole apparatus in the kitchen for a day or two to remind you to loosen the lid every now and then, and to check on the liquid level. You will see bubbles of carbon dioxide starting to form inside the cabbage mixture and a delightful smell of fermenting sauerkraut will start to fill your kitchen. If you don’t like the smell, put the jar somewhere cool but not cold and let it get on with it. Check on it and let the gas out every day or so. After about a week you should have good tasty fermentation going on. At this stage you can choose how strong the taste should be: you can now jar it up into smaller pots and keep it in the fridge (or give it to your friends) for eating. Fridge temperatures will stop the fermentation. If you want it stronger, leave it for another few days – up to another week - out of the fridge, tasting every now and then until it reaches the desired level of pungency. Jars keep about 1 month in the fridge. You can also freeze it, although I’ve never tried. In the old days, apparently sauerkraut was frozen through the winter by packing it into wooden barrels and burying them in the ground so they froze solid and could be thawed and eaten in the spring. The bacteria survive and will regenerate when de-frosted. Eat it, just picking it out of the jar to put into sandwiches, or onto hot dogs. Mix it with mayonnaise for a fantastic sandwich/hot dog relish, have a little bowl of it with salads. It goes specially well with anything meaty or cheesy, but if you like with fish, then indulge yourself. Warm it up with apples and onions to go with sausages, add it to a pasta and ham casserole, have it as a side vegetable with a pork chop. Endless possibilities…. |
Some Changes - April 2022
Thanks to my friends and followers for your patience, and for your encouragement to start blogging again. Archives
April 2022
Categories
All
|
 RSS Feed
