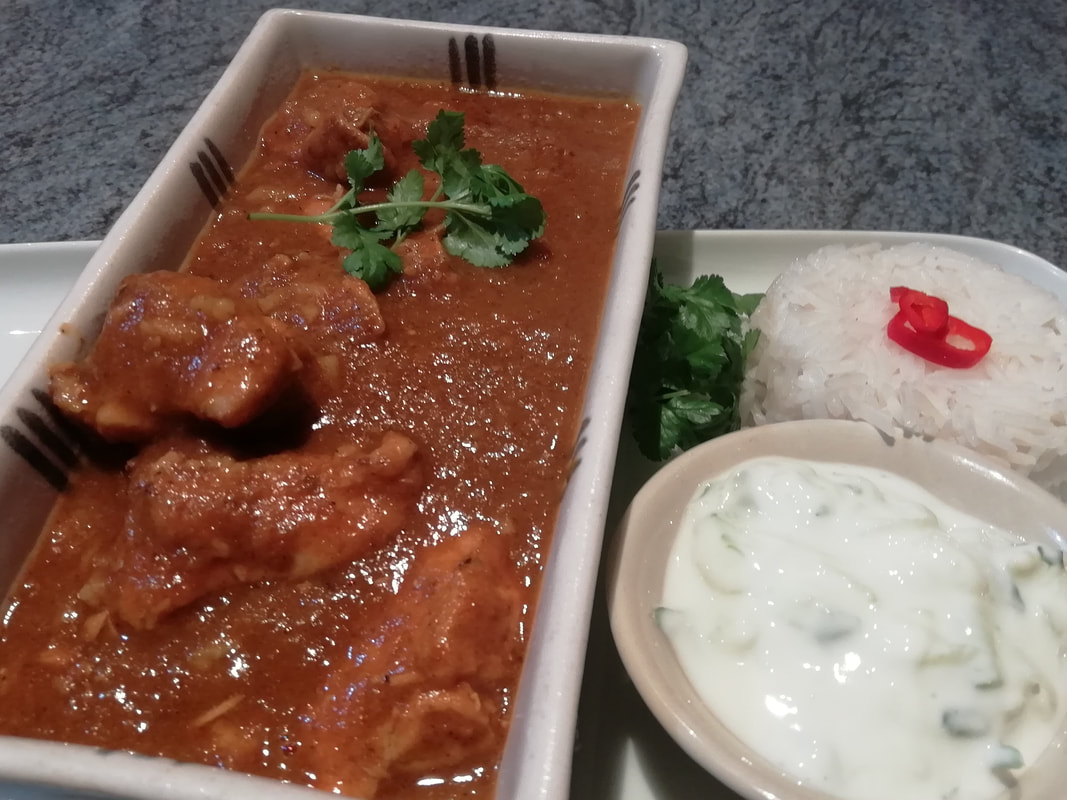
 Smooth spicy sauce, tender chicken, everyone's favourite! Chicken Curry – the Pakistani Way
Who doesn’t love a curry? And the more authentic the better. My friend Fadia, whose family is originally from Pakistan, taught me how to make this smooth sauce. I’m not saying this is truly authentic, but it certainly tastes good, and can be used with chicken, lamb, or a mixture of vegetables. It can be frozen, either just as the sauce or with the meat, so it’s very practical to have as a family-meal standby. You can even throw cooked meat into the sauce and use up the Christmas Turkey leftovers. This is always popular with children, maybe because it’s faintly sweet. My own adore it, and visiting kids, even those who aren’t keen on spicy food, also wolf it down. It isn’t hot, you can keep the spice level as low as you like it by using a bit less of the chilli powder. I give the recipe to make your own curry spice mixture, which I like because I just love a lot of turmeric, but it is pretty much as good if you use a ready mixed curry powder instead of all the different ground spices. Serves 4. Timings – 30 minutes preparation, 30 minutes simmering
Make the sauce: In a heavy saucepan, fry the onions, chilli, garlic and ginger until softened. Add the fennel seeds, stir and cook. Mix the powdered spices in a glass with a little water to a soft paste, then add to the pan. Stir and cook for about 2 minutes to let the flavours mature. Scrape the whole lot into the bowl of a liquidiser and add the other sauce ingredients to the liquidiser, including the fresh coriander if using. Blend until smooth. Add salt and pepper, taste the seasoning, adjust and blend again. At this stage, you can freeze the sauce, or put it in a bowl in the fridge and keep it until needed. You can use it with chicken, or paneer, or a mix of fried vegetables. Fry the chicken meat in the pan you used to make the sauce – you might need to do this in two batches to allow the meat to brown rather than release all the juices and just stew in juice. When all the meat has been lightly browned, add the sauce back in. Cook for about 30 minutes, simmering. It is actually better if left to cool down and heated up again, so I often make this on a Saturday morning, and then leave it to be eaten that evening. It keeps well in the fridge for 2-3 days, so you can make it on Saturday and leave it in the fridge for Tuesday. Serve with rice, naan, a cucumber/mint relish and a tomato/onion relish.
0 Comments
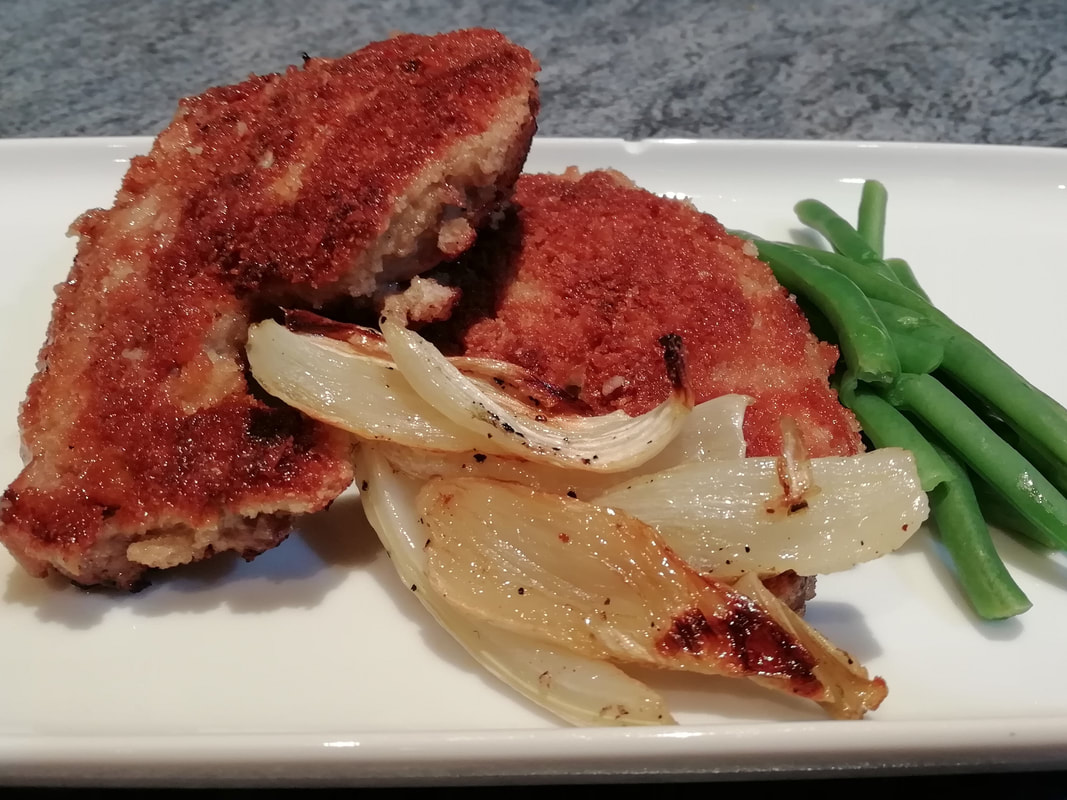 Tender lamb chops in savoury crisp breadcrumb coating Breaded Lamb Chops with Roasted Fennel
Lamb is expensive and delicious, so make a small piece go a long way by coating a tender chop in a crisp breadcrumb. Local British grass-fed lamb is available from good butchers, and the grazing of animals on well maintained pasture or hillsides helps preserve our grassland species of plants and insects. This is a quick weeknight supper but also good enough for an Easter weekend meal, celebrating springtime and local food. The delicate flavour of lamb calls for a simple accompaniment, roast fennel and steamed green beans are perfect. But if you have big appetites to cater for, some buttery mashed potatoes would also go down very well indeed alongside the lamb and fennel. Serves 4 Timings: 45 minutes
Pre heat your oven to 200°C. Take off the outer leaves of the fennel and remove the stringy bits, slice up into pieces about 1 cm wide. Cut the rest of the fennel bulbs into similar size pieces. Put them all on a roasting tray and drizzle with olive oil, then massage the oil into the fennel with your hands. Season with salt and pepper and bake in the oven for about 30 minutes, turning every now and then. The fennel will sweeten and brown as it bakes. Remove from the oven when the pieces are tender and a little browned at the edges. You can serve this room temperature so don’t bother to keep it warm unless you prefer. If you can resist eating the crispy bits straight from the pan you’ve got better willpower than I have. For the lamb: tidy the chops – depending on how your butcher has cut them. You don’t want large pieces of fat or chipped bone, so trim a bit if you need to. Lay the breadcrumbs and the egg in flat dishes in front of you and dip each chop first into the egg and then into the breadcrumbs, patting them on to make a nice firm coating. Lay the chops on a plate or tray for a few minutes to firm up and set. Fry the chops in about 1cm of oil in a large flat frying pan over a medium heat until the breadcrumb coating is crisp and browned and the lamb has reached how you like it – quite pink is very nice with these tender chops, and they only take about 3 minutes per side. Serve with simple green vegetables and your succulent roasted fennel. A squeeze of lemon juice over both the fennel and lamb will just give that final sparkle to the dish. 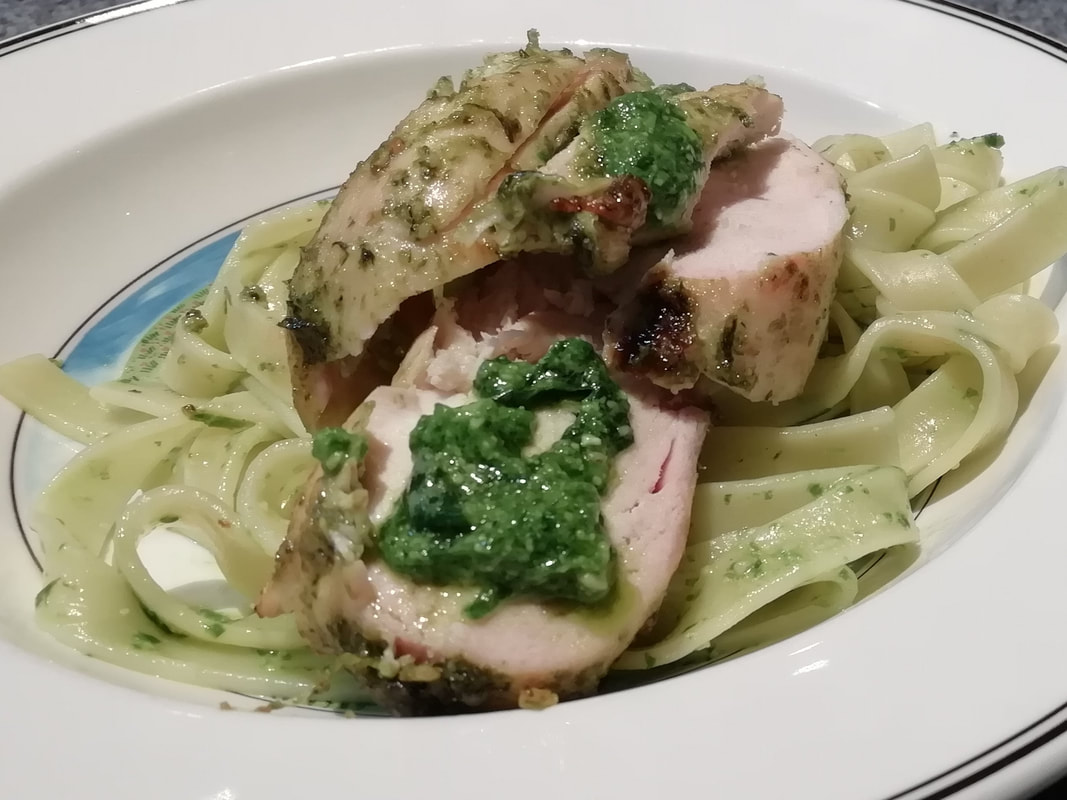 Add that extra dimension - foraged wild garlic, made into pesto, used to coat grilled chicken. Fresh and fragrant. Wild Garlic Pesto with Grilled Chicken and Tagliatelle
Juicy, mild, garlicky but not overdone, delicious, and so very easy. Marinate any meat in any pesto and grill it, and you have a straightforward and tasty meal, but take it to that extra dimension by making your own pesto from foraged wild ingredients. You can really taste the countryside in this wild garlic pesto. It’s nice that wild garlic is so seasonal – it welcomes the spring, stays around for a few weeks and then leaves you for the year. The pesto can be made and kept in a jar in the fridge for at least 2 weeks if you drizzle a layer of olive oil on the top. You can then use spoonfuls as you need and put the jar back in the fridge. Of course, only pick your wild garlic where the dogs and walkers don’t go and wash it well when you get home. Don’t take all the leaves off one plant or empty a patch of it; you want it to come up again next year. Serves 4. Timings: 10 minutes for the pesto, 1 hour marinating (or more), 30 minutes final preparation Pesto:
Blend all the pesto ingredients together thoroughly – I find a stick blender works best for this. Adjust the texture and seasonings – you might need to add more lemon juice or a little more oil depending on the texture and freshness of your leaves. Scoop the pesto into a jar (this much makes about two small jars full which is about double what you need for this recipe) and drizzle a layer of olive oil on the top to stop it discolouring if you aren’t going to use it straightaway. Store in the fridge. Marinate the chicken breasts in 2 tablespoons of pesto in a bowl for at least one hour and up to 12 hours. When ready to eat, pre-heat your oven to 200°C and cook the chicken breasts on a metal cooking tray for about 20 minutes until cooked through and no longer pink inside. The pesto will combine with the juices to make the most gorgeous saucy crozzly bits. Cook the pasta in boiling salted water for the time recommended on the packet, drain and retain a cupful of the cooking water. Mix 2 tablespoons of pesto with the tagliatelle and mix through along with some of the cooking water – adding a bit more to adjust the consistency and make the sauce cling to the pasta. Serve with the chicken sliced on top, drizzled with more pesto and any sauce you can scrape from the cooking tray. Finally, sprinkle with parmesan. A simple green salad is all you need on the side. 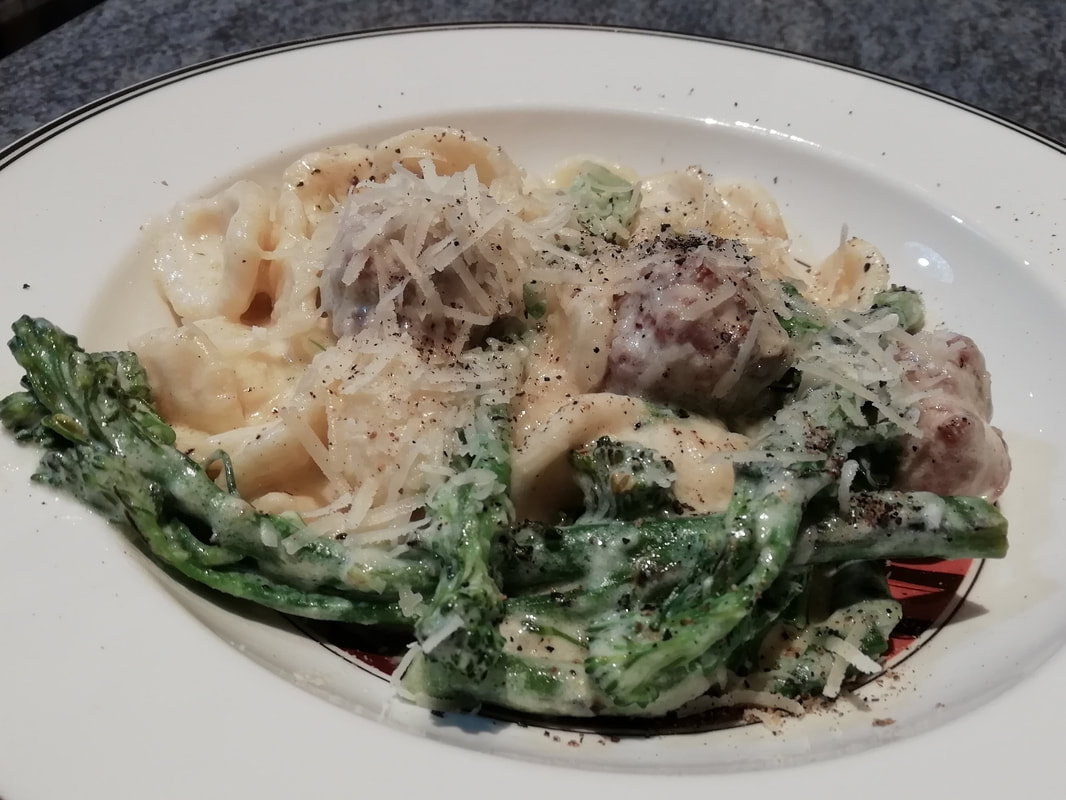 Delicious, creamy, but with that green-good-for-you-bite. Welcome to Rome in April! Orecchiette with fennel sausage and broccoli
The Italians eat green vegetables we don’t have. There’s one called Cima di Rapa which is a spring season green broccoli-style sprouting shoot, sometimes called turnip greens, although I don’t think it’s the same thing as the collard greens/turnip greens eaten in the USA. I may be proved wrong, and if you know more about it than me, I’d be keen to be enlightened – please get in touch. The bitter greens that appear in the spring are considered tonic for the winter-bound body – wakening your cells with vitamins and iron, coursing through your blood to enliven you after the winter sleep. I can’t vouch for the health benefits, but the taste tells you it must be good for you. Anyway, it’s delicious, and it’s eaten with cheesy pasta in Rome in the spring, so what could be better than that? My girlfriends and I ate plates of this at the Enoteca Del Frate and then wandered home, singing songs about rain, so it must have made us happy. I’ve substituted tender stem broccoli for the Cima di Rapa, and charred it a bit to get that bitter green taste. Inform your taste buds that it’s spring, and you’d better awake and get cleaning. I’ve added some fennel sausage meatballs, just because, but you could leave them out for the vegetarian version. It’s pretty rich, due to the cream and cheese in the sauce, but it’s certainly warming, delicious, and stimulating. Welcome to Springtime in Rome! Serves 4. Timings: 40 minutes.
Take the sausage meat out of the skins and add fennel seeds if you need to. Form small balls of the sausage meat - about the size of a small walnut - and roll them in the seasoned flour. In a large frying pan, fry the balls in shallow oil for a few minutes each side, turning them to brown and crisp on all surfaces. Place on kitchen paper to drain. Leave the sausage fat in the frying pan for now. Blanch your tenderstem broccoli by cooking in boiling water for only 2 minutes, drain and cool with cold water. If you have a griddle pan, heat it up. Dump the cooled broccoli into the frying pan and turn in the fennel-flavoured fat to coat the stems. Put a few stems at a time onto your griddle pan and char the broccoli for a few minutes per side, so you get nice charred stripes down the fresh green stem. If you don’t have a griddle pan, you could grill under a hot grill for a few minutes per side until you get some charring and blisters. Put the broccoli aside on kitchen paper. In a big pan cook the pasta as directed on the packet – boil for about 10 minutes depending on the type. Drain the pasta and keep it warm in the colander but keep the cooking liquid. In your large flat frying pan, cook the chopped pak choi stems for a minute to wilt them. Turn the heat down and add the vegetable stock powder or paste to the pan, then stir in the cream. Stir gently to mix the stock through the cream, then throw in half the parmesan. Stir quickly, tip in the pasta, sausage balls, broccoli stems and the pak choi leaves. Add spoonfuls of the pasta cooking water to loosen the sauce as you warm up the mix. Adjust the seasoning – you probably won’t need salt but you might need a grind or two of pepper, and adjust the consistency of the sauce, adding more pasta cooking water. Serve in a big bowl, letting all the family serve themselves, with the remaining parmesan to sprinkle over at will.  Dan Dan Noodles Sichuan street food – spicy, satisfying, silky, slippery noodles, meaty flavour, crunchy texture and a floral tingling back note from the Sichuan pepper. Really excellent slurped as a snack on the street in China (take your own chopsticks) and also a superb family supper – economical, quick to prepare and goes down a treat. The only downside – I guess every recipe has a downside – is that you really do need to use the genuine ingredient – Sichuan pepper. It’s not a pepper, the plant is more related to the ash tree than the pepper corn plant, but the seed husks look a bit like a pink peppercorn. If you have a Chinese grocery near you, buy it there, but if not, you can get it delivered from the usual on-line purchasing sites. They do stay fresh for a long time if you keep them in a sealed container, so it’s worth getting your own supply. There is no substitute for the taste, which is a genuine flavour enhancer, as well as having its own enticing aroma. While you’re in the grocery, do stock up on crispy chilli in oil, you can use it in so many things. It isn’t overly spicy but the crispy dark chilli pieces in the bright red oil are so addictive you’ll be adding it to scrambled eggs, avocado on toast, into stews and curries, and probably to your gin and tonic before you know it. There are many recipes for this dish from basic street food to elevated high class cuisine. Fuschia Dunlop has both styles of recipe in her book, Every Grain of Rice, which is one of my cooking bibles. I mixed her advice with memories of eating these in China and came up with this. One reason the recipe is so simple is that the three constituent parts are prepared separately and mixed together in the dish at the end. They can all be made ahead, so you can throw the final dish together for the family in minutes. Afternote: My friend made this recipe and it turned out very spicy, too spicy for her. She may have used preserved vegetables with chilli, which therefore didn't mean she needed extra fresh chilli, so just watch out for this and taste as you go along! I like to serve a simply steamed Chinese green vegetable – pak choi or whatever you can get, alongside, but you wouldn’t get that on a street corner in Chengdu, so it isn’t very genuine. Serves 4. Timings 30 minutes. For the meat mixture:
For the sauce:
350g Chinese wheat noodles First, toast your Sichuan peppercorns for about 3 minutes in a hot frying pan. Tip them onto kitchen paper to cool and then crush roughly in a pestle and mortar. You don’t want a fine powder, but also you don’t want to bite into a whole pepper, so crush into a gravelly texture. Make the sauce: In a bowl combine the peanut butter with the sesame oil slowly at first, until you have a loose paste. Add the other liquid ingredients and half the ground Sichuan pepper. Taste and adjust the seasoning – I can never resist adding another spoonful of the crispy chilli in oil. This can be done ahead and left in the fridge. Prepare the meat: In a frying pan, fry the meat until the oil comes out, then add the spring onions, chilli, ginger and garlic. Continue frying until the meat is browning and even crisping up a little bit. Add the green vegetable if using and fry for a minute or two longer, just to wilt the vegetable and drive off its liquid. Add the other half of the ground Sichuan pepper. This can also be done ahead and left in a covered container in the fridge and just blasted again in a frying pan to warm up while you are cooking the noodles. Cook the noodles according to instructions – usually in a large pan of boiling water for about 5 minutes. Combine the three ingredients: noodles, meat, and sauce in a large serving bowl, mix well and let everyone serve themselves, drooling and slurping as you go. 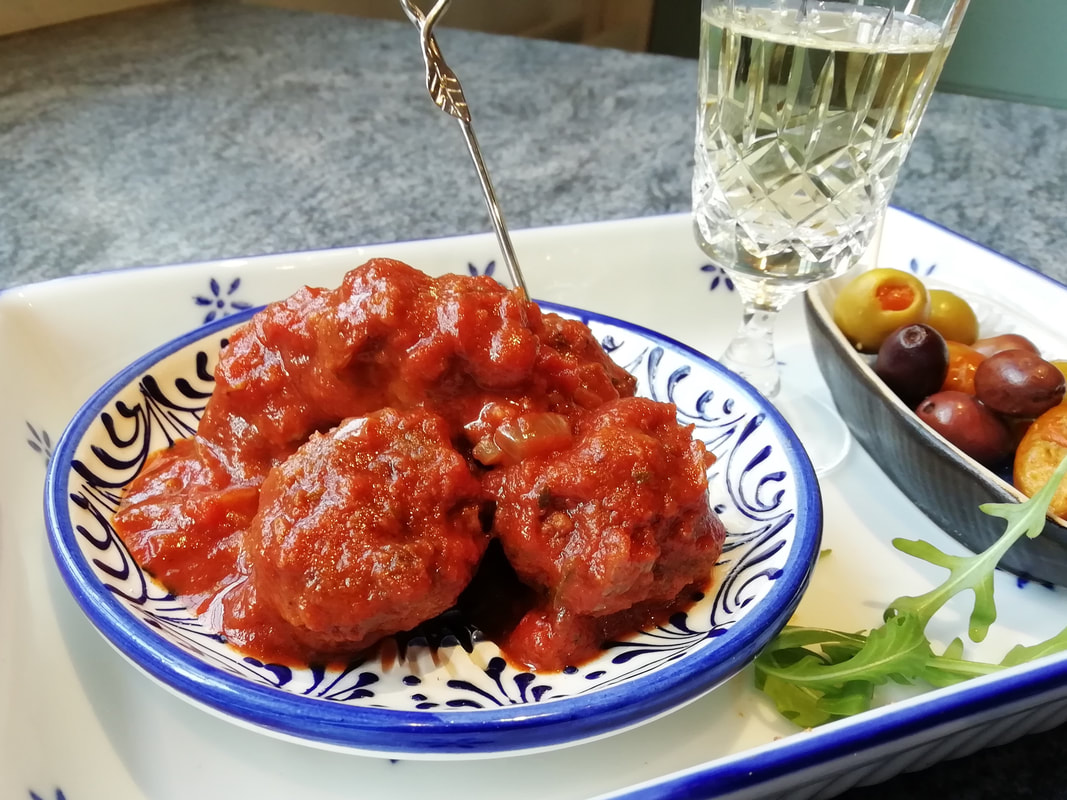 Food for sharing - a plate of succulent Albondigas, pork and beef meatballs Albondigas – Spanish meatballs
A wonderful thing about Spanish cuisine is its versatility; that and the fact that it’s just made for sharing. Make these little lovely meatballs ahead and you can serve them as part of a tapas spread, serve them in a roll like a meatball sub (perfect, says writer-son), or as a main course alongside a hefty portion of patatas bravas and a simple salad. I’ve had these in many a tapas bar in Spain. I think the very best were in the old market in Malaga. After marvelling at the counters of fish, we failed to find a seat inside and sat on a street corner next to the roaring traffic. We tucked into meatballs in rich spicy tomato sauce, jamon, croquetas, olives and some great bread. Albondigas are warm with paprika and cumin; the texture is quite firm as you are supposed to be able to pick them up with a little fork without them disintegrating. They’re friendly little things to eat, perfect for enjoying with loved ones and a dry sherry or a Spanish beer. This recipe makes quite a lot – 60 meatballs, although they are small. It’s worth making a large quantity as they freeze really well, so just pop half of them in the freezer before frying and you can bring them out in a month or so with most of the work done. The sauce can also be divided and frozen for later. Makes 60 little meatballs – about 8 portions. Timings: 30 minutes for the sauce, 30 minutes for the meatballs, then 30 minutes in the oven. All can be done ahead and re-heated.
First, start the sauce, as it needs time to cook down and meld all the flavours. Gently fry the onion in vegetable oil until softened. Add the cumin seeds, oregano and the garlic and stir to cook. Add in the powdered spices and stir again. Tip in the tomatoes, passata and red wine. Cook gently over a low heat for about half an hour – test the seasoning and add salt and pepper as needed. For the meatballs: combine all the ingredients in a big bowl and mix with your hands, work thoroughly to make sure it’s all mixed properly. Make small balls of the mixture – a bit smaller than a ping pong ball. Roll the balls in the seasoned flour and put them on a tray. At this stage you can freeze the ones you don’t want to use straight away – put them in the freezer on a tray until hard, then put them in a plastic bag and seal up. Heat 1cm of oil in a frying pan and fry the meatballs until browned all over – they aren’t very big so it only takes about 5 minutes. Scoop them out and place on kitchen paper. Now you have your cooked meatballs and your sauce – they can be kept for up to a day in the fridge before finally cooking. Preheat your oven to 180°C. Combine the meatballs and sauce in an oven proof dish and place in the oven, covered, for about half an hour to warm right through. If there are leftovers, unlikely, I know, but it sometimes happens, you can warm them up again in a pan with a little additional water. They go beautifully in a bread roll for a hot lunch, maybe with a little melted mozzarella in there as well to add that salty curdy backnote. 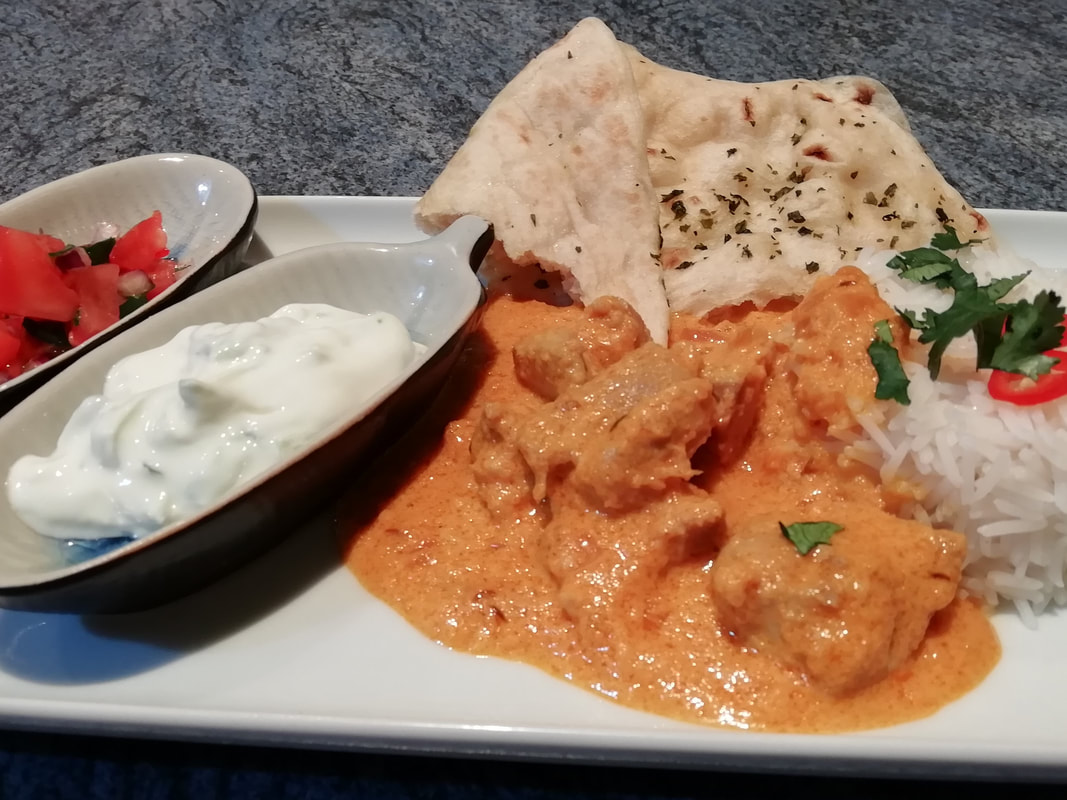 Creamy rich sauce with subtle spicing - from a home made Rajasthani recipe Chicken Curry – the Rajasthani Way (vegan/vegetarian option)
In Jaipur I had a cooking lesson from Mrs. Singh of Dera Mandawa, which also offers “homestays” – the Indian equivalent of a cosy bed & breakfast. Cosy isn’t the right word here, Dera Mandewa is a manor house of royalty - a place of huge courtyards, sized for the elephants to come inside and unload their burdens. We talked and talked through the velvety dark evening. She explained to me that girls rarely left the mansion grounds, even for schooling. Rajasthan in the old days was a place of danger and kidnap, as well as beauty and nobility. Girls stayed close to their female relatives and learned the skills they needed in daily life. Counting the whole spices in and out of the curry sauce was key and was how you learned arithmetic – you don’t want to bite on a whole clove if it’s left in the sauce. Mrs. Singh herself was lucky enough to be in the vanguard of female emancipation, she went to school, became a doctor and then a consultant. Now she lives in her old family home, sharing her culture through food. This is the genuine recipe, with only my addition of tomato puree, as I think the little bit of sweetness is very pleasant. The sauce is made before you cook the meat and is itself vegan, so you can instead use vegetables or paneer for the protein to give you a vegan or vegetarian dish. The onion, garlic, chilli and ginger paste can be made in larger quantities and kept in the fridge to be used in different dishes. My friend Mussarrat Butt from Artisan Nutrition in Didsbury (www.artisannutrition.co.uk) recommends doing this if you are going to make a lot of Indian food. She makes the paste from onions, garlic, turmeric root, salt and ginger and uses it in her vegetarian and vegan curries. It keeps for at least a week. Serves 4 Timings – 90 minutes
A paste made from:
To be added later:
Put 4 tablespoons vegetable oil in a heavy pan, heat well. This looks a lot, but you will need it all. Tip in the whole spices – watch out, the bay leaf will spit like fury. Fry for a few seconds, then add the chopped red onion. Fry for about 10 minutes, moving about, until the onion is browning. While that is frying, make the onion paste in the blender/food processor. Add a little more water if you want to, but remember the water has to be fried off in the next stage which will take longer if your paste is too liquid. Mix the powdered spices in a glass with a little water to a loose paste – this is to avoid scorching the powder, which would give the sauce a burned taste. Add this spice paste to the frying pan, stir and fry to release the fragrance. Now add the onion paste from the blender. The onion paste will meld with the hot oil and onions in the pan and make a thick, bloopy sauce – which will spit and bubble. Resign yourself to having to wipe down the hob after the cooking session. Fry the sauce for about 20 minutes, until it is thick and all the ingredients are combined. Stir in the tomato puree and taste the sauce for seasoning – you will need to add some salt. Keep frying and moving the mass around in the pan. At this stage, start to take out the whole spices – and, like Mrs. Singh, be careful that you count out what you counted in! Keep stirring until the sauce is very thick and the oil starts to show when you draw your wooden spoon through it. Let the sauce cool, add the lime juice and adjust the seasoning. If you need to add a teaspoon of sugar, do so. You can leave it at this stage in the fridge for at least a day, and also freeze it for later. Prepare your protein for the curry: if using chicken thighs, just fry the pieces in shallow hot oil until lightly browned and cooked through. Add the chicken to the curry sauce, loosen with some water and stir in the cream. Warm up gently and don’t boil or the cream will split. Serve with chopped fresh coriander, naan bread, plain rice and some simple relishes and chutneys. 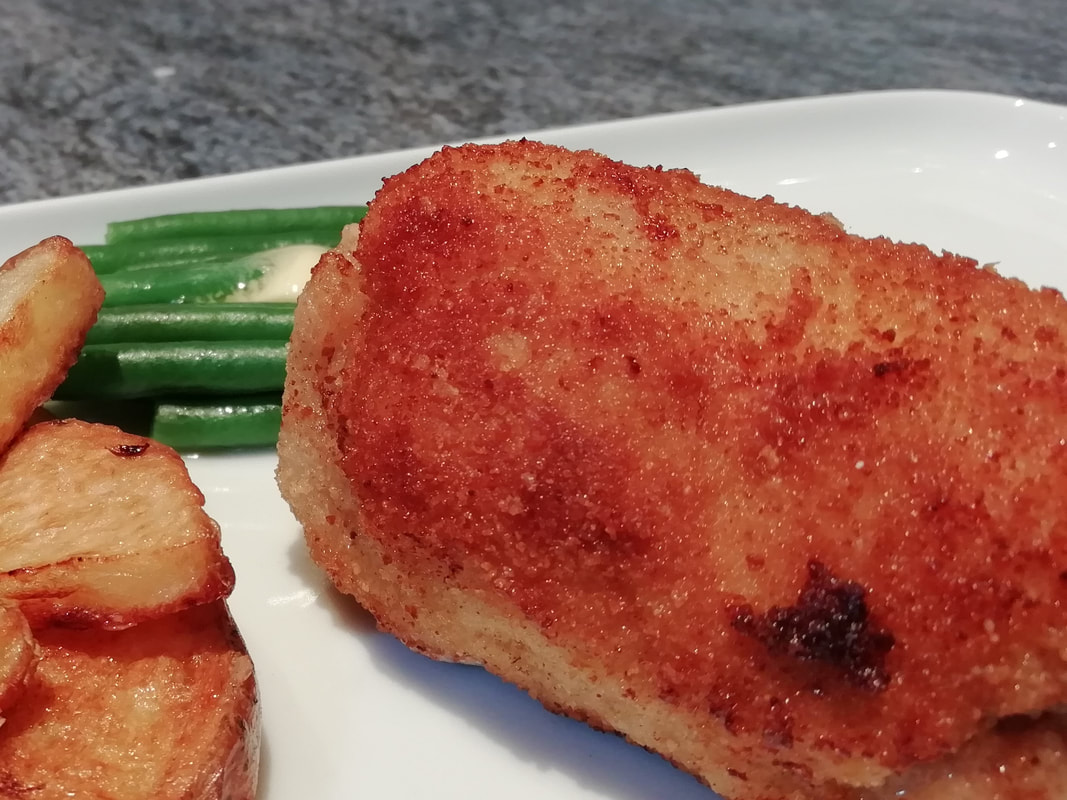 "Little Flamenco Dancers" - Spanish tapas pork rolls, filled with cheese and ham Flamenquin Cordobes
I’ve got a thing for Spanish food – well, haven’t we all? Tapas snacks, eaten in a noisy bar, shouting to be heard above the jokes, the laughter, waiters ordering plates of food from the kitchen, dry sherry glittering on your tongue. Simple tapas – a dish of olives and some slices of jamon, or tapas creations, local specialities: try a different one in every bar – marinated anchovies, stuffed egg-halves, new types of cured meat, or one of the fried ones such as these lovely rolls of pork, ham and cheese. As the name suggests, they are local to Cordoba – city on the banks of the Guadalquivir, where you can find the world famous Mezquita, chequerboard mosque. Lose yourself in the winding streets, admire the decorated Spanish patios, dripping with flowers, do a bit of high-end shopping, but don’t neglect your tummy. Stop at one of the many bars, choosing a shady outdoor table, order a glass of sherry and a plate of “little Flamenco dancers” and enjoy. We ate a juicy portion waiting for the Holy Week parade of shrines to pass by in the streets of Cordoba – a magical evening. Silver shrines being shouldered tenderly through the streets by burly suited men, priests ringing bells, church bells pealing, and Jupiter watching brightly from above. We can’t currently go there, so luckily the flamenquin are easy to make at home, and you can transport your family through taste and texture. These are great for a Spanish themed lunch – add some chips (I did roasted oven chips) and a salad, or go all-out and do a selection of Spanish starters – some cold meat, some manchego cheese, a sliced tomato and onion salad, maybe some marinated anchovies. Serves 4 as a light meal or as part of a selection. Timings – 30 minutes, although you can make and roll them ahead of time and cook only when you want to eat.
Lay your pork pieces out on a flat board – it doesn’t matter how big each one is, you can make the flamenquin quite small if you want them as tapas style bites. Spread a little mustard on each slice. Lay some ham onto the pork, then a thin layer of cheese. Roll up each piece of pork with its filling quite tightly, tucking the ends in as you go. I find that the rolls will stay rolled, they don’t need to be fastened with a cocktail stick or anything. Do all the rolling up first, then lay out the flour, beaten egg and breadcrumbs in bowls in a row along your worktop. Dip the pork rolls first in flour, then in egg, then in breadcrumbs, patting the breadcrumbs on quite firmly. Ideally, at this point, chill the rolls for half an hour in the fridge to set the breadcrumbs. When ready to eat, heat up your deep fat fryer or a good depth of oil in a heavy frying pan – about 1.5cm depth. Fry the flamenquin a few at a time, turning once or twice, until evenly browned and the coating is crisp. They take about 5 minutes. Remove from the oil and keep warm in the oven until you have fried them all. Can you feel the Spanish sunshine? Can you hear the bells?  Crispy outside, creamy and salty inside, delicious and warming: Spanish Croquetas Spanish Croquetas - Smoked Haddock or Crispy Ham (vegetarian optional as choice of filling)
In Spain, they serve a variety of croquetas as part of your tapas spread – salt cod, spinach, mushroom, ham flavours. Take yourself to Malaga, looking at the sea, sipping your cold sherry and eating these lovely creamy-but-crispy bites. They are actually quite substantial, due to the rich bechamel and generous filling, so you could certainly have them for a good warming lunch alongside some green salad and zingy lemon mayonnaise. A tapas or starter portion would be one of each type, a lunch portion might be two of each type – so this recipe makes enough to feed quite a few people. Once you’ve got a feel for the consistency of the bechamel required, you can make these in smaller quantities and using pretty much anything for the filling – leftover chicken, cooked vegetables (but make sure they aren’t watery at all), something spicy? Makes 12-14 croquetas of each type. Timings – 30 minutes on Day 1, 60 minutes on Day 2.
For each type you will need an additional 40g butter, 40ml olive oil and 65g plain flour
First, make your fillings: Poach the haddock fillet in the milk and water with the bay leaf for about 10 minutes until the fish is cooked. Let it cool for a few minutes, then take out the fish and strain the liquid into a jug – you will use this for the sauce later. Remove the skin from the fish and flake the flesh well with a fork, taking out any bones you see. Keep the fish in a bowl. Fry the pancetta in a little oil until crispy, drain on kitchen towel. Cut the prosciutto finely with a sharp knife. Make each bechamel in the same way – I did one after the other in the same pan, as you need a fairly heavy bottomed saucepan. Melt the butter and the oil together, add the flour and stir over a gentle heat, cooking the flour without letting it burn. Add the liquid and keep stirring. It will thicken as you stir, and keep adding the liquid to make a very thick bechamel sauce. You need to keep stirring and cooking for a while to make sure any flouriness is cooked out, and the sauce is creamy. Add the filling and taste for seasoning. Add the grated nutmeg to the ham one. You probably don’t need to add salt to either of these, although you would if you were making spinach or mushroom croquetas. A generous grinding of pepper lifts the flavour. Line a container with cling film – I try to avoid using cling film these days but I have tried other things and the sauce sticks and you waste a lot, so I do use cling film for this. Pour the bechamel into your container and wrap the cling film over the top to stop a hard skin forming. Place in the fridge for 24 hours to chill thoroughly and set firm. Make the second bechamel if you are making two flavours of croquetas and do the same, so you have both flavours chilling overnight. Next day, prepare a flat bowl with beaten egg and another one with breadcrumbs. Working on a floured baking tray, take a dessert spoonful of the set bechamel mixture and roll it in the flour, using flour to stop your hands sticking too. Form it into a cylinder about as long as your thumb and a bit thicker. Make all the croquetas of one type to this stage in one go. Then drop two at a time into the egg mixture, then into the breadcrumbs, firmly pressing the breadcrumbs onto the eggy surface. They should stick and make a firm dry coating. Put the completed croquetas on a plate to set again, while you do the other flavour. It is fiddly, and it takes a while – it might be easier if you have a production line of helpers assisting you with this. When the croquetas have had a few minutes to set, heat 2cm of oil in a heavy pan, or fire up your deep fat fryer. Fry the croquetas quite briefly in medium hot oil – the filling is already cooked, so you just want to warm it up and brown the breadcrumbs. Remove from the hot oil and serve as soon as you can – they do keep warm in the oven quite nicely if you are doing one flavour followed by another. Eat with a simple green salad, a lemony mayonnaise for the fish one, and a tomato relish for the ham one, and imagine you're in Seville, sitting in a sunny courtyard. 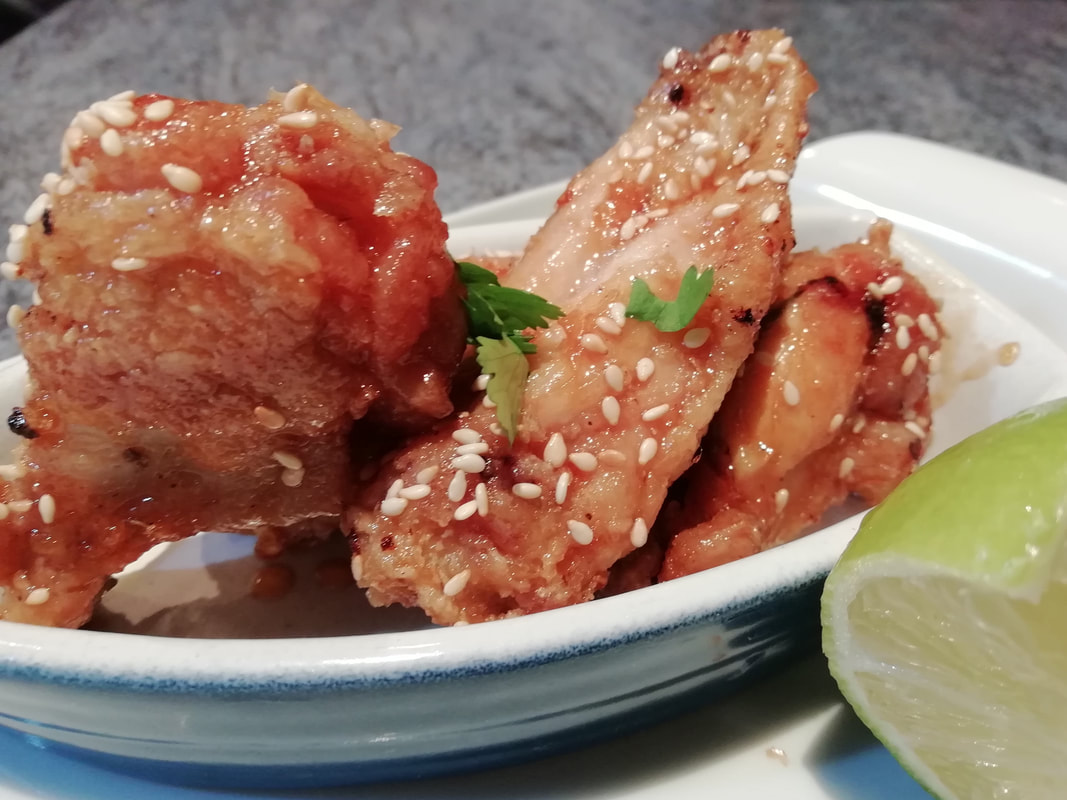 Simple, crunchy, tasty - just yummy! Crispy Chinese Chicken Wings
“Restaurant quality” my son announced, licking sticky spicy sauce off his chin. These are so easy and so good, although they do require watching as the fat is very hot. The secret is a light cornflour batter and double-frying, but they don’t take long. Perfect for a lunch time meal, eaten with your fingers or made more substantial with a bit of rice on the side. I got the idea from Kwoklyn Wan (www.kwoklynwan.com) and have adapted his wonderful recipe a little. Thanks, Kwoklyn, I love your cooking! Making your own sticky barbeque sauce is the work of a moment too, and so much better than the sugary salty gloop from the standard takeaway or the stuff in a bottle. Give these a go, your family will appreciate them! You don’t need a wok or any complicated equipment at all. Serves 4 as a light meal or a starter. Timings – 20 minutes.
For the sauce:
Make the sauce first, in a large pan – you are going to tip the wings in later. Gently fry the crushed cloves of garlic, the ginger and the chillies for about a minute until they start to soften, but not deep fry. Add the rest of the ingredients, taste for seasoning, adjust, and leave on the side. Toast the sesame seeds in a small frying pan with no oil for about 5 minutes until golden, tip onto kitchen paper. Using a deep frying pan – or a deep fryer if you have one – heat up the oil till quite hot. Sorry, I don't use an oil thermometer, I just look at how the oil is behaving. For this, it's not quite smoking but you can see the oil moving about in the heat, and the wings will sizzle as they go in. Mix the cornflour, salt and pepper in a bowl, add the wing pieces to the bowl and rub the cornflour into the wings, pressing the flour onto the skin. Fry a few pieces at a time, don’t crowd the pan or you won’t keep the oil hot enough to make them crispy. The pieces take about 3 minutes per side, you want them cooked and light golden but not brown at this stage. Keep the cooked ones warm on kitchen paper in the oven and keep going until you have done all the wings once. Now start all over again and cook each batch of wings another time for about 8 minutes per batch. Take each batch out and keep warm as you do them. When you’ve done them all, tip the whole lot into the pan with the sauce and mix well. Scatter the sesame seeds over and serve. Everyone can tear the wings apart with their fingers, enjoying the spicy sweet sauce. You could serve simple flatbreads or a little salad, or maybe some plain rice. |
Some Changes - April 2022
Thanks to my friends and followers for your patience, and for your encouragement to start blogging again. Archives
April 2022
Categories
All
|
 RSS Feed
