 Thick fluffy bread dough topped with infused passata and whatever toppings you like - easy party food Roman Street Pizza (vegetarian optionally)
You’ll also find this recipe on my Summer of Six menu, from Rome to Rouen – have a look at the other recipes on the menu if you’re thinking about entertaining outside. Girls’ trip to Rome – and to the best pizza place in the city. We ate standing up outside; quick fast food, coming out of the kitchen continuously on sizzling trays, cut into slabs, thrown onto paper plates and gobbled at speed. Roman street pizza is different from Napolitan – it’s thicker, fluffy and more bready. Highly satisfying to eat and to make. Perfect food for kids, great for parties, easy for school holiday or working at home lunchtimes. Adaptable for all diets and one of the healthiest fast meals, who doesn’t love a home made pizza? Pizza keeps and re-heats so well that it’s worth making a larger quantity than you need on the day, and somehow dough comes out better done in a bigger batch than tiny ones. Makes 10-12 portions, 2 roasting trays full. Timings: 30 minutes initial preparation, then 90 minutes prove, then 10 minutes work and another 90 minutes prove, then 20 minutes to cook - about 5-6 hours altogether. For the dough:
At least 5 hours before you want to eat, start your dough. Mix all the dough ingredients and turn out onto your worktop to knead. Knead well for about 5 minutes and then leave the dough under a bowl on your worktop for about 10 minutes. Knead again for 5 minutes. You will have a shiny, springy dough which you can already see starting to fluff. Leave to prove covered in a warm place until roughly doubled in size – about 90 minutes to 2 hours depending on the temperature. Prepare your tins – I use metal roasting trays or deep square cake tins to cook this. Grease each tin and line with greaseproof paper on the bottom. Take it out of the bowl, knock it back but don’t knead it much, then put it into your prepared tins, stretching it so that it fills the tin about 2cm deep. Leave covered in a warm place to rise again. I like to put the tins into a big plastic bag which you blow up at the neck and then seal with a clip. This keeps the dough protected from draughts and happy in its work. At this stage, you can play with the timings – if you want to leave it to rise more slowly, just leave it in a cooler place. You should leave it for about another 90 minutes in a warm place at least, and it will again double in size and become very puffed up. About 30 minutes before you are ready to cook, start to heat your oven to 240°C. You need to give it good time to warm up so the whole oven is hot – like a real pizza oven. Of course, if you have a real pizza oven, fire it up! Remove the garlic and the basil from the passata. Get the tins of pizza dough and handle them carefully so as not to depress the dough. Carefully spread the passata all over the top of each pizza dough, right to the edge. Whack them straight into the oven for 10-15 minutes until the passata is starting to crust round the edges. Bring them out, and scatter on your other toppings. I would recommend not too much fresh tomato, as it is quite liquid and you don’t want the dough getting soggy with the juice. These pizzas are not supposed to be too deeply topped, so try not to go overboard. Back in the oven for 10-15 minutes to melt the cheese and crisp the toppings. Bring them out and let them cool for just a few minutes before portioning and serving.
0 Comments
 Tangy garlicky buttermilk ranch dressing, wild garlic chicken, crispy bacon and croutons - salad heaven! Buttermilk Ranch Salad with Wild Garlic Chicken, bacon and wild garlic croutons
Wild garlic a-go-go! Using the wild garlic butter you made from your foraged harvest, pan cook a chicken breast which you then slice up on top of a Ranch dressed crisp green salad. Add some wild garlic croutons and crispy bacon – Saturday family lunch time heaven. Buttermilk is not so common in the UK and if you can’t get it, mix a small pot of plain yoghurt with the same volume of milk and whisk well, and you will have the right texture, although not quite the sour-dairy tang. Serves 4 for lunch Timings: 30 minutes, if using already prepared wild garlic butter, and you can roast the chicken ahead and keep cool in the fridge.
First pan roast your chicken meat in the wild garlic butter. Put a good spoonful of butter in a small frying pan over a medium heat and gently fry your chicken, spooning the hot butter over it, and turning it over now and then. A breast will cook in about 8-10 minutes, and a boned thigh will take a little less. The generous butter keeps the meat lovely and moist. Leave the meat to cool and absorb more butter. You can also wrap a piece of chicken in kitchen foil and add some garlic butter to the parcel and just put the parcel in the oven for 20 minutes if you have the oven on for something else. Take it out, let it cool, keep in the fridge until you are ready to use it. Make the croutons – fry the cubes of bread in the frying pan you used for the chicken, adding a bit more wild garlic butter as you go. The leaves of the wild garlic will fry and sizzle and go black but the taste of the croutons is spectacular. They take about 5 minutes, keep moving them around in the pan and then scoop out onto kitchen paper to cool and crisp. Wipe out the frying pan and cook your bacon until crisp, drain on kitchen paper. Make the ranch dressing in your largest salad bowl. Mix the dressing ingredients together well, even whisk with a small whisk if you have one. Taste and adjust the seasoning – you might want a little more salt or a squeeze of lemon juice or a teaspoon of sugar. The dressing should have a nice tang but it doesn’t taste strongly of buttermilk. You can do all the above in advance and keep cool in the fridge for several hours. Wash your lettuce thoroughly and dry or spin. Tip the lettuce into the bowl with the dressing and mix well. (I believe it was Anna del Conte who taught me that a salad should be tossed at least 25 times to coat the leaves properly with the dressing, which is after all, the reason for a salad’s existence.) Top with the sliced chicken, crumbled bacon and crispy croutons. 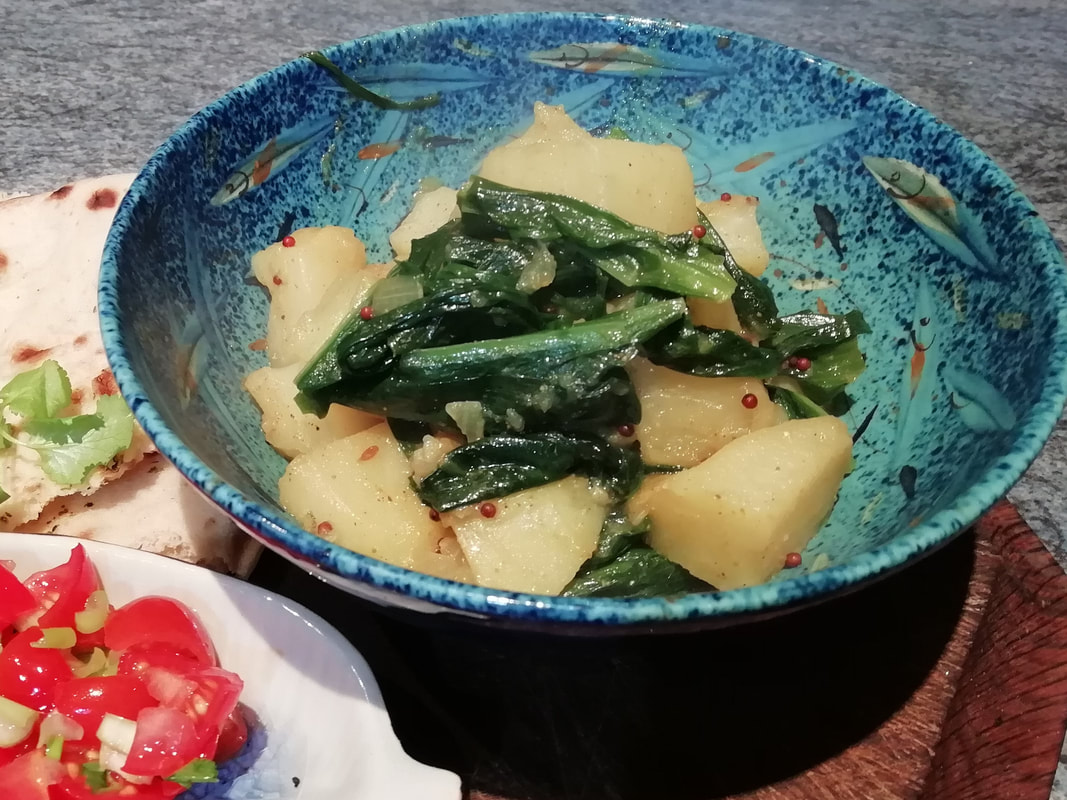 Foraged Wild Garlic, simple spices, comforting potatoes - ideal lunch time meal Wild Garlic and Potato Curry (vegan)
Another seasonal wild garlic recipe to make the most of the delicious harvest before it vanishes back underground for another year. You can substitute spinach for the wild garlic leaves at other times of the year and in that case you might want to add a crushed clove of garlic to the frying onions at the start of the recipe. As always, please forage responsibly. Take your pick from an area where dogs and walkers don't go, and don't take all the leaves from one plant or denude an whole patch. A little goes quite a long way! Combine with other curries in different sauces for a Curry Night Feast with friends and family; or make a simple meal with some warm naan and home-made chutneys and relishes. Chutneys and relishes could include:
Serves 4 as a lunch or as part of a combined curry meal Timings: 30 minutes
In a wide flat pan, fry the mustard seeds and cumin seeds in vegetable oil for a few minutes while they sizzle. Tip in the chopped onion and chilli, and fry for a few minutes. Add the cubed potato and pour in water from the kettle to just cover the cubes. Mix the powdered spices with some water in a glass to give you a light paste and pour into the pan of potatoes. This avoids you burning the ground spices in the hot oil and gives a more balanced flavour. Add the lemon juice, a sprinkle of salt and a grind of pepper, then put the lid on and leave over a low heat to simmer for about 15 minutes. The potatoes will absorb the water and flavourings. Don’t let the pan boil dry, keep topping up with a little water if it’s all absorbed. After 15 minutes the potatoes should be tender and cooked and there should be a little flavoured gravy in the bottom of the pan. Add the torn up wild garlic leaves and put the lid back on again for a few minutes as they wilt down and cook. Adjust the seasonings and serve with plain rice, fluffy naan and your relishes.  Balanced and beautiful - fresh celery and squash soup, a light lunch Celery and Squash Soup (vegan)
Sometimes an accidental combination just sings out loud. A few sticks of celery and half a butternut squash are denizens of the Monday fridge, leftovers from the weekend. But rejoice! The lightness and slight bitterness of celery balances the sweetness and creaminess of the squash and the two flavours meld like cheese in an omelette. It’s even good enough to make on purpose. It’s a great lunch time soup with a simple salad and some good bread. Serves 4 Timings: 30 minutes
Gently fry the onion and celery in a little vegetable oil until tender, 5 minutes. Add the cubes of squash and stir around. Add the vegetable stock, relish, and a little grind of pepper. You probably don’t need salt as the stock is salty enough but taste and adjust to your liking. If you have had the oven on and you know you’re going to make this soup, you could also roast the squash cubes for 30 minutes in a medium oven with a little oil, but I wouldn’t put the oven on just for that. Simmer for 20 minutes, then cool and liquidise. You can add the reserved celery leaves before you blend or hold them back for a garnish. Check the seasoning and serve.  Dan Dan Noodles Sichuan street food – spicy, satisfying, silky, slippery noodles, meaty flavour, crunchy texture and a floral tingling back note from the Sichuan pepper. Really excellent slurped as a snack on the street in China (take your own chopsticks) and also a superb family supper – economical, quick to prepare and goes down a treat. The only downside – I guess every recipe has a downside – is that you really do need to use the genuine ingredient – Sichuan pepper. It’s not a pepper, the plant is more related to the ash tree than the pepper corn plant, but the seed husks look a bit like a pink peppercorn. If you have a Chinese grocery near you, buy it there, but if not, you can get it delivered from the usual on-line purchasing sites. They do stay fresh for a long time if you keep them in a sealed container, so it’s worth getting your own supply. There is no substitute for the taste, which is a genuine flavour enhancer, as well as having its own enticing aroma. While you’re in the grocery, do stock up on crispy chilli in oil, you can use it in so many things. It isn’t overly spicy but the crispy dark chilli pieces in the bright red oil are so addictive you’ll be adding it to scrambled eggs, avocado on toast, into stews and curries, and probably to your gin and tonic before you know it. There are many recipes for this dish from basic street food to elevated high class cuisine. Fuschia Dunlop has both styles of recipe in her book, Every Grain of Rice, which is one of my cooking bibles. I mixed her advice with memories of eating these in China and came up with this. One reason the recipe is so simple is that the three constituent parts are prepared separately and mixed together in the dish at the end. They can all be made ahead, so you can throw the final dish together for the family in minutes. Afternote: My friend made this recipe and it turned out very spicy, too spicy for her. She may have used preserved vegetables with chilli, which therefore didn't mean she needed extra fresh chilli, so just watch out for this and taste as you go along! I like to serve a simply steamed Chinese green vegetable – pak choi or whatever you can get, alongside, but you wouldn’t get that on a street corner in Chengdu, so it isn’t very genuine. Serves 4. Timings 30 minutes. For the meat mixture:
For the sauce:
350g Chinese wheat noodles First, toast your Sichuan peppercorns for about 3 minutes in a hot frying pan. Tip them onto kitchen paper to cool and then crush roughly in a pestle and mortar. You don’t want a fine powder, but also you don’t want to bite into a whole pepper, so crush into a gravelly texture. Make the sauce: In a bowl combine the peanut butter with the sesame oil slowly at first, until you have a loose paste. Add the other liquid ingredients and half the ground Sichuan pepper. Taste and adjust the seasoning – I can never resist adding another spoonful of the crispy chilli in oil. This can be done ahead and left in the fridge. Prepare the meat: In a frying pan, fry the meat until the oil comes out, then add the spring onions, chilli, ginger and garlic. Continue frying until the meat is browning and even crisping up a little bit. Add the green vegetable if using and fry for a minute or two longer, just to wilt the vegetable and drive off its liquid. Add the other half of the ground Sichuan pepper. This can also be done ahead and left in a covered container in the fridge and just blasted again in a frying pan to warm up while you are cooking the noodles. Cook the noodles according to instructions – usually in a large pan of boiling water for about 5 minutes. Combine the three ingredients: noodles, meat, and sauce in a large serving bowl, mix well and let everyone serve themselves, drooling and slurping as you go. 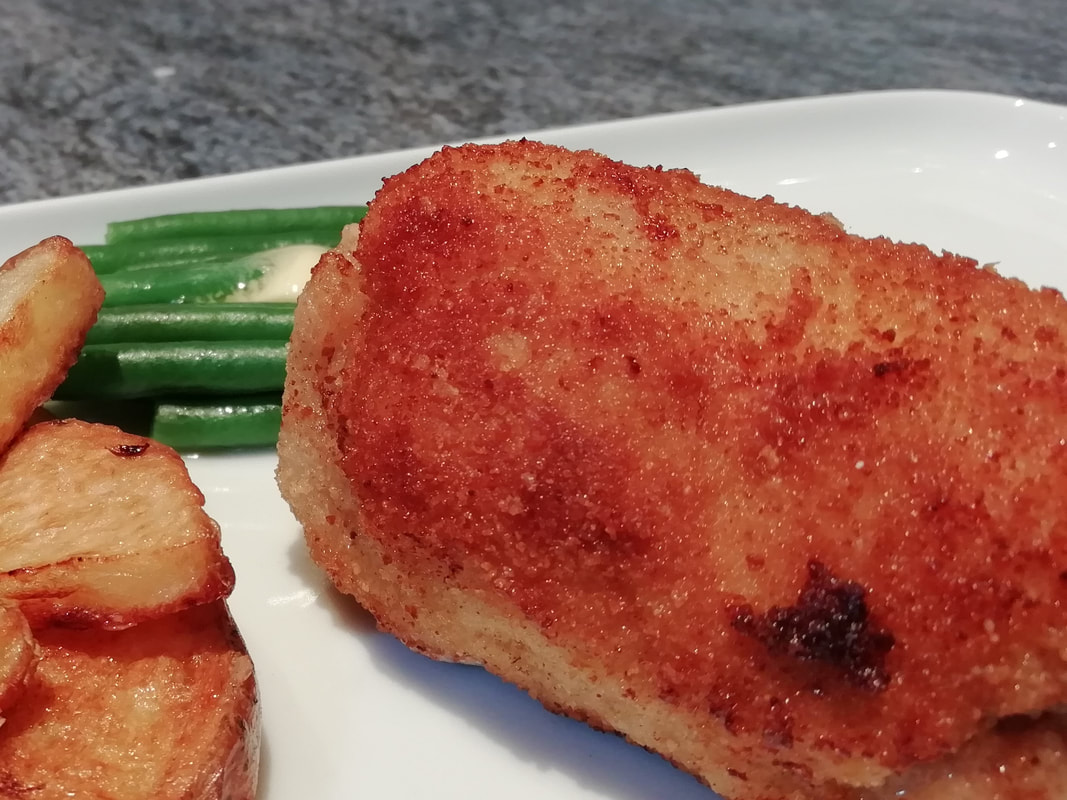 "Little Flamenco Dancers" - Spanish tapas pork rolls, filled with cheese and ham Flamenquin Cordobes
I’ve got a thing for Spanish food – well, haven’t we all? Tapas snacks, eaten in a noisy bar, shouting to be heard above the jokes, the laughter, waiters ordering plates of food from the kitchen, dry sherry glittering on your tongue. Simple tapas – a dish of olives and some slices of jamon, or tapas creations, local specialities: try a different one in every bar – marinated anchovies, stuffed egg-halves, new types of cured meat, or one of the fried ones such as these lovely rolls of pork, ham and cheese. As the name suggests, they are local to Cordoba – city on the banks of the Guadalquivir, where you can find the world famous Mezquita, chequerboard mosque. Lose yourself in the winding streets, admire the decorated Spanish patios, dripping with flowers, do a bit of high-end shopping, but don’t neglect your tummy. Stop at one of the many bars, choosing a shady outdoor table, order a glass of sherry and a plate of “little Flamenco dancers” and enjoy. We ate a juicy portion waiting for the Holy Week parade of shrines to pass by in the streets of Cordoba – a magical evening. Silver shrines being shouldered tenderly through the streets by burly suited men, priests ringing bells, church bells pealing, and Jupiter watching brightly from above. We can’t currently go there, so luckily the flamenquin are easy to make at home, and you can transport your family through taste and texture. These are great for a Spanish themed lunch – add some chips (I did roasted oven chips) and a salad, or go all-out and do a selection of Spanish starters – some cold meat, some manchego cheese, a sliced tomato and onion salad, maybe some marinated anchovies. Serves 4 as a light meal or as part of a selection. Timings – 30 minutes, although you can make and roll them ahead of time and cook only when you want to eat.
Lay your pork pieces out on a flat board – it doesn’t matter how big each one is, you can make the flamenquin quite small if you want them as tapas style bites. Spread a little mustard on each slice. Lay some ham onto the pork, then a thin layer of cheese. Roll up each piece of pork with its filling quite tightly, tucking the ends in as you go. I find that the rolls will stay rolled, they don’t need to be fastened with a cocktail stick or anything. Do all the rolling up first, then lay out the flour, beaten egg and breadcrumbs in bowls in a row along your worktop. Dip the pork rolls first in flour, then in egg, then in breadcrumbs, patting the breadcrumbs on quite firmly. Ideally, at this point, chill the rolls for half an hour in the fridge to set the breadcrumbs. When ready to eat, heat up your deep fat fryer or a good depth of oil in a heavy frying pan – about 1.5cm depth. Fry the flamenquin a few at a time, turning once or twice, until evenly browned and the coating is crisp. They take about 5 minutes. Remove from the oil and keep warm in the oven until you have fried them all. Can you feel the Spanish sunshine? Can you hear the bells? 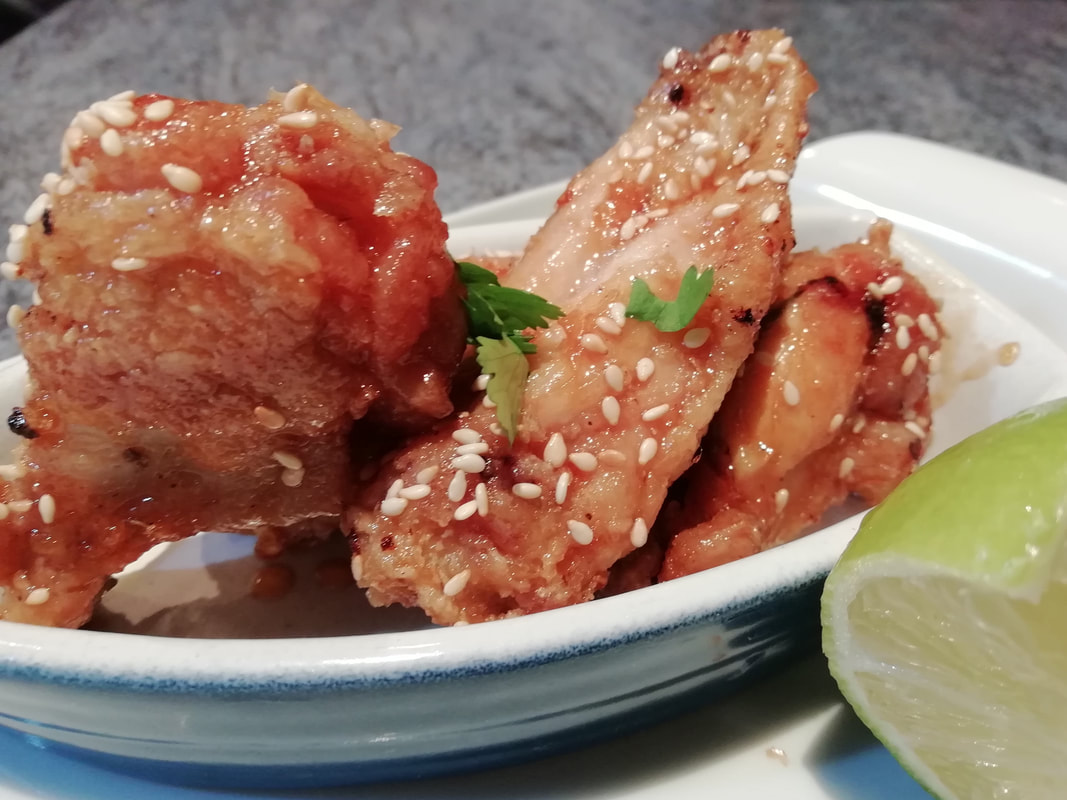 Simple, crunchy, tasty - just yummy! Crispy Chinese Chicken Wings
“Restaurant quality” my son announced, licking sticky spicy sauce off his chin. These are so easy and so good, although they do require watching as the fat is very hot. The secret is a light cornflour batter and double-frying, but they don’t take long. Perfect for a lunch time meal, eaten with your fingers or made more substantial with a bit of rice on the side. I got the idea from Kwoklyn Wan (www.kwoklynwan.com) and have adapted his wonderful recipe a little. Thanks, Kwoklyn, I love your cooking! Making your own sticky barbeque sauce is the work of a moment too, and so much better than the sugary salty gloop from the standard takeaway or the stuff in a bottle. Give these a go, your family will appreciate them! You don’t need a wok or any complicated equipment at all. Serves 4 as a light meal or a starter. Timings – 20 minutes.
For the sauce:
Make the sauce first, in a large pan – you are going to tip the wings in later. Gently fry the crushed cloves of garlic, the ginger and the chillies for about a minute until they start to soften, but not deep fry. Add the rest of the ingredients, taste for seasoning, adjust, and leave on the side. Toast the sesame seeds in a small frying pan with no oil for about 5 minutes until golden, tip onto kitchen paper. Using a deep frying pan – or a deep fryer if you have one – heat up the oil till quite hot. Sorry, I don't use an oil thermometer, I just look at how the oil is behaving. For this, it's not quite smoking but you can see the oil moving about in the heat, and the wings will sizzle as they go in. Mix the cornflour, salt and pepper in a bowl, add the wing pieces to the bowl and rub the cornflour into the wings, pressing the flour onto the skin. Fry a few pieces at a time, don’t crowd the pan or you won’t keep the oil hot enough to make them crispy. The pieces take about 3 minutes per side, you want them cooked and light golden but not brown at this stage. Keep the cooked ones warm on kitchen paper in the oven and keep going until you have done all the wings once. Now start all over again and cook each batch of wings another time for about 8 minutes per batch. Take each batch out and keep warm as you do them. When you’ve done them all, tip the whole lot into the pan with the sauce and mix well. Scatter the sesame seeds over and serve. Everyone can tear the wings apart with their fingers, enjoying the spicy sweet sauce. You could serve simple flatbreads or a little salad, or maybe some plain rice. 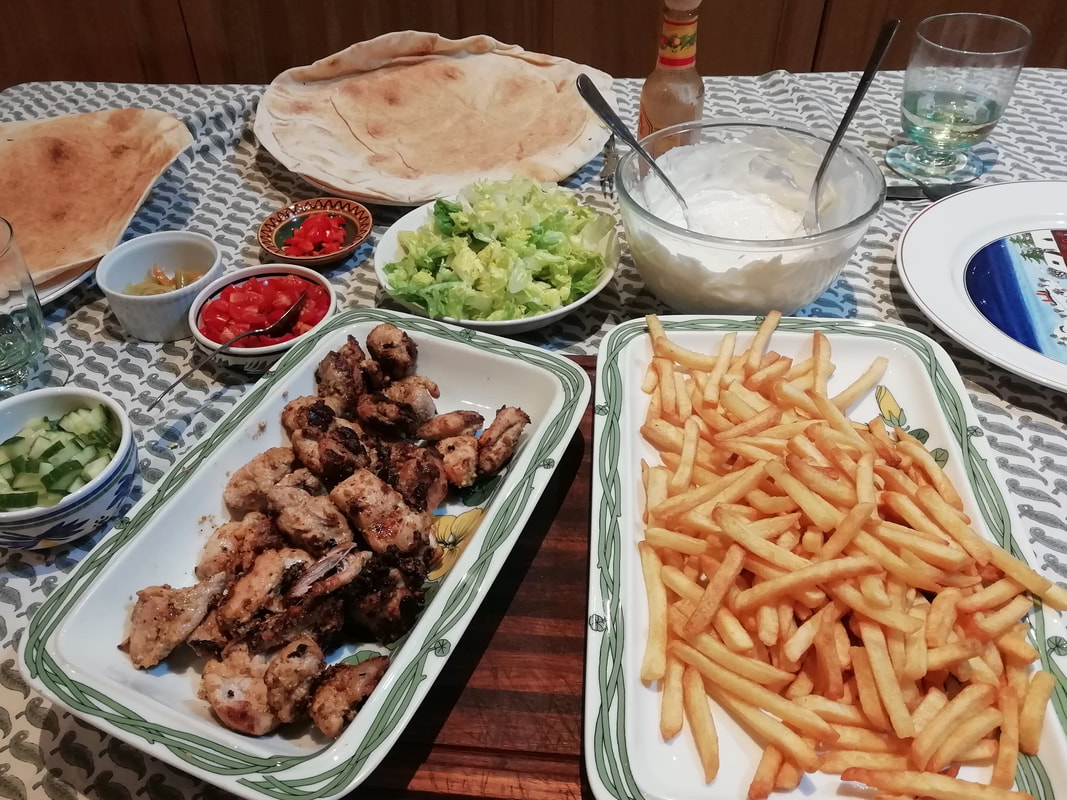 Tender marinated chicken, grilled and served with flatbreads, chips, salads and sauce Chicken Shawarma – mildly spiced grilled meat and tasty sauce There are ton of recipes out there for this traditional middle Eastern dish. I’ve eaten it all over Southern Europe and had a particularly memorable version in Athens. Writer-Son, who studied in Canada, longs for the Shawarma served from food trucks in Vancouver. We searched around for the best recipes and based this on one we found on CafeDelites, which is a great foodie website, and I hope Karina doesn’t mind my adaptation. It’s a lovely easy comforting family dish, you can serve it just with flatbreads for a simple lunch, or with chips and even rice for a bigger dinner meal. The essential thing is the garlic/yoghurt/tahini sauce, so make sure you get a good tahini, and if you have the choice of light or dark tahini, use the light one. I'd say this meal is great for all the family but for some reason, teenagers especially seem to like a) grilled things and b) a meal they can assemble themselves. So let them roam free, stuff their flatbread with whatever they like in whatever order they like and save yourself at least one argument. Serves 4 Timings: 10 minutes preparation, overnight marinade, then 20 minutes cooking. For the marinade:
600g boneless chicken – I like thigh meat as it has a fuller flavour but breast also works Shawarma sauce:
Sides: A salad made of chopped tomatoes, chopped cucumber and spring onions; red onions lightly pickled in white wine vinegar; chopped radishes; iceberg or other crunchy lettuce, pomegranate seeds. Large soft flatbread and/or rice, chips, whatever carbohydrate your heart desires. Mix all the ingredients for the marinade in a bowl, add the chicken chopped into bite sized pieces. Mix well, cover and leave overnight in the fridge. Heat the grill to maximum, when you are ready to eat and have decided on your flatbreads/chips/rice and started to prepare that. Thread the chicken on to metal skewers and grill under a strong heat until cooked through, turning with tongs to get all the surfaces cooked. This will take about 10-12 minutes. The marinade will catch and char, which is part of what gives the dish its lovely flavour, but it can set off your fire sensor, so be aware! Traditionally of course this is cooked on a spit in front of a hot radiant grill but in a domestic setting I find the oven grill is the best. I’ve tried it on a cast iron griddle pan and whatever you do to it, the marinade sticks horribly to the pan and starts to burn. When all the chicken is grilled through, take off the skewers and put it all in a dish – you can keep it warm at this point if you are still cooking the sides. Make up the salads. The choice is very flexible but I think the lightly pickled red onions are a must – just slice up the onions into a shallow dish of white wine vinegar with a teaspoon of sugar and a sprinkling of salt. They are ready to eat in a minute. A mixed salad of tomatoes/cucumbers and spring onions gives a fresh crunch as does a dish of thinly sliced radishes – whatever’s fresh in the market. A scattering of pomegranate seeds adds a fantastic texture and that little pop of sourness to bring everything alive. Mix the sauce ingredients together and whisk lightly to add a little creaminess. Loosen the sauce with a little oil if you need to, depending on the texture of the yoghurt you used. Warm the flatbreads very gently if using. To serve – lay the table out and let people choose their options – a wrap in a flatbread, some chunks of chicken with chips and salad, juicy chicken on fluffy rice, and dripping with the fragrant garlic/tahini sauce.  Lentil and vegetable soup - all you need for lunch Lentil Soup (vegan)
This is one of my personal standbys. It’s like a warm old woolly jersey. It doesn’t knock your socks off, but it’s delicious, smooth and full of veg. It’s also easy and quick to make from store cupboard staples and vegetables you are likely to have around. On that note, feel free to switch around the veg for whatever you have – add a leek, add the leftover cooked broccoli from yesterday, or a couple of Jerusalem artichokes. None of the quantities is exact, I just use a few vegetables and a handful of lentils per portion. Eaten for lunch with a piece of toast, it gently hits the spot, or rather strokes it. In our first lockdown, to give my Lunch Club seniors a change from cake, sometimes I took round a portion of soup (in sealed clean jam jars which they solemnly handed back to me the following week), and this was one of them. Several people asked for the recipe, which I took to mean it had gone down well. It also freezes perfectly, so you can make larger quantities and have it to hand when a bowl of soup is all that you want. You can, of course, zing it up a bit. Add some chillies – fresh or dried – or some garlic, add some fresh herbs, add lemon, or add tomatoes – not all at once, I’d say, but try what you like. You can even add some curry powder with the frying vegetables if you like your life spicy. Serves 6 Timings – 10 minutes preparation, 15 minutes cooking
Heat a little oil in a heavy saucepan and cook the onion, celery and carrots for a few minutes until they begin to soften and cook. Add the lentils and stir for one minute. Pour in the stock, bring to simmering, add the marmite and the Henderson’s Relish. Simmer for about 10 minutes, taste and adjust the seasoning, adding salt and pepper and any handfuls of fresh herbs you might have around. Cook for another 5 minutes – the lentils should be very soft and mushy by now and the vegetables are well cooked. Leave to cool, then puree. When you re-heat you might want to add a little bit more liquid as it does tend to thicken up, but you can freeze without doing this, to better use the freezer space. Serve with a salad and fresh bread, or with garlic croutons.  Rosti potato cakes, golden & crisp: ideal for school holiday lunches Rӧsti (Potato Cakes) (vegan, depending on the trimmings)
A favourite lunch for hungry youngsters – either half-way down a ski slope, if you’re lucky enough to get to Switzerland at half term (we can dream?) or more prosaically, at home in your own kitchen. Rӧsti are very versatile, nearly as much so as pancakes, and are available as light, substantial, sweet or savoury options. They are also cost effective, crunchy and friendly to eat, so what’s not to like? Serve with a fried egg, some crispy bacon, left over cold meat, apple puree and cinnamon sugar – whatever takes your fancy. The only real downside is that you have to cook them in very hot fat, so small or even medium sized children won’t be able to make them for themselves. This also means you have to cook them in batches, unless you have an industrial sized fryer. I think batch cooking for school holiday lunch time is quite a practical idea. You can get the whole squabbling lot of children in the kitchen waiting eagerly for their meal and you can check on their homework progress/music practice/time on the Playstation/mood/nits/whatever as you cook and serve. There’s quite a bit of grating needed if you’ve got a gang of kids to feed, so either get them involved too, or use a machine. Serves 4 Timings 30 minutes
Peel the potatoes and drop them into cold water. Grate them into a bowl. And it doesn’t matter if they go brown. Add 2 teaspoons of fine salt (although I bow to no-one in my adoration of Maldon Sea Salt flakes, fine salt is better here, as you want to get it all over the potato surface) and mix with your hands. Leave for 5 minutes and then squeeze the water out of the potatoes. I find the best way to do this is to scoop them all into a tea towel and squeeze this over the sink. You do need to be quite firm about this, as if you leave too much water in the potato, the rӧsti will be mushy and not crisp. Prepare whatever accompaniment you are having with the rӧsti, unless it’s fried eggs which you will want to do at the last minute. Warm up your oven unless you are serving in batches. In a large pan, heat a generous level of oil until quite hot – at least 1cm deep. Drop a small handful of potato into the oil – I can get about 4 of these into my largest frying pan. Squash the potato down with a spatula to level it out and fry for several minutes - they will sizzle vigorously. Flip over with the spatula and fry on the other side for a few minutes – about 5-6 minutes altogether. Drain on kitchen paper and best to serve straightaway, although you can keep them warm in a hot oven on a metal tray for a few minutes if you want to serve everyone together and give you time to cook the second batch. You will need to keep an eye on the level of oil in the pan and top up if needed – if you cook them in too little oil you will get scorched potato rather than deep fried, which is less appealing. Channel your inner ski-enthusiast, and enjoy! |
Some Changes - April 2022
Thanks to my friends and followers for your patience, and for your encouragement to start blogging again. Archives
April 2022
Categories
All
|
 RSS Feed
