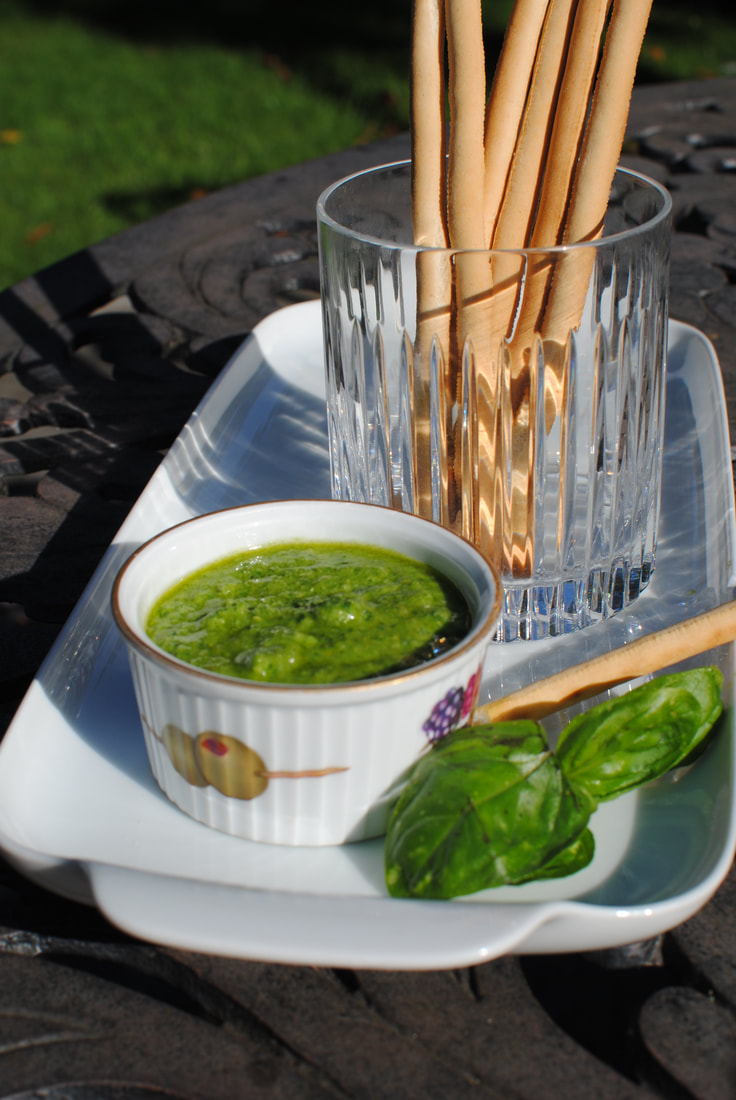
 Green and gorgeous! Fresh basil pesto. Fresh Basil Pesto – Pesto Genoese (vegetarian and vegan options)
Fresh basil: aniseedy, aromatic, tempting and prolific. If you can find the right spot for it, in a warm corner of the garden away from slugs, it grows perfectly in a pot. All you have to do is buy one of those supermarket pots of forced basil, for which I always feel very sorry, and take each little plantlet out, carefully separating them each from their too-close mates, and plant them in your pot in rich compost. Basil likes sun, warmth, lots of food and water, and it will reward you with the most amazing vibrant harvest. Keep taking the tops off the plants to avoid them going to seed and you will get beautiful big juicy leaves all the way into September. Even if you don’t grow it yourself, you can often get big bags of leafy basil from grocers which are very good value. Home made pesto is by far and away better and different from the shop-supplied stuff. Bought pesto is perfectly good but try making your own and you won’t look back. You can adjust the garlic and lemon to your exact taste too, but there’s something about the freshness of the basil coming through. It’s quick to make and keeps in the fridge for weeks so you can keep a fresh pot going from July onwards and have enough to give away too. Vegetarian parmesan is available which seems to taste fine, so that’s a good alternative if you prefer to avoid parmesan. For a vegan version you can leave out the cheese altogether and add a teaspoon of nutritional yeast for the umami feel. Pesto is so versatile; it deserves a superlative. Here are just a few uses for it
Pine nuts are not cheap but they are worth it. You don’t need a lot, and if you buy a pack you can always use up the rest on a salad for lunch, they are wonderful lightly fried and salted. Makes 2 small jars or one marmite jar, enough for about 8 portions of pasta or to marinade 8 chicken breasts Timings: 20 minutes
Put everything together in a large straight container and process with a stick blender until smooth and creamy. Add a little more salt and lemon juice to taste, and a grind of black pepper if you like. Test the texture, the end of season basil has more structure than the early leaves so you might need a bit more olive oil and lemon juice in your last batches of the year. Spoon into your clean small jars and then dribble a layer of olive oil on top, which helps keep it fresh. Keeps in the fridge for at least 2 weeks, if you replace the olive oil when you take a spoonful out.
0 Comments
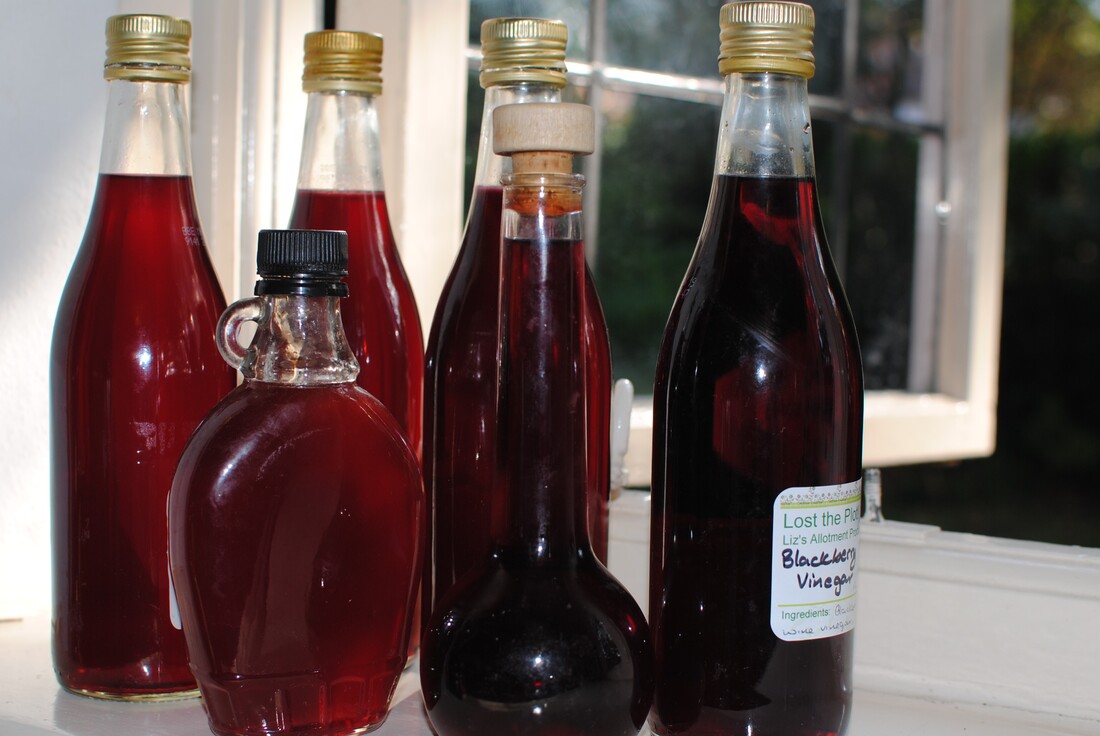 Sweet vinegary nectar - for the very best salad dressings Blackberry Vinegar
I always wonder what to do with all of nature’s bounty, and blackberries are one of the most worrying crops. They fruit so generously, although the plants are perfectly capable of sending out runners and reproducing that way, they don’t really need to make fruits and seeds. But they do, and we benefit, along with all the animals and birds that depend on the fruit and the shelter from the bushes. By the way, don’t worry about taking the fruit, you aren’t depriving the animals, as I’ve sometimes heard people comment when blackberry picking. Like any fruiting plant, the blackberry will make more ripe fruit the more that are picked. If you didn’t pick the first ones, the later berries wouldn’t ripen, so it’s not greedy to make your own harvest and then leave the later ones for nature. When picking, I have two tubs. I separate out the “breakfast quality berries” for us to eat right away and have the larger tub for “processing berries” which go into jams, pies, crumbles and make large quantities of fruit vinegar. Fruit vinegar is an incredible substance. If you haven’t tried it yet in a salad dressing, you will be amazed at the difference it makes. Like balsamic vinegar only more so. It’s sweet, tasty, fruity and irresistible. It enhances your cooking in multiple ways. Every salad dressing is the better for a splash of it; add it to sauces when you’re reducing to add that touch of sweetness and shine; add it to deep flavoured soups to give that extra lift; add it to meat gravy when stirring up the juices from the bottom of the pan; de-glaze a pan of fried mushrooms with it; and you can even drink it diluted with hot water or fizzy water for a healthy and (allegedly) cold-curing cordial. Really, what more could you ask? I think you can tell I’m a convert. You can use other berries and fruits for fruit vinegars, but not the very fleshy ones like plums, as their juice would dilute the vinegar too much and affect the keeping properties. It’s the perfect Christmas gift for cooking-interested friends. You can’t buy fruit vinegars easily in the shops and a homemade present is eagerly received. Do save up some pretty bottles for gifts, the ones that maple syrup comes in are nice, or some swing-top lemonade bottles. I have to thank Pam Corbin and her River Cottage Handbook # 2, Preserves, for the basic recipe, but it also comes from many home cooks and older fashioned collections. The basic proportions can be multiplied many times to use up your harvest. Makes about 3 x 600ml bottles Timings: picking, 3-4 days pickling and then 30 minutes to finish and bottle
Put your berries in a container with a lid. I prefer not to leave food in touch with plastic for long periods, so a large saucepan is ideal if you know you don’t need to use it for some days. Cover the berries with the vinegar and mash them down a bit with a wooden spoon to release the juices. Cover and leave for 3-4 days. If your cover is not tight enough, the fruity vinegar will attract all the fruit flies in the neighbourhood so do make sure it’s well covered. After the 3-4 days, drain the liquid from the berries by placing in a jelly bag overnight. If you don’t have a jelly bag, you can make one from an old teatowel securely tied up into a bag shape with string and then suspend it from a kitchen cabinet handle or some other method of letting the juice drain out into a large bowl. Discard the fruit. Measure your liquid. Place in a large pan and add 450g of sugar to each 600ml of liquid. Bring to a boil, simmer briefly and skim off any scum if it rises. Cool a little and bottle into clean decorative bottles. It keeps for over a year in a cool dark place but you can give most of it away at Christmas with a glow of pride. 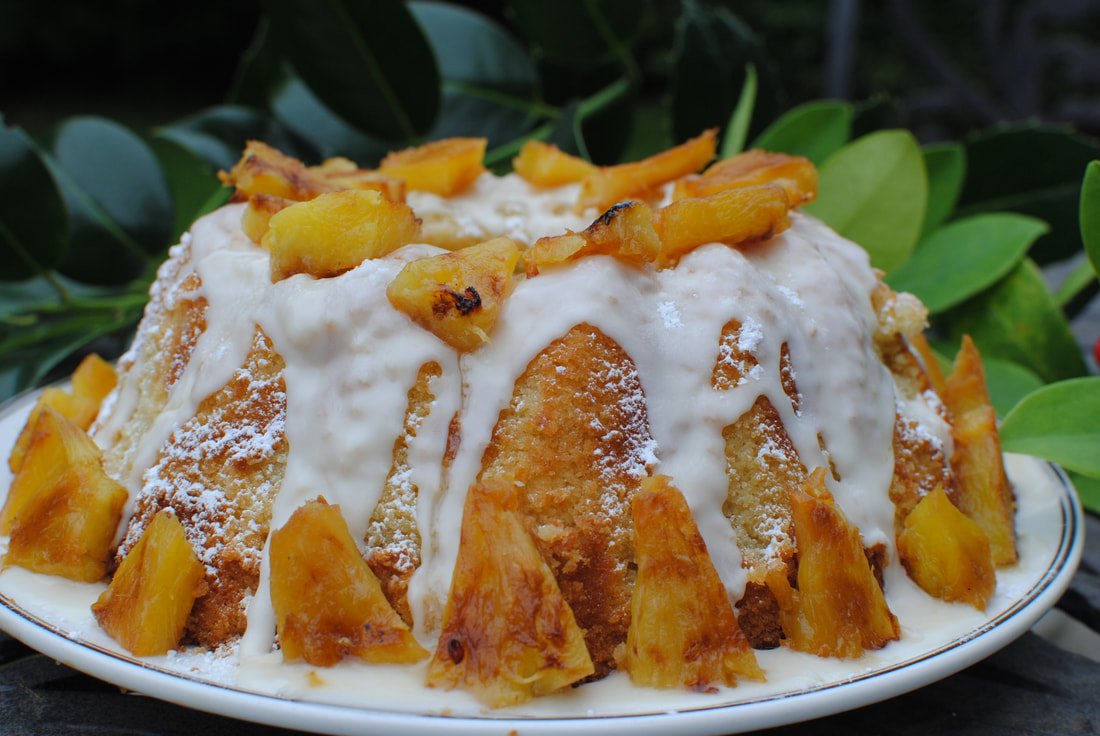 Rum infused cake, soaked with rum and banana liqueur syrup, topped with drizzly icing and charred pineapple - perfect for a party! Cake de Ron – Cuban Christmas Rum Cake
Introducing Christmas in the Caribbean – a new feature I’m working on and hope to publicise soon. I know it’s early to be thinking about such things, but how about making your heart glow with some plans to whisk away loved ones to the sunny beaches and lapping waves of your favourite island? Even if we can’t actually visit in person, you can imagine yourself on the sand, hearing the calypso rhythms and sipping a mojito when you cook up a spicy Caribbean Christmas Feast. Give yourself plenty of time to plan the menus, think about the decorations and you can be relaxed on the day and join in the fun. Christmas is special anywhere – from the snowy Tivoli Gardens in Denmark to the freezing German Christmas markets, warmed up by spiced wine and grilled baguettes with sheep’s cheese topping. But in the Caribbean, as you might expect, they go the extra mile. Every island has its own traditions, because they all have their own special background and mix of history, difficult and joyous. Some islands have parades of supernatural beings, some have reggae carol competitions; all have special food and drink just perfect for sharing and making a party go with a zing. Look out for my recipes on the theme of Caribbean Christmas, but for now, try this Cake de Ron. You do have to get yourself for some proper rum and even some banana liqueur, but you can use those in a Banana Dacquirie (recipe coming soon) as well as the cake, so nothing goes to waste. I’ve not come across a cake recipe with double cream in before, it makes the cake very rich and smooth and helps absorb the alcohol. The rum is cooked out in the oven so the taste is quite subtle; even those who are not big fans of rum won’t find it overpowering. If you wanted a stronger rum taste you could soak the cooked cake in a mixture of rum and sugar rather than the syrup, but in that case take the cake out of the tin first before you drizzle as it would loosen the structure. Makes one 23cm bundt cake, or a normal 25cm cake if you don’t have a bundt mould. Makes 10-12 slices. Timings: 90 minutes and then time to decorate
Grilled pineapple, icing sugar and water icing for decoration Pre heat your oven to 180°C and grease your cake tin. If using a bundt tin, grease especially well as they do tend to stick. Sieve the flour and baking powder. Whisk the butter and sugar together until creamy, add the lemon zest. Add in the eggs one at a time with a spoonful of flour each time. Measure the cream, rum and liqueur into a jug and add this a bit at a time into the mixture along with a spoonful of flour each time. Scrape down the sides of the bowl to make sure it’s all mixed well and beat until you get a creamy, slightly fluffy mixture. Spoon this into your cake tin and bake for 50 minutes to an hour until risen, golden on top and a skewer comes out clean. Meanwhile, make the syrup. Melt the butter in a small pan, add the sugar, rum and liqueur and stir to dissolve. It will bubble up. Cook for a few minutes but don’t let it caramelise. Cool. Griddle your pineapple slices or pieces. Brush the pieces with melted butter and place on your griddle pan to get those charred lines. If you don’t have a griddle pan just fry gently until slightly golden. You want a charred outside but still crisp and juicy inside. Remove the cake from the oven and cool on a wire rack for 10 minutes. Poke holes with a skewer, being careful not to go all the way through the bottom of the cake and drizzle the syrup over. Leave 30 minutes to soak in and turn the cake out onto a plate to cool further. When the cake is cool, make a water icing by mixing icing sugar with a couple of spoonfuls of water (or rum if you want that extra flavour) and drizzle over, letting it drip down the sides. Decorate with the pineapple slices and dust with icing sugar. Whipped cream might complete the decadence. The cake will keep in the fridge for a couple of days but is really designed to be eaten that day or the next at a big noisy party. 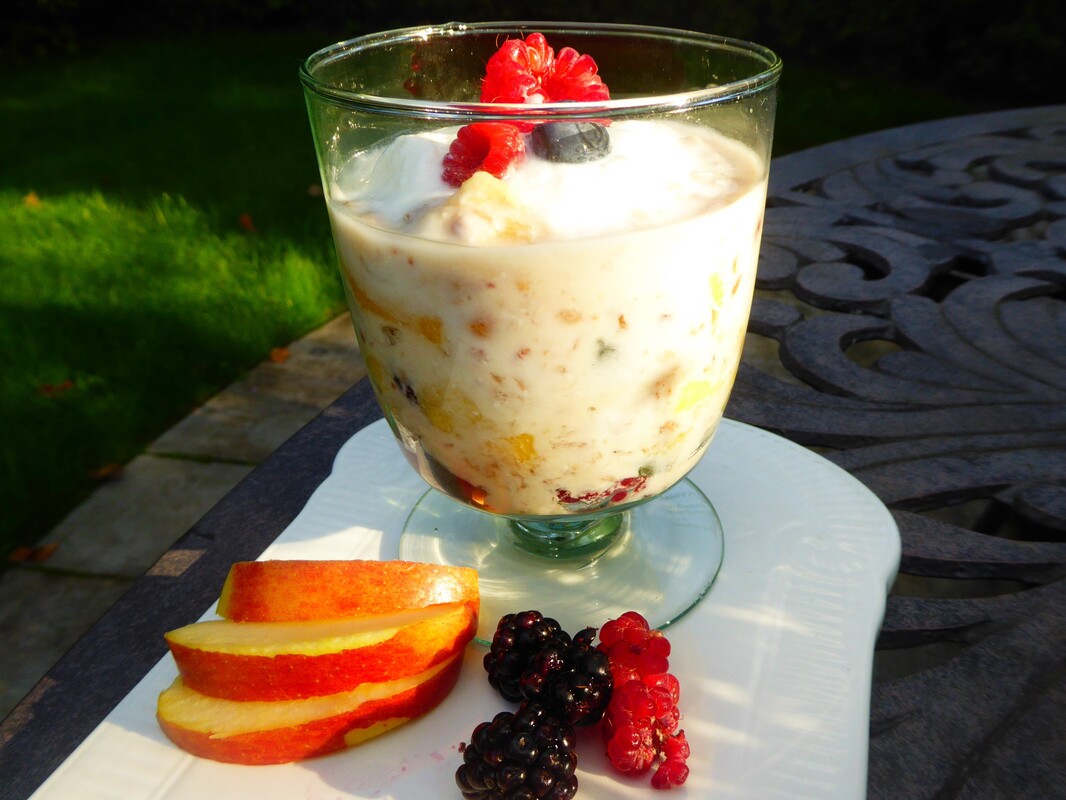 A mix of oat flakes, seeds, nuts and fruit, mixed with apple juice and yoghurt. Makes you feel healthy just looking at it! Bircher Muesli- a good way to start the day
Bircher Muesli wasn’t originally for breakfast. The Swiss physician, Dr. Max Bircher-Benner, invented a recipe as a healthy meal starter in 1900. He saw many of his patients suffering from diseases that he felt could be avoided if people ate a better diet. He liked the idea of uncooked grains, more fruit, some nuts and a little dairy. The muesli was actually supposed to be eaten in small portions before each meal, thus leaving less room in the stomach for meat, bread, processed foods and other less nutritious items. His original recipe included sweetened condensed milk and no fruit juice, probably due to the grocery provisions available at the time. Nowadays, the processed version is marketed as a ready-mixed slurry for breakfast combined with sweetened yoghurt. It’s served in German and Swiss hospitals as a breakfast option and it ticks most of the boxes for a healthy diet to enrich and encourage your internal bacteria. The “gut biome” does a lot of the digestion work for you and is now thought to influence mood, mental wellbeing, inflammation including allergic reactions and a whole host of factors that can make you feel good or bad. Encouraging the little blighters to do their work well seems to me a good idea. Life’s too short for a complicated breakfast, except maybe on Sundays. For the weekday morning, the most one seems capable of is scooping something onto a plate and spooning it down in a rush. Bircher Muesli is a perfect solution; you can make up a big bowl of it on Sunday evening and leave it in the fridge to be scooped out, mixed with yoghurt and whatever fruit you have on hand, and you have the healthiest breakfast imaginable on your plate in under 2 minutes. More than that, each batch is different, so you’ve always got a nice surprise for your tastebuds on a Monday morning, a good way to start the week. The bowl lasts a week in the fridge, as the acid in the apple juice preserves the ingredients. (the grated apple goes a bit brown by the last day but that's no matter) I stick to the rule of two in my Bircher Muesli, for simplicity’s sake. Two fresh fruits, two dried fruits, two sorts of seeds, two types of nut; that’s enough. You can swop around the brazil nuts and hazelnuts one week for almonds and walnuts the next, and you can use different seeds as you prefer. Do try to get live yoghurt (or make it…), to further encourage that healthy productive gut. If you can get organic oats, and even nicer, organic muesli base, so much the better. I am very lucky to have my friend Mussarrat at Artisan Nutrition just round the corner where I can buy small quantities of fresh organic grains, nuts and fruit, weighed out into my own containers, so I don’t have to store too many little packets of half consumed things, and can change around the ingredients as I like. But you can buy packets of different nuts, seeds, dried fruits etc and keep them in a large Tupperware container, ready for use. Here’s the one I made last week and is in the picture, with some fruit from my allotment, but as said, please alter the nuts, seeds and fruits to your taste and what you can buy. Makes about 5 servings – one for each weekday morning Timings: 20 minutes on Day 0, then 2 minutes each day after
For the morning: 100ml live plain yoghurt, a handful of blueberries, or a small banana, or a small mango, whatever you have around. At some times of the year you might have several types of berry around and in the spring you might be restricted to bananas – so be it. Put the grain flakes, dried fruit and seeds into a small bowl. Chop the nuts up quite finely, to taste, add to the bowl. Cut up the apple, discard the core and grate it, including the skin. Add to the bowl along with the apple juice. Stir, cover, and leave overnight in the fridge. To eat, spoon about 2 tablespoons out into a small bowl, add about the same amount of live plain yoghurt, one small portion of another fresh fruit, mix and eat. 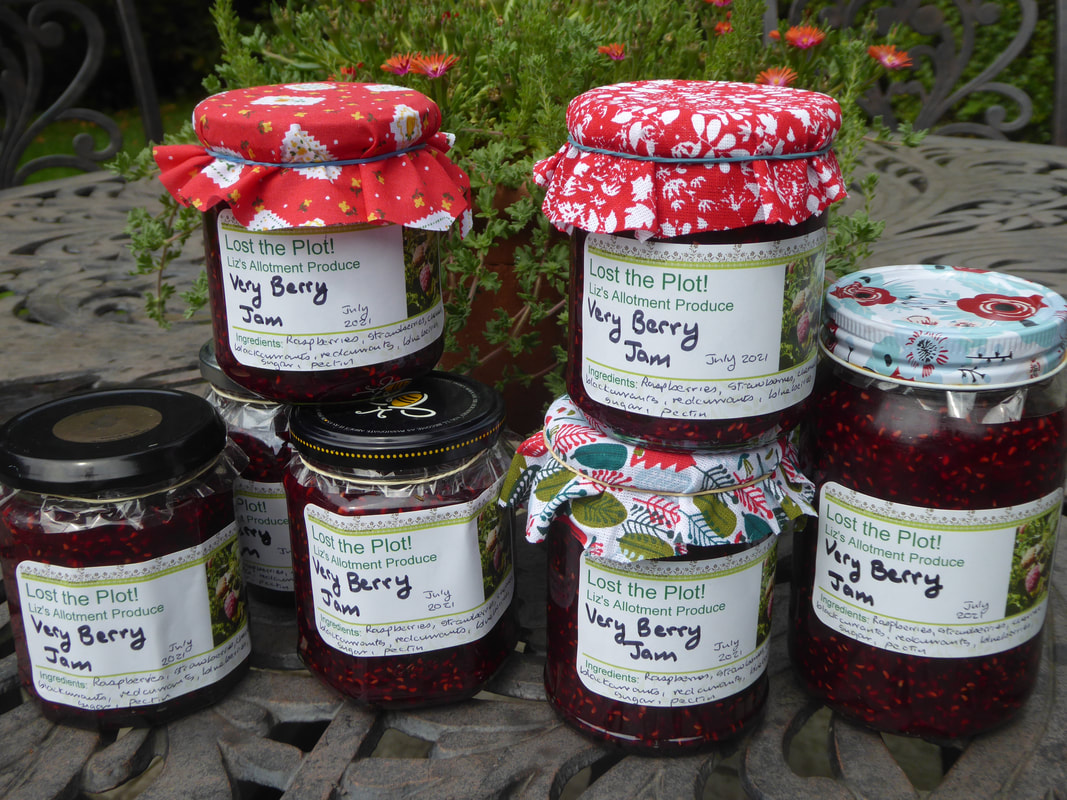 The first batch of mixed berry jam. Ruby red, deep flavoured and delicious. Very Berry Jam
This is the easiest jam I make and also the one that people seem to like the best. I generally give my friends a little hamper at Christmas with allotment produce and I always include a pot of home-made jam. It makes a wonderful take-along present for parties too, a touch more personal and less usual than the bottle of prosecco. Which I am not knocking by the way, a bottle of fizz is always welcome in my house. It’s easy because you use whatever fruit you have to hand; it doesn’t have to be home grown. We often have fruit for breakfast and if there are any manky strawberries or slightly soft blueberries left, I pop them in a freezer bag to save up and use in this mixed berry jam. As it happens, the raspberries in my allotment are producing a bumper crop this year, so this particular batch is raspberry based. I picked cherries, strawberries and black and redcurrants from the allotment and added some blueberries from the fridge that were a bit sad. Later in the season I might add some blackberries or gooseberries or even a fig or two from the tree next door. If you are using a lot of low pectin fruit such as strawberries, you might need to add some pectin, use jam sugar or add in a handful of redcurrants, but the joy of a mixture like this is that all the fruits meld together and make up for each other’s deficiencies while making all their tastes sing in harmony. I had two bags of frozen fruit mixture from the allotment/breakfast leftovers and a big harvest of raspberries, so I had 1.6kg of fruit. The general principles of jam making are:
Makes 8 small jars Timings: about an hour 1.6kg mixed berries, stalks removed 1kg jam sugar and 600g granulated sugar Place the fruit (defrost any you have frozen of course) in a large pan – the jam will rise up when it boils so better use a bigger one than you think. (Much bigger) Simmer for about 10 minutes. Add the sugar. Stir to dissolve and then let it boil merrily. Meanwhile, sterilise your jars. Boil the jam until it reaches 104.5°C on your jam thermometer. Stir it every now and then as it bubbles just to stop anything catching on the bottom of the pan and adding a burned flavour. Switch off the heat and let it cool for about 10 minutes – to under 90°C. Pour or scoop the jam into your jars, cover with a wax disc and the plastic cover held by an elastic band. Put the lids on your jars and screw on tight. When cool, label the jars and store in a cool place until you use the jam. It will keep for at least a year. 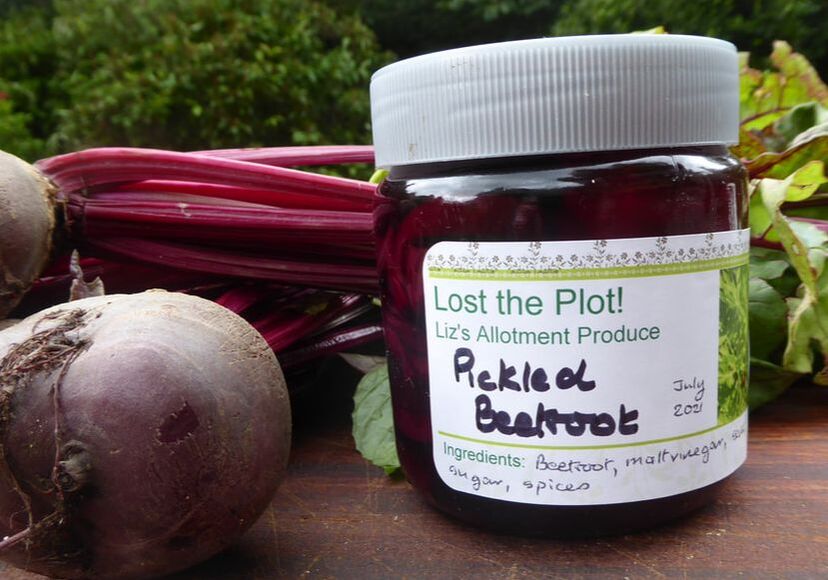 Sweet sour salty tangy pickle with a buttery texture Home Pickled Beetroot
Now we’re coming into preserving season, making jams and savoury jars of loveliness to remind us of Summer sunshine in the depths of Winter and to perk up our tastebuds in the cold weather. Pickled beetroot is the absolute easiest thing to make, requiring no special equipment and tastes so much better than the shop bought jars. You can adjust your seasoning to your own taste and feel so proud when you bring the beautiful jar of deep purple slices out to enhance a meal of cold meat or add to a corned beef or cheddar sandwich. Is that only a Northern tradition? Delicious anyway, if messy. If you don’t grow your own beetroot – which is lovely tolerant vegetable and quite easy to grow if you don’t sow it too early as I always do – then get a pretty bunch of fresh beetroot from your green grocer. If you buy it with the tops on you can see how fresh it is – the leaves are also attractive. Wait till you have the oven on for a roast or something; beetroot doesn’t mind waiting a couple of days in the vegetable drawer. I like to roast my beetroot, partly because I’m lazy and partly because I like the taste better. The taste of beetroot is often described as “earthy” which doesn’t properly catch the sweet autumn smoky depth of this wonder vegetable. It’s supposed to be one of the true “superfoods” having a proven ability to reduce blood pressure. Maybe so, but I’d eat it because it tastes so good and looks so beautiful. The health benefits are a pleasant bonus. I make a batch of pickling vinegar up every now and then, cool it and put it in a clean bottle. It keeps in a cool place for months and means you can just heat it up and pour it over sliced beetroot whenever you have some around. Makes 2 jars Timings: 2 hours roasting and overnight cooling down for cooking the beetroot, 30 minutes for preparing the vinegar and pickling the beetroot but this will give you more vinegar than you need so it will take you less time when you do another batch.
Roast the beets: wrap the beetroot in foil, either individually if they are fist sized or in twos or threes if they are smaller. Seal the parcels well and put on a tray in the oven when you have the oven on for a roast or casserole. Let them cook along with the other dish for about 2 hours, depending on the size and then leave them in the oven when your other dish is done, to cool down with the oven. I find this gives me perfectly cooked tender beetroot. In the morning, take them out of the oven (doesn’t matter if you don’t remember till later) and keep them in the fridge until you use them. They will keep for a couple of days before you have to pickle them. Clean your jars: I like to use peanut butter jars or other jars with pure plastic lids so that the vinegar doesn’t get a chance to corrode the inside but jam jars will do. Fill the jars full of boiling water, then empty and dry. Make the pickling vinegar: put the vinegar into a small pan with all the ingredients, bring to a simmer. Taste and adjust the seasoning – I like it quite sweet so I sometimes add another teaspoon or two of sugar. You could even add honey if you like the additional flavour. Let the pan simmer for a couple of minutes, then let it cool nearly to room temperature to infuse the spices into the vinegar. Strain the vinegar and discard the spices. This is your pickling vinegar now. Bring it back to simmering when you’ve sliced your beetroots. Unwrap your beetroots and just rub the skin off. It will come off easily. Wear gloves if you don’t want stained hands but it’s quite fun to get red fingers. Halve the beetroots if they’re large and slice into very thin slices using a sharp knife. As you slice, feel the texture, it should be a buttery softness. If you get any fibrous bits (which can happen with home grown beetroot if you leave it too long in the ground and it goes woody), cut round them if you can. Place the sliced beetroot into the jars, working like a puzzle master to fit the most slices into the jar that you possibly can. Put them in horizontal layers with some stuffed vertically down the gaps. Fill each jar to within about 1cm of the top. Pour the hot vinegar directly into the jar. Using a knife or skewer, poke down into the jar to release any air pockets – you can see them from the outside. This will help them keep better and let you get a bit more vinegar in. Top up with more vinegar to cover all the beetroot, seal the jars and keep in a cool darkish place. They don’t have to go in the fridge until you open the jar. Keep any un-used pickling vinegar in a clean bottle or jar until you get the next batch of beetroot to process. You'll be surprised how much you get through in a year, once the family get the taste for the home made stuff. 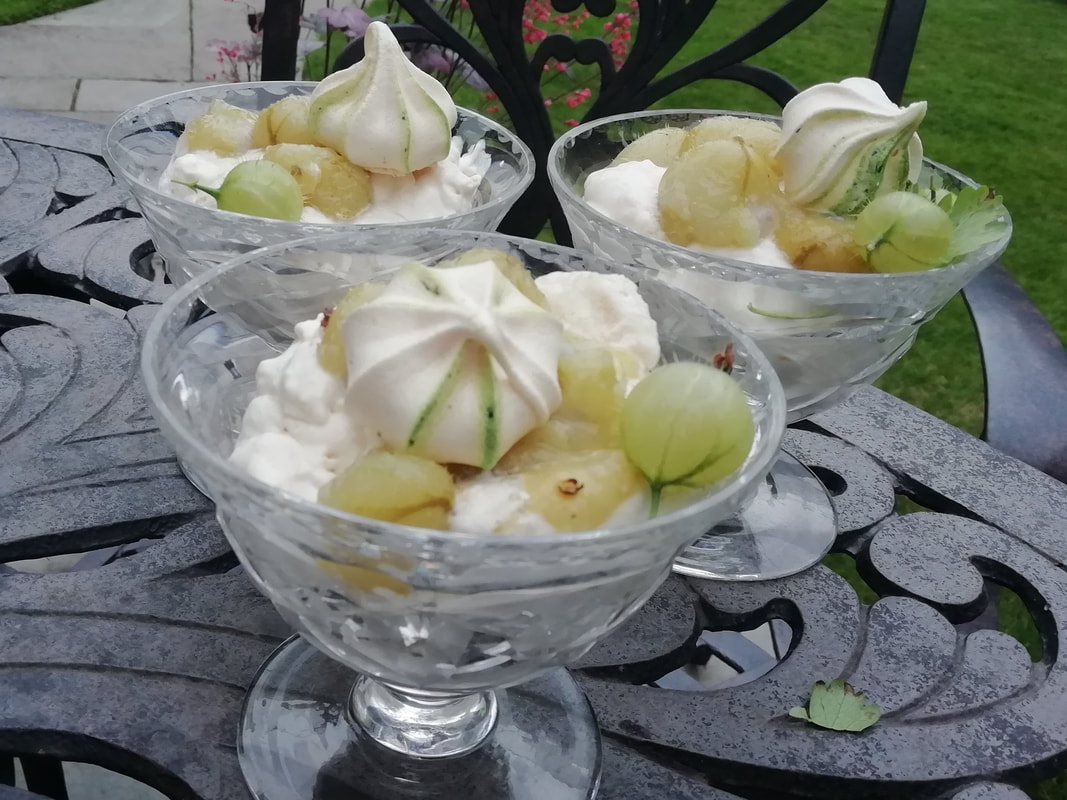 Gooseberries, cream and meringue: dessert heaven! Barnsley Mess
Forget your southern Eton confections! True Northern desserts need true Northern berries, by which I mean gooseberries. Yorkshire Gooseberry growers are a competitive bunch, and have been outdoing each other, and their Cheshire neighbours since the 1700s. I wouldn’t cook with one of the massive show gooseberries but the yearly harvest from my green gooseberry bushes makes the most wonderful sour/sweet fruit puree that just begs to be blended with foamy cream and crushed meringue. I don’t know if anyone from Barnsley ever made this particular combination but I have christened it the Barnsley Mess in honour of those competitive Yorkshire gooseberry enthusiasts. Long live the eccentric hobbies of England! We all know that a gooseberry fool is wondrous and easy dessert; but twist it up a bit with some home made meringue for that sweet/sour, cream/crunch combination that lights up your dinnertime. Serves 6 (with some meringues left over) Timings: About an hour to cook the gooseberries and assemble if using ready made meringues but you can do most of it in advance and just whip the cream and assemble at the last minute.
Make your meringues: whip the egg whites until stiff peaks form, stir in half the sugar, whip a little more and stir in the rest of the sugar. You should have a glossy quite stiff mixture. Place spoonfuls on a lined metal baking sheet and cook at low heat in the oven at 130°C until dry and crumbly – about 90 minutes to 2 hours depending on the size of the spoonful you used. You do want these meringues to be quite dry and not chewy inside so you can crumble them up. Cool on a wire rack and keep in an airtight tin. If you want to make little decorative meringues, fit a piping bag with a wide star nozzle. Use a toothpick to draw a line of food colouring down the inside of the piping bag in 3 lines. Fill some meringue mixture into the bag and dot stars of the mixture onto your lined baking sheet. This amount of meringue mixture will make about 15 little star meringues and about 8 larger ones, so you have plenty. Take about 10 of the largest berries and poach them gently in a little water with a dash of elderflower cordial until soft but still retaining their shape – only about 3 minutes if the berries are just picked. Scoop them out of the liquid and keep cool. Cook the rest of the berries in a dash of elderflower cordial for about 5 minutes until they have cooked down and released their juices. Add the sugar, stir to dissolve and continue to cook until you have a concentrated gooseberry syrup, almost a jam but not quite as thick. Allow to cool. Whip the double cream until soft peaks form. Crumble your large meringues into chunks and smaller bits. Mix the meringue and the gooseberry “jam” into the cream and turn with a spoon a couple of times to give a rough combination. Spoon into individual dishes or a large dish and drizzle the poached gooseberries over the top. Crown with your little stripy meringues. Enjoy your Northern treat and breathe in the clean fresh air from the hills. 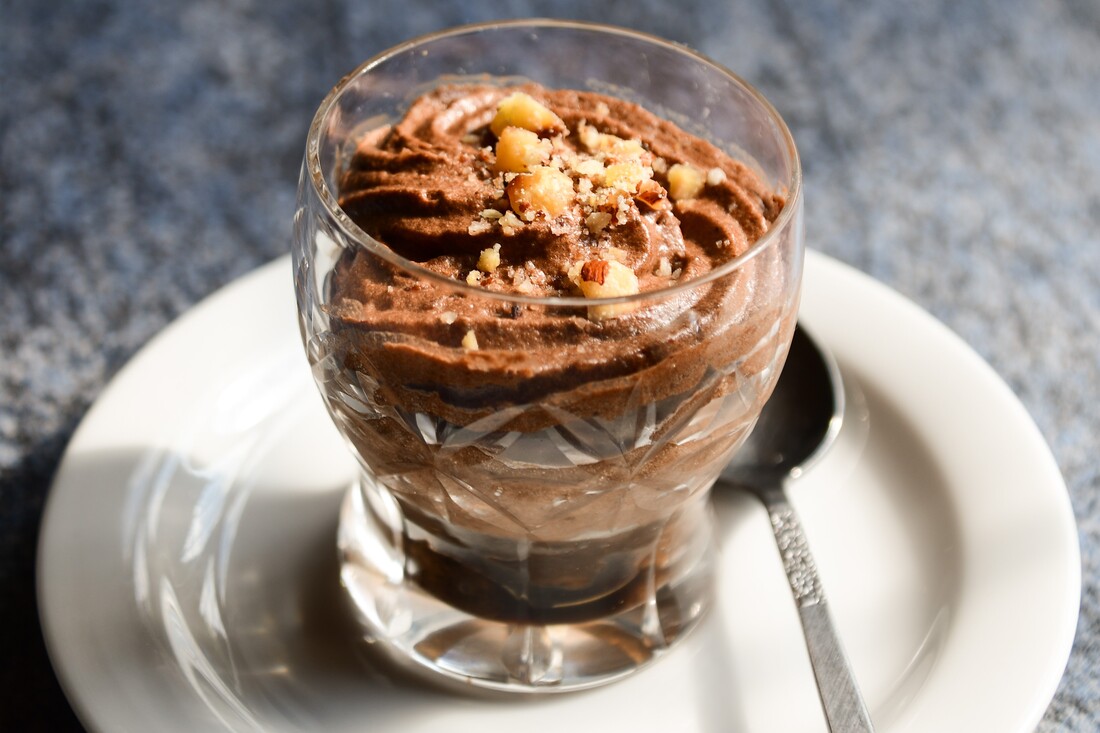 Coffee sponge topped with chocolate and hazelnut mousse - simple and elegant Postre Principe Alberto (Prince Albert’s dessert)
Tiny little pots of delicious nutty chocolate mousse with a surprise at the bottom of the cup. Apparently Prince Albert of Monaco is very fond of chocolate mousse. I mean, who isn’t? This dessert was created in his honour on a visit to the Canary Islands by Dona Matilda Arroyo of La Palma, the islands’ most famous chef and baker. It is served in many restaurants across the archipelago and is a real taste of the Canaries. The Moorish influence on Spanish cuisine is seen in the bitter coffee sponge combined with the smooth sweet mousse – it’s a delightful contrast and very simple to make and serve. You can of course use bought sponge biscuits or cake for the base, but naturally it’s nicest if made yourself. Serves 6 Timings: 90 minutes and 2 hours to cool and set Coffee sponge:
Mousse:
75g hazelnuts 100ml strong coffee, cooled Roast the hazelnuts in a small frying pan until browning but not burned. Let them cool and crush them finely in a spice grinder. You want mostly a fine flour but keep some rougher nubbles aside for topping the mousse. Pre heat the oven to 180°C. Grease and line a flat baking tin – you are making a thin layer of sponge like a swiss roll not a full thick cake. Make the sponge: whisk the eggs and sugar together until creamy and thick – about 5 minutes. Melt the butter and leave to cool a little. Add the flour to the eggs/sugar mixture a spoonful at a time and add in the coffee granules. Spoon the melted butter over the cake batter and mix in gently with a metal spoon. Spread the mixture out on the prepared tin, to only about 1cm thick and bake for about 10 minutes until cooked through. Cool on a wire rack and peel off the backing paper. Make the mousse: whip the egg whites until stiff. Melt the chocolate over hot water while you whisk the egg yolks gently with the caster sugar. Scrape the melted chocolate into the egg yolks, mix well, then scrape the whole liquid mixture into the egg whites. Add the ground hazelnuts to the bowl and mix well with a metal spoon, being careful not to beat the mixture too hard and also being careful to mix in any liquid chocolate lurking at the bottom of the bowl. You will have a rather thick delicious chocolate mousse, with the hazelnuts adding a little firm texture. Cut circles of the coffee sponge and place in the bottom of your crystal glasses or whatever you are serving the dessert in – traditionally a pretty glass to show off the layers. Soak each sponge layer in the strong cooled coffee. Add more rather than less, you want quite a well soaked sponge. Scoop the chocolate mousse into a piping bag and pipe a thick layer of mousse into each glass on top of the coffee sponge. You can spoon it in of course, rather than use a piping bag but piping gives a neater finish. Top each mousse with a sprinkle of roughly chopped hazelnuts. Cool for at least 2 hours before serving.  Add some glowing red sauerkraut to your salad or your sandwich! Ruby Sauerkraut (vegan)
OK, so there are as many recipes for Sauerkraut as there are German grandmothers in the world, and every single one of them believes their way is best. Never mind, unless you are in possession of a German grandmother, then you need a recipe. The basics of sauerkraut are simple – cut some firm cabbage up very finely, massage it with salt until the juices run, pack it into a jar so that it ferments and burps away happily, and when that’s over, you have sauerkraut. Most grandmothers add a couple of teaspoons of caraway seeds and no other seasoning. Teeming with beneficial microbes and packed full of cabbagey nutrition, this is a genuine home-made superfood. Fermented foods are proven to improve your gut microbiome. A healthy gut not only means you digest your food comfortably and thoroughly; it has effects on mental wellbeing. I’m not big on making or believing nutritional claims for any one sort of food; I believe in a good mixed diet and no supplements or pills for most of us. But in this case, I do believe the evidence – some sort of fermented food really does do you a lot of good. And of course, home made is the best way. It’s extremely cost effective and means you can get the end result you want. I love making ruby sauerkraut with red cabbage instead of white, just for the beauty of it. I add some spices, turmeric and ginger for the tingle; if you’re being healthy you might as well go the whole hog. But please play around with the basic recipe and let me know if you come up with some delicious variations. The only other thing to get right is the size of your jars. To keep the cabbage below the surface of the liquid, you need to press it down. I have a fermenting jar with a valve in the lid and quite a wide mouth. A standard jam jar fits inside this so when I screw the lid down, the jam jar presses inside on the cabbage. You can keep a whole cabbage leaf aside, to put under the little jar to hold the mixture down more efficiently. You don’t have to use a fermenting jar, it just helps to avoid accidents if you forget to check on your bubbling cabbage and the gas builds up, but you do need a fairly wide glass jar for the fermentation and another smaller one to fit inside. Play around with them before you start, as its quite annoying to have your salted cabbage ready to be packed away and you’re still fitting jars inside each other like a toddler in kindergarten. Might give rise to a toddler style tantrum and that would never do. Makes 2 medium jars Timings: About an hour preparation, 30 minutes mixing and then 1 week fermenting.
Very finely chop the cabbage – as thin slivers as you can get. This does take quite a while but put the radio on and keep going. Grate the carrot and add that in, along with all the rest of the ingredients. Sprinkle the salt over the mix. With your hands, not a spoon (but you can wear plastic gloves if you have to) knead and massage the salt into the mixture for about 10 minutes. In this time you should see the liquid start to come out of the vegetables. Keep going and add a bit more salt if you think it needs it – the amount does depend on the firmness of the cabbage so it can be variable. Let it rest for 10 minutes and then knead/massage again for another 10 minutes. Clean your jars thoroughly with boiling water – the only microbes you want in this mixture are the ones already in the cabbage that can live through all that salting – those are the ones that will ferment and preserve the vegetables. Pack the mixture into your fermentation jar, firming it down with a spoon. The liquid should be visible and will rise up over the next couple of days. If it doesn’t, you can top up the jar with some brine made from mixing water and salt together. Press the cabbage down using your jar and inside-jar arrangement and leave the whole apparatus in the kitchen for a day or two to remind you to loosen the lid every now and then, and to check on the liquid level. You will see bubbles of carbon dioxide starting to form inside the cabbage mixture and a delightful smell of fermenting sauerkraut will start to fill your kitchen. If you don’t like the smell, put the jar somewhere cool but not cold and let it get on with it. Check on it and let the gas out every day or so. After about a week you should have good tasty fermentation going on. At this stage you can choose how strong the taste should be: you can now jar it up into smaller pots and keep it in the fridge (or give it to your friends) for eating. Fridge temperatures will stop the fermentation. If you want it stronger, leave it for another few days – up to another week - out of the fridge, tasting every now and then until it reaches the desired level of pungency. Jars keep about 1 month in the fridge. You can also freeze it, although I’ve never tried. In the old days, apparently sauerkraut was frozen through the winter by packing it into wooden barrels and burying them in the ground so they froze solid and could be thawed and eaten in the spring. The bacteria survive and will regenerate when de-frosted. Eat it, just picking it out of the jar to put into sandwiches, or onto hot dogs. Mix it with mayonnaise for a fantastic sandwich/hot dog relish, have a little bowl of it with salads. It goes specially well with anything meaty or cheesy, but if you like with fish, then indulge yourself. Warm it up with apples and onions to go with sausages, add it to a pasta and ham casserole, have it as a side vegetable with a pork chop. Endless possibilities…. 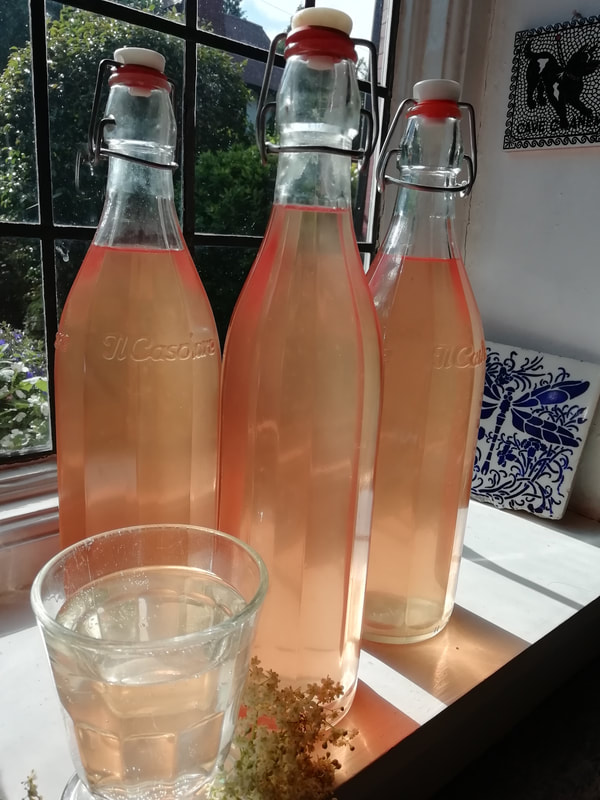 Simple, lovely, fresh. Tasting of flowers and summer. Elderflower cordial - mix with water, sparkling water, or prosecco! Elderflower Cordial
Simple, beautiful and fresh. I have come to the conclusion that complicated recipes are not for me. Pick your elderflowers from a tree that isn’t too close to a road or a dusty path. I think that some trees have a different complex of aromas in their pollens from others – so it’s interesting over time to make batches of cordial from different trees and see if you can taste any variation. I also think that cordial made with flowers early in the season when they start to open tastes more floral than cordial made with later flowers, which tastes richer. That might be my imagination, but a world of elderflower cordial tasting is a pleasant place to be for a while. There are loads of cordial recipes out there but this is a combination of the Pam Corbin version in River Cottage Handbook No 2 Preserves (a must have) and the Fern Verrow version (another must have book for both the recipes and the photography). I have no idea if there is any medical sense behind this, but I have heard that children with hay fever were given elderflower cordial in olden days, in order to provide them with small doses of pollen to accustom their immune systems to the allergen in harmless amounts. A similar role has been claimed for honey. I’m not saying there’s any medical benefit to elderflower cordial, only that it tastes superb and you are using a bountiful natural resource. Depending on the space in your fridge or freezer and how long you want your supply to last, you can make this without the citric acid if you like. Then it will keep only a few weeks on the shelf and will need to be refrigerated once open. You can make it and freeze it in plastic bottles, but I never have the room in my freezer for that and am trying to minimise my use of plastic in food preparation anyway. I use old glass olive-oil bottles, the ones with the swing-cap lids and I find that the cordial keeps several months in a cool place, which is as long as the supply lasts in our house and by that time we’re into the more winter-ish fruity cordials as the season rolls round. You can make up the cordial with water, fizzy water or lemonade. If you want a Hugo Cocktail, add lime juice, mint leaves and prosecco and waft around the garden looking and feeling lovely. Makes about 2 litres Timings: 1 hour to pick and start the steeping, overnight steeping, then about 30 minutes to boil up and bottle
Pick your elderflowers and bring them home as soon as possible, breathing in the scent from the bag every now and then. Shake off any insects or dust but don’t wash them. Put them in a large bowl (not plastic) or pan. Using a potato peeler, peel the lemons and the orange and add the peel to the flowers while you boil the kettle. Keep the peeled fruit in the fridge. Pour the boiling water over the flowers/peel, cover the bowl with a tea towel and leave to infuse and steep overnight. Next day, strain the liquid out through your jelly bag. I hang mine from the cupboard where we keep our glasses so I have to be sure to start the straining only after we’ve laid the table for breakfast. Let the liquid strain for about 30 minutes and don’t squeeze the bag or you will get a cloudy cordial. While it’s dripping through, squeeze the lemons and the orange, and strain out any pips. Measure all the liquid that you have – the juice and the strained elderflower liquid – into a large pan – you should have about 2 litres. Per litre of liquid add 700g sugar and 2 teaspoons of citric acid, if using. Bring to a rolling boil and skim off the pollen-laden scum that comes to the surface. While it’s coming to the boil, boil up your kettle and sterilise your bottles. Bottle the cordial while it’s still hot and clip the lids on, so the cooling down closes the lids more tightly. When cool, wipe the bottles, label and keep them in a darkish place. |
Some Changes - April 2022
Thanks to my friends and followers for your patience, and for your encouragement to start blogging again. Archives
April 2022
Categories
All
|
 RSS Feed
