 Chewy, crunchy, sweet and satisfying, Millionaire's Shortbread Millionaire’s Shortbread
Yes, I know it’s got about a million calories per piece – which is why it’s called millionaire’s shortbread, yeh? but it is totally delicious, and you can always eat just a small piece, can’t you? As a treat? And then don’t have any more. Until the tin is empty. It’s a bit of a stop-start to make as you have to make the three layers in sequence, so you need to be around and in the kitchen for a few hours off and on but each layer doesn’t take very long so you can do other things in between. I researched a bit before finalising this recipe and I based it mainly on Jane’s Patisserie – Jane has a lovely baking site, so if you want further inspiration, head over to Janespatisserie.com for lots of lovely cakes and sweet things. Our Seniors Lunch Club discussion this week was about Garden Birds. Our favourite birds were blackbirds and robins because of their songs, but there was strong support for starlings due to their cheeky nature and their amazing flocking murmurations. One of our members has a tame blackbird who comes to the back door for his food, but the robin used to steal the worms she fed to her pond-living frogs, so she wasn’t so keen on him. Makes 16 small squares Timings: about 3 hours but with rest/cooling periods in between phases For the shortbread:
For the caramel:
300g chocolate for the topping Pre heat your oven to 180°C. Line and grease a 22cm square cake tin, quite deep. You can use any shape tin you like of course, but to cut even squares, a square tin is best. Make the shortbread: Cream the butter and sugar together, either by hand or in a mixer with the paddle. Add the flour little by little until you have a crumbly dough. Knead very quickly just to bring it together and then press the dough into the bottom of the cake tin. Bake for about 25-30 minutes (depends on the size and depth of your tin) until light brown. Watch out, shortbread can turn from just right to overcooked quite quickly, so be careful. Take it out of the oven, put the tin on a rack and let it cool down. Make the caramel: Put all the ingredients into a heavy bottomed pan – one of those cast iron/enamel pans is good. Stir over a low heat very slowly until the sugar is properly dissolved – you must keep the heat low until the grittiness of sugar is gone. This stage takes a good ten minutes. Now turn the heat up a little and move the pan onto the smallest burner – this is to stop the mixture burning in the corners of the pan. Constant stirring – use a wooden spatula with a flat end to scoop the mixture off the bottom of the pan. Cook and stir for about 7-10 minutes until the mixture has changed to a golden caramel colour, and when you move the spatula through the mixture you can see the bottom of the pan for a second – it’s really getting thicker. Watch out for splashes and bubbles, the boiling sugar mixture is hot. Pour the caramel onto the top of your shortbread and smooth out. Let the tin cool on the worktop and then place it in the fridge to cool down a bit further. Melt the chocolate in a bowl over hot water until smooth, then pour over the top of your set caramel. Leave to cool. If you’re cleverer than I am, melt two colours of chocolate in separate bowls and stir them on top of the caramel – I put them both in the same bowl so there weren’t any swirls of white chocolate in among the dark! Never mind, it tasted great and I’ll know for next time.
0 Comments
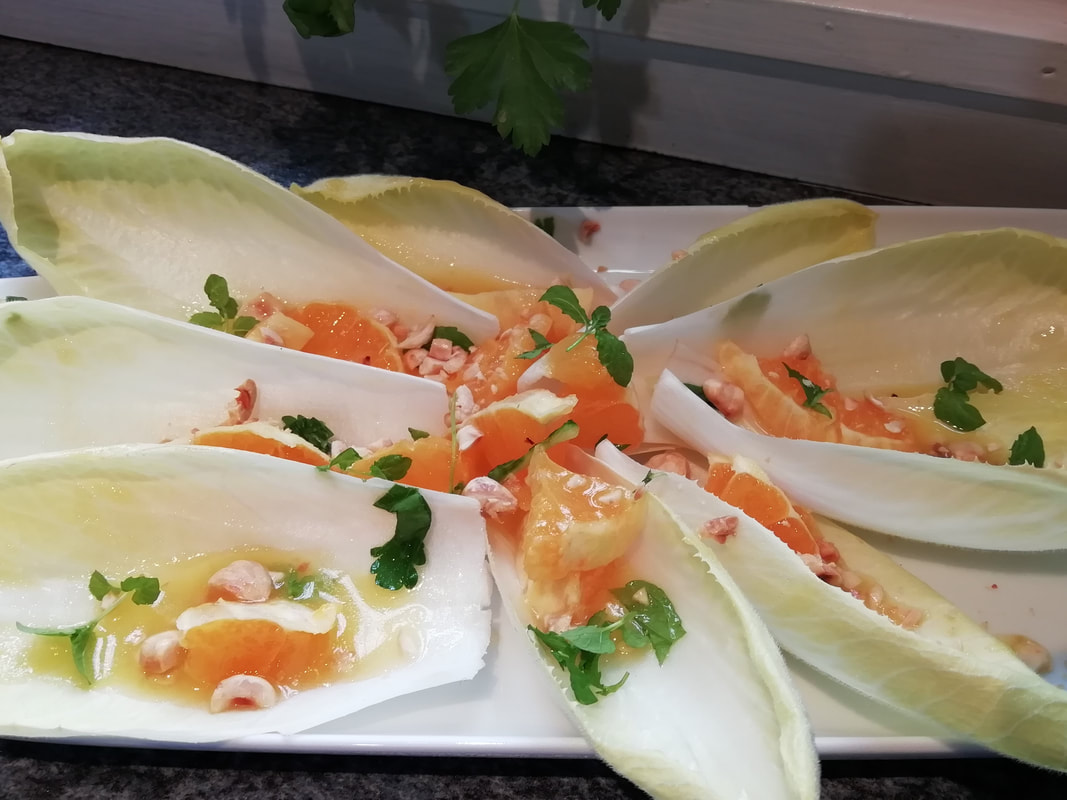 Refreshing and vitalising - salad of chicory, orange and hazelnut, with an olive oil and orange juice dressing Chicory, Orange and Hazelnut Salad (vegan)
This is a lovely light Spring lunch time salad – juicy from the fruit and crunchy from the nuts, with a back note of bitterness from the chicory and tiny sparkles of flavour from the mint. Very refreshing and full of vitamins. If you can’t get chicory, - which is mostly available in shops from January to March - a firm fresh lettuce will do, one of the cos type with strong leaves rather than floppy ones. The dressing makes a full jar but if you have some left over, it goes well on a straightforward green salad too. It’s worth getting a small bottle of walnut oil if you don’t normally keep it in your salad-oils selection. (we all have one of those, don’t we?) It adds a lovely nutty taste to a French dressing and is high in Omega 3, so has health benefits. My sons don’t eat a lot of nuts, so I think that adding a sploosh to every salad dressing is a good way of getting nut oils into them. You can eat this as part of a mixed salad table or by itself as a light lunch with some good bread to mop up the juices. Serves 4 as part of a salad table, timings 20 minutes.
For the dressing:
Roast the hazelnuts by placing them on a tray in the oven at 180°C for 10 minutes. This can be done ahead of time, and the roasted hazelnuts kept in an airtight jar for use in salads, cakes, meringues, snacking. Chop the hazelnuts roughly into smaller pieces but don’t grind them. Peel the orange and try to remove most of the white pith, cut the fruit into small chunks. Do this over a small bowl to catch the juice, but you aren’t squeezing the orange. Separate the leaves of the chicory heads and wash, they’re usually pretty clean but wash them anyway and dry. Put all the ingredients for the dressing in a jar with a tight lid and shake well. Taste and adjust, you might need to add a bit more salt or a bit more sugar, depending on the sweetness of the juice you used. And you will need to shake well to dissolve the honey through the dressing. Arrange the chicory leaves on your plate, strew over the orange chunks and then scatter over the hazelnuts. Drizzle the dressing over everything and add some tiny mint leaves for accent.  Creamy rich sauce with subtle spicing - from a home made Rajasthani recipe Chicken Curry – the Rajasthani Way (vegan/vegetarian option)
In Jaipur I had a cooking lesson from Mrs. Singh of Dera Mandawa, which also offers “homestays” – the Indian equivalent of a cosy bed & breakfast. Cosy isn’t the right word here, Dera Mandewa is a manor house of royalty - a place of huge courtyards, sized for the elephants to come inside and unload their burdens. We talked and talked through the velvety dark evening. She explained to me that girls rarely left the mansion grounds, even for schooling. Rajasthan in the old days was a place of danger and kidnap, as well as beauty and nobility. Girls stayed close to their female relatives and learned the skills they needed in daily life. Counting the whole spices in and out of the curry sauce was key and was how you learned arithmetic – you don’t want to bite on a whole clove if it’s left in the sauce. Mrs. Singh herself was lucky enough to be in the vanguard of female emancipation, she went to school, became a doctor and then a consultant. Now she lives in her old family home, sharing her culture through food. This is the genuine recipe, with only my addition of tomato puree, as I think the little bit of sweetness is very pleasant. The sauce is made before you cook the meat and is itself vegan, so you can instead use vegetables or paneer for the protein to give you a vegan or vegetarian dish. The onion, garlic, chilli and ginger paste can be made in larger quantities and kept in the fridge to be used in different dishes. My friend Mussarrat Butt from Artisan Nutrition in Didsbury (www.artisannutrition.co.uk) recommends doing this if you are going to make a lot of Indian food. She makes the paste from onions, garlic, turmeric root, salt and ginger and uses it in her vegetarian and vegan curries. It keeps for at least a week. Serves 4 Timings – 90 minutes
A paste made from:
To be added later:
Put 4 tablespoons vegetable oil in a heavy pan, heat well. This looks a lot, but you will need it all. Tip in the whole spices – watch out, the bay leaf will spit like fury. Fry for a few seconds, then add the chopped red onion. Fry for about 10 minutes, moving about, until the onion is browning. While that is frying, make the onion paste in the blender/food processor. Add a little more water if you want to, but remember the water has to be fried off in the next stage which will take longer if your paste is too liquid. Mix the powdered spices in a glass with a little water to a loose paste – this is to avoid scorching the powder, which would give the sauce a burned taste. Add this spice paste to the frying pan, stir and fry to release the fragrance. Now add the onion paste from the blender. The onion paste will meld with the hot oil and onions in the pan and make a thick, bloopy sauce – which will spit and bubble. Resign yourself to having to wipe down the hob after the cooking session. Fry the sauce for about 20 minutes, until it is thick and all the ingredients are combined. Stir in the tomato puree and taste the sauce for seasoning – you will need to add some salt. Keep frying and moving the mass around in the pan. At this stage, start to take out the whole spices – and, like Mrs. Singh, be careful that you count out what you counted in! Keep stirring until the sauce is very thick and the oil starts to show when you draw your wooden spoon through it. Let the sauce cool, add the lime juice and adjust the seasoning. If you need to add a teaspoon of sugar, do so. You can leave it at this stage in the fridge for at least a day, and also freeze it for later. Prepare your protein for the curry: if using chicken thighs, just fry the pieces in shallow hot oil until lightly browned and cooked through. Add the chicken to the curry sauce, loosen with some water and stir in the cream. Warm up gently and don’t boil or the cream will split. Serve with chopped fresh coriander, naan bread, plain rice and some simple relishes and chutneys. 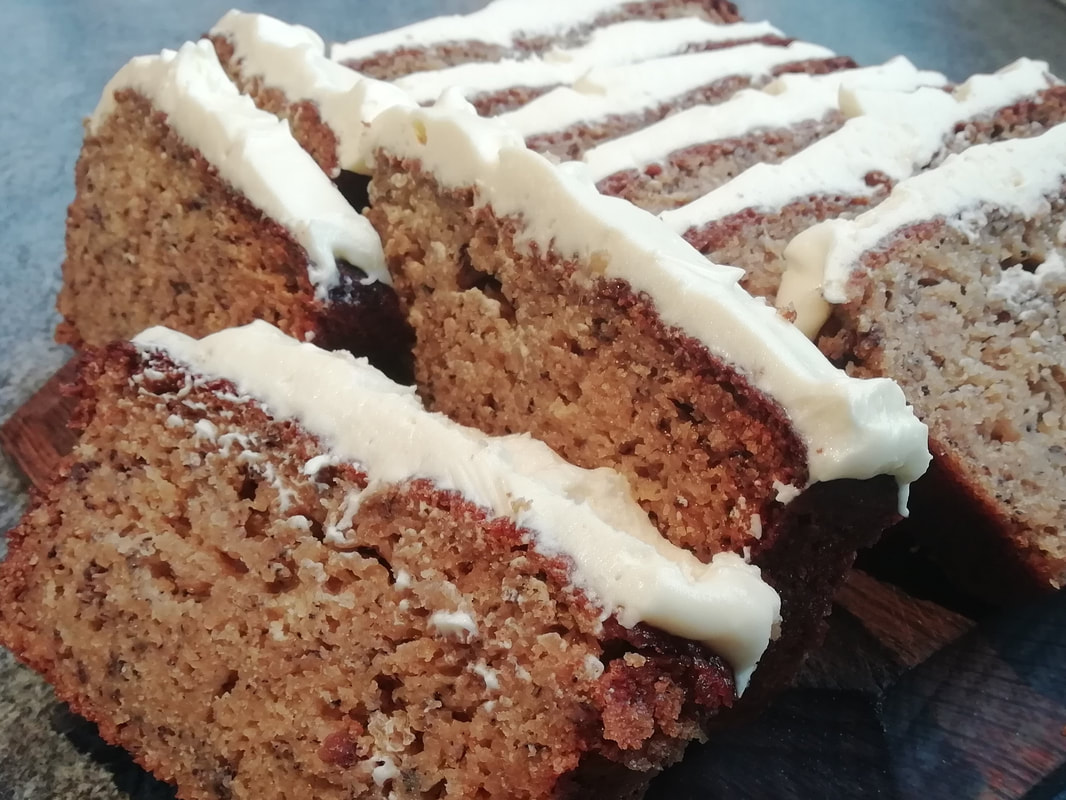 Evocatively delicious banana bread with tangy passionfruit icing Hawai’ian Banana Bread with Lilikoi Cream
Yes, it’s exotic. We holidayed in Hawai’i when my son graduated from Vancouver. Beautiful isolated islands, tropical climate, incredible scenery, great people. The cuisine is very much centred around fish, fruit and vegetables, local and fresh. We did a dive-day – snorkelling round the island of Lainai’i; food included. We had banana bread for breakfast, accompanied by passionfruit (Lilikoi) cream frosting. It was delicious and gave us so much energy, it set us up perfectly for a demanding day snorkelling in progressively more challenging environments. Our last snorkel was over a very deep ridge, pierced by a huge upswelling rock, which made the current flow up and over, bringing nutrients and fish from deep in the Pacific to our wondering eyes. It was like flying through the roof of a cathedral of light, shoals of fish flickering below. The taste of the moist sugary banana bread, with the icing cut through by the tang of passionfruit, brings back Hawai’i to me. I hope it brings you closer to that tropical paradise, too. Our Seniors’ Lunch Group discussion this week was about Lent – and specifically about what we give up, why, and what we really couldn’t give up. Our chocolate-fiend (98 years old) gives up her daily chocolate, and really looks forward to Easter Saturday when she’s allowed to start again – she lines them up two days in advance to anticipate the taste. Chocolate, sherry, and crisps were the most popular self- denials, but we also had the daily news-fix to be renounced, and “biting my fingernails”. What we couldn’t give up included the telephone, the internet, the Saturday crossword and writing a daily diary – one of our members has written her own diary since the mid-1960s, which would be a fascinating social history if we were ever allowed to read it. Makes 10 slices. 30 minutes preparation, 1 hour cooking, 30 minutes for the Lilikoi Cream
For the lilikoi cream: 90g softened butter, 120g cream cheese, juice of 4 passionfruits, 150g icing sugar Pre heat your oven to 180°C. Grease and line a loaf tin. Beat up the oil, sugar, vanilla essence and eggs in a large bowl until fairly fluffy. In another bowl, mash the bananas with the yoghurt, then add them to the oil/sugar/eggs mixture. Sieve in the flour, baking powder, bicarb and salt, mix well and then mix in the hazelnuts. You will have a gloopy delicious mixture. Do taste it thoroughly at this stage; it’s a cook’s prerogative to enjoy the cake mix. Scoop it into the loaf tin and bake for about 50-55 minutes until brown on top and beautifully spongy. Take out and leave to cool on a wire rack for about 10 minutes, then turn out of the tin and leave to cool fully. You don't have to ice this to enjoy it, it's wonderful as it is. To make the icing: soften the butter well – without melting it, but good and soft. Beat the butter well adding a spoonful of icing sugar at a time. I find a hand-held whisk is better at this than a mixer. When you’ve added half the sugar, start adding the juice and the cheese while whisking all the time and adding the sugar in spoonfuls. You will end up with a soft creamy mixture which tastes of fruit with a sharp edge from the cheese. If you can avoid eating the whole lot out of the bowl, just dollop the icing on top of the loaf. Keep somewhere cool until time to serve. Are you on a beach? Listening to the surf?  Glowing with health and warmth, give yourself a treat with a bowl of beetroot soup Beetroot Soup (vegetarian/vegan)
Sometimes the simple things are the best, especially for lunch. Beetroot soup is sweet, earthy, friendly and really good for you. All sorts of things are said to lower blood pressure, but I understand that beetroot is among the few things to be proved to do so, other than prescribed medicines. A straightforward vegetable soup, it’s easy to make, cheap and cheerful – who can resist eating something of such an amazing colour? Be warned, it can turn your urine pink – nothing to be worried about, just shows you have an efficient set of kidneys doing what they should do and filtering your blood. You can cook your beetroot in a number of ways – wash the roots, remove any fibrous rooty bits and any tops and leaves (you can cook those separately like spinach), and then boil, or microwave. I prefer to roast mine when I have the oven on for something else – just wrap the beetroots individually in kitchen foil, and put them on a small roasting tin in the oven at whatever temperature you are cooking, for about 1 ½ hours, so if you are roasting a chicken, they will take about the same time. If you are making toad in the hole, just leave the beetroot in the oven for a bit after you take out the Yorkshire puds. I leave the beetroot in the oven to cool down after I put the oven off, it just makes sure they are fully cooked through and totally tender. When cool (and you can do this the day or so after) take off the foil, rub off the skin, and then use the cooked beetroot. Serves 6 Timings: 20 minutes if using cooked beetroot.
Fry the onion gently in a little oil until tender – about 5 minutes. Add the garlic and cook for another 5 minutes. Add the beetroot cubes and the stock and simmer for about 5 minutes. Allow to cool slightly and then liquidise. You don’t need to strain through a sieve as there are no fibrous bits in beetroot (unless it's the last harvest from the allotment, in which case do please strain it!). Warm through and adjust the seasoning – you may need to add some salt and pepper. Serve with a swirl of sour cream if you like or plain yoghurt and some good bread. 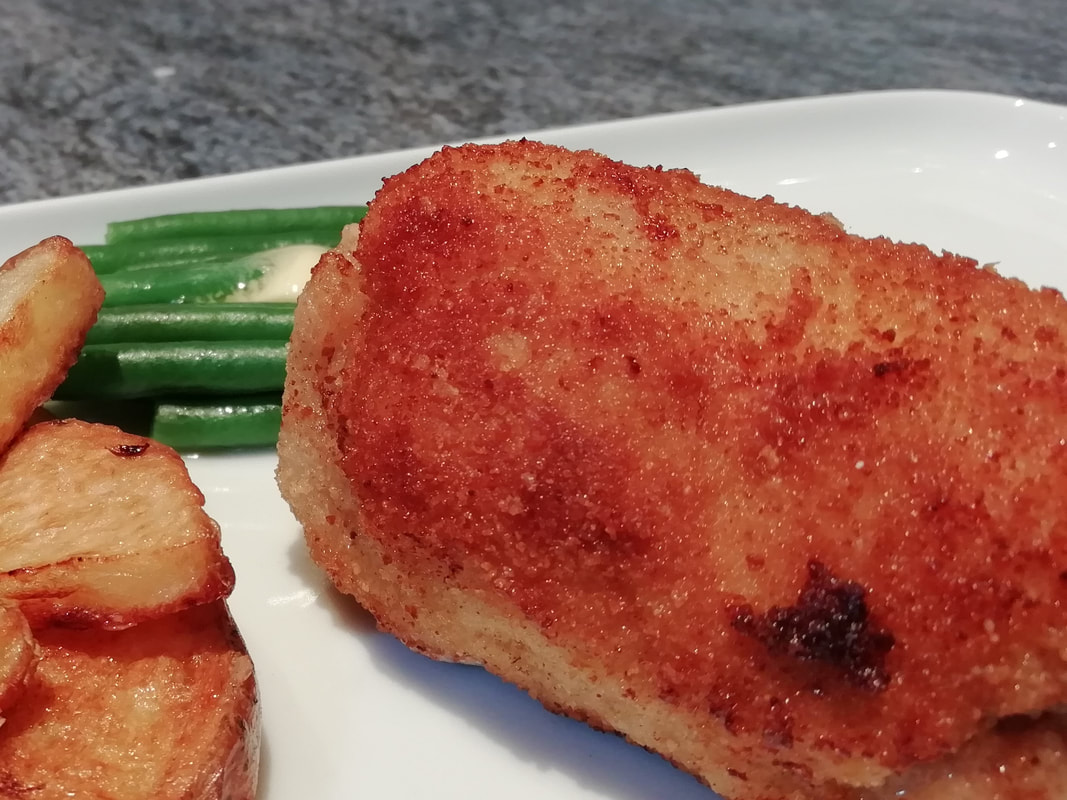 "Little Flamenco Dancers" - Spanish tapas pork rolls, filled with cheese and ham Flamenquin Cordobes
I’ve got a thing for Spanish food – well, haven’t we all? Tapas snacks, eaten in a noisy bar, shouting to be heard above the jokes, the laughter, waiters ordering plates of food from the kitchen, dry sherry glittering on your tongue. Simple tapas – a dish of olives and some slices of jamon, or tapas creations, local specialities: try a different one in every bar – marinated anchovies, stuffed egg-halves, new types of cured meat, or one of the fried ones such as these lovely rolls of pork, ham and cheese. As the name suggests, they are local to Cordoba – city on the banks of the Guadalquivir, where you can find the world famous Mezquita, chequerboard mosque. Lose yourself in the winding streets, admire the decorated Spanish patios, dripping with flowers, do a bit of high-end shopping, but don’t neglect your tummy. Stop at one of the many bars, choosing a shady outdoor table, order a glass of sherry and a plate of “little Flamenco dancers” and enjoy. We ate a juicy portion waiting for the Holy Week parade of shrines to pass by in the streets of Cordoba – a magical evening. Silver shrines being shouldered tenderly through the streets by burly suited men, priests ringing bells, church bells pealing, and Jupiter watching brightly from above. We can’t currently go there, so luckily the flamenquin are easy to make at home, and you can transport your family through taste and texture. These are great for a Spanish themed lunch – add some chips (I did roasted oven chips) and a salad, or go all-out and do a selection of Spanish starters – some cold meat, some manchego cheese, a sliced tomato and onion salad, maybe some marinated anchovies. Serves 4 as a light meal or as part of a selection. Timings – 30 minutes, although you can make and roll them ahead of time and cook only when you want to eat.
Lay your pork pieces out on a flat board – it doesn’t matter how big each one is, you can make the flamenquin quite small if you want them as tapas style bites. Spread a little mustard on each slice. Lay some ham onto the pork, then a thin layer of cheese. Roll up each piece of pork with its filling quite tightly, tucking the ends in as you go. I find that the rolls will stay rolled, they don’t need to be fastened with a cocktail stick or anything. Do all the rolling up first, then lay out the flour, beaten egg and breadcrumbs in bowls in a row along your worktop. Dip the pork rolls first in flour, then in egg, then in breadcrumbs, patting the breadcrumbs on quite firmly. Ideally, at this point, chill the rolls for half an hour in the fridge to set the breadcrumbs. When ready to eat, heat up your deep fat fryer or a good depth of oil in a heavy frying pan – about 1.5cm depth. Fry the flamenquin a few at a time, turning once or twice, until evenly browned and the coating is crisp. They take about 5 minutes. Remove from the oil and keep warm in the oven until you have fried them all. Can you feel the Spanish sunshine? Can you hear the bells?  Chocolately, creamy, rich and glittery, most appropriate for Valentine's weekend indulgence Red Velvet Butterfly Cupcakes
Valentine’s recipe for the Seniors Lunch Club: red velvet cake of course! Moist, chocolately and delicious, even romantic. I’ve always hankered to do the proper American-style cream cheese frosting, so I tried it, and I’m afraid I’ve learned we don’t have the right sort of cream cheese in the UK. My cream cheese frosting came out far too runny to ice on top of the buns, but I still wanted to use it, so I made the buns into butterfly-cakes and filled the hole in the cake with the icing, so it didn’t need to hold its shape so much but could still give that tangy salty creamy edge to the sweet cake. It tasted great, so I’m giving the recipe, but I’ll try again with the cream cheese frosting to see if I can make it turn out firmer. Our Seniors Lunch Club audio call game was a Guess Who I am? (Romantic Couples). I provided everyone with a couple-description when I dropped off the newsletter and cake, and we had to ask yes/no questions to find out the romantic pair each member was representing. Tarzan and Jane caused us some problems, Elizabeth Bennet and Mr. Darcy were discovered after a good set of questions and Anthony and Cleopatra were quite easy to guess. For Mark, who wanted to know if my recipes were scaleable if you aren’t cooking for a crowd, yes indeed. Especially this recipe, you can reduce all the ingredients proportionately and get a smaller production. Go by the relative proportion of eggs to other ingredients, which in this recipe is 1 egg to 50g each of flour/sugar/butter. I’d make a 2 -egg mixture with 100g of each of the other ingredients, and you’ll get about 6 buns-worth. Ice and eat 2 immediately, freeze the others and bring them out 2 at a time, ice and eat. A week’s worth of home-made cakes from one easy batch. Makes 18 buns. Timings – 10 minutes preparation, 30 minutes cooking, 15 minutes to ice and finalise.
Pre heat your oven to 180°C. Beat the butter with the sugar until light and creamy, add the cocoa powder and oil with the whisk running. Add in the eggs one at a time, with a spoonful of flour each time (this is said to stop the mixture splitting). Add the food colouring – you will need a lot of red colouring to overcome the brown of the cocoa powder but use as much as you like! Then fold in the rest of the flour carefully and stir in the yoghurt. Spoon the mixture into paper bun cases, filling each about half full, and place the tray in the oven. I like to cook one tray of buns at a time, to avoid having to go in and change them about on the oven shelves, and the mixture will stand quite happily as you do this. Cook for about 30 minutes until risen and spongy. Remove from the oven and cool on a wire rack until ready to fill/ice. You could ice these with a normal water-ice made from icing sugar and water, coloured with food colouring, or make them a bit more decadently into butterfly cakes with a cream cheese icing and jam filling. Make the cream cheese frosting by warming the butter quite well – if you start with cold butter you will get nuggets of butter through the cream cheese, and that isn’t nice. It needs to be soft but not fully melted. Beat the butter with the icing sugar and cream cheese until well blended, adding the vanilla essence and food colouring as desired. You will need to put a tea towel over your mixer while adding the icing sugar or you’ll get a kitchen that looks as if it’s snowed. To make each bun into a butterfly cake – cut out the centre of the bun using a sharp knife in a circular motion – you are cutting out a sort of circular pyramid shape. Spread raspberry jam into the hole, then fill with the cream cheese icing. Cut the little piece of bun you removed into two and place back onto the iced centre of the bun, with the curved sides together and the pointier bits facing out – it only very vaguely looks like a butterfly, but it does look quite nice! Sprinkle with icing sugar and edible glitter. These should be kept cool and eaten within 2 days, because of the creamy frosting.  Crispy outside, creamy and salty inside, delicious and warming: Spanish Croquetas Spanish Croquetas - Smoked Haddock or Crispy Ham (vegetarian optional as choice of filling)
In Spain, they serve a variety of croquetas as part of your tapas spread – salt cod, spinach, mushroom, ham flavours. Take yourself to Malaga, looking at the sea, sipping your cold sherry and eating these lovely creamy-but-crispy bites. They are actually quite substantial, due to the rich bechamel and generous filling, so you could certainly have them for a good warming lunch alongside some green salad and zingy lemon mayonnaise. A tapas or starter portion would be one of each type, a lunch portion might be two of each type – so this recipe makes enough to feed quite a few people. Once you’ve got a feel for the consistency of the bechamel required, you can make these in smaller quantities and using pretty much anything for the filling – leftover chicken, cooked vegetables (but make sure they aren’t watery at all), something spicy? Makes 12-14 croquetas of each type. Timings – 30 minutes on Day 1, 60 minutes on Day 2.
For each type you will need an additional 40g butter, 40ml olive oil and 65g plain flour
First, make your fillings: Poach the haddock fillet in the milk and water with the bay leaf for about 10 minutes until the fish is cooked. Let it cool for a few minutes, then take out the fish and strain the liquid into a jug – you will use this for the sauce later. Remove the skin from the fish and flake the flesh well with a fork, taking out any bones you see. Keep the fish in a bowl. Fry the pancetta in a little oil until crispy, drain on kitchen towel. Cut the prosciutto finely with a sharp knife. Make each bechamel in the same way – I did one after the other in the same pan, as you need a fairly heavy bottomed saucepan. Melt the butter and the oil together, add the flour and stir over a gentle heat, cooking the flour without letting it burn. Add the liquid and keep stirring. It will thicken as you stir, and keep adding the liquid to make a very thick bechamel sauce. You need to keep stirring and cooking for a while to make sure any flouriness is cooked out, and the sauce is creamy. Add the filling and taste for seasoning. Add the grated nutmeg to the ham one. You probably don’t need to add salt to either of these, although you would if you were making spinach or mushroom croquetas. A generous grinding of pepper lifts the flavour. Line a container with cling film – I try to avoid using cling film these days but I have tried other things and the sauce sticks and you waste a lot, so I do use cling film for this. Pour the bechamel into your container and wrap the cling film over the top to stop a hard skin forming. Place in the fridge for 24 hours to chill thoroughly and set firm. Make the second bechamel if you are making two flavours of croquetas and do the same, so you have both flavours chilling overnight. Next day, prepare a flat bowl with beaten egg and another one with breadcrumbs. Working on a floured baking tray, take a dessert spoonful of the set bechamel mixture and roll it in the flour, using flour to stop your hands sticking too. Form it into a cylinder about as long as your thumb and a bit thicker. Make all the croquetas of one type to this stage in one go. Then drop two at a time into the egg mixture, then into the breadcrumbs, firmly pressing the breadcrumbs onto the eggy surface. They should stick and make a firm dry coating. Put the completed croquetas on a plate to set again, while you do the other flavour. It is fiddly, and it takes a while – it might be easier if you have a production line of helpers assisting you with this. When the croquetas have had a few minutes to set, heat 2cm of oil in a heavy pan, or fire up your deep fat fryer. Fry the croquetas quite briefly in medium hot oil – the filling is already cooked, so you just want to warm it up and brown the breadcrumbs. Remove from the hot oil and serve as soon as you can – they do keep warm in the oven quite nicely if you are doing one flavour followed by another. Eat with a simple green salad, a lemony mayonnaise for the fish one, and a tomato relish for the ham one, and imagine you're in Seville, sitting in a sunny courtyard.  Simple, crunchy, tasty - just yummy! Crispy Chinese Chicken Wings
“Restaurant quality” my son announced, licking sticky spicy sauce off his chin. These are so easy and so good, although they do require watching as the fat is very hot. The secret is a light cornflour batter and double-frying, but they don’t take long. Perfect for a lunch time meal, eaten with your fingers or made more substantial with a bit of rice on the side. I got the idea from Kwoklyn Wan (www.kwoklynwan.com) and have adapted his wonderful recipe a little. Thanks, Kwoklyn, I love your cooking! Making your own sticky barbeque sauce is the work of a moment too, and so much better than the sugary salty gloop from the standard takeaway or the stuff in a bottle. Give these a go, your family will appreciate them! You don’t need a wok or any complicated equipment at all. Serves 4 as a light meal or a starter. Timings – 20 minutes.
For the sauce:
Make the sauce first, in a large pan – you are going to tip the wings in later. Gently fry the crushed cloves of garlic, the ginger and the chillies for about a minute until they start to soften, but not deep fry. Add the rest of the ingredients, taste for seasoning, adjust, and leave on the side. Toast the sesame seeds in a small frying pan with no oil for about 5 minutes until golden, tip onto kitchen paper. Using a deep frying pan – or a deep fryer if you have one – heat up the oil till quite hot. Sorry, I don't use an oil thermometer, I just look at how the oil is behaving. For this, it's not quite smoking but you can see the oil moving about in the heat, and the wings will sizzle as they go in. Mix the cornflour, salt and pepper in a bowl, add the wing pieces to the bowl and rub the cornflour into the wings, pressing the flour onto the skin. Fry a few pieces at a time, don’t crowd the pan or you won’t keep the oil hot enough to make them crispy. The pieces take about 3 minutes per side, you want them cooked and light golden but not brown at this stage. Keep the cooked ones warm on kitchen paper in the oven and keep going until you have done all the wings once. Now start all over again and cook each batch of wings another time for about 8 minutes per batch. Take each batch out and keep warm as you do them. When you’ve done them all, tip the whole lot into the pan with the sauce and mix well. Scatter the sesame seeds over and serve. Everyone can tear the wings apart with their fingers, enjoying the spicy sweet sauce. You could serve simple flatbreads or a little salad, or maybe some plain rice. 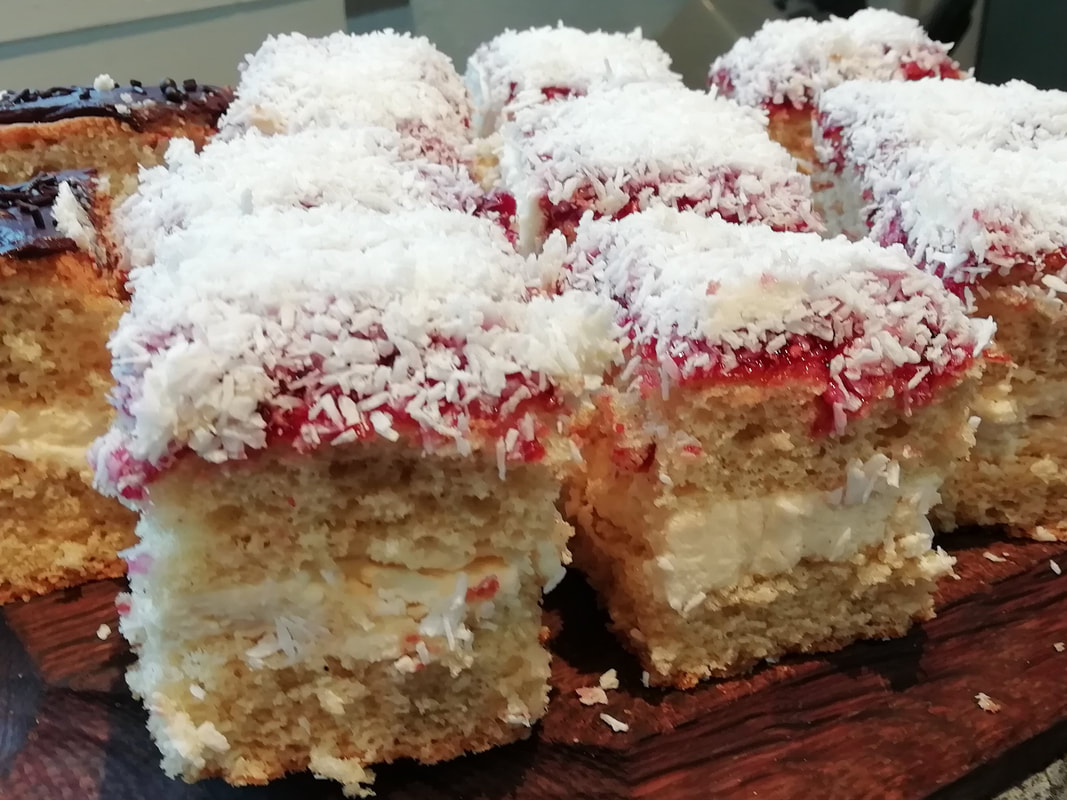 Vanilla sponge, filled with white chocolate buttercream, topped with tangy raspberry jam and coconut - yummy! February Cake
This is for cheering you up in bad weather, giving you something to look forward to. It’s very rich, a little goes a long way, but it’s a great mood-enhancer, so it was a good choice for my Seniors Lunch Club this week – we all needed cheering up after the gloom of floods, frost and pestilence. It’s the same cake recipe as I made a few weeks ago, a vanilla Genoese sponge. This time I filled it with a decadent white chocolate and buttercream fluffy filling and topped it with raspberry jam and desiccated coconut. The jam was just acid enough to take the edge off the extremely sweet filling, but some of my Seniors couldn’t manage their whole piece in one sitting and had to split it over two days – double the pleasure really, so why not? We discussed what we like about the month of February – for such a dark dank month, there’s actually quite a lot to appreciate: many birthdays, Valentine’s Day, pancake Day, Chinese New Year, the garden bulbs starting to come up and the birds starting to sing. Our Australian volunteer gave us a word-picture of February in Australia – extremely hot, insects humming a low background note, wearing sandals to school – feels like more than half a world away. I don’t think the icing in this cake would survive a Sydney February, so keep it for the British winter, and let it warm you through. Genoese Sponge – makes 16 portions. Timings – 15 minutes preparation, 25 minutes cooking, 1 hour to cool down, and 15 minutes to fill and ice.
Filling – 200g butter, 200g icing sugar, 100g white chocolate melted. Topping – 100g raspberry jam, warmed up, and 6 tablespoons desiccated coconut. Pre heat your oven to 180°C. In your mixer, beat the eggs and sugar until fluffy – takes about 5 minutes. At the same time melt the butter in a small pan – then take it off the heat - and weigh out and sieve the flour. Grease and line a cake tin – for this amount I use a 22cm square tin, which makes a cake that is also easy to portion out. When the eggs/sugar mix is beaten up, add the flour gradually, beating on a lower speed. Spoon the butter on top and mix up the whole thing gently with a metal spoon – this keeps the air in the mix better than the rather coarser effect of a wooden spoon. Scoop the batter into the cake tin and place in the oven for about 20 minutes until the cake is risen, golden on top and springy to the touch and a skewer comes out clean. Take it out, and leave to cool on a wire rack, then turn it out of the tin, peel off the paper, turn right way up again and leave to cool completely. At this stage, you can wrap it well in greaseproof paper and freeze it if you like. Make the filling: beat the butter in your mixer until turning fluffy and add the icing sugar one spoonful at a time – you will need to put a teatowel over your mixer while doing this to avoid sugar-dusting the whole kitchen. Melt the white chocolate in a bowl over hot water, and when melted, pour straight into the mixer, keeping the whisk running. You will notice the already fluffy butter/sugar mixture take on an almost mousse-like texture. Slice the cake through the equator carefully with a bread knife and fill with the white chocolate buttercream. Top with the warm raspberry jam and immediate sprinkle on your desiccated coconut so that it sticks nicely. Eat within 2 days, and if you take a piece round to a friend, recommend that they keep it in the fridge to ensure the icing doesn’t run! |
Some Changes - April 2022
Thanks to my friends and followers for your patience, and for your encouragement to start blogging again. Archives
April 2022
Categories
All
|
 RSS Feed
