|
Scones with Clotted Cream and Raspberry Jam
Yes, very simple. But sometimes simple is what fits the bill. We had a birthday party at the Seniors Lunch Club this week – mine, and a shared party with the memory of our dear Ruth who died in the Autumn just gone. Last year on the audio conference phone call we had a real shared party for us both. We remembered Birthday Parties we’d had in the past. Ruth herself remembered the Ball she had for her 21st. She grew up in South Africa so her birthday was the middle of winter, being the end of May. She said she drank a glass of fizzy wine, which she’d never tasted before (this must have been in the middle 1940s) and got a little tipsy. Other members had also had memorable 21st parties – one lady was taken to see Tommy Steele at the Palace Theatre in Manchester for her celebration. So, this week, we remembered Ruth: her humour, her love of Africa, her directness, her involvement with everything around her. She was loving and bossy and funny, and we miss her. But we remembered her with love and laughter and we had a simple friendly party for my birthday – sandwiches, sausage rolls, cheesy things on sticks and these scones with jam and cream. They are easy to make, but need to be eaten fresh. The only trick with scones is to avoid kneading the dough, it’s very delicate and you don't want it to turn bread-like. So keep light hands, handle the dough as quickly as possible and cook the scones in a hot oven on a pre-heated baking tray. There are many variations of scones, you can add dried fruit, or make cheese scones. If I am doing the cream/jam route, I prefer them plain, but please yourself. Makes 18 small scones Timings: 30 minutes 450g self raising flour 30g caster sugar 2 teaspoons baking powder 100g softened butter 2 eggs 150ml milk Raspberry jam (or strawberry if you prefer which is more traditional) Clotted cream (or whipped cream) Pre heat your oven to 230°C, and put a flat baking sheet in to warm up. Sieve the flour and baking powder into the bowl of your mixer, add the sugar. Rub the butter into the flour using your fingertips or the pastry paddle of your mixer. Add the egg and milk and mix with a fork to a soft dough. Knead very gently and quickly just to bring the dough together. Roll out on your work surface to about 2cm thick and cut rounds using a fluted cutter. I quite like the smaller scones but make them any size you like. Brush the tops with milk, then get them onto the hot baking tray and back into the oven. Bake for about 8-10 minutes – watch them as they rise. Remove when very lightly browned on top and cook on a wire rack. When cool, split open the scones. I like butter first, then jam (homemade raspberry jam is incomparable, and I will put my recipe on the blog at the appropriate jam-making season) and then clotted cream.
0 Comments
Twice Cooked Pork – Tender Stir-Fry Pork with Wild Garlic
Oh, this is so good. I’ve got lots of friends who say “I’m not that keen on Chinese food” and that’s because they’ve only eaten the high calorie, often fried, maybe too spicy version that some restaurants serve. If you only ate a particular food from a takeaway outlet (apart from the honourable exception of fish and chips and possibly pizza which are both the ultimate street food dishes) do you think you would like it? Give the home cooked, made with love, made with care, made with fresh ingredients version a go. It’s also a high-vegetable low-meat cuisine, which should suit our new attitude to food. Something that puts UK home cooks off Chinese food is the use of authentic ingredients. I understand that. I’m lucky to live near the UK’s best Chinatown (biased, me? Maybe) and can get my ingredients from the Manchester Chinatown supermarkets. But if you don’t live near a genuine store run by Chinese people, you can get a lot of this online. You can also carefully substitute some British ingredients. For instance, this recipe is often made in China with a green vegetable called “garlic shoots” – like a spinach that tastes of garlic. So use the European Wild Garlic foraged from your hedgerow, and hey presto, fusion cooking at its best. Honestly, try this one. It’s easy to make the main parts ahead while you’re doing something else so you can finalise the dish in minutes when you get home from that swimming lesson and you need something on the table right away. Thanks again, Fuchsia Dunlop, for the base recipe and the history. Serves 6 Timings: Day 1 - 10 minutes preparation, 1 hour simmering. Day 2 – 30 minutes (which is mostly prepping the veg)
Day 1: Simmer the pork belly piece in water with the simmering spices added. Cover the pork with cold water, bring to the boil and simmer for about 40 minutes until it is cooked through. Leave to cool in the cooking water and then remove from the liquid and put in the fridge overnight. Day 2: Remove the skin from the top of the pork – leaving as much of the fat as you can. Genuine Chinese cooks leave on the skin, which does contain lots of gelatine for healthy hair and skin, but it may not suit British tastes. Remove any bones or gristle from the underside of the piece. Slice the cold pork as finely as you reasonably can. Each slice will have a generous top of fat and then a meaty part further down. If you don’t need all the pork in one meal, you can freeze the slices in layers on greaseproof paper and then wrapped in a bag – so you can cook them straight from frozen another day and save all the simmering and cutting time. Heat some oil in your wok. Quickly fry the garlic, chilli and ginger to release their flavours. Push to the side of the wok and drop in the slices of pork. Fry them briefly – they will sizzle and release their lovely spicy fatty flavour. Turn them once or twice in the oil to be sure they are well cooked and a bit crisp, then push them to the side of the wok. Stir fry the spring onions, celery and red pepper quickly, then push them to the edge of the wok too. Spoon the yellow bean paste into the middle of the wok and fry briefly. Add the black beans and crispy chilli in oil and mix in. Bring the meat and the fried vegetables back into the centre of the wok and mix well. Add the handfuls of green leafy vegetables and stir very briefly to heat them and cook through quickly. Add the soy sauce. Taste and adjust – you might need a little more soy. Serve with plain steamed rice or over lightly cooked noodles. Spinach and Wild Garlic Soup (vegetarian, vegan option)
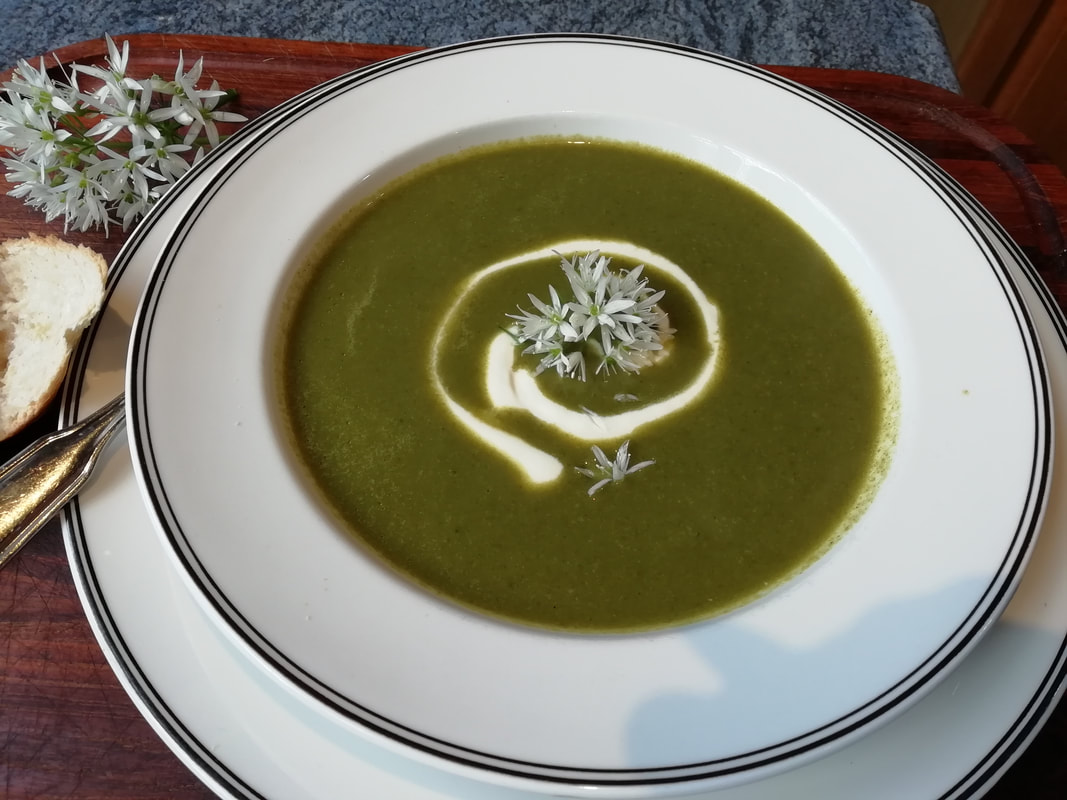
The wild garlic time is nearly over, so make the most of it with a final extra. The perpetual spinach in the allotment is now bursting forth with new growth, despite the rain, so there’s enough harvest to make this beautiful green soup. Outside of wild garlic time, you can use a couple of cloves of garlic to give that pungent background taste which complements the spinach so well. Light and tasty springtime lunch, garnished with the white flowers. Serves 4 Timings: 30 minutes
Cook the onion gently in vegetable oil until transparent. Don’t let it brown. Add the garlic cloves if using and stir to cook. Add the potato pieces to the pan with the vegetable stock and simmer for 10 minutes to cook through. Add the spinach leaves and wild garlic leaves and cook for 10 minutes. Liquidise and check the seasoning – you might need salt, depending on the saltiness of the stock you used. At this stage you can cook and keep in the fridge for up to 2 days or freeze. When ready to eat, warm up the soup, and add the milk if using. Don’t boil, or you will curdle the milk. Serve with a swirl of sour cream and a lovely scattering of garlic flowers. Lemon Curd Butterfly Cupcakes
Pretty as a picture, aren’t they? Tasted good too. My Seniors Lunch Club group were very appreciative. They always are, which is nice, but I have noticed that people as they get a little older seem to enjoy a strong clear taste – and lemon is always popular. We had a game of “Who Am I?” this week – members pick a character’s name out of a bag without looking. This name is then worn on a headband (made out of newspaper stapled together, we aren’t high tech) so the member can’t see it, but everyone else can. The member then has to guess who their character is by asking only Yes/No questions. I usually choose a theme for the “Who Am I?”, and this time the theme was British Royals. Easy you might think, but of course the British royal line goes a long way back and even wanders into legend. Henry VIII was relatively easy to get, as was the late Queen Mother, but King Arthur took 9 guesses, and Anne Boleyn stumped us until a very heavy hint from the member who had played Henry VIII got us over the line. I don’t think anyone would have guessed John of Gaunt so I took his name out of the bag. We had a lot of fun. This is a game you can play at home and it’s also a good game for remote interaction – we played it several times in lockdown on our audio conference calls and it works well. We’ve played it with the themes of “Film Stars”, “Animals”, “Spooky Halloween Characters,” and enjoyed them all. Makes 18 cakes Timing: 60 minutes to make one batch, then cooling time and 30 minutes icing.
Pre heat your oven to 180°C. Beat the sugar and butter together until fluffy, add the eggs in one at a time, adding a spoonful of flour with each one. Turn the mixer to a lower speed and add in the rest of the flour and the lemon zest. Spoon the batter into paper cupcake cups – you want them reasonably filled as you are going to cut the tops off the buns to make the butterflies. I measured one, and I used 45g of batter to make a well filled cup cake. Bake for about 20 minutes until golden and cooked through. Remove from the oven and cool on a wire rack. I prefer to make 2 batches one after the other if you are making more than the 12 in a standard cup-cake tin, as I think they rise better when there’s only one tray in the oven at a time. The batter stands perfectly well as the first batch is cooked. For the icing: beat the butter with the icing sugar, lemon zest and juice until creamy and fluffy. You will need to cover your mixer with a tea towel to stop the icing sugar rising up and dusting the whole kitchen. Scoop the buttercream into a piping bag with a big star nozzle. That of course is optional, you can just dollop spoonfuls of the buttercream onto the cupcakes if you want. Using a sharp knife, cut a pyramid shape from the centre of each cake. Fill the centre of the cake with a teaspoonful of lemon curd, then pipe a curl of buttercream. Cut the piece of cake you removed in half and place it back onto the top of the buttercream to form “wings”. Add a few sprinkles if you like. This process goes quite quickly if you do them all at once. Keep in a cool place until serving and eat within 2 days. Rhubarb Cordial
Once you’ve made your own fruit cordials, your family will beg you to continue and you won’t look back. You'll start collecting bottles like a mad thing. You can make them out of pretty much any fruit you can lay your hands on. I know that rhubarb isn’t a fruit, but we eat it as such, and you can make the prettiest cordial out of it with an unusual but wonderful flavour. I got the idea for this recipe from Fern Verrow – an inspirational book about a farm run on organic and biodynamic principles and using seasonal produce for sensational taste. Anyone with a garden patch of rhubarb or an allotment will know that it’s difficult to keep rhubarb under control once it gets going. This year, with the rains in January – which turned into a full-on flood in my allotment as the Mersey overflowed – the ground was saturated. Rhubarb loves that; you even need to water rhubarb when it’s raining, it’s that thirsty. This spring, it’s so happy, you can nearly hear it singing as it grows. Once you’ve made enough crumble, cakes, and pies to keep you going, give this cordial a go as well. I use a jelly bag which I hang from a wooden spoon handle put through two cupboard doors in the kitchen, but you can line a sieve with cheesecloth and let it drip through that also. As with all preserving, sterilise your bottles, funnel, jugs, and spoons well to help the cordial keep without spoiling. Makes about 1 litre Timings: 1 hour work with overnight straining
Clean your rhubarb but don’t peel it as if you were making a compote. You want as much of the pink outside string bits as possible for the colour. Cut it into 2cm chunks and put it in a large pan with the water over medium heat. Bring to a simmer and let it cook for about 30 minutes until it is really soft. Spoon the liquid and pulp into a jelly bag and let it drip through into a bowl overnight. Don’t squeeze the bag as you want the juice to be clear. Measure your juice and put it in a large pan. I had 1 litre of juice from this much rhubarb but you might have more or less depending on your type and juiciness of stalks. For every 1 litre of juice add 600g sugar, the juice of 2 lemons and a teaspoon of citric acid. The citric acid helps the cordial keep longer but you can leave it out if you don’t have it – you just need to keep the cordial in the fridge or freezer if you aren’t going to use it in a couple of weeks. Bring to the boil, stirring to dissolve the sugar and then bottle into sterilised bottles. Add sparkling water and a few blue flowers for a perfect summer drink or make a cocktail for something a bit different for your garden party. Bombay Potatoes (vegan)
Just spectacular. The family gobbled them up and would have eaten twice the portions. Another lesson in why the simplest things are often the best. This is a dish you find all over India, so I don’t know why Bombay, now Mumbai, became specifically associated with them. Every family and every restaurant have their own way of doing it – some recipes are more roasted, some have more sauce, some include tomatoes and some don’t. I make a potato and spinach curry that has more sauce, so I decided to make this one dry and crispy. The whole spices are quite important as they give flavour and a little crunch to the dish. Serves 4 Timings 90 minutes although you can boil the potatoes beforehand
Boil the potatoes for about 15 minutes in water with the teaspoon of turmeric added – the water will turn bright yellow and so will the cut surfaces of your potatoes. Try to avoid splashing the water on your kitchen work surfaces as it will stain. Drain the potatoes – they should be tender but not falling apart. Heat your oven to 205°C. In a large oven proof pan or metal oven tray, gently fry the whole spices in 2 tablespoons of vegetable oil until they release their fragrance – about 2 minutes. Tip the potatoes into the pan and mix well, sprinkling over the garam masala, curry powder and a generous pinch of salt. Put the roasting tin into the oven for 45 minutes. Every now and then turn the potatoes with a spatula to ensure all the surfaces get crispy. Serve either as a side dish to another meal or on their own with some fresh relishes and chutneys. Australian Chocolate Cake
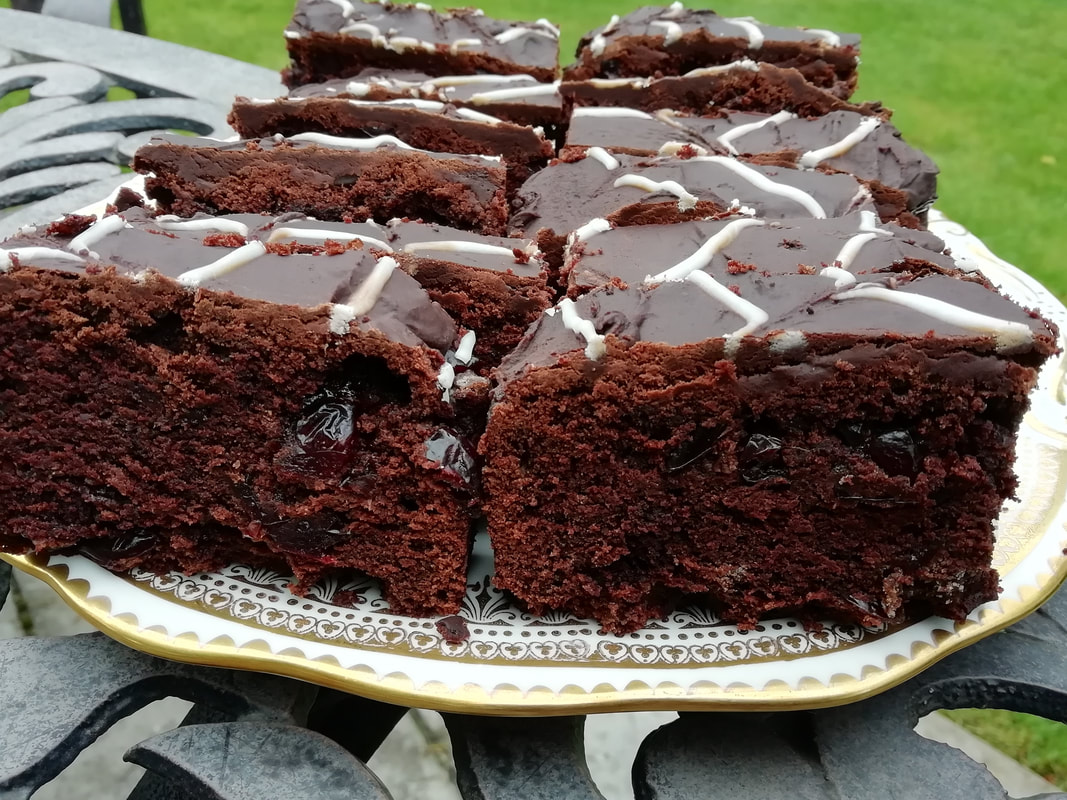
My friend Bronwyn gave me this recipe. I don’t know if it’s truly Australian or just her own family recipe, but it’s a great cake. Deep and chocolately with an almost brownie-like gooey texture and speckled with juicy pieces of fruit. It’s also very simple to put together, you don’t need a mixer or a whisk. There are no eggs, which makes the sponge more brittle than a Genoese for example – so be careful getting it out of the tin. (My first attempt cracked in several places and I had to repeat.) Leave it to cool in the tin and then turn out gently onto a rack. I iced it with a simple icing-sugar and water icing, but you can leave it plain. Our Senior’s Lunch Group this week was a Farewell Party for one of our volunteers who’s been with us all through our lockdown audio conference call sessions. She’s helped us keep our spirits up in difficult times with her humour and sense of fun – thanks Tricia! We had a lively session of party games – guessing the number of matches in the box, the number of marbles in the jar and the weight of a bag of rice. We then tried to guess the smells in 6 little pots I had prepared – it’s much more difficult than you might think. We recognised lemon, and the smoky smell of whisky, but coffee and vanilla scents stumped us, and so did the fresh smells of chives and mint. Try it yourself, it’s a great group game and quite amazing how you can’t quite name a familiar smell. And a good use for those little hotel pots of jam that you brought home and washed out and now don’t know what to do with. Makes 16 pieces Timings: 90 minutes, then cooling and icing.
Icing: 200g icing sugar, mixed with 1 tablespoon cocoa powder, 1 teaspoon of coffee granules and 3 tablespoons of water Pre heat the oven to 180°C. Grease and line a 22cm square cake tin or other large cake tin. You could also use a loaf tin if you are making a half quantity. Put the water, cranberries, butter, sugar, cocoa and ground spices into a saucepan and heat to boiling. Stir well to combine. Leave to cool to blood temperature – if you take the next steps when it’s too hot, the flour will cook in the hot butter and the cake won’t be so moist. Mix the teaspoon of bicarbonate of soda with the boiling water and stir well to dissolve. Pour this into the chocolate mixture, add the flour, and mix well with a wooden spoon. Add the chocolate pieces and stir again. Spoon the batter into the cake tin and bake about 35 minutes until a skewer comes out clean. Leave to cool in the tin and turn out carefully onto a wire rack before icing. Vanilla Pannacotta & Rhubarb Compote
Fresh rhubarb from the allotment, springing up and just asking to be used in all sorts of desserts. never without a bowl of poached ruhubarb in the fridge at this time of year. A lovely easy dessert which can be made ahead and kept in the fridge for at least two days. You can play around with the flavours of the pannacotta and I will give a few different ideas at seasonal times; you can of course pair the vanilla version with just about any tart fruit compote. Gooseberries, damsons, plums would all work well. This is not vegetarian, due to the use of gelatin which is an animal product. I have tried with the vegetarian alternatives and have not yet come up with the right recipe, so far they have all given a much harder set than the perfect wobble. I will keep on trying and post it on the blog when I find the right mix. A vegan version with non-dairy cream/milk/yoghurt is also under investigation. Anyone got any hints or foolproof recipes, please share with me. Serves 4 Timings: 30 minutes and 3 hours to set
Make the rhubarb compote: Peel the rhubarb, cut the sticks into 3cm lengths and put them in a pan with the granulated sugar and a splash of orange juice. Bring to a simmer, simmer for 3 minutes until tender (might be longer depending on how fresh the rhubarb is) and put off the heat. If you don’t stir, the pieces will keep their shapes better, which doesn’t affect the taste but allows you to dress the plate. Leave to cool and keep in a sealed container in the fridge. The compote is great with cream, with custard or yoghurt and will keep for 3-4 days. Make the pannacotta: Place the gelatine leaves in cold water for 5 minutes to soften. In a small pan heat the cream, sugar, vanilla and milk to simmering, but don’t boil. Take the gelatine out of the water and slide them into the hot cream, they will dissolve as they go in. Leave the mixture to cool and then add the yoghurt, stirring well, even using a small whisk so it ends up smooth. Strain the mixture into a jug and pour into whatever moulds you are using. Metal moulds are easiest to un-mould but you can also use ramekins or whatever you have. To serve: if you want to unmould, dip your mould in hot water and then upturn over the plate. The pannacotta should plop satisfyingly out. Dress it up with a spoonful of rhubarb and some parts that have held their shape. Chicken Tinga Wraps
Mexican food is spicy but not necessarily dramatically so. The use of a variety of chillies and sauces gives a subtle warmth and sweetness to the dishes and is a reason why the cuisine is so popular. Chipotle in Adobo sauce is a special preparation of jalapeno chillies which are dried (after which they are called chipotles) and then canned in a sauce made from tomatoes, herbs and spices. The heat from the chillies merges with the sweetness of the sauce over time. A little goes a long way, but they are great ingredient to make your meals taste genuinely Mexican. My son gave me a tin of these for Mother’s Day, an unusual present but very welcome. I had to make some his favourite meals of course, in return, and like all youngsters, he loves a wrap with layered ingredients. The Chicken Tinga itself would also go beautifully with rice and re-fried beans or on a Tostada or in a crispy taco shell with some shredded lettuce. Serves 6 Timings: 2 hours for the Chicken Tinga, which can be done 2 days ahead. 20 minutes to make up the wraps. For the Chicken Tinga:
For the wraps:
Make the Chicken Tinga: In a large heavy pan (I use my Le Creuset here), fry the chicken thighs in a little vegetable oil until browned on all sides. Take them out of the pan and use the same oil to fry the onions and garlic until tender and translucent, about 5 minutes. Add the oregano, celery salt and cumin powder, stir to release the fragrance. Add the tin of tomatoes and the chipotles in adobo and the Worcester sauce. Simmer for a few minutes to blend the flavours, then allow to cool a little and then liquidise the sauce in a blender. Return the sauce to the pan, add the chicken stock and put the chicken thighs back in. Simmer for about an hour, with the lid partly ajar. The sauce is quite thick and it will bubble and spit. Keep an eye on it, and don’t let it catch on the pan. After an hour, check how well cooked the meat is – if it is falling apart, remove the meat from the pan and tear it up with two forks. Reduce the sauce by simmering for another 10 minutes – you will get a very thick spicy coating sauce. Return the meat to the pan and stir well. At this stage, you can allow the Chicken Tinga to cool and it can be portioned and frozen or kept cool in the fridge for up to 2 days. To assemble the wraps: Warm the tortillas in a frying pan for a few minutes – keep moving them up and down the stack to be sure they all get a bit of heat. This is much better than warming them in an oven as they stay moist, which you need to roll them properly. Splodge the chicken tinga onto the lower half of your wrap, sprinkle with cheese to taste, add a spoonful of avocado cream and a feathering of coriander. Fold the edges towards the centre and then roll up your wrap tucking the ends in as you go. Eat with your hands, but you’ll need a napkin. Rhubarb Crumble Cake
The first fresh rhubarb is now coming up in the allotment. Wonderful sour juicy stalks, just begging to be used in crumbles, cakes, compotes and pies. The Germans have a recipe “streusel kuechen” which is similar to our crumble, and slightly more transportable to take to my Seniors Lunch Club group. The sourness of the rhubarb contrasts beautifully with the vanilla flavoured classic Victoria sponge. The cake has a slightly puddingy texture due to the juice seeping into it, and you need to cook it on a metal tray in case any juice comes out of the bottom of your baking tin. This week’s theme with my Senior’s Group was Space. I must admit, my choice, and not one that greatly inspired the group. Most, but not all, remembered the moon landings, and most have seen recent news clips about the current Mars landings – although were not convinced about the relevance to their own lives. I had to run round the table (on which a vase of flowers was representing the Sun) with a coffee cup (the Earth) showing how the rotation of our planet brings about night and day in Manchester. Exhausting, and I needed the cake to restore my energy. Makes 16 portions Timings: 90 minutes For the crumble:
Prepare the rhubarb: clean the stalks, string them and cut into 1cm lengths. Make the crumble first by rubbing the butter into the flour with your fingertips or using the pastry paddle of your mixer, then stir in the sugar. Leave aside while you make the cake. Beat the butter with the sugar until fluffy, then add the eggs in one by one with a spoonful of flour each time. Add the vanilla flavouring and the rest of the flour. Spoon the mixture into the prepared tin and arrange the rhubarb pieces on top of the cake batter. Strew the crumble mixture over the top. Bake for about 50 minutes and check if done – a skewer will come out clean – leave it another few minutes if needed, it depends a bit on how juicy the rhubarb is. Put the tin on a wire rack and leave the cake to cool in the tin for a few minutes. Serve with some icing sugar sieved over the top or as a pudding with custard or icecream. The cake will keep in a sealed tin for 2 days or so. |
Some Changes - April 2022
Thanks to my friends and followers for your patience, and for your encouragement to start blogging again. Archives
April 2022
Categories
All
|







 RSS Feed
