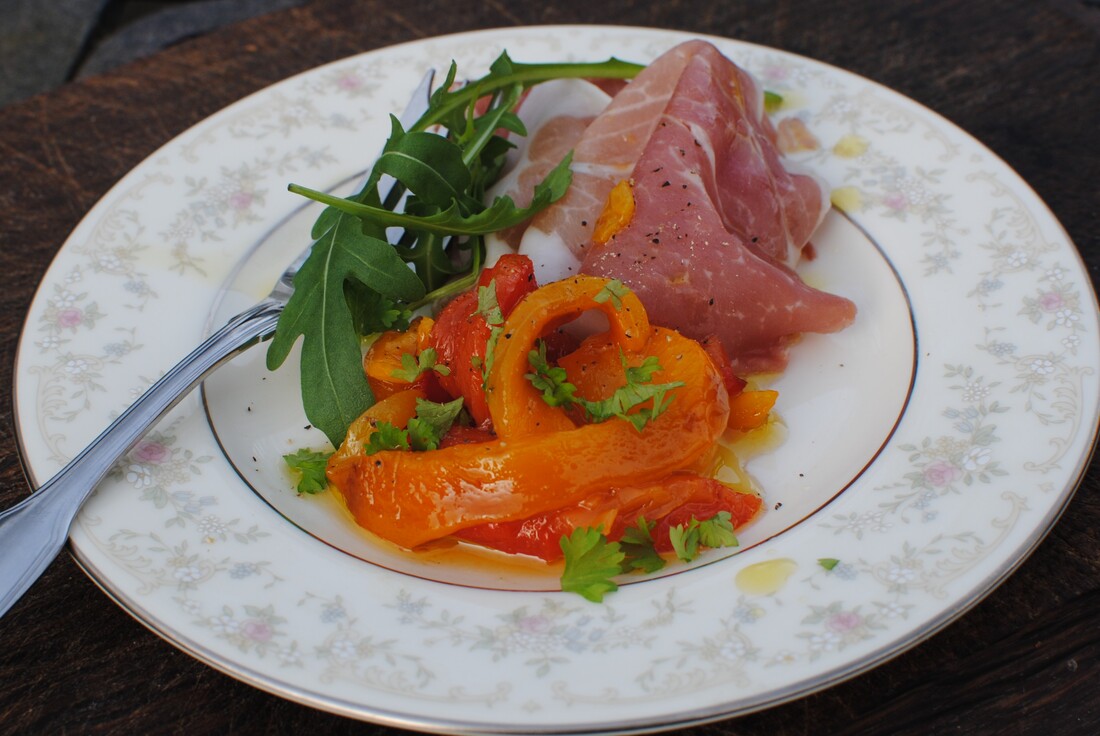
 Simple colourful classic, and so many ways to serve them: grilled peppers, marinated in olive oil and herbs. Grilled Marinated Peppers (vegan, but serving suggestion includes meat)
This is so simple but so delicious. I ate it first at a small French bistro in Canterbury, which has probably long since disappeared but provided straightforward un-faffy cooking that was huge on flavour and love. I like a recipe that I can make ahead and bring out as a home-made treat when needed at this time of year, without having to attend to last minute preparations when you have guests in the house. Have a jar of these grilled peppers ready, and a pack of good Spanish ham, and you have a starter fit for a houseful of princes. They keep for at least a week in the fridge, in a jar with their oil. After you’ve finished the peppers, the oil makes a tasty base for a very tangy flavoured French dressing – use it on crunchy red radicchio or endive, some leaves with a strong flavour of their own, and maybe a few shavings of parmesan on top. Of course, you can also serve these as part of a vegan or vegetarian selection of grilled vegetables, grilled courgette with a sprinkle of lemon juice and some mint in the oil is lovely, and so is grilled aubergine with crushed garlic. Serves 6 Timings: about 30 minutes work, but cooling time needed after the grilling.
Grill the peppers under a hot grill, turning until all sides have been charred and the skin is blackened and blistered. Turn them on their tops to grill their little bottoms too, you want the whole skin area grilled. Put the now burnt-looking peppers into a glass bowl and cover with a plate to let the steam get at them. Not a plastic box as you don’t want hot food touching plastic if you can help it. You can leave them to cool completely while you do something else. Take the peppers out of the bowl, pull out the choke with the seeds and stalk on. Carefully pull off the skin or scrape it away from the soft flesh with a sharp knife. It will come away easily after the grilling and the steaming. Make sure you clean away all the little seeds from the flesh. Cut the flesh into long strips with scissors and place it in a clean jar layering the peppers up with oil. You can add any seasonings you like at this stage – a fresh bay leaf is nice or some lightly bashed coriander seeds or black pepper corns, but you don’t have to add anything. Top up the jar with oil to cover the peppers and leave in the fridge for an hour or until you want to use them. To serve, give everyone a small serving of your best Parma or Serrano ham, a spoonful of peppers and a few leaves of rocket. Done!
0 Comments
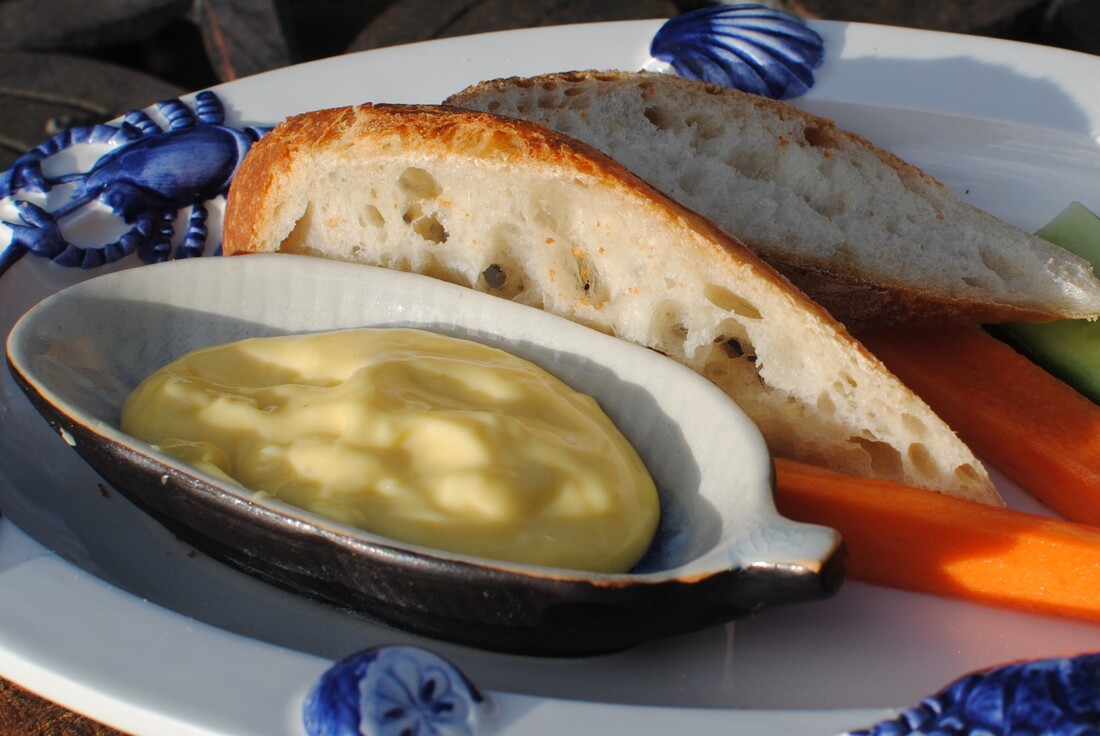 Spanish Allioli or French Aoli - garlicky, creamy, just right for dipping Allioli or Aioli? A whole yolk’s worth of fun!
Another Spanish tapas, that you don’t even have to order. As soon as you sit down, the waiter brings you the menu, a teensy bowl of this lovely rich oily paste and some pieces of bread. This being the Canary Islands, the bread is unfortunately white, thin and tasteless but the allioli makes up for it. They seem to add herbs, whatever they have around, to make it green and therefore even more attractive. On my recent holiday in Tenerife (very nice thank you) we had allioli speckled with chives or parsley, something I’m pretty sure was dill, and maybe even oregano. But the basics are just egg, garlic, mustard, oil, vinegar and salt. I used to be nervous of making my own mayonnaise. Don’t be. I was worried about all the admonitions to only add the oil one drop at a time, or else dreadful things (curdling? How horrible does that sound?) would happen. Yes, you have to add the oil slowly, but so far, I’ve never yet curdled, and now I’ve made it loads of times. Then some chefs have taken to making it in a food processor, as an “easy” solution to the difficulties of the hand made version. This made me even more nervous, how difficult must it be, if even top chefs recommend using a machine? But the machine needs washing up and also means you have to make quite a large quantity. Half the joy of making your own mayo is that you can make one-egg-yolk’s worth, which is just enough for lunch for 4 people, and nothing left over. You really don’t want to be storing fresh mayo for more than a few hours in the fridge, so what are you supposed to do with all that over-production from using 4 yolks, let along all the dreadful eggy washing up. So, use a tiny tiny whisk, get your oil bottles out (such fun) and take ten minutes to produce the most glorious, glowing, garlicky home made allioli ever seen on this planet. Serve it simply with some good (French sourdough baguette is perfect) bread and some vegetable batons and you have a top class vegetarian lunch. Now we’re coming close to the dreaded school holidays, teach one child and set their task to make mayo every other day. One day as allioli dippers, one day in coleslaw with baked spuds, another day dolloped into a BLT – your lunches will be easy, nutritious and cost effective. As well as teaching your child a life skill and the practice of patience. Teach another child how to make soup and every other day have a different home made soup. Teach another child (if you have another going spare) how to make bread, and you'll have a real lunch time production line going. I’m not giving strict quantities here. Every egg is a little bit different and also you might use other oils or herbs. The only quantity you start off with is one egg yolk. Put one egg yolk in a small bowl. Sprinkle onto it one half teaspoon of sugar. Add one half teaspoon of Dijon mustard or a half teaspoon of English mustard powder. If you are making garlic flavoured mayo (allioli), squash a garlic clove with some fine salt into a paste, and add that to the yolk. If you aren’t making a garlic version, just sprinkle half a teaspoon of salt into the yolk. Beat the yolk up for a bit with your teeny tiny whisk. Now start adding the oil. You can use olive oil (not the very best heavy green oil for the whole thing as that can make it a little bitter) or rapeseed oil, nut oil, or just plain sunflower oil. I like to add a little of each in rotation just for fun and so that the final mayo doesn’t taste too much of any one of them. You add the oil a little at a time and beat each dribble in before adding the next. You will notice the mixture becoming thicker, almost like an oily custard. Keep going until you have about an espresso cup full of mixture, which should be thick and glossy. Taste it. Add a teaspoon of white vinegar, beat it in. Add a little more oil, whisk. Add a teaspoon of lemon juice. Taste it, add more salt or sugar if you need it. Add a dribble of cold water, whisk. Add some chopped herbs if you want or even some tabasco or chilli sauce for a spicy version. Mix well. If you make it half an hour before you want to eat, the garlic and herb flavours will intensify. 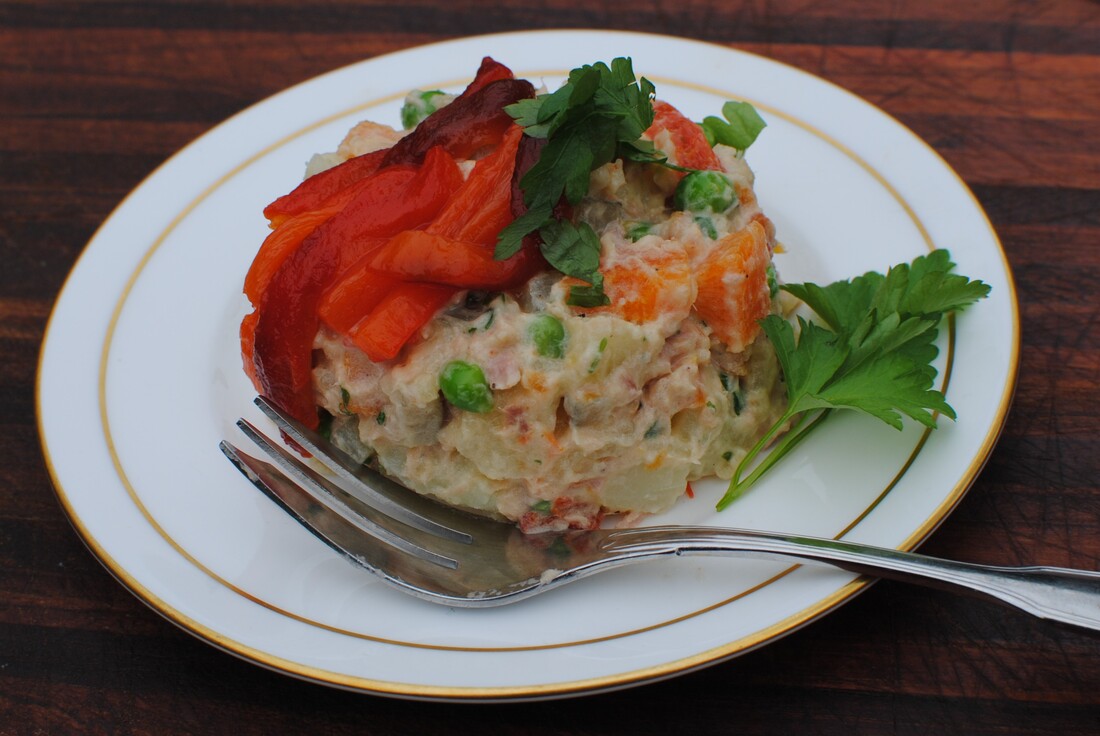 Simple but delicious. Potatoes, carrots, peas, tuna and gherkins in a creamy mayo Ensaladilla (vegetarian options)
Returning to a much-loved place is a joy. Eating the food you first ate there takes you back. I’ve said in this blog before how much I learned from eating in the Canary Islands. “Gourmet” is not the first thing you think about the Canaries, but these days it should be near the top of the list, along with sun, sand and holiday fun. We all adore sharing a table of tapas with friends or family. Everyone chooses a favourite, but you also get the chance to try new things. In Spain, when you sit down with a drink, the bar will also often serve you a little portion of their chosen “tapas de dias” without extra charge. It’s good marketing, encourages you to sit and drink another round, and lets you try home made small portions of local food. Just what I like to do best. You find “Ensaladilla” on the menu at most tapas bars in the Canaries. The proper name is Ensaladilla Russa, or Russian Salad, but who cares? And is it anyway? A Russian chef, Lucien Olivier, is said to have made the first salad of this type in Moscow in the 1860s, but the same recipe exists all over Europe in various forms and they can be quite different, so I don’t see how anyone can lay claim to the “best”, or the “original” or the “genuine” recipe. I’ve eaten a similar dish in the Balkans with chopped ham in it, they sell pots of it in German supermarkets with sausage pieces, I’ve had a very eggy version somewhere on my travels. The main variation in Spain has tuna, so that’s what I’ve gone with here. The basic recipe is cooked potatoes, carrots and other vegetables, bound together with a mayonnaise dressing, and some herbs. For protein you can add chopped ham or other softish processed meat, or eggs or fish. You can add or leave out: chopped pickled cucumber/gherkins, capers, anchovies, red peppers. Some like chopped dill, others prefer parsley. You can layer it attractively or just mix it up and serve it as a scoop. The dressing is usually freshly home-made mayonnaise, but you can use mayo from a jar and you can lighten it a bit with sour cream or plain yoghurt if full-on mayo isn’t for you. Two big no-no rules: no garlic in the mayo and no tomatoes in the mixture. I tried to re-create our favourite versions from Tenerife, but please let me know if you have any favourite family recipes, or other versions you love and I’ll try those too. 8-10 starter portions 30 minutes preparation
Boil the potatoes with their skins on, leave to cool and then peel and dice quite small. This avoids you cooking small peeled cubes of potato which tend to dissolve into mush. However, best to cook the carrots when already diced up, as they don’t peel well once cooked. Grill the peppers until blackened on all sides, then put them in a glass bowl with a plate on top to steam while they are hot, wait until they are slightly cooled and the skin will come off easily. Remove the seeds, stalks and membranes. Cut the flesh into long thin strips with scissors. Cook the peas. If frozen just pour boiling water over them, leave 2 minutes and drain, which keeps them nice and crunchy. If fresh, boil for 2-3 minutes. Drain under cold water. When all the vegetables are cool, add the potato cubes, carrots, peas and chopped gherkins to a bowl. Chop the fresh parsley and add in, and chop half the red pepper and add in. Break up the tuna, add it to the bowl along with the mayonnaise. Mix well, taste and adjust the seasoning. You might need a little salt, maybe a squeeze of lemon juice and a grinding of black pepper. Chill the mixture in the fridge before serving. You can make a nice shape by spooning the ensaladilla into a ramekin and turning out onto a plate; decorate with a couple of the reserved strips of red pepper and a leaf of parsley. 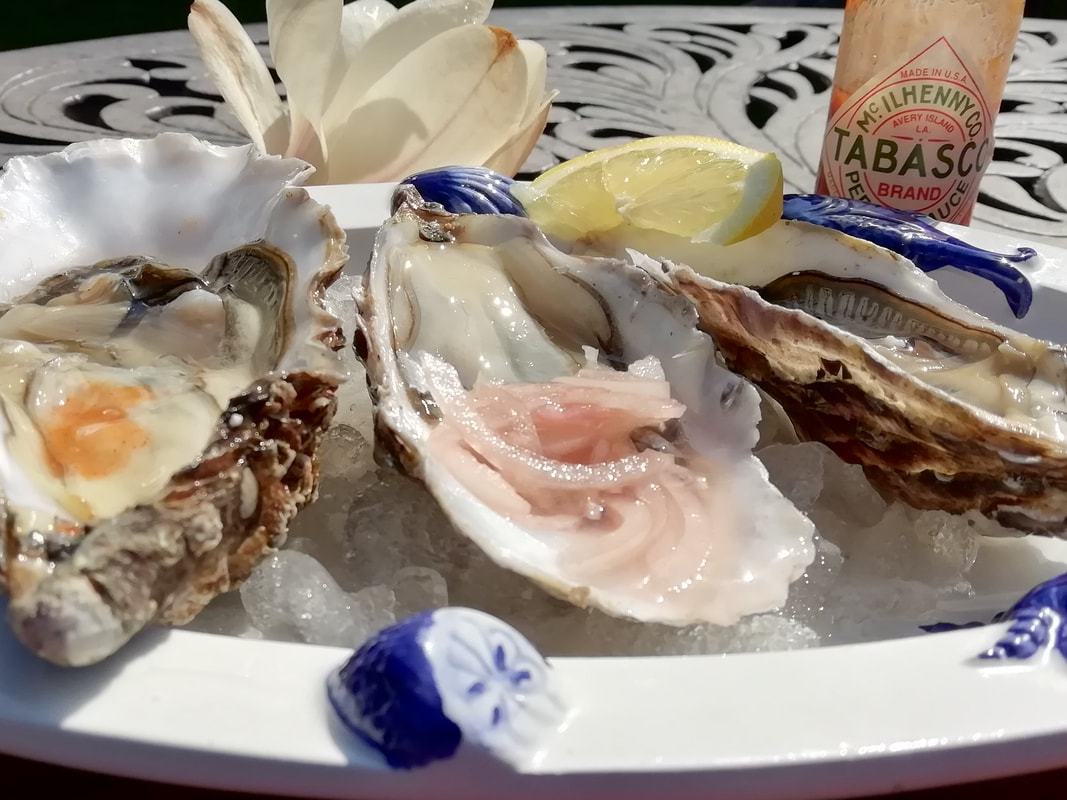 British Oysters, sustainable and delicious Fresh Oysters on their shells, as simple as could be
Yes I know. Not everyone likes them or can be persuaded to try them. But think, what a memorable party it’s going to be! Check with your guests first (they’re quite expensive at £1-£2 per oyster) and throw a packet of crisps at the ones who just won’t try delicious, sustainable, chic, British seafood. There are people who are allergic as well, and we can’t blame them for that. Crisps for them too. You’re lucky if you live near a fishmonger who sells them on ice, maybe tell them of your plans and order in advance. You can also get them online, fresh from Cornwall or Essex. Native oysters and farmed ones spawn at different times, so you can get them most of the year. Serves 6 (three each) Timings: about an hour, but it's all prep, no cooking involved
Slice the shallots and start them pickling. Get some wide flat bowls ready. Open the oysters. You need a firm flat blade, like the widest flat screwdriver you can find, or a short heavy bladed knife. Wrap one hand in a teatowel and hold the oyster – this gives you a better grip and protects your hand from inadvertent stabs. With your knife hand, gently get the tip under the top shell of the oyster near the hinge – you can generally see where the top shell sits inside the lower shell, and twist slightly, moving the knife from side to side and then round the whole shell. You will need to cut the attachment on the top shell. Leave the oyster in its juices on ice and move on to the next. You will get quicker as you go along. Once you’ve taken the top shells off all of them, go back and loosen the oysters from their bottom shells. To Serve: Arrange three oysters per plate on ice. Add a slice of lemon to the side of the plate, a spoonful of shallots in vinegar to one oyster, a shake of Tabasco to another, and serve. Your guests just slide them down their throats. Or you can just make up a big iced platter of oysters and let everyone add their own flavours. Don't forget to keep the shells as garden decorations, they make a great addition to a flower bed and the birds love to turn them over to reveal whatever's taken shelter underneath. 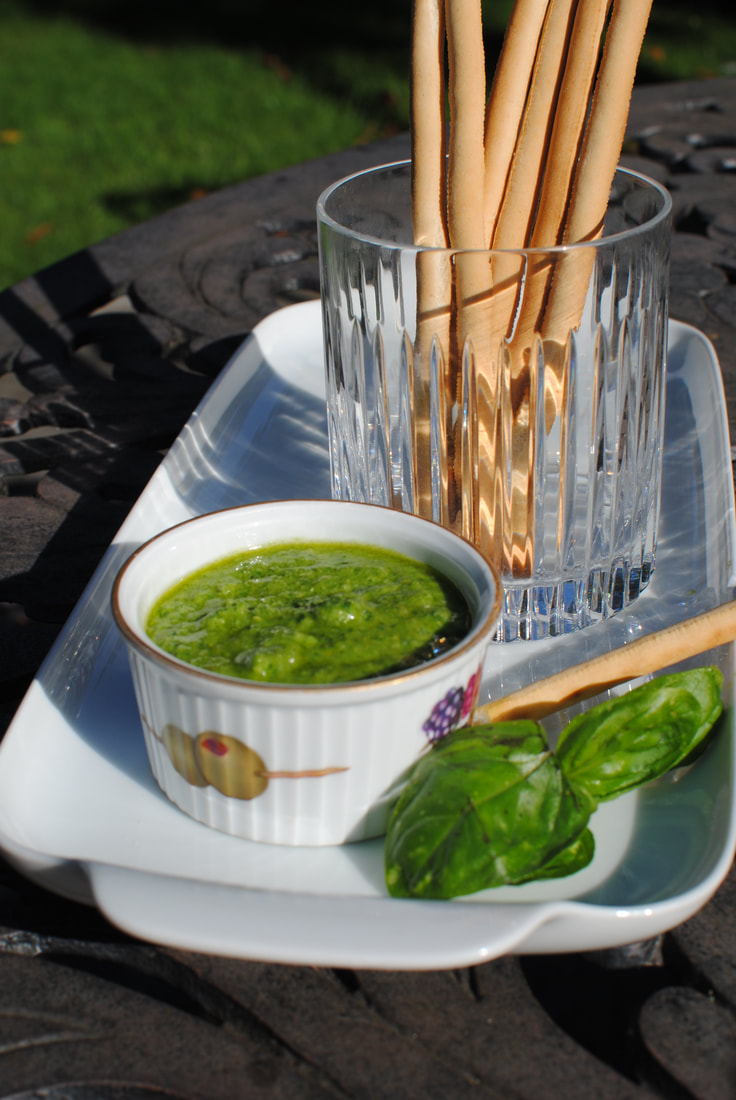 Green and gorgeous! Fresh basil pesto. Fresh Basil Pesto – Pesto Genoese (vegetarian and vegan options)
Fresh basil: aniseedy, aromatic, tempting and prolific. If you can find the right spot for it, in a warm corner of the garden away from slugs, it grows perfectly in a pot. All you have to do is buy one of those supermarket pots of forced basil, for which I always feel very sorry, and take each little plantlet out, carefully separating them each from their too-close mates, and plant them in your pot in rich compost. Basil likes sun, warmth, lots of food and water, and it will reward you with the most amazing vibrant harvest. Keep taking the tops off the plants to avoid them going to seed and you will get beautiful big juicy leaves all the way into September. Even if you don’t grow it yourself, you can often get big bags of leafy basil from grocers which are very good value. Home made pesto is by far and away better and different from the shop-supplied stuff. Bought pesto is perfectly good but try making your own and you won’t look back. You can adjust the garlic and lemon to your exact taste too, but there’s something about the freshness of the basil coming through. It’s quick to make and keeps in the fridge for weeks so you can keep a fresh pot going from July onwards and have enough to give away too. Vegetarian parmesan is available which seems to taste fine, so that’s a good alternative if you prefer to avoid parmesan. For a vegan version you can leave out the cheese altogether and add a teaspoon of nutritional yeast for the umami feel. Pesto is so versatile; it deserves a superlative. Here are just a few uses for it
Pine nuts are not cheap but they are worth it. You don’t need a lot, and if you buy a pack you can always use up the rest on a salad for lunch, they are wonderful lightly fried and salted. Makes 2 small jars or one marmite jar, enough for about 8 portions of pasta or to marinade 8 chicken breasts Timings: 20 minutes
Put everything together in a large straight container and process with a stick blender until smooth and creamy. Add a little more salt and lemon juice to taste, and a grind of black pepper if you like. Test the texture, the end of season basil has more structure than the early leaves so you might need a bit more olive oil and lemon juice in your last batches of the year. Spoon into your clean small jars and then dribble a layer of olive oil on top, which helps keep it fresh. Keeps in the fridge for at least 2 weeks, if you replace the olive oil when you take a spoonful out. 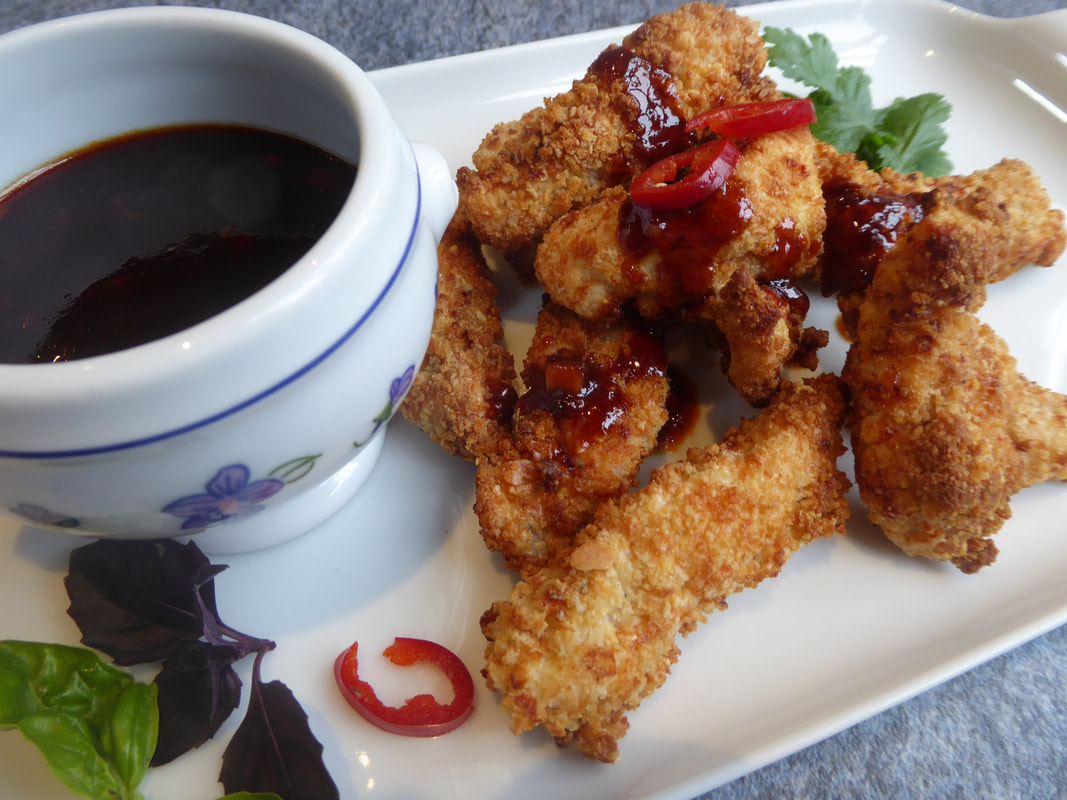 Breadcrumbed strips of chicken, served with warm spicy rich Gochujang dipping sauce Chicken Scrunchers with Gochujang Dipping Sauce
A family favourite, deservedly so. Easy to do either in a frying pan or in the air fryer if you have one. I have recently acquired one and I love it for the substitution of deep frying with healthier lighter air frying. You can whip this up for an easy kids’ lunch in 20 minutes. I have written previously about my son’s fondness for Korean spicy flavours and his Mother’s Day gift of a tub of gochujang paste. We’ve used the spicy salty paste a lot and it’s still in the fridge and going strong. A little goes a long way. You can tone down the spices as suits your own family’s taste but this combination of sweet, salt and spice is a winner. I think we based the sauce recipe on Joshua Weissman’s (joshuaweissman.com) sauce for wings, but you can use it on any crunchy finger-type food. Serve with a platter of vegetable batons alongside the chicken for extra dipping and you have a great healthy meal. Serves 4 for a light meal Timings: 30 minutes
Gochujang sauce:
Vegetables for dipping: red or yellow pepper, carrots, celery etc. Whatever’s fresh and to your taste. Dip the chicken strips into the beaten egg and then into the breadcrumbs to coat and leave them on a baking tray in the fridge to set the coating. In a small saucepan, warm the oils together and briefly fry half the garlic and all the ginger until sizzling, but don’t brown them. Add in the soy, vinegar, rice wine, sugar and gochujang paste. Stir and simmer to blend. In a cup, mix the cornflour with 2 tablespoons water, then dip up a spoonful of the simmering sauce, mix into the cup, then tip the whole cupful back into the saucepan. Stir and bring to a simmer as it thickens. Let it cool a bit but keep warm. Fry the chicken pieces either in a frying pan with a small amount of oil or in the air fryer until cooked through and the coating is browned and crisp. Prepare the vegetable batons. Serve the chicken, vegetables, and the sauce together and allow everyone to dip to their heart’s content.  Ready Made Puff Pastry rounds baked with cheddar cheese and cayenne pepper - the definition of more-ish! Puff Pastry Cheesy Bites
So extremely more-ish you probably have to make two batches. And if you’re serving them as a starter then don’t blame your guests for not having much appetite for the main course. You can use puff pastry to wrap up all sorts of things: anchovies with parmesan, parma ham, plain ham with mustard, whatever. I find that this combination of salty tangy cheese and the spice hit of cayenne pepper is the best but do try whatever suits your own tastes. The cheese melts out in a delicious crispy way and the cayenne just perks your appetite for another bite. They’d also be good for a quick school holiday lunch, served with a green salad and a chopped tomato salsa. Makes 26 rounds Timings: 40 minutes
Pre heat your oven to 190°C fan or 200°C circulation. Have ready three flat oven trays lined with greaseproof paper. Unroll the pastry on its own paper wrapping. Sprinkle the cheese evenly all over the surface and sprinkle the cayenne pepper on top. Roll the pastry up again and cut it into rounds about ½ cm thick. Place the slices on the trays, leaving enough space to expand – you can get about 8 on a tray. Place in the oven for about 20 minutes until the cheese has melted and the pastry is puffed and golden. Slide them onto a wire rack to cool a bit and sprinkle with sea salt crystals. Eat them while still warm. 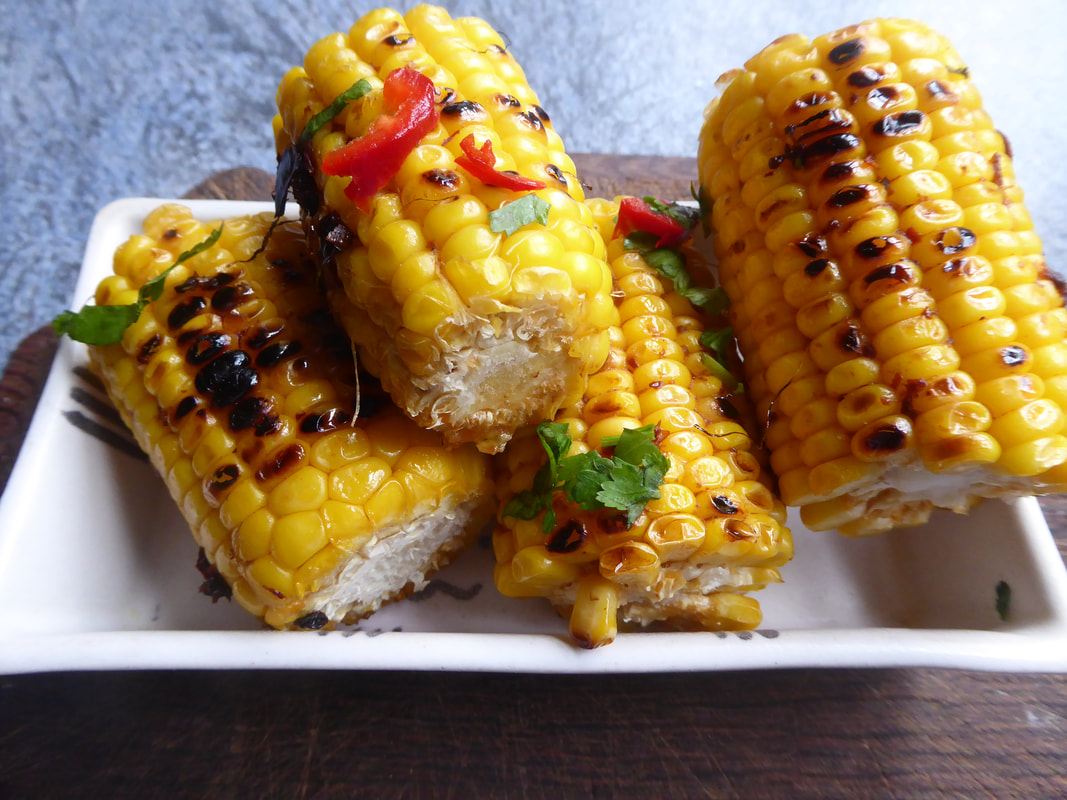 Smoky chipotle spiced butter smothers griddled sweet corn - a lovely lunch Chipotle Griddled Corn on the Cob
A juicy spicy accompaniment to a main meal or a lunch time snack in themselves. Kids tend to love this, as with all meals they can eat with their fingers while running round the garden but who can resist getting stuck into a corn cob, getting the bits between your teeth and the butter down your chin? At this time of year you can buy them fresh from the greengrocer, or ready peeled in the supermarket. As with all vegetables, the fresher the better, so if you can get some at your local farmers market or from a farm shop where they grow and pick them, you’ll taste the difference. Amp it up a bit by using a chipotle spicy butter and griddling the cobs to complete the cooking with a delicious charred overtone. You can do these on the barbeque or use a griddle pan with ridges. I’ve not tried them under a normal oven grill and I’m not sure that would work very well as I think you need the contact with the hot grid to get the charred effect. You can use any spice you like in your butter but chipotles have an affinity with the corn – maybe because they’re from the same part of the world originally or just because the smoky spice of the chipotles sets off the sweet corn so well. Serves 4 Timings: 40 minutes
Bring a large pan of water (not salted as that hardens the corn) to the boil and add a teaspoon of sugar. Drop the corn cobs into the pan and simmer for 5-10 minutes depending on how fresh they are. Pre heat your oven to 180°C, and get some kitchen foil ready. While the corn is boiling, blend the butter with the chipotle, sauce and lime juice. A stick blender does this very well. Taste and add pepper and salt if needed. Drain the cobs, run cold water on them and leave them to cool down a bit. Heat up your griddle pan or fire up the barbeque. Rub just a little butter on the cobs and grill them for a few minutes, turning so that the hot grill comes in contact with all sides of the cobs and chars them in attractive stripes. If the barbeque is really hot, this won’t take more than a couple of minutes per side so you have to keep your attention on the grill and keep turning the cobs. When you’ve got the charred stripes, place each piece of corn in a wrap of kitchen foil with a teaspoon of butter on the top of the corn. Wrap up the foil and put the plate of wrapped cobs into the oven for 20 minutes. The corn finishes cooking in the spicy butter and ends up tender, smoky and sweet. Let them cool a little before serving. You’ll need napkins to mop the butter off your chin! 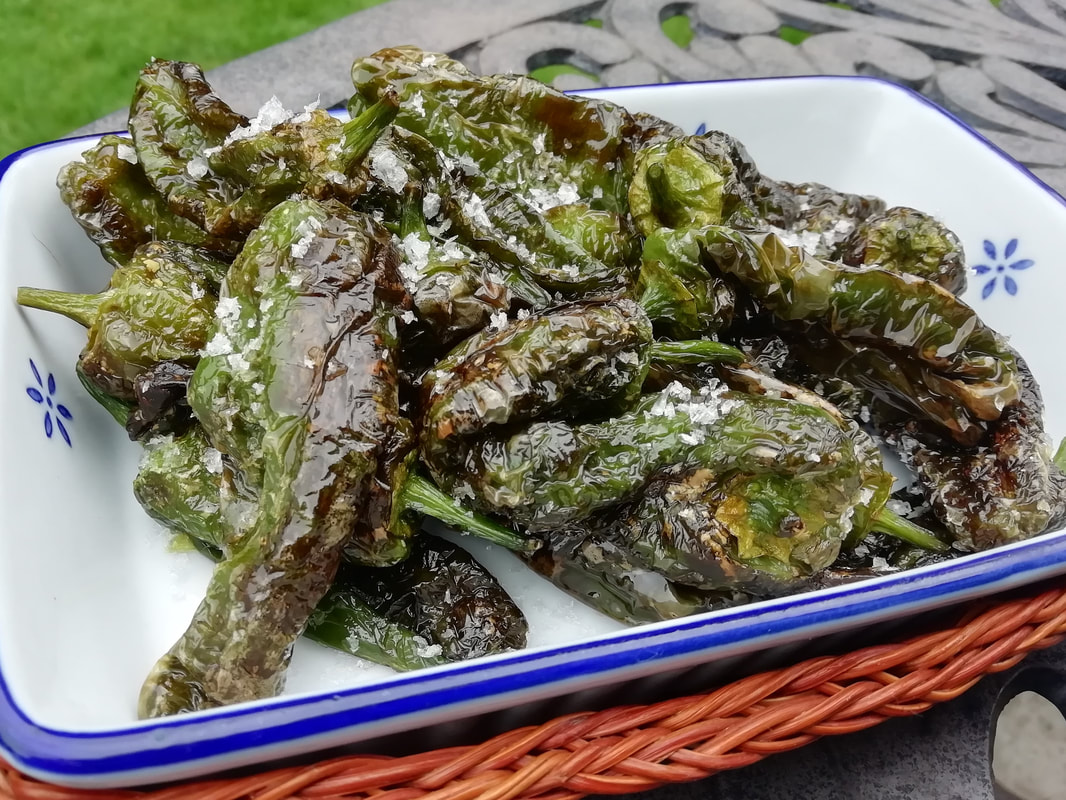 Salty, juicy, padron peppers. Party finger food with a difference - one in ten has a spicy kick..but which one? Padron Peppers
An indispensable part of any tapas selection, and a joyous addition to any party spread, sharing table or al fresco meal. We all love finger food, especially outside with our friends and family, and anything that makes life easier for the cook is a winner with me. The fun thing about these peppers is that although they are mainly mild tasting, one in 10 has a spicy kick to it, and you can’t tell which ones by looking. So you’re adding a little risky gamble to your snacking, which gives you a very pleasant frisson of anticipation. The variety of peppers is so special that it has been awarded a PDO protected status by the EU. I like the feeling of almost eating a national monument – similar to the UK’s Stilton cheese or Italy’s Prosciutto Toscano ham. Serve as part of a sharing table, or as a starter with a glass of Spanish red wine. You could pack them into a sealed container and take them along as a different vegetable for a picnic or put them in a lunchbox for your child to show off at school. Serves 4 as part of a mixed starter Timings: 15 minutes
Make sure the peppers are dry or they’ll spit as they hit the hot oil. Heat the oil in a heavy based frying pan – you are not deep frying but you need more than a slick of oil. Place the peppers in the hot oil and turn them as the skins puff and char. Fry for a few minutes, making sure all sides are cooked. Turn them onto a plate and sprinkle generously with the flaky sea salt. Serve warm or room temperature, and you will need a napkin to wipe your oily hands. 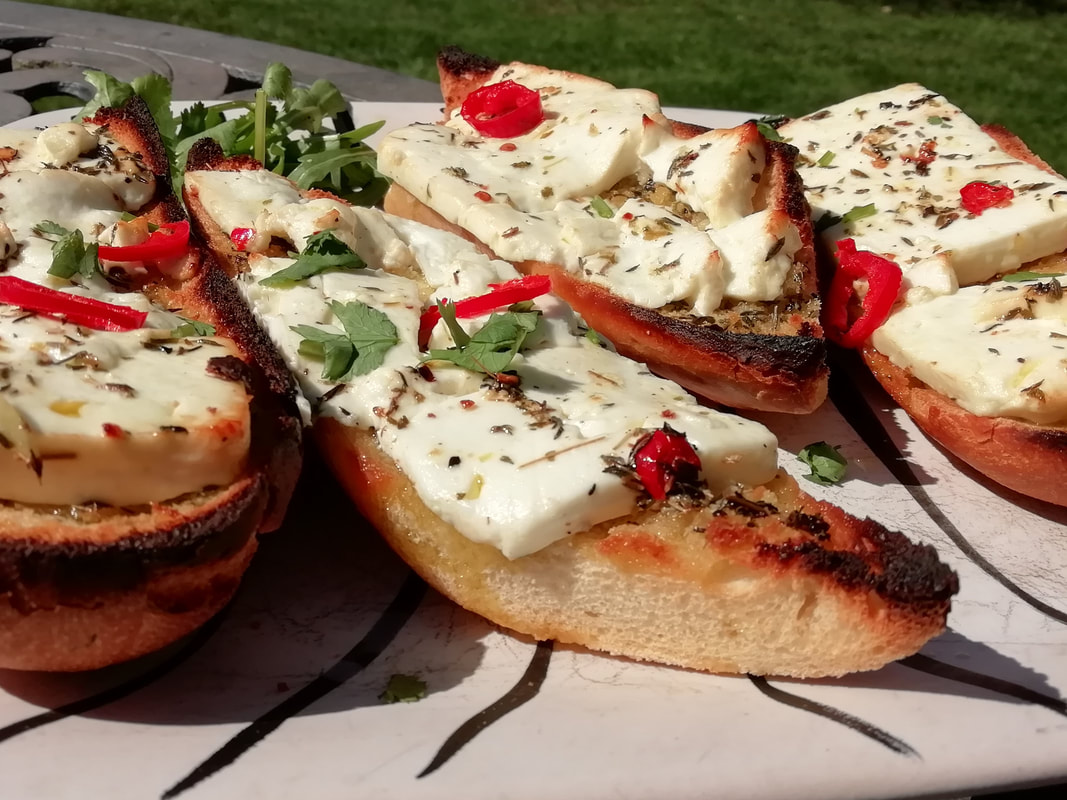 Crisp baguette topped with marinated feta cheese, grilled to melting perfection Grilled Feta Baguettes (vegetarian)
In Cologne Christmas market the spicy, salty smell of the Sheep’s Cheese Baguettes demands your attention. The cheese is marinated in barrels of olive oil with whole cloves of garlic, chillies, herbs and other spices. The vendor hauls dripping chunks out of the barrel, scrapes off the crust of herbs and flaked chillies, smacks it expertly into white shards and throws them on to halved baguettes, which are then flashed under a hot grill until seared and starting to brown. You eagerly, biting through the crust to find the melting garlicky cheese, oozing gently into bread. These slices of goodness are just as at home at a summer garden party and are easy to prepare and serve. They're from my Summer of Six set of recipes, designed for small group outdoor parties, appropriate for this summer and autumn gatherings. Have a look at the pages (link above) for lots of ideas to make your entertaining easy and tasty. They'd be good for a school holiday lunch too. Serves 6 Timings: marinate the feta for at least 2 days; can be much longer. Final preparation, 20 minutes.
Several days before eating, marinate your cheese. Mix the oils with the chilli, garlic, bay, and dried herbs and spices in a leak proof fridge container. Take the cheese out of its packet and cut in half across and then cut each piece across its equator, to make thinner pieces. Put these into the container and turn to cover with oil. Put all the cheese into the container, fix the lid, turn it back and forth a couple of times to distribute the oil and then leave in the fridge for a few days. Turn it again a few times a day, whenever you’ve got the fridge open. Pre-heat your grill to a high setting. Cut the baguette into 3 slices and then halve each piece, so you have 6 long half-pieces. Grill these lightly – 2-3 minutes max - just to toast the top surface. Drizzle some of the oil from the container over the toasts, especially at the edges, and then cover the slices with the cheese pieces. Drizzle a bit more oil over, adding any pieces of marinated chilli you find. Grill for a few minutes until the cheese just starts to brown - it won’t melt like cheddar. To Serve: eat hot, with maybe a few rocket leaves scattered artistically on the cheese, or some chopped chillies and coriander. |
Some Changes - April 2022
Thanks to my friends and followers for your patience, and for your encouragement to start blogging again. Archives
April 2022
Categories
All
|
 RSS Feed
