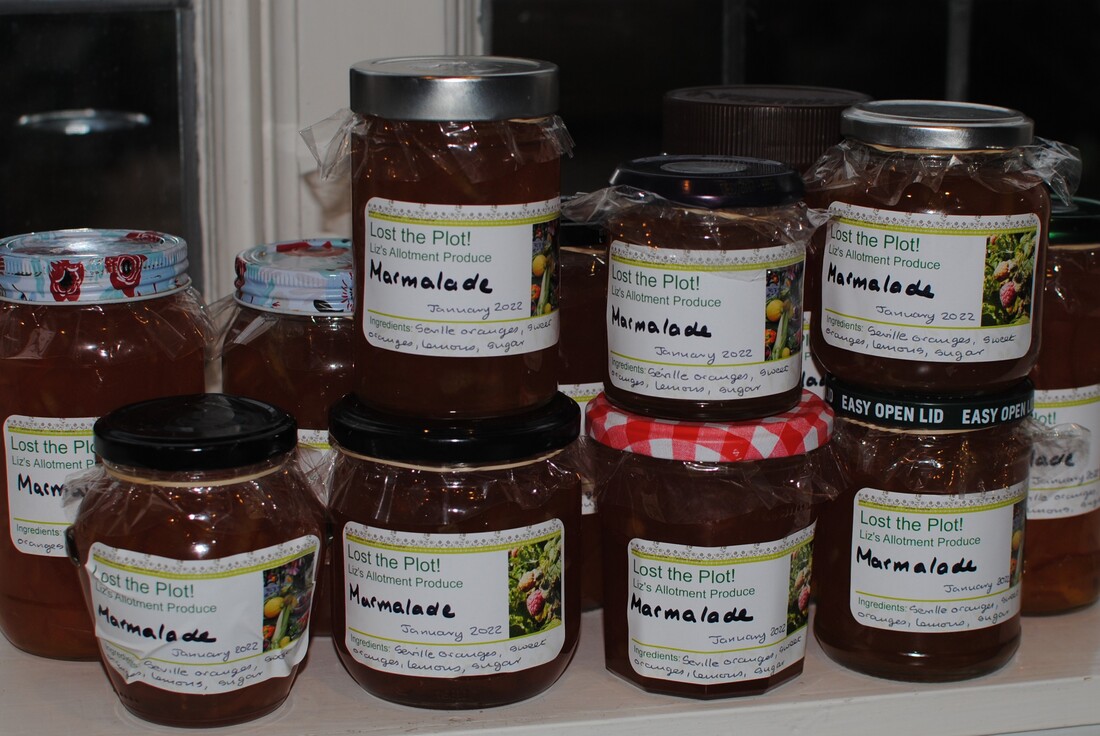
 This year's production of marmalade Marmalade
This turned out to be Marmalade Weekend. It's a two day job so when I was working I always dedicated a January weekend to the task and I still stick to that tradition. The scent of marmalade cooking takes me back to my childhood - my (Scots) Mum made industrial quantities and the sweet smell of bubbling oranges used to greet us when we came home from school. In my post from 14th January last year - have a look in the archive if you are interested - I give the full recipe and method inherited from her, so please let me know if you ever make it. I was proud to be awarded a Bronze level certificate in the Dalemain World's Original Home Made Marmalade competition in 2021 and will be sending off my jar for this year's judging too. I was marked down last year for "not filling the jar properly" (I'd hastily re-jarred a set into a smaller jar as there is a size limit to the entry, and obviously had not filled it to the brim) so I might hope to correct that fault this year. Wish me luck!
1 Comment
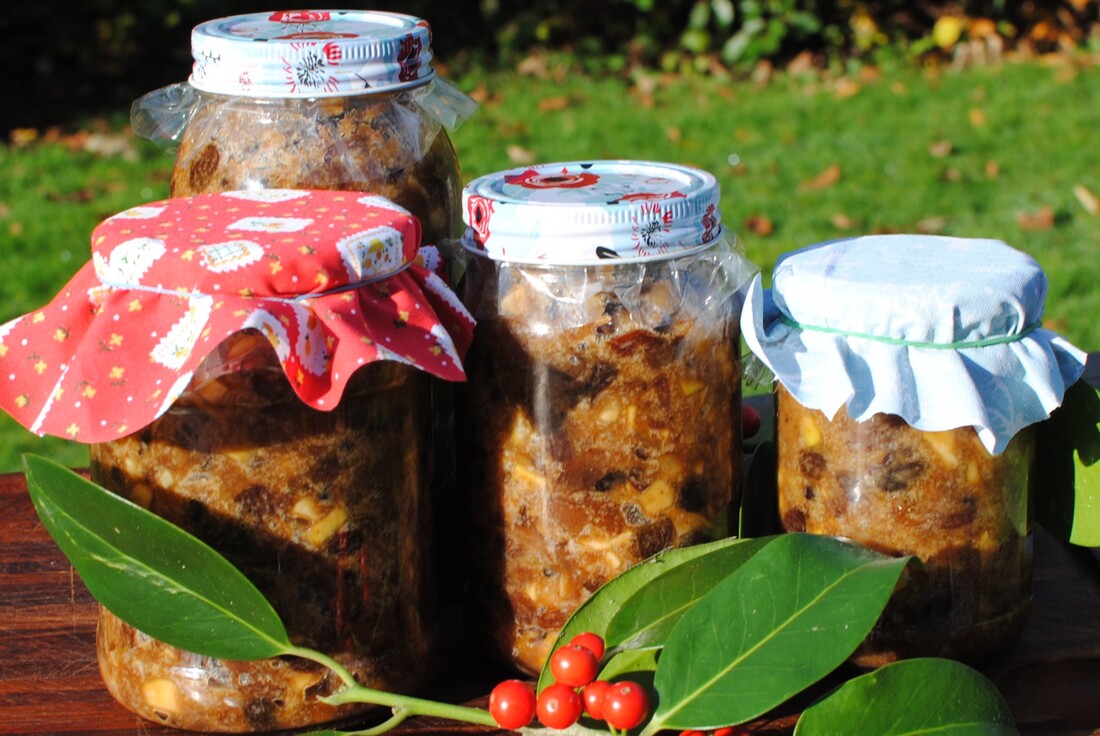 It just says Christmas, doesn't it? Raisins, apples, brandy, spices. All ready for those Mince Pies. Mincemeat You can buy so many versions of mincemeat in jars and most of them are quite good. But once you’ve made your own, you will make it again and again, and then you’ll start giving it to friends as a pre-Christmas present. When you make mince pies with this, people will ask – “are they homemade?” and then they will ask “and did you make the mincemeat too?” if they know what they are tasting. As with all home-made ingredients, one of the best things is to cater exactly to your own tastes. I like the subtle crunch of nuts in mincemeat, so I have more in my recipe than some others, and I also like the fruity appley taste. Too much fresh fruit means it doesn’t keep so well, but I prefer to use my fresh mincemeat up every year and not give it space in the pantry till next Christmas, so I don’t mind if my mincemeat doesn’t keep more than six months. This is loosely based on Delia Smith’s Christmas recipe. I look forward to taking her book from the shelf every year and delving into it. Her tip is that melting the suet through the fruit adds to the keeping quality and is better than just adding it dry to the mixture as you will find in bought jars and some recipes. The melted fat looks quite a lot when you take the dish out of the oven but it coats all the fruit and disappears as the mixture cools. I always use the vegetarian suet you can get at the supermarket. Make your own, try variations of ingredients and flavours, and you’ll end up with something unique to you. You might prefer whisky instead of brandy? You might like more orange flavour or want to add some spoonfuls of marmalade – give it a go! Leave out the peel if you don’t like it and use dried cranberries. Really go wild and add some preserved pineapple and slosh in some rum. Makes about 2kg, 4 medium jars Timings: 1 hour on the first day, overnight soaking then 3 hours slow cook
Chop the apples into small dice and add to a large bowl with all the other ingredients except the brandy. Stir well and leave covered in a cool place overnight for the flavours to mingle and the fruits to absorb the juices. Next day, pre-heat the oven to 120°C and cook the bowl - covered with foil – for about 3 hours until all the suet is melted. Bring it out and let it cool in the kitchen, while you stir it from time to time to keep the fat mixed in. Add the brandy when the mixture is cold. Store in clean jars, tightly sealed. It does keep for a year or more depending on the mixture, but you can surely use it up over this Christmas? Make an extra batch of mince pies and take them round to an elderly neighbour? 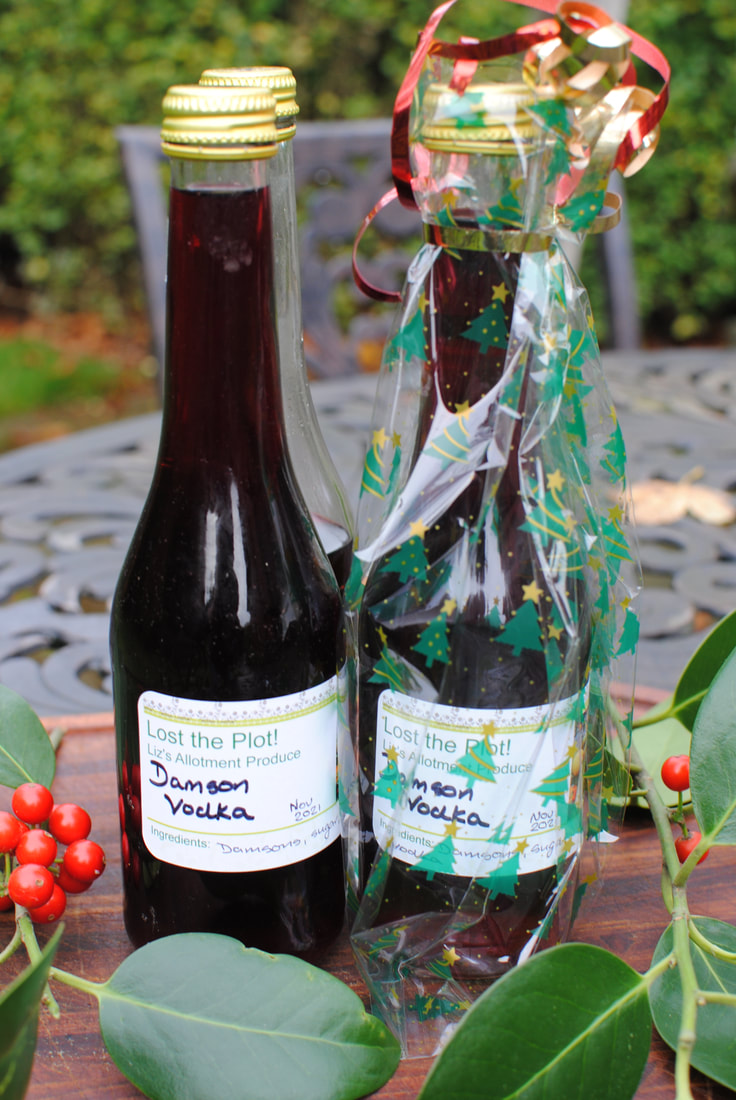 Might it be beginning to feel a bit like Christmas? Time to strain the Damson Vodka. Damson Vodka
Something this easy doesn’t really deserve the name of a recipe, it’s more of a doze while the alcohol and natural fruit does the work for you. But it ends up as something delicious for which you will gain praise, deservedly, because it also needs patience; a virtue in rather short supply. You can make a flavoured vodka out of pretty much any fruit, but the stronger tastes and firmer fruits work best, and can be played with, as they can take extra notes such as cinnamon if you desire. Damson trees have a habit of over producing in some years and making a sweet spirit can be a great way of dealing with the excess, while you use up the very best fruit in crumbles, pies, jams and other preserves. Because damsons have a thick skin and are small, so have little fruit compared to the big fat plums, they do need a good two months marinating with the vodka to get the flavour out. You can assist the flavour migration by spearing the damsons as you throw them into the bottle or by freezing them beforehand which splits the skins and allows the alcohol to penetrate. I never have enough room in my freezer for random bags of fruit, so I just pinch the fruit a bit as I clean it and leave it two months in the vodka. It seems to do the trick. As I said, more of a doze than a recipe. Play with the flavours if you like – add a stick of cinnamon or a couple of star anise to the mixture if you feel you would like a Christmas tinge to your vodka. Having tried one or two variations, I prefer the plainer fruiter version but that’s just me. Makes nearly 3 x 300ml bottles 20 minutes preparation, 2 months in the dark
Place the clean damsons in a container you can seal up – an old coffee jar or kilner jar is ideal. You’ll need 2 x large coffee jars for this quantity. As you put them in, prick them with a skewer or pinch them with your fingernails just to split the skin a little bit. Add the sugar. Pour the vodka over. Seal up your jars and leave them in a cool dark place. For the first 2 weeks try to shake them every day to distribute the sugar and keep the alcohol moving into the fruit. After that, shake them every week or so. You will notice it takes about a month for the sugar to disappear. The vodka will start off clear and gradually take a ruby tinge. It will also evaporate a little if your jars are not quite tight, doesn’t matter. But alcohol does tend to creep a bit so put the jars on a piece of kitchen paper to mop up any sticky spills. After about 2 months, you can strain off the vodka and bottle it. If you bashed your damsons or froze them, you might have to strain the liquid through a muslin cloth to get the fine bits out if you want a crystal clear final result. I just sieved through a normal kitchen sieve because my damsons were still quite intact. The fruit can be de-stoned and eaten over ice-cream, added to a crumble or used in boozy chocolates – recipe for that one to come nearer to Christmas. You are supposed to leave the Damson Vodka for a year to mature. I have never had the willpower to do this so I cannot vouch for how much better it tastes after a year. I really can’t imagine it can be much better than it already is. I stand ready to be corrected however, so all you experienced fruit vodka makers out there can put me right. The Damson Vodka can be drunk by itself over ice as a seasonal aperitif, mixed with prosecco, used in all sort of cocktails, or as a post prandial tipple on its own. Bottoms up! 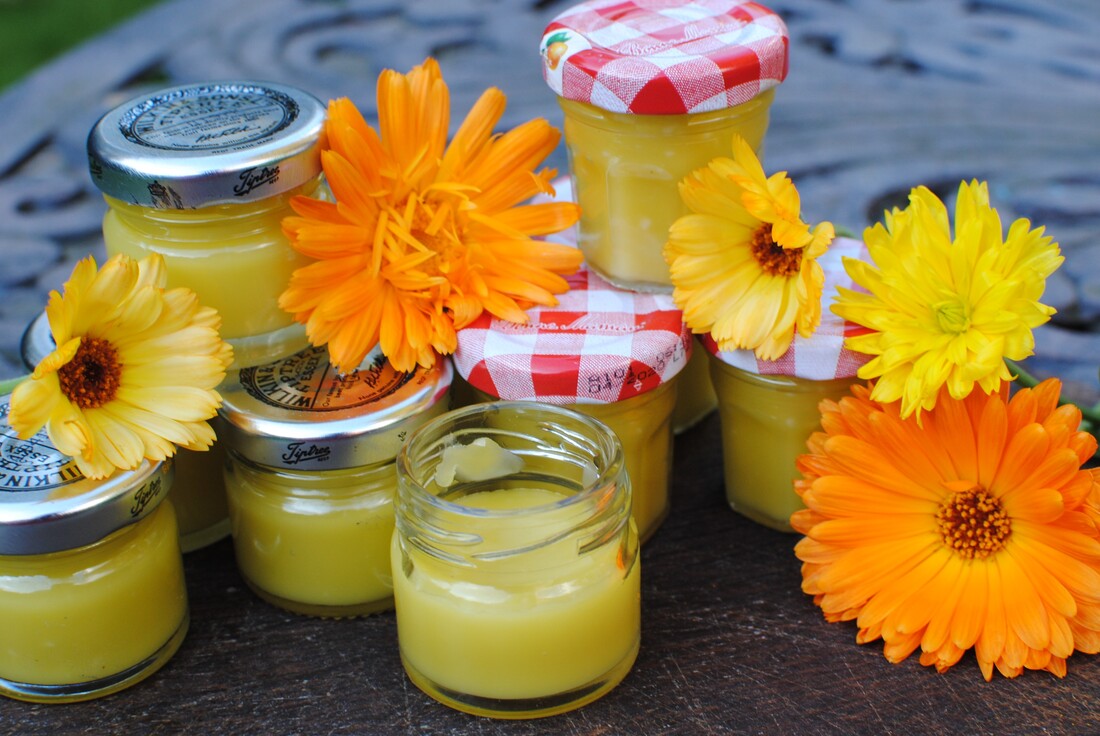 Use flowers from your garden, olive oil and beeswax to make your own pots of soothing skin balm Calendula Hand Balm
No, not a recipe as such, for putting on the table and eating, but still a sort of recipe. Using flowers from the garden, especially ones as exuberant as marigolds/calendulas always seems like a great idea. Calendula allegedly has healing powers, especially for skin problems. I can’t claim miracle cures or anything like that, but this balm feels nice, contains only natural ingredients and keeps your hands nice and soft. I can’t give exact quantities here, weights of flowers don’t really add up. I picked yellow and orange marigold flowers over several weeks and kept stuffing them into two medium sized jars which I filled with lower quality olive oil. I left them in a warm corner of the kitchen and just added more flowers as I picked them. At first, I just picked off the petals and discarded the rest of the flower, but further research told me that the main healing chemicals are found in the flower head where the petals attach, so I then started just throwing the whole flower heads into the jar. You need to bash the flowers down with a wooden spoon to keep them under the oil or they will start to go off. You end up with a bright orange jar of flowers, under the cool amber of olive oil, so they look quite nice. You combine the oil with a solid fat to set it. You can use just beeswax granules or you can add additional fats such as shea butter or cocoa butter – I used organic cocoa butter. You can also add a drop or two of essential oil if you would like more fragrance. Once you think they’ve had long enough to infuse – I left mine about 2 weeks – then strain the mixture. I used an old teatowel in a sieve to let the golden oil run into a bowl. Discard the old petals. Measure your oil. The general rule is to add about 4-7 parts oil to 1-3 parts of beeswax/other solid fat. The quantities depend on how firm you want your balm. I used about 6 parts oil, 1 part cocoa butter and 2 parts beeswax granules. That gave me a firm but very spreadable waxy balm which is solid at room temperature even in warm weather. I might make it a bit firmer if I do it again, I would say these quantities are slightly too oily for using on your lips, for instance, but it rubs nicely into your hands. Melt the beeswax and any other fat together in bowl over hot water, not direct heat. Add the marigold oil a little at a time and keep stirring until all is absorbed. Pour the mixture into clean pots and leave the lids off until the contents have cooled down – you don’t want condensation forming on the inside of the lids and dropping onto the balm. Seal up the pots and keep in a cool dark place until use. They make perfect Christmas presents and will bring a little summer sunshine onto your winter skin. My recipe was: About 6 handfuls of calendula flowers, picked over about 2 weeks, when dry. Steeped in olive oil in glass jars for about 2 weeks. Then sieved out leaving about 200ml infused oil. I melted 7 tablespoons of beeswax granules (they are very light) with 1 tablespoon of shea butter and mixed in the oil gradually. That gave me about 12 little pots of balm. As you can see, I used the little jam pots that you get at some hotels. Sadly, I can’t resist taking, cleaning and saving them, and I’m very pleased to have found a use. 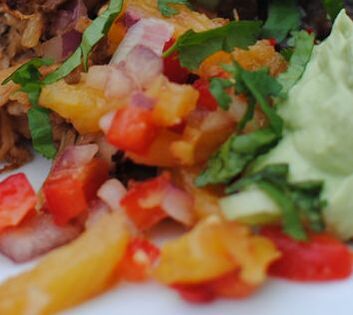 Juicy pineapple, griddled and scorched, combined with spices for that extra flavoured mouthful Charred Pineapple and Red Pepper Salsa
This just makes any meat dish sing out loud. The fresh pineapple, crunchy pepper and tangy lime juice combine to refresh your tastebuds and enhance the meal. A spicy meat really benefits from the contrast with the juicy sweet salsa. Griddling or charring the pineapple adds a slightly smoky depth which makes all the difference. Serve as a side dish to Slow Roast Jerk Pork or to any spicy meaty dish. This relish is part of my Caribbean Christmas menu which will be on my website as a full menu from Cocktails to Cake de Ron in a couple of weeks. Serves 8 Timings: 30 minutes
Peel and core your fresh pineapple and cut it into rings. Melt the butter and brush the rings with it. Fire up your griddle pan and place the rings on the griddle for about 3 minutes a side to get those nice charred stripes and the slightly burned taste. If you don’t have a griddle pan, use a frying pan, you will still get the flavour. Let the rings cool and cut them into slivers, place in a bowl. Peel, de-seed and chop the red pepper into small dice, and peel and chop the red onion to the same size pieces and add them to the pineapple. Squash the garlic with salt, de-seed and chop the chilli and add to the bowl. Stir in the honey and the lime juice, sprinkle over a good teaspoon of salt. Stir and taste, depending on how sweet your pineapple was you might need more honey or more lime juice. Stir to combine the flavour and serve at room temperature. 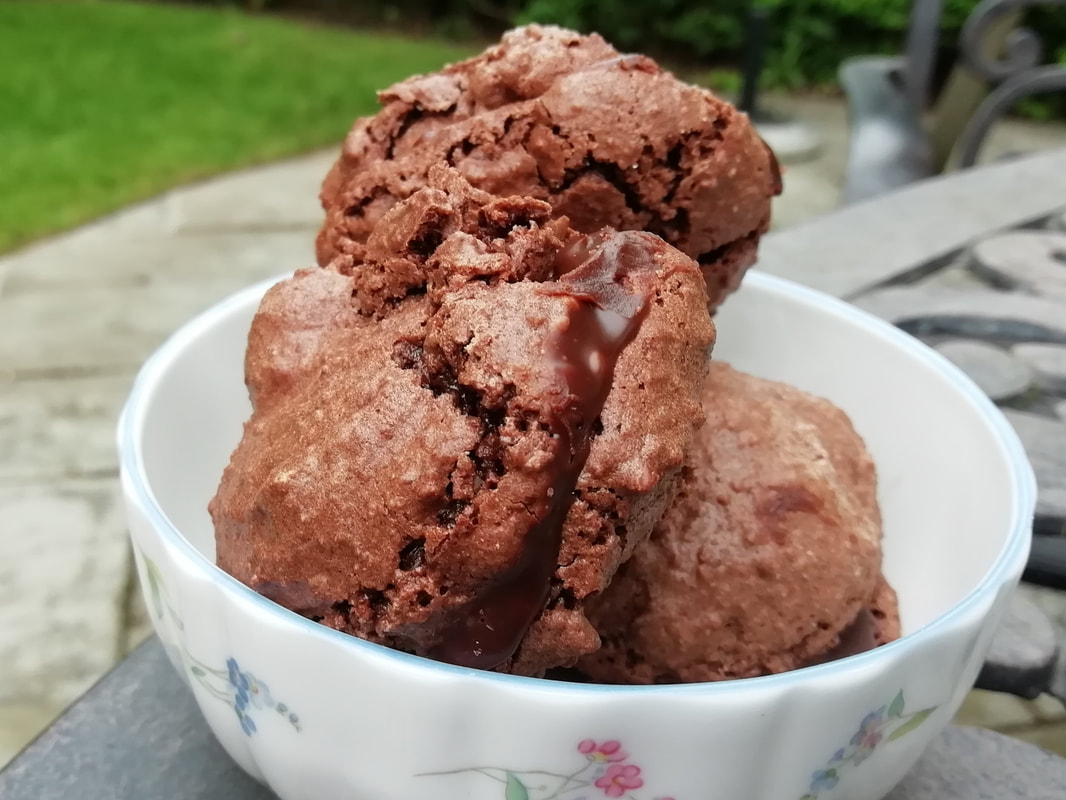 Rustic and delicious, home made chocolate macaroons Rustic Chocolate Macaroons
These are clearly macaroons, the slightly raffish Italian older cousin of the sophisticated French macaron. A confection of whipped egg white with sugar and ground nuts has been around for a long time, and the idea was allegedly brought to France with the entourage and cooks of Catherine de Medici in the mid 1500s. In France they refined and formalised the original recipe to produce the riot of coloured macarons you can buy today: smooth and elegant, with various flavours and strong (mainly artificial) colours. A macaroon/macaron is different from the classic meringue in that you leave it for a while after whipping the egg whites and mixing with the sweet stuff, so that it forms a slight crust on the top surface. The crust bakes to a chewy texture, contrasting with the fluffy softness inside. The usual filling is a rich ganache, which seeps into the inner surface of the macaron, adding another even gooey layer. These taste just as good and have that chewy nutty texture but you don’t have to faff around with a piping bag to get the flying saucer perfection. If you want to make French macarons, I will bring some recipes onto the blog well before Christmas, so you can make them as pretty presents. My friend Freddie Sykes is a great baker and made a batch of these for my recent birthday. He based his recipe on the You-Tuber Adam Ragusea’s version, so thanks to both these young men. Makes 10 Timings: 90 minutes
Beat the egg whites until fluffy, then beat in the granulated sugar until the mixture is glossy and you get floppy peaks. Put in the almond flour, powdered sugar, cocoa powder, and half a pinch of salt. Fold the dry ingredients into the eggs until you get a mousse-like consistency. Cover a sheet pan with parchment paper and spoon the batter on in about 20 dollops. Let them sit and dry for a half hour. Heat the oven to 180°C and bake until the meringues start to crack, about 15 minutes. Cool completely before filling. To make the ganache, combine as little as 2 tbsp of cream with an equal quantity of chocolate by volume. Microwave until just bubbling, let it sit for a minute, then stir until smooth. Cool the ganache down to get it to a spreadable consistency. Spread ganache onto the bottom of a macaron, then sandwich it with one of roughly equal size. 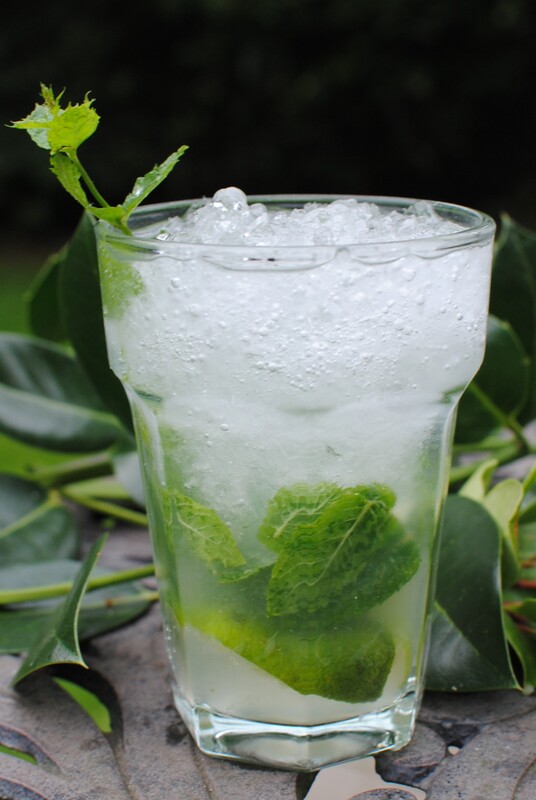 Mint, rum, sugar - the classic Mojito Mojito
Simple and sophisticated all at once. Mint, rum, limes and sugar, that’s all you need. And ice. To serve a crowd, you will need either a bartender working full speed or make up a whole jug of Mojito ahead of time and have someone ready to stir and pour, although the genuine cocktail is made carefully each in its own glass, taking the time to muddle the mint into the syrup. I quite like to set up a cocktail station and hand the task over to a guest who I know can be a bit shy – giving them something to do and keep their hands busy is a great ice-breaker and there’s the bonus of being extremely popular as people taste the cocktail and shower the creator with compliments. You will also need to assign a “runner” to the cocktail station to fetch more mint or crush more ice on command. This recipe is one from my Caribbean Christmas series which will be on the website as a full menu very shortly. Makes one Mojito. (but you'll want more than one...)
Place the rum, syrup, lime and several sprigs of mint in the bottom of quite a large heavy glass and “muddle” them with a proper muddling tool or with the end of a wooden spoon. You should take your time over the muddling; you aren’t smashing or pureeing it. Add crushed ice to the brim of the glass, then top up with sparkling water. Serve with a straw so your guests can choose how to mix up the layers – strong rummy sweet minty liquid at the bottom or lighter icy sparkle at the top. Garnish with another sprig of mint and maybe a jaunty slice of lime. 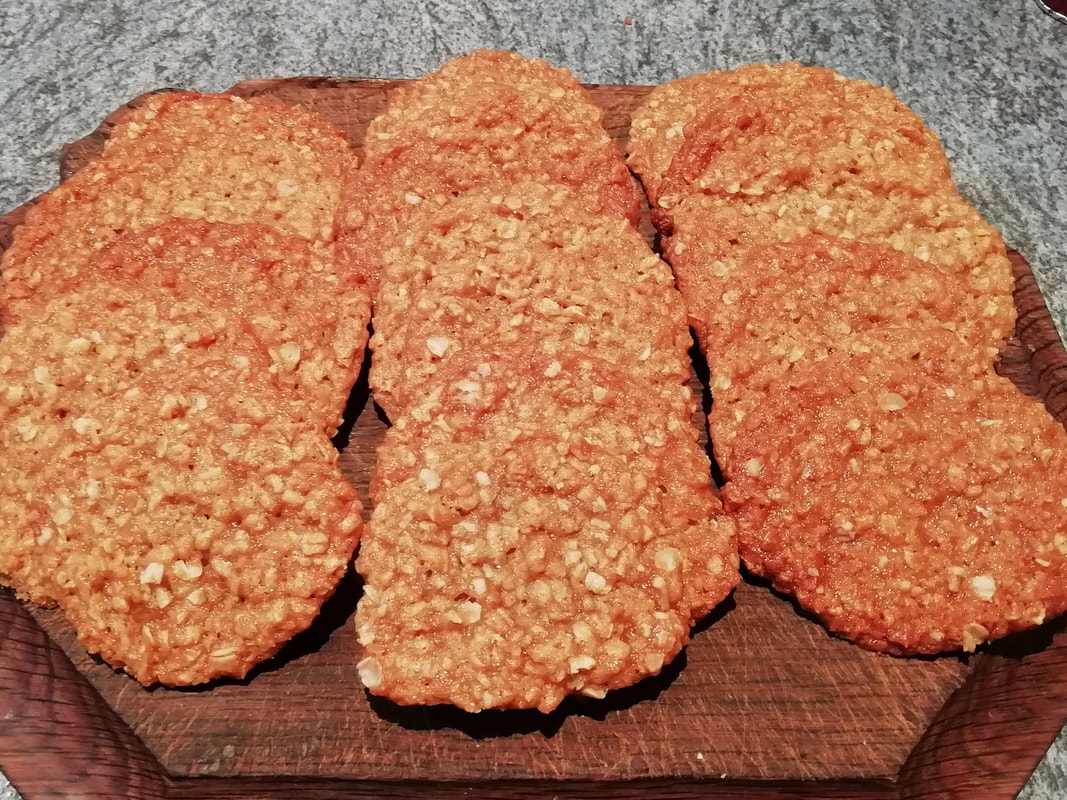 Chewy, oaty, syrupy and delicious. Homemade Anzac Biscuits are perfect for an Autumn picnic. Anzac Biscuits
These are a bit like the Australian version of scones – not that I mean they’re actually like scones to eat, they’re more like thin flapjacks, but I mean that every family has their own recipe, thinks it’s the best, and the taste is evocative of home, family cooking, Saturday afternoon in the garden, packed lunch boxes and good times. They are also a commemoration of resistance in bad times – traditionally these are the biscuits that were made, packed up and sent off by communities to their troops on the front line in Europe in the First World War, far away from home. They’re sugary, chewy, full of calories and they’re a blend of the taste and texture of the North and the South – oats and coconut. Having no egg, they keep well, as they would have to, being sent half-way across the world, and that makes them ideal for all family occasions – picnics, long walks, movie nights on the sofa. They’re also easy to make, which means children can really let their creative instincts run riot. I’ve seen recipes with added dried fruit, or added chocolate chunks – not part of the classic canon but why not? This recipe is based on the one given by Kate Young in the Little Library Cookbook, with some tweaks suggested by other Australian friends. The magic ingredient is of course golden syrup, which has properties that enhance just about any recipe – it provides that chewy sweetness and binds all the more substantial ingredients together. They don’t rise much but they do spread out in the oven, so give them a bit of space. I made them for the Seniors Lunch Club group and we had a discussion on all things Australian – ranging from the animals to the wine, to the geography, to history. Some of our members have relatives who were deported, some have relatives who have emigrated. Many have visited and have happy memories. One of our volunteers is Australian and loves to make these for the group on Australia Day – coming up in January. Makes about 30 medium sized cookies. Timing 40 minutes.
Pre heat your oven to 180°C and line two baking trays with greaseproof paper. Put the butter, sugars and golden syrup into a small pan and melt over a low heat. Sieve the flour into a large bowl and add the oats and coconut. Mix the bicarbonate of soda and water, add to the pan of butter and stir in, then tip the pan of liquid mixture into the bowl of dry ingredients and mix briefly. Put walnut sized spoonfuls of the mixture on the baking trays. I get about 4 in a row along one of the short sides of a tray. Some recipes say flatten the spoonfuls of mixture to get a more biscuit shaped outcome and some don’t, which gives a more domed outcome, but it’s up to you. I get about 12 on a tray. Put the trays in the oven for 8 minutes and then swop over the position on the shelf – it does make quite a different to this mixture where in the oven they are cooked. Cook for another 5-6 minutes and then take them out when they are still soft and golden brown, not deep brown. They are very soft when taken out, so let them harden on the tray for a couple of minutes before sliding the whole sheet of baking paper onto a rack to cool. 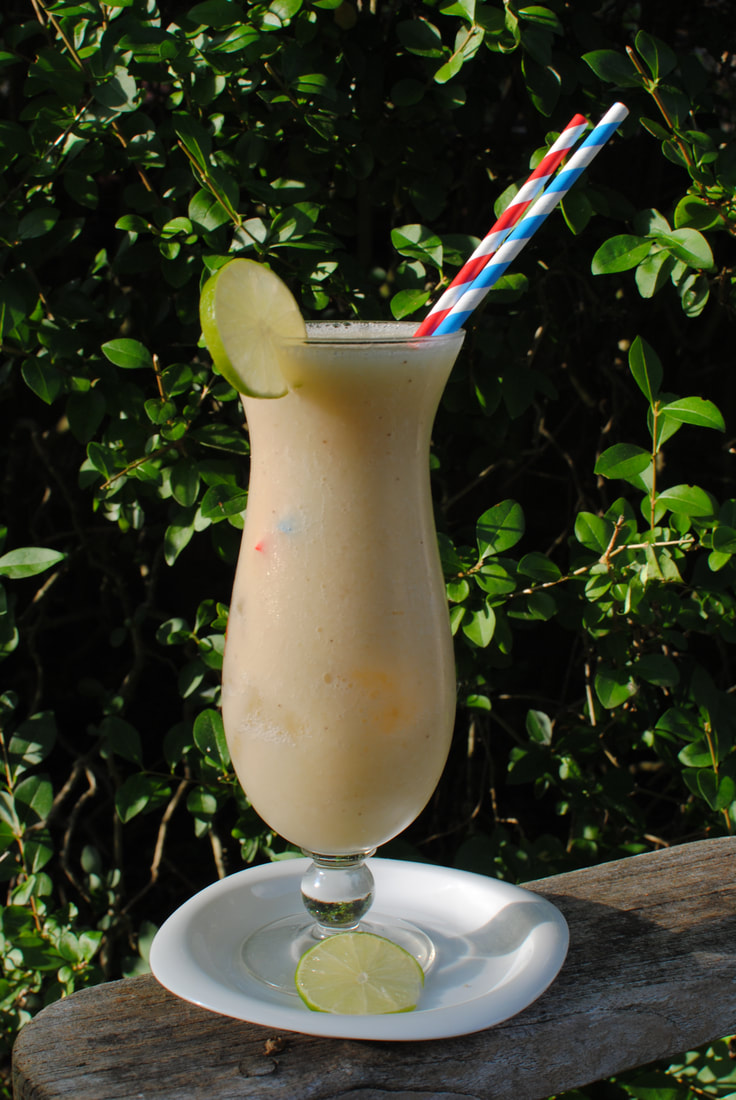 Rich, smooth, fruity, and packs a real punch. Divine. Banana Daiquiri
This recipe is from my Christmas in the Caribbean menu which will be published in full shortly. Have a look at the Cake de Ron from August, and look out for more recipes in the series. Of course, a Banana Daiquiri is appropriate at any time of year, so don't restrict yourself to the colder months. Creamy, delicious and fruity. The original Daiquiri, invented in Cuba in 1900, consisted only of lime juice, rum and sugar combined with shaved or crushed ice. It must have been very like the original Mojito too, but now the two cocktails are delightfully different. Along the way, some genius decided to add fruit to the blended mixture and the Daiquiri we know and love was born. You can use many fruit flavours, but banana was made in heaven to pair with rum and gives such a lovely creamy texture, it has to be the best. You can make up a jug full by multiplying the quantities; stir well on serving to mix up the layers as it might separate if left to stand. Although it seems unlikely that any party with interested guests is going to let this jug of wonder stand for any length of time. It’s a deceptive cocktail. Feeling gentle and fruity, it slips down easily; if you wanted to reduce the alcohol content you could substitute another shot of sugar syrup for the Cointreau. Makes one Daiquiri
Simply blend all the ingredients together until a smooth creamy liquid can be poured out of the blender into your tall frosted glass. 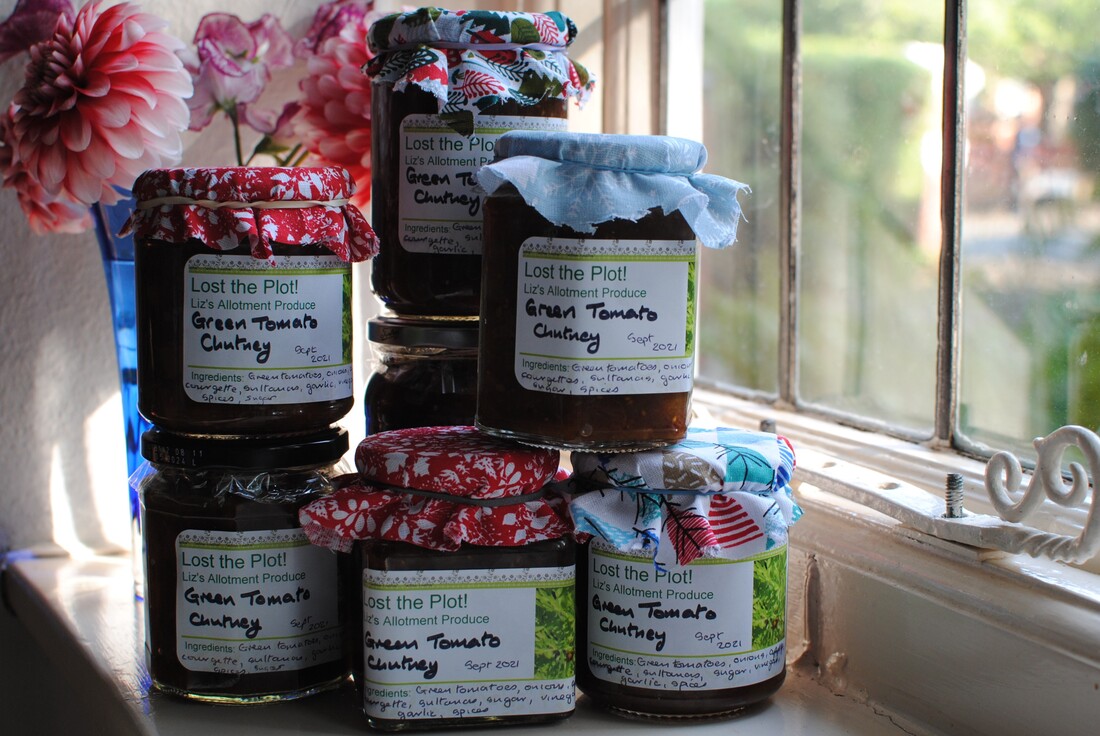 Green Tomato Chutney
We all love chutney in a cheese sandwich or with a slice of cold meat, and home made is of course nicest. You can adjust to your own tastes. I like a chutney with small pieces, nothing big that feels like a mouthful, and I like a dark sweet deep tasting mixture rather than a light fruity jammy product. But that’s my preference and you might love a light spreadable apple chutney best. I also like a textural contrast, the sweet softness of the courgette pieces against the popping crunch of tiny green tomatoes. This year, my tomatoes got blight quite early, so I had to take the plants down and remove all the fruit, so I had a good harvest of unripe small tomatoes. Last year, the blight arrived late, so I’d eaten all my own tomatoes ripe off the plants and had to buy green tomatoes from my friendly grocer (thanks, FreshSave of Didsbury!). You never know, and that’s the wonderful thing about chutney. Not only is it seasonal, it’s very much of THIS season, the way that things have grown this year. One batch is never quite the same as the next. You have to be a bit nimble about your ingredients and be prepared to change around – adding some sliced green beans if you haven’t got enough green tomatoes for instance. This is the basic recipe, found in many books and on scraps of paper in your grandmother’s recipe drawer. I’ve again used Pam Corbin’s River Cottage Handbook No 2 for the basic inspiration and great advice on making all sort of preserves, but I’ve changed to suit my own harvest and preferences, and you should do the same. I like a malt vinegar/cider vinegar mix because I like the malt vinegar’s dark muscularity, but again, if you prefer a lighter gentler chutney, use all lighter vinegar. The main thing about this sort of chutney (which is quite like the famous brown pickle you buy) is that all the ingredients are chopped up to about the same size little pieces. It does take time, but it give you a very consistent result, so it’s worth the trouble. That means tiny tiny green tomatoes can stay whole, little ones get halved or quartered, and bigger ones (larger than your thumbnail) might go into 6. Make it on an afternoon where you can be in the kitchen. You don’t need to keep an eagle eye on it constantly but don’t leave it for more than 10 minutes at a time. Everyone in your family will come in now and then, have a sniff and say “vinegar”. It’s one of the joys of the season. Makes about 6 x jam jars Timings: 1 hour to prepare, 3-4 hours simmering
A little bag of muslin (can be the corner of an old teatowel, or the piece of old muslin nappy you keep for such things, surely we all do that?) tied up tightly with string, containing a 2cm piece of fresh ginger, 2 teaspoons coriander seed, 1 teaspoon black pepper corns, 1 teaspoon cloves. Put a podcast on and cut up all your fruit. Place in a large deep saucepan with the other ingredients and bring to a simmer. Simmer over a low heat and stir every now and then to stop anything catching on the bottom of the pan; burned bits you don’t want. Stir and simmer for 3 hours with the lid on the pan and then take the lid off and simmer another hour or so to reduce the liquid. You will have a brown sticky fruity vinegary gloop. It’s ready when you can draw a wooden spoon through it and still see the bottom of the pan in the trail of the spoon for a few seconds. You can cook it until you reach the consistency you like. Spoon carefully into sterilised jars (I fill them with boiling water, empty out and leave them upside down in a coolish over to dry out so they’re ready when the chutney is), cover with jam pot covers, put the lids on and label the jars. The chutney is better if you leave it a few weeks to mature, so it’s an ideal Christmas gift. It will keep at least a year, more like two years, on a cool dark shelf. |
Some Changes - April 2022
Thanks to my friends and followers for your patience, and for your encouragement to start blogging again. Archives
April 2022
Categories
All
|
 RSS Feed
