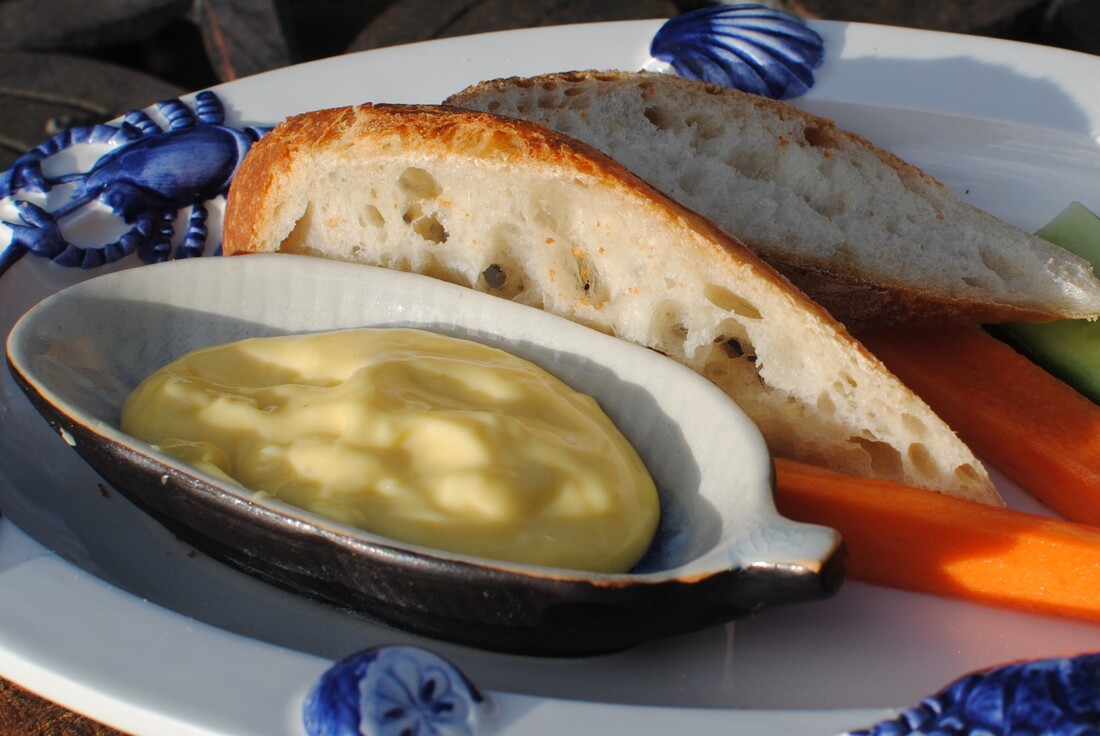
 Spanish Allioli or French Aoli - garlicky, creamy, just right for dipping Allioli or Aioli? A whole yolk’s worth of fun!
Another Spanish tapas, that you don’t even have to order. As soon as you sit down, the waiter brings you the menu, a teensy bowl of this lovely rich oily paste and some pieces of bread. This being the Canary Islands, the bread is unfortunately white, thin and tasteless but the allioli makes up for it. They seem to add herbs, whatever they have around, to make it green and therefore even more attractive. On my recent holiday in Tenerife (very nice thank you) we had allioli speckled with chives or parsley, something I’m pretty sure was dill, and maybe even oregano. But the basics are just egg, garlic, mustard, oil, vinegar and salt. I used to be nervous of making my own mayonnaise. Don’t be. I was worried about all the admonitions to only add the oil one drop at a time, or else dreadful things (curdling? How horrible does that sound?) would happen. Yes, you have to add the oil slowly, but so far, I’ve never yet curdled, and now I’ve made it loads of times. Then some chefs have taken to making it in a food processor, as an “easy” solution to the difficulties of the hand made version. This made me even more nervous, how difficult must it be, if even top chefs recommend using a machine? But the machine needs washing up and also means you have to make quite a large quantity. Half the joy of making your own mayo is that you can make one-egg-yolk’s worth, which is just enough for lunch for 4 people, and nothing left over. You really don’t want to be storing fresh mayo for more than a few hours in the fridge, so what are you supposed to do with all that over-production from using 4 yolks, let along all the dreadful eggy washing up. So, use a tiny tiny whisk, get your oil bottles out (such fun) and take ten minutes to produce the most glorious, glowing, garlicky home made allioli ever seen on this planet. Serve it simply with some good (French sourdough baguette is perfect) bread and some vegetable batons and you have a top class vegetarian lunch. Now we’re coming close to the dreaded school holidays, teach one child and set their task to make mayo every other day. One day as allioli dippers, one day in coleslaw with baked spuds, another day dolloped into a BLT – your lunches will be easy, nutritious and cost effective. As well as teaching your child a life skill and the practice of patience. Teach another child how to make soup and every other day have a different home made soup. Teach another child (if you have another going spare) how to make bread, and you'll have a real lunch time production line going. I’m not giving strict quantities here. Every egg is a little bit different and also you might use other oils or herbs. The only quantity you start off with is one egg yolk. Put one egg yolk in a small bowl. Sprinkle onto it one half teaspoon of sugar. Add one half teaspoon of Dijon mustard or a half teaspoon of English mustard powder. If you are making garlic flavoured mayo (allioli), squash a garlic clove with some fine salt into a paste, and add that to the yolk. If you aren’t making a garlic version, just sprinkle half a teaspoon of salt into the yolk. Beat the yolk up for a bit with your teeny tiny whisk. Now start adding the oil. You can use olive oil (not the very best heavy green oil for the whole thing as that can make it a little bitter) or rapeseed oil, nut oil, or just plain sunflower oil. I like to add a little of each in rotation just for fun and so that the final mayo doesn’t taste too much of any one of them. You add the oil a little at a time and beat each dribble in before adding the next. You will notice the mixture becoming thicker, almost like an oily custard. Keep going until you have about an espresso cup full of mixture, which should be thick and glossy. Taste it. Add a teaspoon of white vinegar, beat it in. Add a little more oil, whisk. Add a teaspoon of lemon juice. Taste it, add more salt or sugar if you need it. Add a dribble of cold water, whisk. Add some chopped herbs if you want or even some tabasco or chilli sauce for a spicy version. Mix well. If you make it half an hour before you want to eat, the garlic and herb flavours will intensify.
0 Comments
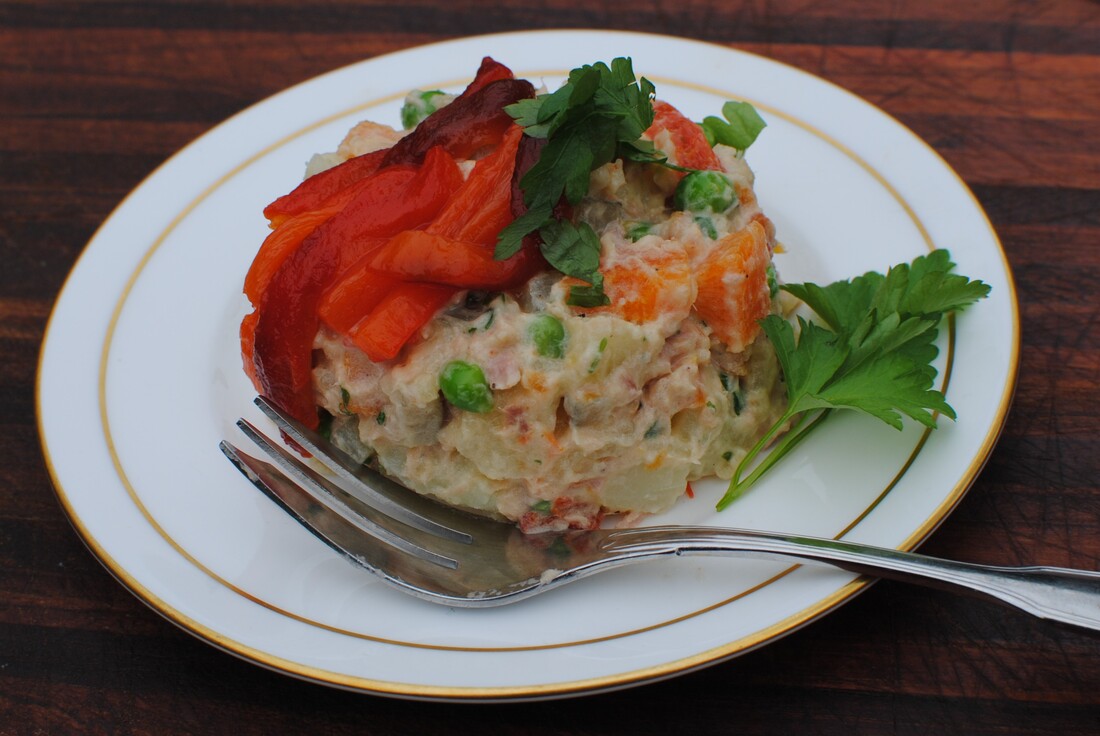 Simple but delicious. Potatoes, carrots, peas, tuna and gherkins in a creamy mayo Ensaladilla (vegetarian options)
Returning to a much-loved place is a joy. Eating the food you first ate there takes you back. I’ve said in this blog before how much I learned from eating in the Canary Islands. “Gourmet” is not the first thing you think about the Canaries, but these days it should be near the top of the list, along with sun, sand and holiday fun. We all adore sharing a table of tapas with friends or family. Everyone chooses a favourite, but you also get the chance to try new things. In Spain, when you sit down with a drink, the bar will also often serve you a little portion of their chosen “tapas de dias” without extra charge. It’s good marketing, encourages you to sit and drink another round, and lets you try home made small portions of local food. Just what I like to do best. You find “Ensaladilla” on the menu at most tapas bars in the Canaries. The proper name is Ensaladilla Russa, or Russian Salad, but who cares? And is it anyway? A Russian chef, Lucien Olivier, is said to have made the first salad of this type in Moscow in the 1860s, but the same recipe exists all over Europe in various forms and they can be quite different, so I don’t see how anyone can lay claim to the “best”, or the “original” or the “genuine” recipe. I’ve eaten a similar dish in the Balkans with chopped ham in it, they sell pots of it in German supermarkets with sausage pieces, I’ve had a very eggy version somewhere on my travels. The main variation in Spain has tuna, so that’s what I’ve gone with here. The basic recipe is cooked potatoes, carrots and other vegetables, bound together with a mayonnaise dressing, and some herbs. For protein you can add chopped ham or other softish processed meat, or eggs or fish. You can add or leave out: chopped pickled cucumber/gherkins, capers, anchovies, red peppers. Some like chopped dill, others prefer parsley. You can layer it attractively or just mix it up and serve it as a scoop. The dressing is usually freshly home-made mayonnaise, but you can use mayo from a jar and you can lighten it a bit with sour cream or plain yoghurt if full-on mayo isn’t for you. Two big no-no rules: no garlic in the mayo and no tomatoes in the mixture. I tried to re-create our favourite versions from Tenerife, but please let me know if you have any favourite family recipes, or other versions you love and I’ll try those too. 8-10 starter portions 30 minutes preparation
Boil the potatoes with their skins on, leave to cool and then peel and dice quite small. This avoids you cooking small peeled cubes of potato which tend to dissolve into mush. However, best to cook the carrots when already diced up, as they don’t peel well once cooked. Grill the peppers until blackened on all sides, then put them in a glass bowl with a plate on top to steam while they are hot, wait until they are slightly cooled and the skin will come off easily. Remove the seeds, stalks and membranes. Cut the flesh into long thin strips with scissors. Cook the peas. If frozen just pour boiling water over them, leave 2 minutes and drain, which keeps them nice and crunchy. If fresh, boil for 2-3 minutes. Drain under cold water. When all the vegetables are cool, add the potato cubes, carrots, peas and chopped gherkins to a bowl. Chop the fresh parsley and add in, and chop half the red pepper and add in. Break up the tuna, add it to the bowl along with the mayonnaise. Mix well, taste and adjust the seasoning. You might need a little salt, maybe a squeeze of lemon juice and a grinding of black pepper. Chill the mixture in the fridge before serving. You can make a nice shape by spooning the ensaladilla into a ramekin and turning out onto a plate; decorate with a couple of the reserved strips of red pepper and a leaf of parsley. 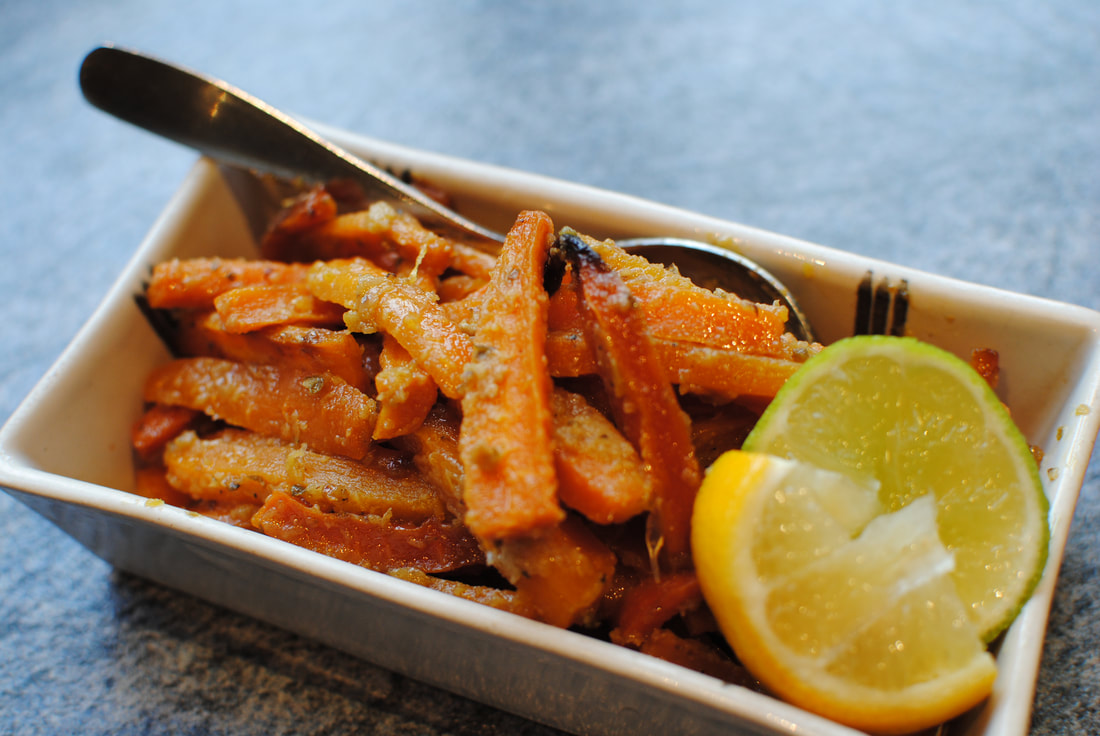 Oven roasted carrots in a citrus glaze Roasted Carrots with Citrus Mojo (vegan)
In the Caribbean, a citrus sauce, or mojo, is used on a lot of vegetables and meats. Plantain is traditional at Christmas, in a citrus mojo. When making up my Christmas in the Caribbean menu, I couldn't easily get plantain in Manchester and thought to try using carrots instead, which are of course traditional in UK at Christmas anyway. Cultural mixing, especially in food, is something I'm very much in favour of. The flavours of orange and carrot match so well. In the Caribbean you would use sour oranges, similar to Seville oranges, which are ripe at Christmas to make the mojo sauce for these carrots. If you can get Seville oranges, use those, but if you can’t, just use normal sweet oranges and add some lemon and lime juices to the mix. Roasted carrots have that lovely slightly burned edge and texture which you don’t get by boiling them, and of course the tray of carrots can go in the oven alongside whatever else you’re cooking for an easy side dish to your roast. Carrots are very tolerant things and you can peel and chop them ahead of time – even the day before you cook if you keep them in a plastic bag in the vegetable drawer of the fridge and also make the mojo ahead of time so you can throw it all together as you need. The only caution I would give is that the carrots cook down to a much smaller portion than you think, so if you have hungry big eaters in your family, add a few more carrots to your bowl! Serves 8 as a side dish Timings: 90 minutes from scratch but preparation can be done ahead
Make the mojo sauce by blending the onion, garlic, spices and juices together until you have a creamy sauce. Mix this with the carrots and spread them out on a metal baking tray. Drizzle lightly with vegetable oil. Pre heat the oven to 180°C. Roast the carrots for 30 minutes, then turn up the temperature to 200°C and roast for another 40 minutes. You need to stir them and turn them every now and then to make sure they roast evenly. Serve them as a side dish to your delicious slow roast jerk pork or to to any other roast meal. 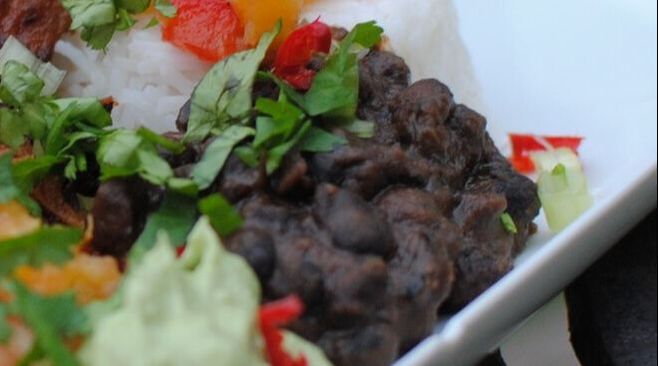 Traditional Caribbean Black Beans - cooked with green peppers and garlic Traditional Caribbean Black Beans - cooked with green peppers and garlic Black Beans with peppers and garlic (vegan) A traditional part of the Caribbean Christmas table, a dish of tasty black beans is also a great vegan offering for a party gathering. They’re even better and deeper flavoured made it ahead of time and they freeze well too. It’s worth using dried black beans rather than a tin, they have a stronger flavour, but you could certainly use a tin or two if you’re short of time. A tin of the little darlings is a great storecupboard standby for a quick dish of beans when unexpected visitors land on you. This recipe is part of my Caribbean Christmas menu, which will be on the website as a full menu from cocktails to Cake de Ron in a couple of weeks. I don’t usually have leftovers from this, but if you do, add them to a ratatouille to change it into a bean stew, with all the goodness and flavour from all those wonderful vegetables. Serves 8 with some leftovers Timings: overnight soaking, 4 hours cooking – can be done ahead of time and warmed up or frozen
Soak the black beans overnight in plenty of water. De-seed and de-stalk the green peppers by cutting round the stalk and pulling out the centre, wash to get rid of the seeds. Peel the garlic cloves and pop them into the green peppers. Place the beans and the garlic filled peppers in a large saucepan and add cold water to cover the beans by about 2cm. Add the bay leaves. Bring the pan to the boil, and simmer over a low heat until the beans are softened – about 3 hours. You could do this in the slow cooker and it would take about 6 hours. While the beans are cooking, grill the red peppers until the skins blister and char all over, then place them in a glass bowl with a plate on top to steam and cool. When cool, you can rub off the skin very easily and remove the centres and seeds. Set aside. When the beans are cooked, let the pan cool for 10 minutes. Take out the green peppers and garlic – the garlic should have stayed inside the peppers but search through the beans to make sure you’ve got them all. Put the green peppers, garlic, half the red peppers and a cupful of beans with their water in a blender with the relish and ground spices and 2 tablespoons of olive oil. Blend up to a thick paste and add back into the pan of beans along with the remaining red peppers, chopped up into small strips. Stir into the beans and taste. Add a slug of olive oil and more lemon juice, more salt if needed and a good grind of black pepper. Traditionally, they shouldn’t be too spicy, just a friendly warmth. Re heat the beans, adjust the seasoning as you like, and then allow to cool a bit before you serve – they will thicken as they cool and you want that slightly thicker texture. They go like a dream with simply steamed white rice and are the perfect side to a slow roast pulled pork. 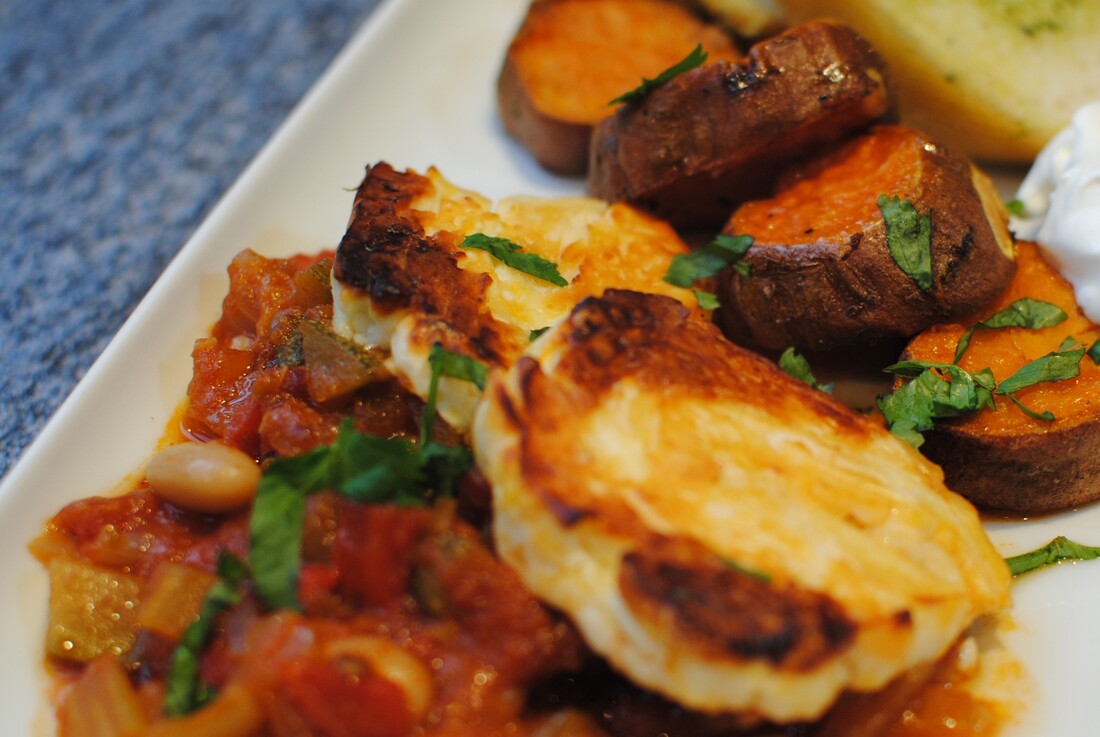 Spicy vegetable mix topped with roasted halloumi and served with sweet potato slices Spicy Beany Ratatouille topped with Grilled Halloumi (vegetarian)
You can top anything with halloumi, more or less. It’s so versatile, and such a friendly cheese. Like an egg, it keeps its shape, but nestles down into the spicy mix you cook it into. This meal is sort of like a shakshuka with halloumi instead of eggs, and with beans. So not very like a shakshuka except that it’s warm, comforting, tasty, spicy, tomatoey and gorgeous. The bean stew is very adaptable according to the ingredients you have in your cupboard or receive in your vegetable box. I think halloumi goes very well in a mix with celery and peppers, but you can add aubergines (I would have, just didn’t have any in the vegetable drawer) or green beans, any firm veg you have around. The spices are important, and a good warm mix of cumin, paprika and some chipotle in adobe gives you a glorious glow. It’s a wonderful dish to have made ahead of time and just pop it in the oven when you get home from parents’ evening to have ready in 40 minutes with no hassle while you unpack the school bags and wash out the lunch boxes. I served it with roasted slices of sweet potato, to make the most of the oven being on, and with a dollop of plain Greek yoghurt sprinkled with fresh coriander and a baton of garlic bread. My friend Louise inspired me to make this when she hosted our Fine Wine and Dine Book Club recently, so thanks to you, Louise for the idea. Serves 4 Timings: 30 minutes initial preparation, then it can be left for a day, and 40 minutes in the oven before you eat.
Extra: About 750g sweet potatoes, sliced into rounds 1cm thick, a tub of plain Greek yoghurt, and a handful of fresh coriander, chopped. 1 baguette of garlic bread. In a heavy pan (I use my Le Creuset), gently fry the onion, pepper and celery in a little vegetable oil until softened. Add the garlic, fresh chilli and the dried oregano. Stir and fry for a minute, then add the ground spices, stir well, and add the tins of beans and tomatoes. Add another half tin of water and the chilli sauce and chopped chipotle, along with the Henderson’s Relish, marmite and bay leaves. Stir well together and simmer for about half an hour to deepen the flavours. Taste, add salt or a little more water if needed. You don’t want too liquid a mix, so don’t add too much water. You will be able to taste the lovely warmth of the herbs and adobo sauce but it shouldn’t blow your head off. At this stage, you can cool down the mixture and keep it in the fridge for up to 2 days. When ready to cook, heat the bean stew gently in a pan and pre heat the oven to 200°C. Prepare your slices of sweet potato – about 1cm thick, and toss them with oil, salt and pepper in a roasting tin. Place the bean stew in a roasting tin that will take the stew about 3cm deep – you might need a smallish square tin rather than the big tin you'd use for roast chicken. Remove the bay leaves. Slice the halloumi into 8 slices and place on top of the bean stew. Put the sweet potato slices in the top of the oven and bean stew on the second shelf for about 40 minutes. Turn the sweet potato slices occasionally. At the end, the halloumi should be lightly browned on top – if not, give it a quick flash under the grill just to get that lovely sticky texture. Serve with a dollop of cool Greek yoghurt and some chopped fresh coriander.  Creamy, spicy and delicious. A bite of chicken or prawn, a crunch of vegetable and a slippery noodle in every mouthful. Tom Yum Noodle Soup (pescatarian or vegan option)
Maybe this is an odd memory to associate with Dublin. You’d think oysters, Guinness, champ. But I used to catch an early plane to Dublin on a regular basis and meet colleagues in the airport. I’d been up so early, the meal felt like lunch to me and I didn’t fancy bacon and eggs, so we used to gather at the food court, and indulge in a Tom Yum soup. The combination of spice and creamy coconut, Thai red curry and coriander, tender prawns and juicy mushrooms was exactly right to re-set my inner clock and perk me up ready for the afternoon meetings. I still find that a home made version makes an energising and easy lunch, if you keep a few staples around. I like the base made with chicken stock, of which I usually have a plentiful supply in the freezer, but you can make it with vegetable stock and use a stock cube. Infusing the stock with the aromatics is a key part of the recipe but you could do this ahead of time, reduce the stock again and keep it in the fridge to assemble the meal with only a few minutes notice. A combination of prawns and chicken is traditional but you can change around the protein and the vegetables to suit your tastes and what you have in the house. Some chopped mushrooms add that chewy texture and contrast very nicely with the slippery rice noodles, so mushrooms, courgette and spring onion would make a good vegan option, maybe with some sliced baby corn for the protein. Try it and leave me a comment, I’d love to hear other versions. Serves 4 Timings: 1 hour
Heat up your stock and add the infusion ingredients. Let it simmer for a few minutes and then leave to cool down with the spices in the liquid. Strain the stock, discard the spices. As above, you can poach the chicken breast in the stock while you do this. Warm up the stock in your soup pan, add the Thai red curry paste and stir in well. Add the chopped green vegetables, the mushrooms and most of the spring onions, simmer for a few minutes. Add the prawns and the chicken pieces. Add the fish sauce and the lime juice to the soup, bring to a simmer and cook for about 3 minutes. Add the coconut milk to the pan and bring to a slow simmer – do not boil vigorously as this can curdle the milk. Add the rice noodles in, stir and simmer for 2-3 minutes to soften the noodles, they don’t need a lot of cooking. Taste and adjust the seasoning, you might need a touch more lime juice or a little shot of soy. Sprinkle with coriander and the remaining chopped spring onions to serve. 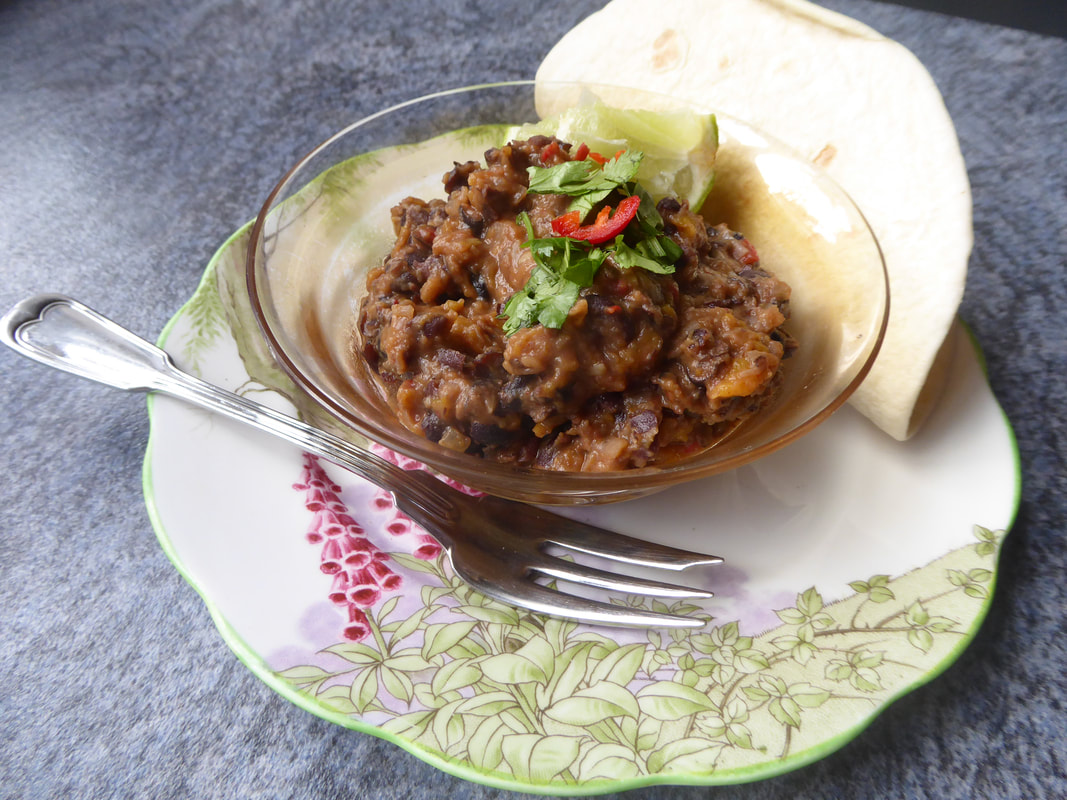 Spicy, satisfying black beans cooked with vegetables and aromatic herbs. Refried Beans (vegan)
If you’re thinking of the Mexican restaurant meal where you don’t eat the refried beans, then think again; you won’t push these to the side of your plate! Home-made refried beans are superb, so much better than the tinned or packet version. They really make a genuine addition to a home cooked Mexican meal, are so easy to make and of course offer a vegan alternative to the meaty filling of tacos so you can cater to all tastes in one meal. Use them as a side dish to your meat meals, or stuff a wrap or a taco with them along with some cheese, or lettuce and a salsa. Great for a light lunch with a friend or for school holiday lunches at home. Serves 6 as a side to a Mexican meal Timings: 30 minutes 1 x medium onion, about 150g, peeled and chopped quite finely ½ yellow pepper, de-seeded and finely chopped 1 x mild jalapeno chilli, chopped finely. 1 x clove garlic, squashed with salt 1 x 400g tin black beans, drained Ground spices: ½ teaspoon cumin, ½ teaspoon garlic powder, ½ teaspoon cayenne pepper, ½ teaspoon mild paprika, ½ teaspoon smoked paprika. Henderson’s Relish and a teaspoon of marmite. Vegetable oil to cook. Juice of ½ lime. Handful fresh herbs chopped – you could use coriander, or parsley or chives. Fry the onion, pepper, chilli and garlic in the vegetable oil for a few minutes until tender. Add the ground spices and fry to release the flavour. Add the black beans and ½ tin of water. Stir up and allow to simmer. Add the Henderson’s Relish and the marmite, stir in and simmer for a few minutes. Using a potato masher, mash the beans into the sauce quite roughly. They will release their starchiness and make a thick puree. Add the lime and adjust the seasoning, you might want a little more salt or some ground pepper. Add the fresh herbs just before you serve. 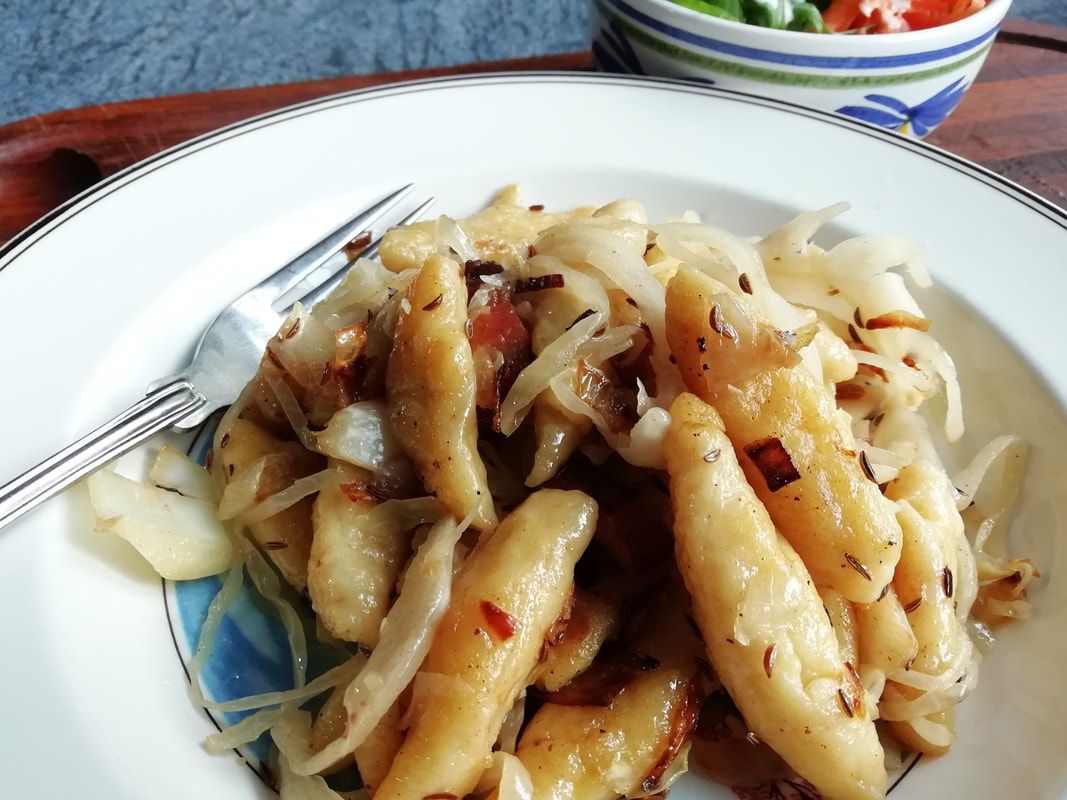 A German version of gnocchi - little potato/flour dumplings, fried with onions and bacon, scented with caraway. Schupfnudeln (vegetarian optionally)
They sound odd, but they’re plump and fluffy and delicious, and surprisingly easy to make. They’re the German equivalent of the Italian gnocchi, which gives you an idea of the texture. The name just means “pinched dumplings” which indicates that you don’t need a machine to make them. They’re not usually eaten with a tomato sauce (for no good reason that I can think of, it’s one of those “just so” questions), but are fried up with some well flavoured meat, soaking up the fat and pan juices. In the Munich Christmas Market you will find schupfnudeln billowing their savoury smell along the alleys of wooden huts, heaving with woolly-wrapped merry makers. The dumplings are fried up with smoked bacon, sweet onions, tangy sauerkraut and a sprinkling of caraway seeds for a very characteristic taste. Spear them with a fork; and enjoy a genuine continental Christmas treat. Preparation: Peeling and boiling potatoes – 30 minutes. Then making the dumplings – 1 hour. Final preparation – 20 minutes.
Mix the mashed potato, flour and eggs together, season with salt and pepper. Use your hands to form a soft dough and mix well, but don’t knead. Cover the dough and chill in the fridge while you bring a large pan of salted water to the boil. Remove 1/6th of the dough from the lump. Roll it on a floured worktop, like rolling playdough into a long snake about 2cm thick. Pinch off pieces about 2cm long and roll on your palm - the shape of your hand will naturally make a worm-shaped piece of dough, thinner at the ends than at the middle. This is what you want. Roll about 25 pieces like this and drop them into the boiling water. Don’t overload the pan, you want the water to retain the heat and boil the batch up quickly. They will rise to the top and expand as they cook, taking about 1-2 minutes. Scoop out the cooked dumplings and place them on a fine wire rack or on a tea towel, so they don’t sit in liquid. Keep going until you’ve done all the dough. You get quicker as you go along! At this stage you can cool your schupfnudeln and keep them for a day covered in the fridge until you want to cook them. You can also freeze them on a metal tray and put them in a bag once frozen. Cook straight from frozen, without thawing if you do this. About 30 minutes before eating, start to fry your bacon in your largest frying pan in a generous amount of vegetable oil. Fry until browned and starting to crisp, then add your onions to the pan. Fry for a few minutes until transparent and starting to brown and then add the shredded cabbage. Fry for another few minutes and then add the butter to the pan. When sizzling, add the caraway seeds and tip in your schupfnudeln. Turn with a spatula to brown all sides and warm through, then add the sauerkraut to the pan. Fry a little longer to cook through, adding a little more butter if you need. 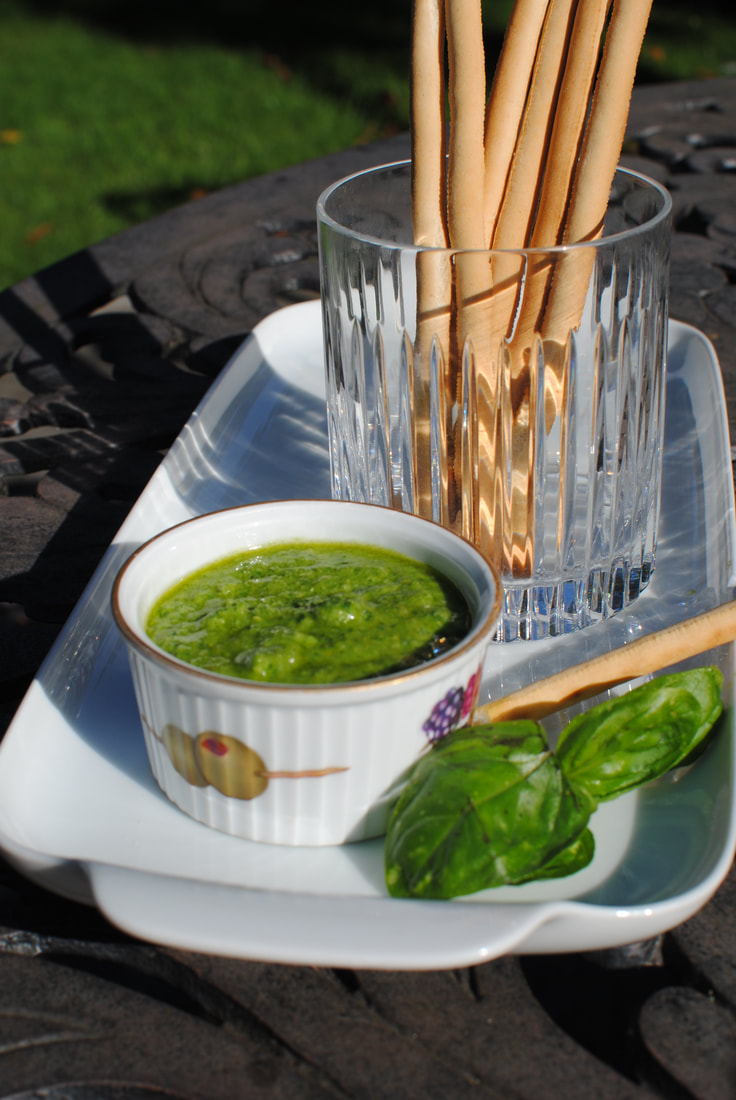 Green and gorgeous! Fresh basil pesto. Fresh Basil Pesto – Pesto Genoese (vegetarian and vegan options)
Fresh basil: aniseedy, aromatic, tempting and prolific. If you can find the right spot for it, in a warm corner of the garden away from slugs, it grows perfectly in a pot. All you have to do is buy one of those supermarket pots of forced basil, for which I always feel very sorry, and take each little plantlet out, carefully separating them each from their too-close mates, and plant them in your pot in rich compost. Basil likes sun, warmth, lots of food and water, and it will reward you with the most amazing vibrant harvest. Keep taking the tops off the plants to avoid them going to seed and you will get beautiful big juicy leaves all the way into September. Even if you don’t grow it yourself, you can often get big bags of leafy basil from grocers which are very good value. Home made pesto is by far and away better and different from the shop-supplied stuff. Bought pesto is perfectly good but try making your own and you won’t look back. You can adjust the garlic and lemon to your exact taste too, but there’s something about the freshness of the basil coming through. It’s quick to make and keeps in the fridge for weeks so you can keep a fresh pot going from July onwards and have enough to give away too. Vegetarian parmesan is available which seems to taste fine, so that’s a good alternative if you prefer to avoid parmesan. For a vegan version you can leave out the cheese altogether and add a teaspoon of nutritional yeast for the umami feel. Pesto is so versatile; it deserves a superlative. Here are just a few uses for it
Pine nuts are not cheap but they are worth it. You don’t need a lot, and if you buy a pack you can always use up the rest on a salad for lunch, they are wonderful lightly fried and salted. Makes 2 small jars or one marmite jar, enough for about 8 portions of pasta or to marinade 8 chicken breasts Timings: 20 minutes
Put everything together in a large straight container and process with a stick blender until smooth and creamy. Add a little more salt and lemon juice to taste, and a grind of black pepper if you like. Test the texture, the end of season basil has more structure than the early leaves so you might need a bit more olive oil and lemon juice in your last batches of the year. Spoon into your clean small jars and then dribble a layer of olive oil on top, which helps keep it fresh. Keeps in the fridge for at least 2 weeks, if you replace the olive oil when you take a spoonful out.  Ready Made Puff Pastry rounds baked with cheddar cheese and cayenne pepper - the definition of more-ish! Puff Pastry Cheesy Bites
So extremely more-ish you probably have to make two batches. And if you’re serving them as a starter then don’t blame your guests for not having much appetite for the main course. You can use puff pastry to wrap up all sorts of things: anchovies with parmesan, parma ham, plain ham with mustard, whatever. I find that this combination of salty tangy cheese and the spice hit of cayenne pepper is the best but do try whatever suits your own tastes. The cheese melts out in a delicious crispy way and the cayenne just perks your appetite for another bite. They’d also be good for a quick school holiday lunch, served with a green salad and a chopped tomato salsa. Makes 26 rounds Timings: 40 minutes
Pre heat your oven to 190°C fan or 200°C circulation. Have ready three flat oven trays lined with greaseproof paper. Unroll the pastry on its own paper wrapping. Sprinkle the cheese evenly all over the surface and sprinkle the cayenne pepper on top. Roll the pastry up again and cut it into rounds about ½ cm thick. Place the slices on the trays, leaving enough space to expand – you can get about 8 on a tray. Place in the oven for about 20 minutes until the cheese has melted and the pastry is puffed and golden. Slide them onto a wire rack to cool a bit and sprinkle with sea salt crystals. Eat them while still warm. |
Some Changes - April 2022
Thanks to my friends and followers for your patience, and for your encouragement to start blogging again. Archives
April 2022
Categories
All
|
 RSS Feed
