|
Chocca Mocha Cupcakes
Cupcakes are always a good option for my Seniors Lunch Club group, and chocolate never fails. I added a touch of coffee to the flavouring to make it mocha and that extra deep bitterness. I also added some chocolate chips to the cupcake mix to give a bit of texture and more chocolatiness. The buttercream and chocolate icing was piped on with a fine star nozzle and I couldn’t resist a bit of golden glitter on top. We had a bit of a party this week, to celebrate end of term, as we’re having a two-week break. We had a sandwich platter; I made some sausage rolls and things on sticks and we played Charades. I chose movies/books/films/TV themes that I thought our group would know, people picked one out of a bag and had to act it out. Some of our group were quite nervous about acting in front of the group but they all got into it quite quickly and we were roaring with laughter at the performances. “Jaws” was easy to guess, “My Fair Lady” was quite tricky to act, and “Coronation Street” stumped both the actor and the audience. It’s a great game to play with any age group and prompts all sorts of discussions too. “Dr. No” started a debate about which is our favourite Bond actor and which is our favourite Bond movie – members got quite heated with opinions about Roger Moore/Sean Connery and went away determined to watch the movies again and re-think their all time favourites for a Bond-themed session in the Autumn. Makes 24 cupcakes Timings: An hour to make the batch of cupcakes, then time to cool and about 20 minutes to ice them
For the icing: 200g salted butter, 200g icing sugar, 20g cocoa powder, 2 tablespoons Camp Coffee Essence, 50g dark chocolate Pre heat your oven to 180°C and put out your cupcake papers. Beat the butter and sugar together until creamy and a bit fluffy. Sieve the flour, cocoa powder, and coffee granules together. You might have to scrape the coffee granules through the sieve a bit. Add an egg at time to the butter/sugar mix with a spoonful of flour each time, then add the coffee essence and the rest of the flour. Stir through the chocolate chips. Spoon into the cupcake moulds and bake in the oven for 20 minutes, turning the tray round after about 15 minutes to check. I prefer to bake one tray at a time in the middle of my smaller oven rather than bake two trays one above the other, but if you do that, swop them over half-way. Cool on a wire rack. To make the icing, beat the butter until creamy and add the icing sugar and cocoa a spoon at a time, putting a tea towel over your mixer to stop the powdered sugar rising up. Melt the chocolate over a bowl of hot water. Beat the coffee essence into the butter/icing sugar mixture and then add the melted chocolate and beat again to give a creamy fudgy pipeable icing. Pipe onto the buns using a star nozzle and decorate as you like. Keep in the fridge to set the icing if you are transporting them anywhere.
0 Comments
Singapore Noodles
Noodles are a world staple, and a comfort food for many. A mild curry-spiced noodle dish using whatever protein you have to hand is a very useful recipe to have up your sleeve. You can make this as complicated or easy as you choose, and it’s very tasty whatever you use. The traditional protein to include with Singapore Noodles are: chicken, for its soft texture; Char Siu pork for its barbeque tang and interesting red colour; and little shrimps for that added salty sea taste. You can make it with only chicken or only seafood if you prefer, just adjust the quantities accordingly and add some hoisin sauce to the noodle mixture for the barbeque sweetness. I left out the chicken in the recipe below as I felt that the pork and shrimps were quite enough. For a special treat, I made the Char Siu pork myself – which is quite straightforward to do and gives you several meals worth of meat which freezes very well so it’s all extremely convenient. You can buy Char Siu from Chinese groceries, but I’d rather trust my familiar butcher and know that my meat comes from well raised pigs on local farms. Some recipes add red food colouring to the marinade for extra intensity, I’d rather not but it’s up to you. To make the char sui pork: Timings: 10 minutes then overnight marinade, then 1 hour in the oven 700g pork shoulder in one piece – makes enough for 8 portions of Singapore Noodles and a bit extra for adding to stir fries etc. You could make a smaller quantity but doing it this way and freezing the extra is highly economical. Marinade:
Mix the marinade ingredients together in a bowl that will fit in your fridge. If you need to, cut the pork into two long strips which should each be about 6cm wide. Massage the marinade into the pork, cover the bowl and leave overnight in the fridge. Next day, pre heat the oven to 180°C. Wrap the pork pieces in kitchen foil and roast on a baking tray for about 20 minutes. Take them out, baste with some of the marinade, wrap again and roast for another 20 minutes. Take them out again, remove the foil, baste with marinade again and roast for another 20 minutes. Ensure your pork is cooked through, it should be pink but cooked inside and a bit sticky on the outside from the baked-on marinade. Brush the pork pieces with the honey and water glaze and put under a hot grill for a few minutes to set the glaze. Leave the pork to come down to room temperature before slicing. Slice finely along the grain of the meat so you get round slices which are coloured on the outside. You will also be left with a few scratty bits and pieces which you can bag up and freeze for adding to stir fries. To freeze the slices, lay them on greaseproof paper and cover with another layer of greaseproof paper. You can fold the paper over itself to give several layers of pork and slide the whole package into a freezer bag. Doing it this way means you can take out just a few slices of frozen meat whenever you want them and leave what’s left for another day. For the recipe below for 4 people you will need about half the pork slices. To make the Singapore Noodles: Timings: 30 minutes if using ready cooked pork
Cook the noodles according to the pack instructions. Depending on the thickness some just need to have boiling water poured over them and others need to be brought to the boil and simmered for 2-3 minutes. Drain and drizzle over a little sesame oil. Leave in the colander. Mix the chilli in oil, soy sauce, fish sauce and rice vinegar together, set aside. In your wok, quickly fry the ginger, garlic and chilli. Push to the side of the wok, add a little more oil and fry the pepper, carrot and spring onions briefly. Add the cooked pork and prawns, and cook for just a minute or so, then add in the drained noodles. Pour over the mixed sauce, and sprinkle over the curry powder. Mix and cook for only a minute or two to warm through and allow the sauce to permeate the meat and noodles. Serve immediately, maybe adding a sprinkle of spring onions if you like. Gazpacho (vegan)
Packs a punch, Gazpacho does. It doesn’t leave you in the dark as to its intentions. It wants to jump up and shout, and make you do the same. It’s a cold soup, made from raw vegetables, and you can feel it doing you good, as well as waking up your tastebuds. I used to make this quite often in the summer and take it to work in a chilled thermos flask for my lunch. Apart from the aroma of garlic making it obvious what I was eating, the little moans of pleasure from my desk caused much merriment in the office. Never mind, anything that makes you feel that good at work should be encouraged. Do make it a day ahead so the flavours can meld, and serve it as chilled as you can, as that suits it. You can adjust the proportions to your own tastes – I quite like the sharp vinegary tang, but you can reduce the amount of vinegar if you want a gentler approach. If you have fresh parsley to hand, it’s lovely to add some towards the end of the blend so you get it rather roughly chopped, but it’s not part of the classic recipe. For a dinner party, you can serve little chopped vegetables as a topping and let everyone choose their own, but it’s not necessary for a family lunch. Serves 4 Timings: 30 minutes and then at least 2 hours to chill
Put the whole lot into the bowl of your blender and add about 200ml cold water, some salt and pepper. Blend until fairly smooth. Add the parsley at this time if using. Blend again, and taste for seasoning and acidity. You can add a teaspoon of sugar to balance the acidity, a little more salt or a little more oil. Blend and chill until needed. The soup will keep at least 2 days in the fridge. Chocolate and Peanut-Butter Birthday Layer Cake
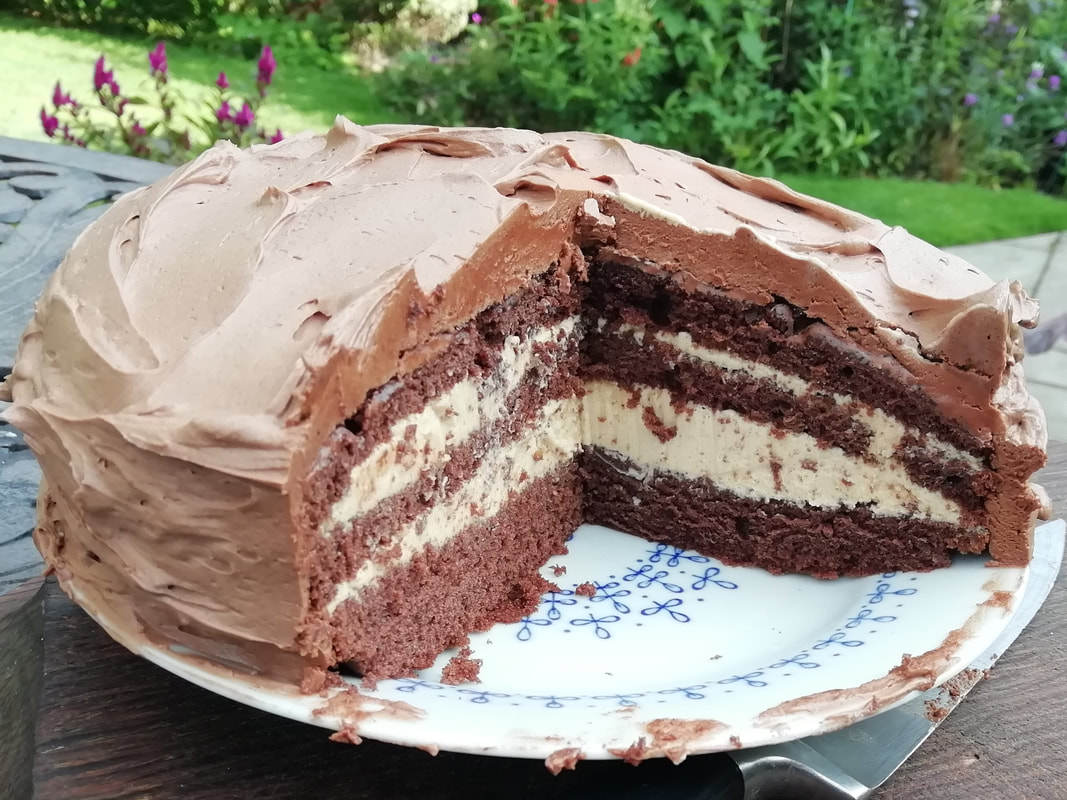
A birthday request from my boy. He’s had a tough year, going through a postgraduate course without ever seeing his classmates or lecturers in person. He’s been gracious and good humoured throughout, fairly helpful in the house (when asked) and knows he’s luckier than so many others who’ve been locked up in student residences for weeks. As a treat, I asked him to name his desire for a birthday cake and he challenged me to make a dark chocolate and peanut-butter layered cake. This is what I came up with. He’s great at pinging inspirational ideas for food off me, although they generally involve nuclear amounts of chilli. This one is a change from that trend, you’ll be glad to know. The salty crunch of the peanut butter makes the perfect contrast to the deep chocolately velvety cake. You do make quite a mess eating it unless it’s straight out of the fridge. We enjoyed it very much and I hope you do too. The picture doesn’t do it justice, really, so please use your imagination. Serves 8 (small slices as it’s very rich) Timings: 90 minutes, then time to chill. For the cake:
For the filling:
For the topping:
Pre heat your oven to 180°C. Grease and line an 18cm cake tin – I like a loose bottomed one as it makes it much easier to get out. Beat the eggs and caster sugar together energetically until fluffy. Melt the butter and let it cool slightly. Sieve the flour and cocoa powder together. Add the flour/cocoa to the beaten egg/sugar mixture one spoon at a time with the mixer going slowly and then pour the butter over the top and mix it in with a metal spoon. Mix in the sour cream. Scoop the batter into your cake tin and bake 25-30 minutes until brown on top and a skewer comes out clean. Cool the cake on a wire rack and remove from the tin, taking the paper off the bottom too. The sponge is quite moist due to the cream, so don’t worry if it looks less spongy than some cakes. When cool, carefully cut the cake into three layers. For the filling, whisk the butter and peanut butter together vigorously and add the icing sugar a spoonful at a time, covering your mixer with a tea towel to stop the sugar dust going all Christmassy on you. Sandwich the layers of cake together generously. Make the topping: melt the chocolate over hot water. Beat the butter and icing sugar together carefully, as above with a tea towel over the mixer, then stream in the melted chocolate and keep whisking. This makes quite a fluffy mousse-like soft buttercream icing. Decorate the sides and top of the cake with the chocolate buttercream. Keep the cake in the fridge to set the icing. It keeps for several days in the fridge but you need to keep it cool right up till serving. Chicken Yuk Sung - lettuce leaf wraps
Light, fresh and tasty, these are ideal for a make-it-yourself starter (always the most relaxed way to begin a meal) and even for a light low-carb lunch. Yuk Sung comes from the Chinese word for “fluffy meat” and describes the almost shredded texture of a dried meat you can buy which is used for topping a rice porridge or tofu dish. This recipe has moved a long way from there, and the only fluffy thing about it is the crispy rice vermicelli, which impart a fabulous crunch to the mouthful. I have used preserved Chinese vegetable in the recipe, which gives a deep sour salty background and a slightly squeaky texture. You buy this in packs from a Chinese grocery or on line, and you can use it in a lot of Chinese food. If you can’t get it, substitute some well chopped firm fresh white cabbage, and soak it in salted water for 10 minutes. I have based the filling on a recipe from the always reliable Kwoklyn Wan, (kwoklynwan.com) with a few additions from other sources. It went down a treat with my family and we made it into a main course and served rice alongside too. Serves 4 Timings: 60 minutes – which is mostly vegetable chopping, the cooking only takes 10 minutes
Wash the lettuce well and separate the leaves but keep them whole. You can leave the lettuce in cold water to crisp up while you fry. Combine the sauce ingredients and set aside in a small bowl. Put about 2cm of oil in your wok, heat up well and deep fry the vermicelli a few at a time. They will puff up instantly and turn brown nearly as quickly, so scoop them out and put them on kitchen towel to drain. You can salt them lightly. Remove most of the oil from the wok and start to stir fry. Fry the ginger, garlic and chilli for 30 seconds to release the aromas, then add the chicken. Stir fry for 5 minutes or more until the chicken is cooked through and the juices have evaporated and concentrated back into the meat. Set aside on a plate. Fry the onions, carrot, pepper, water chestnuts and preserved vegetable briefly to soften them. Add the sauce to the wok and cook for a couple of minutes to start to concentrate it. Add the chicken mixture back in, stir and cook. There shouldn’t be liquid in the bottom of the wok, you are looking for a fairly dry mix. Remove the wok from the heat and let cool a couple of minutes while you drain and spin the lettuce and get the vermicelli on the table. Let everyone make their own parcels of delicious delight, wrapping the filling of spicy chicken and vegetables and a pinch of crunchy vermicelli in the tender lettuce. Swedish Stuffed Eggs
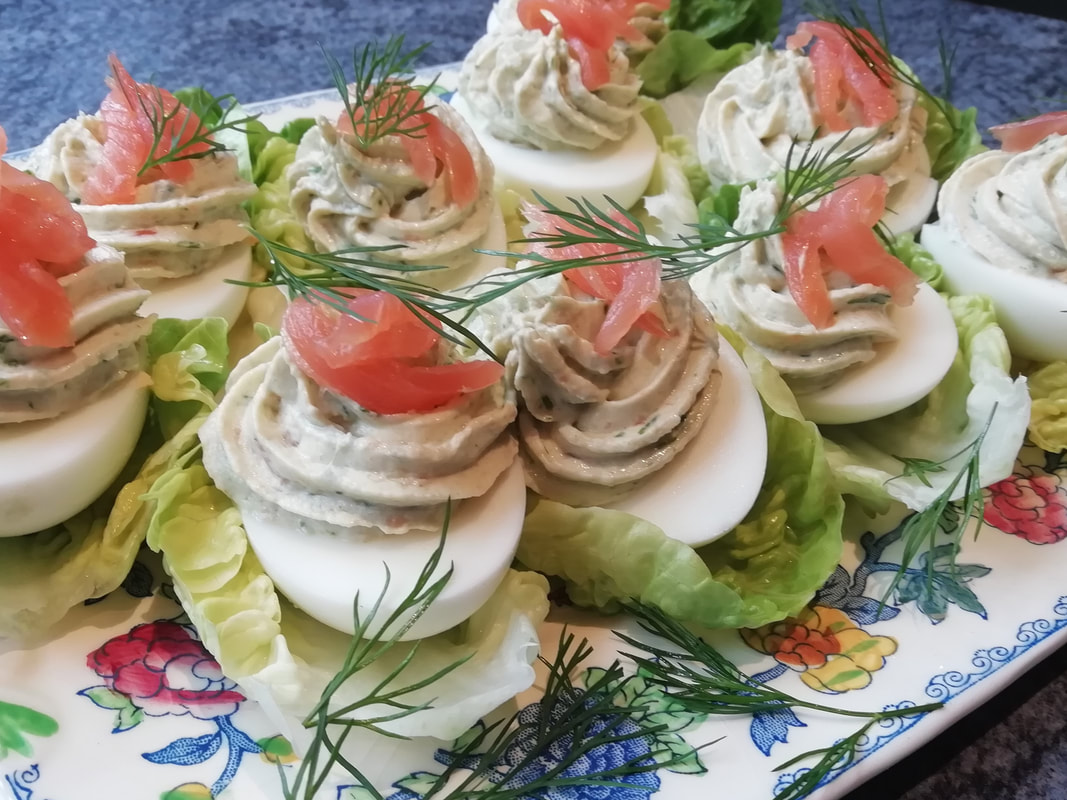
Eggs and fish are a classic Scandinavian combination. Add some fresh herbs and a spritz of lemon or a fizz of horseradish and you have a thing of beauty. Stuffed eggs are a staple of any Scandinavian buffet. They are the perfect party food, easy to prepare ahead, pass round and let your guests eat with their hands as they wander through the garden. Often, in a stuffed eggs recipe (see my own recipe for Devilled Eggs) the yolk of the hard boiled egg is combined with a variety of other ingredients and then used to stuff the egg cavity. In this recipe, the smoked salmon mousse is just piped on top of the whole egg, leaving the yolk in place for an even richer combination. Top with a strip of smoked salmon or even a little sprinkle of salmon roe if the budget runs to it. Serves 6 Timings: 40 minutes
Reserve one slice of smoked salmon for decoration, snip it into lengths and leave aside. Reserve some fronds of dill for decoration too. Wash the lettuce thoroughly, separating the leaves but keeping them whole, and leave in cold water to crisp up. Make the mousse by blending the smoked salmon, cream cheese, chives, dill, sour cream, horseradish and lemon juice. I like to use a hand blender for a smooth result. Taste and adjust the seasoning – you might need a little salt and pepper to bring up the flavours. Scoop the mousse into a piping bag with a wide star nozzle. Halve the eggs, and you might need to take a sliver off the bottom of the white to stabilise them. Pipe the mousse on top of the eggs and chill in the fridge until ready to serve. To serve just place each egg on a lettuce leaf and add a strip of smoked salmon and a frill of dill. Redcurrant Meringue Pie – “Johannisbeerkuchen”
Redcurrants hang like bunches of rubies beneath the bushes in the allotment. They’re outrageously fertile, producing several kilos per bush. They are called Johannisbeeren – St. John’s Berries, in German, because they ripen around St. John’s Day – 24th June, Midsummer's Day. This year they’re a bit late, but every bit as juicy and perfect as ever. I make this pie at least once a year because it’s my husband’s all-time favourite baked dessert. It is a bit of a faff to make because the pie crust dough is fragile and tends to slump, and you have to cook it first, then fill the crust and cook again. But it’s worth it; the pie looks a treat and the taste is out of this world. The juicy tart plump berries combine with foamy meringue in the filling and the pie crust is crisp, crumbly, and sweet. You could make a similar pie with any tart small berry such as raspberries, blackcurrants, or even stoned cherries. I made it in a high sided square tin, and when I baked it, the crust on the sides slumped down under its own weight as it cooked and softened. It would have been better to cook it in a metal quiche tin with sides only a centimetre or so high, and that’s what I will do next time, so that’s what I’m recommending for you; so your pie should look neater than mine on the picture. I made it for my Seniors Lunch Club this week (and of course reserved a slice or two for my husband). Our theme was Wild Flowers, so we had a little vase of wild flowers (otherwise known as weeds from my allotment) on each table. There were many memories of picking wild flowers, making daisy chains, testing friends under the chin with a buttercup, throwing sticky burrs at people in the school playground and other misdemeanours. Our favourite wild flowers included bluebells, daisies, roses and honeysuckles. Then our conversation moved randomly, as it so often does, and we ended up having a round of “if I was going to have a tattoo, it would be…..”. We ranged from butterflies and roses to dolphins and dragons. If there’d been a mobile tattoo artist around at that minute, she’d have had a queue of octogenarian customers. Serves 12 Timings: about 2 hours (and that doesn't count picking the berries) For the crust:
For the filling:
Mix all the crust ingredients to a smooth dough, knead very briefly, wrap and put in the fridge to chill for 30 minutes. This will make it slightly more stable, although it is a very soft crumbly dough. Grease and line your low sided metal loose bottomed quiche tin. Pre heat the oven to 180°C. When the dough has chilled, roll it out on a floured surface and press it into your prepared tin. You probably won’t get the whole sheet of dough across into the tin in one piece, but don’t worry about that. This crust is more like a biscuit than pastry, so just get it to about half a centimetre thin layer across your tin and press the dough pieces together to join them. Line with greaseproof paper and baking beads and cook for about 30 minutes. Remove the paper and beads and cook again for about another 10 minutes just to ensure the base is cooked and light brown. Meanwhile, beat the egg whites well until smooth and fluffy and stiff peaks have formed. Gently mix in the sugar and cornstarch and then tip in the redcurrants and mix again. Spread this across your pie crust and bake again until the filling is set and the top is very lightly browned. I baked mine for 30 minutes at 180°C and then turned the heat down to 170°C for another 30 minutes but if you are using a lower sided tin it would take less time, so give it 20 minutes and 20 minutes and see if it’s done. The filling should be set and with no wobble but still be very juicy. Keep in the fridge on the tin bottom and eat with whipped cream within a day or so of making. Go and put your feet up after all that, and enjoy an afternoon in the garden. Tandoori Prawn and Pineapple Kebabs
Simple and fresh: straight off the grill! These are everyone’s favourite appetiser. Mildly spiced prawns in a green herby tandoori marinade contrast with the buttery juicy pineapple for an explosion of flavour. Great for parties and for starting off a summer garden celebration or barbeque. Serve with garlic bread, a few bitter salad leaves or just as they are, with lime juice and a sprinkle of chopped coriander. Serves 6 Timings: 30 minutes preparation, 2 hours marinate, 30 minutes to assemble and cook
Marinade:
Mix up the marinade ingredients, stir well and add the prawns. Marinade for at least 2 hours. Heat up the butter in a shallow frying pan and fry the chunks of pineapple for a few minutes to caramelise and release the juices. Keep the chunks cool until ready to assemble the kebabs. Heat up your grill or barbeque. Simply skewer the pineapple chunks and prawns onto wooden sticks (pre soaked) or metal skewers, allowing 2 prawns per skewer and interspersing the pineapple. Grill quickly – about 3 minutes on each side, making sure the prawns are cooked through. Serve straight from the grill, squeezing over a little lime juice as you go. Spanish Lentil Salad (vegan option)
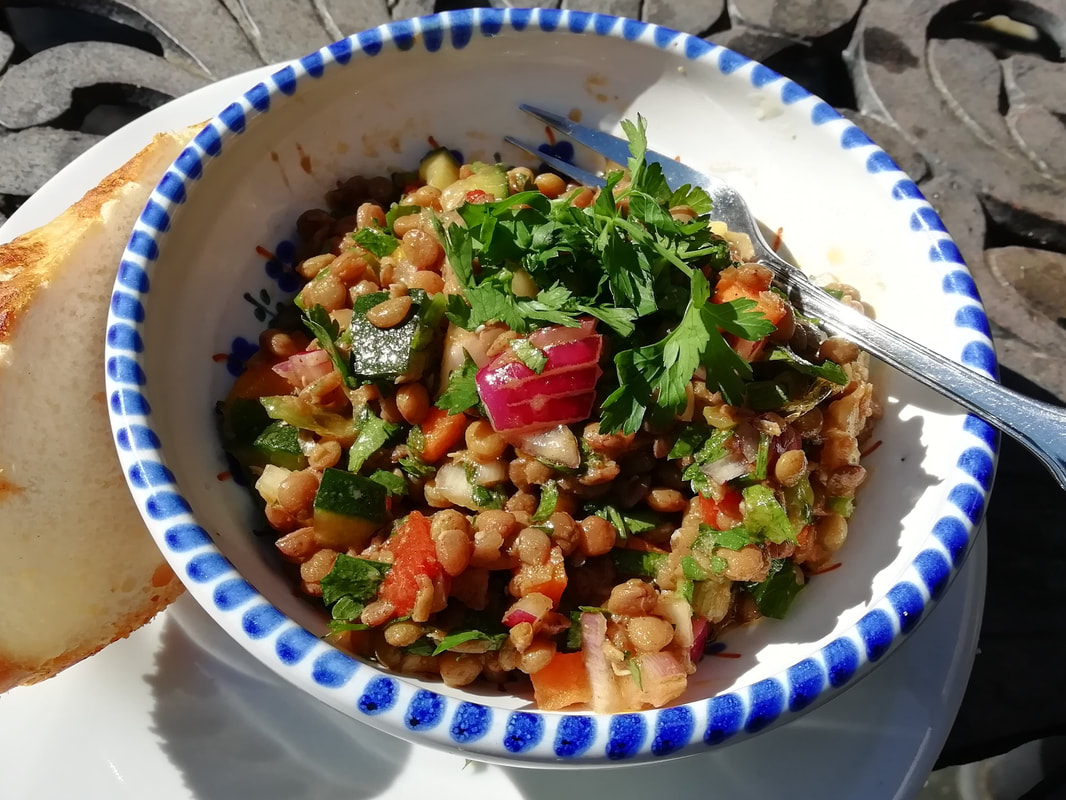
The Spanish are so good at meals for hot weather, they have to be. When we’re in a heatwave here in Blighty, we crave cooling but nourishing dishes, and can do no better than to take a lesson from our Spanish cousins. Lentil salad is a quiet classic. Easy to make, keeps in the fridge for days, goes with just about anything, and you can eat it on its own or put a boiled egg on top for an extra bit of excitement. Perfect for lunchboxes and relaxed lunches alike. This salad has the taste of Spain in a subtle way – the dressing contains pimento pepper, which is like paprika, and cumin for that very slightly Arabic edge. It’s not spicy, but if you want to spice it up a bit you could certainly add some sliced chilli to the vegetables or a teaspoon of chilli to the dressing. I adapted the recipe from SpanishSabores.com who have a whole host of inspiring Spanish recipes on line but I was really trying to re-create the dish I had at Finca el Cerillo in the hills above Malaga and I think I’ve got the essence of it here. You could add some feta cheese, or some other herbs. If you add tomatoes, then it won’t keep as long because of the additional juice, but they are very pleasant in the salad too. Serves 8 as part of a selection of salads Timings: 1 hour
Put the lentils and the lentil vegetables on to boil in a large pan – about 2cm of water covering the top of the lentils. Bring to the boil and simmer while you grill the peppers. Simmer the lentils for about 15 minutes, then check – they should be just done, with a bit of texture to them. Test them and give them another 5 minutes if you think they aren’t done enough but be careful, you don’t want to overcook. When they’re done, drain in a sieve and leave to cool down. Remove the vegetables that were boiled with the lentils. While the lentil simmer, put the peppers on a tray under a hot grill and keep turning them as the skin blisters and blackens. When they are blackened on all sides, put them straight into a glass bowl with a plate on top. (Much better than the old method of putting grilled peppers in a plastic bag – we now know that we’d rather not have plastic touching hot food.) Give them 10 minutes to collapse and cool down while you make the dressing. To make the dressing: shake all the ingredients together in a jar, and taste. Adjust the seasoning, you might need more salt or lemon juice or honey. Go back to the peppers and now you can peel them easily, scraping away the skin from the flesh and discarding the insides and the seeds. Chop the flesh of the peppers into small dice. Clean and chop the other fresh vegetables and then mix everything together. Chill in the fridge for at least an hour or better 3 hours before serving. Keeps for several days in a sealed container in the fridge. Postre Principe Alberto (Prince Albert’s dessert)
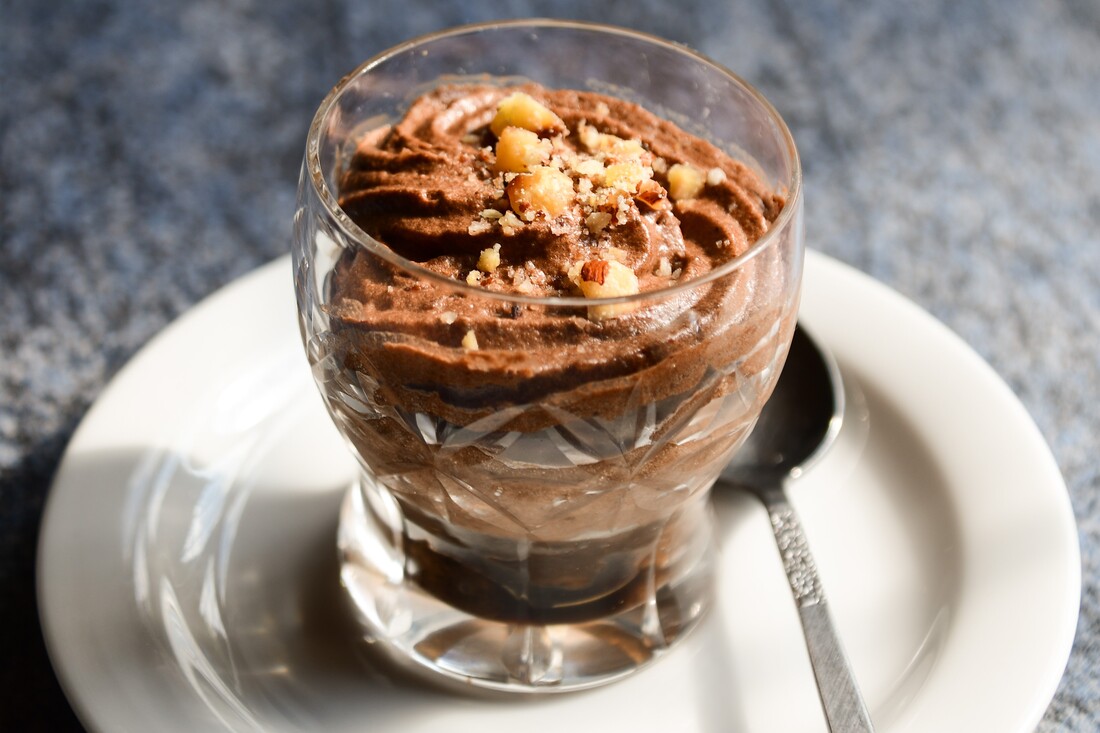
Tiny little pots of delicious nutty chocolate mousse with a surprise at the bottom of the cup. Apparently Prince Albert of Monaco is very fond of chocolate mousse. I mean, who isn’t? This dessert was created in his honour on a visit to the Canary Islands by Dona Matilda Arroyo of La Palma, the islands’ most famous chef and baker. It is served in many restaurants across the archipelago and is a real taste of the Canaries. The Moorish influence on Spanish cuisine is seen in the bitter coffee sponge combined with the smooth sweet mousse – it’s a delightful contrast and very simple to make and serve. You can of course use bought sponge biscuits or cake for the base, but naturally it’s nicest if made yourself. Serves 6 Timings: 90 minutes and 2 hours to cool and set Coffee sponge:
Mousse:
75g hazelnuts 100ml strong coffee, cooled Roast the hazelnuts in a small frying pan until browning but not burned. Let them cool and crush them finely in a spice grinder. You want mostly a fine flour but keep some rougher nubbles aside for topping the mousse. Pre heat the oven to 180°C. Grease and line a flat baking tin – you are making a thin layer of sponge like a swiss roll not a full thick cake. Make the sponge: whisk the eggs and sugar together until creamy and thick – about 5 minutes. Melt the butter and leave to cool a little. Add the flour to the eggs/sugar mixture a spoonful at a time and add in the coffee granules. Spoon the melted butter over the cake batter and mix in gently with a metal spoon. Spread the mixture out on the prepared tin, to only about 1cm thick and bake for about 10 minutes until cooked through. Cool on a wire rack and peel off the backing paper. Make the mousse: whip the egg whites until stiff. Melt the chocolate over hot water while you whisk the egg yolks gently with the caster sugar. Scrape the melted chocolate into the egg yolks, mix well, then scrape the whole liquid mixture into the egg whites. Add the ground hazelnuts to the bowl and mix well with a metal spoon, being careful not to beat the mixture too hard and also being careful to mix in any liquid chocolate lurking at the bottom of the bowl. You will have a rather thick delicious chocolate mousse, with the hazelnuts adding a little firm texture. Cut circles of the coffee sponge and place in the bottom of your crystal glasses or whatever you are serving the dessert in – traditionally a pretty glass to show off the layers. Soak each sponge layer in the strong cooled coffee. Add more rather than less, you want quite a well soaked sponge. Scoop the chocolate mousse into a piping bag and pipe a thick layer of mousse into each glass on top of the coffee sponge. You can spoon it in of course, rather than use a piping bag but piping gives a neater finish. Top each mousse with a sprinkle of roughly chopped hazelnuts. Cool for at least 2 hours before serving. |
Some Changes - April 2022
Thanks to my friends and followers for your patience, and for your encouragement to start blogging again. Archives
April 2022
Categories
All
|






 RSS Feed
