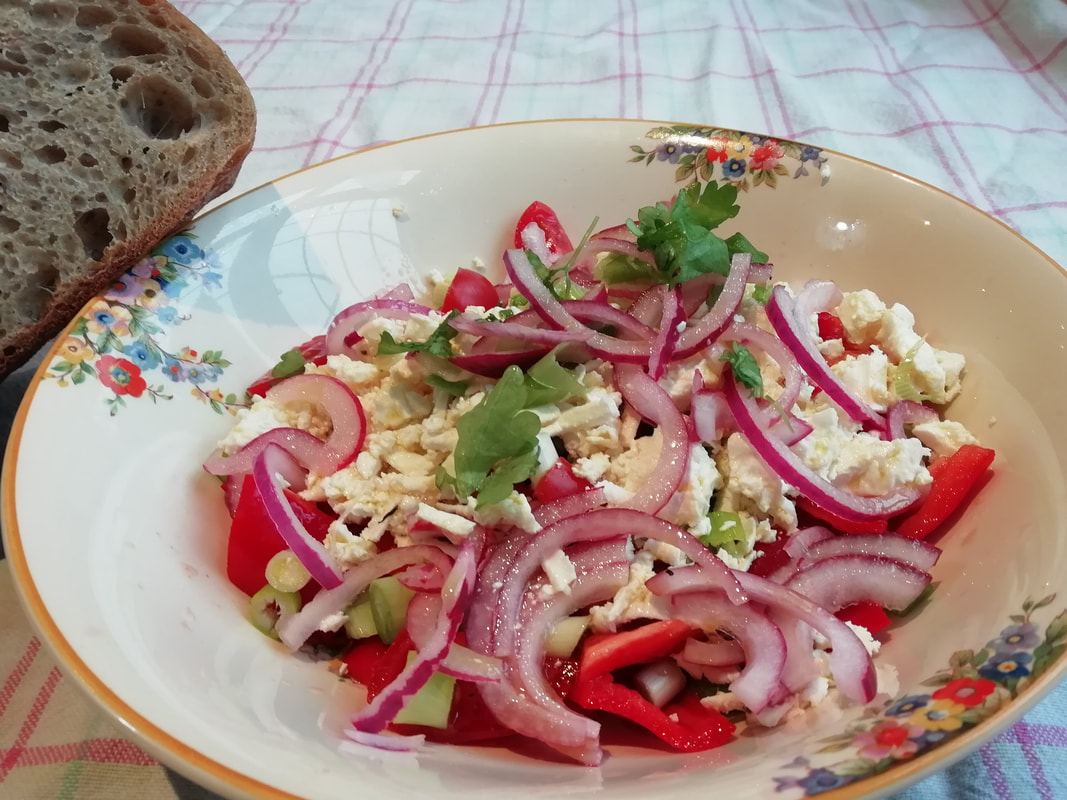
 Simple salad of tomatoes, peppers, salty cheese and lightly pickled red onions - delicious with a slice of bread Serbian Salad (vegetarian)
Long long ago when the world was young and I could still fit into my leather trousers (by far the best outfit for travelling ever invented – warm and cool like your own skin and never needed a wash…) I spent a lot of time driving about in what was then Yugoslavia. We ate at roadside restaurants where the cuisine was not at all remarkable – centring round grilled meat or some sort of tripe stew which our customer tried to trick us into eating on several occasions, to his own great amusement. One dish was found on most menus and I looked forward to it: a very simple “Serbian salad”. You can make it at any time of year but try to get the best possible tomatoes. The salty cheese sets off the sweet tomatoes, and the onions add that little bit of fire and crunch on your palate. The best Serbian salad I ever ate used home-marinated goat cheese, which I have re-created using feta, but if you don’t have time to marinate, you can just use feta from the packet. Serves 4 as part of a mixed salad table. Timings – 15 minutes to get the cheese marinating, and then 15 minutes to put the salad together when you want to eat. For the marinated cheese: 1 packet feta cheese (although I usually put two packs in to marinate at the same time, it’s only a tiny bit extra work and you can use it in all sorts of salads, or grilled on a slice of baguette, and it keeps a week or so in a closed container in the fridge, ready for you to use.) 100ml olive oil, 100ml light oil (sunflower or rapeseed work well, not nut oil for instance) – a clove of garlic, half a fresh chilli, teaspoon chilli flakes, a slice of lemon, teaspoon coriander seed, teaspoon crushed black peppercorns, teaspoon dried oregano, any strong fresh herbs you have to hand – thyme, rosemary are good. For the salad:
To marinate the cheese: Put the ingredients into a plastic container – I find one of the smaller takeaway boxes ideal. Mix up the oil with the spices and flavourings – you can adjust the flavours to your taste and the season. Take the feta out of the packet and slice it through its middle so you have half thickness slices – this is to increase the surface area and means the marinating flavours get further into the cheese. Slice the cheese so that it all fits into the container and spoon the oil around it, so it gets all over the surfaces. Put the lid on and leave in the fridge for 24 hours or up to 5 or 6 days. Turn the cheese in the oil if you remember. To assemble the salad: Slice the red onion and put it in a small bowl with the wine vinegar, some salt and a teaspoon of sugar, just enough to cover it. Wash and slice some good juicy ripe tomatoes. Take out the central pith if they need it, but don’t worry. Place in a rather flattish salad bowl if you have one. Chop the parsley leaves and the spring onions. De-seed the pepper and chop it into chunks, mix with the tomatoes. Crumble the cheese over the top of the tomatoes, then fish the red onion slices out of the vinegar and spoon them on top. Scatter on the spring onions. Mix 4 tablespoons of olive oil with one spoon of the vinegar you used on the onions, add a grind of pepper and check the seasoning, adding a smidgen more salt or sugar if needed. Dress the salad. Eat as part of a mixed salad table, with some salami or cold ham and some good bread. You can make this an hour or so ahead of time, the dressing will just sink into the vegetables, and it’s robust enough to be transported in a lunch box.
1 Comment
 Rosti potato cakes, golden & crisp: ideal for school holiday lunches Rӧsti (Potato Cakes) (vegan, depending on the trimmings)
A favourite lunch for hungry youngsters – either half-way down a ski slope, if you’re lucky enough to get to Switzerland at half term (we can dream?) or more prosaically, at home in your own kitchen. Rӧsti are very versatile, nearly as much so as pancakes, and are available as light, substantial, sweet or savoury options. They are also cost effective, crunchy and friendly to eat, so what’s not to like? Serve with a fried egg, some crispy bacon, left over cold meat, apple puree and cinnamon sugar – whatever takes your fancy. The only real downside is that you have to cook them in very hot fat, so small or even medium sized children won’t be able to make them for themselves. This also means you have to cook them in batches, unless you have an industrial sized fryer. I think batch cooking for school holiday lunch time is quite a practical idea. You can get the whole squabbling lot of children in the kitchen waiting eagerly for their meal and you can check on their homework progress/music practice/time on the Playstation/mood/nits/whatever as you cook and serve. There’s quite a bit of grating needed if you’ve got a gang of kids to feed, so either get them involved too, or use a machine. Serves 4 Timings 30 minutes
Peel the potatoes and drop them into cold water. Grate them into a bowl. And it doesn’t matter if they go brown. Add 2 teaspoons of fine salt (although I bow to no-one in my adoration of Maldon Sea Salt flakes, fine salt is better here, as you want to get it all over the potato surface) and mix with your hands. Leave for 5 minutes and then squeeze the water out of the potatoes. I find the best way to do this is to scoop them all into a tea towel and squeeze this over the sink. You do need to be quite firm about this, as if you leave too much water in the potato, the rӧsti will be mushy and not crisp. Prepare whatever accompaniment you are having with the rӧsti, unless it’s fried eggs which you will want to do at the last minute. Warm up your oven unless you are serving in batches. In a large pan, heat a generous level of oil until quite hot – at least 1cm deep. Drop a small handful of potato into the oil – I can get about 4 of these into my largest frying pan. Squash the potato down with a spatula to level it out and fry for several minutes - they will sizzle vigorously. Flip over with the spatula and fry on the other side for a few minutes – about 5-6 minutes altogether. Drain on kitchen paper and best to serve straightaway, although you can keep them warm in a hot oven on a metal tray for a few minutes if you want to serve everyone together and give you time to cook the second batch. You will need to keep an eye on the level of oil in the pan and top up if needed – if you cook them in too little oil you will get scorched potato rather than deep fried, which is less appealing. Channel your inner ski-enthusiast, and enjoy!  Buttery, crisp mince pies with a juicy filling, or dense fruity Christmas cake? Mince Pies
Home made mince pies are so different from the shop-bought, you might as well see them as different species. Even the best of the shop-bought ones have thicker pastry, so that they keep longer. Home-made can have crisp, flaky, buttery thin pastry, which snaps slightly in your teeth, revealing the plump raisiney-appley juicy mincemeat within. I do generally make my own mincemeat, and it keeps years so it’s worth a go to get your own ideal recipe, but there are some very good jars out there, and I wouldn’t turn my nose up at them. Just get the mincemeat out of the jar and into a bowl and make it your own – add some chopped almonds, or top up the booze content, or jazz up the Christmas spicing with some powdered ginger. Maybe a little bit of grated apple, but not too much as you don’t want the filling too liquid. I made a batch of mince pies for my Seniors Lunch group and they were most appreciative. I’ve been making them for our Covid-secure “Gate Date” neighbours parties too. We meet (in groups of 6 only) at the end of our drives, not inside gardens, to raise a mug of mulled wine and scarfle down a hot mince pie with brandy butter. Mince pies are good Covid-secure food as you can hand them out (wearing plastic gloves) in one-person portions, topped with a scoop of brandy butter for luxury. For twenty minutes you can forget about the cold and the damp and that you are standing on the pavement wearing your ski anorak, talking to your neighbours, instead of being cosy round your tree. In this very odd Christmas, we have to make the best of what we’ve got. (I should point out, we’re in Tier 3 and allowed to meet in groups of 6 in public places. Those in Tier 4 have my sincere sympathy – perhaps you could pass a batch of mince pies across the wall to your neighbours and raise a glass of mulled wine on zoom?) Makes 12 mince pies. Timings - 1 hour although you can make the pastry and keep it cool
Brandy butter: beat 250g butter (I like salted, though not the one with salt crystals in it) with icing sugar and brandy in your mixer until you have your preferred consistency and flavour – everyone’s a bit different in their brandy tolerance. Keep in a sealed tub in the fridge to eat on mince pies, Christmas pud, Christmas cake, whatever. Pre-heat your oven to 200°C and grease a 12-cup pie tin Mix the flour and butter together in your mixer with the pastry paddle or rub the butter into the flour with your fingertips until it is like fine crumbs. Add the ground almonds and icing sugar and mix lightly. Add one egg and keep mixing slowly. Add cold water a teaspoon at a time until the pastry binds together – don’t make it too dry or it will crack when you roll it out. Knead very quickly to bind the pastry together and then you can wrap it up and keep it in the fridge. You don’t have to chill this, as the pies are too small to shrink much. Beat the second egg in a bowl. Roll out the pastry on a floured surface to 2-3mm thick and cut bottoms and tops – this makes just enough for the 12 pies. Put the bottom parts into the pie tins and brush round with beaten egg. Spoon the mince-meat into the pies – a goodly mound of filling is required as it doesn’t rise; put on the tops and press round with a fork to seal. Brush the tops with beaten egg and sprinkle a little bit of demerara sugar on top to give a crunch. Using a knife cut a little slit in each pie top for steam to escape. Bake in the oven for 12-15 minutes until crisp and golden. Cool on a wire rack and keep in an airtight tin for 3-4 days. Eat as they are or warmed up with brandy butter on top, dribbling down your cold fingers. Merry Christmas, everyone, hope it was a good one.  Yummy, mildly-spiced spinach curry sauce - eat as it is or add chicken or lamb Asha’s North Indian Saag – vegan sauce or main, or use with meat
Asha and her husband are our next-door neighbours. She is a marvellous cook and often shares food with us. During lockdown I did a lot of their shopping and Asha reciprocated by passing delicacies over the garden wall on a regular basis. We call each other up and say “come to the wall” – I pass over bags of shopping and she passes over trays wrapped in kitchen foil. My family always love having something from Asha on our table – the flavours are not strong (they don’t like highly spicy things) but elegant and flexible. This is a perfect example of her food – it’s a spinach curry, which can be eaten just as it is, with rice or naan for a vegan meal, or used as a sauce for meat which is separately cooked. It’s not spicy hot, although there is a warmth to it. It’s a very versatile dish - the original recipe calls for spinach – I used chard leaves from my allotment. I used a leek instead of the kale, and you can include a turnip or not depending on what’s in the shops. Serves 4. Timings 20 minutes preparation (if you have to wash the spinach. If you are using a bag from the supermarket it will take less time!) 40 minutes cooking.
Place all the ingredients except the cumin seeds/lemon juice in a pan with about 1 cup of water – you need about 2cm liquid in the bottom of the pan so it depends on what vegetables you have used. Bring to a boil and simmer for 10 minutes until the vegetables are soft. You can also do this in a pressure cooker – bring up to pressure and cook for 2 minutes at high. Cool and liquidise briefly – not too liquid, you still want some texture not a soupy smooth puree. Taste and add salt/pepper as required. You might want a squeeze of lemon juice or a teaspoon of sugar depending on the sweetness of the tomatoes you used – use your judgement. Put about ½ tablespoon vegetable oil in a pan and cook the cumin seeds briefly until browned. Add the spinach mixture and simmer for 15 minutes. It is quite a thick mixture and will spit and bloop in the pan so you’ll need a lid on and stir it sometimes. You just want it to cook down a bit and let the flavours blend. Eat as it is – easy lunch with naan bread or dipping tortillas or add some grilled meat or halloumi or cubed cooked potatoes for additional protein and texture. It also freezes well as a sauce. Nice to have a lighter vegetarian dish as an alternative to all that Christmas protein!  Chocolate swiss roll sponge, filled with creamy chocolate/coffee butter icing - yummy! Chocolate Swiss Roll – “Yule Log” This is an adaptation of a true Yule Log. I needed something transportable, wrapped in kitchen foil, to take round on my delivery to my Lunch Club seniors. A real luxurious Yule Log would be the same chocolate Swiss roll cake, but maybe filled with smooth chestnut cream and covered with whipped cream dusted with chocolate powder to look like bark. This version doesn’t have quite the indulgent look of that, but you can’t take whipped cream icing round in kitchen foil, it would just disintegrate. Instead I filled it with a coffee/chocolate buttercream to add that touch of (vaguely firmer) luxury and dusted it with caster sugar/chocolate powder for a slight gritty contrast. It was very well received, anyway, I can report. Our discussion in the Seniors Lunch Group was about “The Best Present I Never Got” – a topic suggested by one of our inventive members, and of course we veered off topic anyway as we aren’t very good at following rules. We discussed everything about presents: the ones we wished for, the best ones we got and the best ones we gave. Our 98-year-old remembered a doll she’d been given when she was eight, which she loved with all her heart. When she came back home after years of war work at a factory in Birmingham, aged 22, the first thing she asked her parents was “where’s my doll?” and she was heartbroken (for a while) that it had been given to a small child in the neighbourhood. This prompted reminiscences from other members of being given a doll’s pram, and how proud that made the little girl, or giving a wheeled walker to a toddler at just the right stage and seeing the delight on his face as he realised the additional scope for mischief and mobility that it gave him. Wonderful memories. Don’t be afraid of Swiss Rolls – people can be nervous about them, but once you’ve got the hang of being quick to handle them straight out of the oven, they are super easy and very impressive, and they are a fatless sponge, so less calorific and rich than the butter-containing recipes. (Of course I then go and spoil it all by making an filling of buttercream, but in non-Christmas times you can use a spreading of jam for the filling and keep the fat content down.) Chocolate Swiss Roll – serves 8 (I made 2 to give 11 servings and some left for my household too) Timings – 10 minutes preparation, 10 minutes in the oven. Allow 2 hours to cool and then another 20 minutes for the icing and final decoration.
Pre heat the oven to 220°C. Put the eggs and sugar in the mixer and beat vigorously until fluffy and creamy-coloured. While that is going on, you can line your shallow baking tray with greaseproof paper. You need to make a shell of paper for the sponge, so cut the paper a bit bigger than your tray and fold up each side. Cut each corner at an angle so you can fold the paper over the corners to make a nicely edged shell – it doesn’t have to be exact and you don’t have to pin the corners as I was once taught. (what a nightmare, using pins in a cake! I’m amazed no-one got stabbed by a pin in my teenage attempts at Swiss Rolls). Once the egg/sugar mixture is light and creamy, turn the motor of your mixer down low and add in the flour and cocoa. Remove the whisk from the bowl and add in the hot water. Mix carefully with a metal spoon to keep the air bubbles in, and then scrape out the mixture into your prepared paper shell. You will get quite a thin layer – spread it carefully with the back of your metal spoon right into the corners of your paper shape. Place it in the oven and watch as the sponge puffs up and rises. It only takes 7-9 minutes as it is a thin layer of cake. While it’s baking, lay out a clean tea towel on your work surface and sprinkle some caster sugar on it. When the sponge is done – nice and springy to the touch but not burned on the edges yet – turn it out onto the tea towel and peel off the greaseproof paper. Quickly roll up the sponge in the tea towel, curling it over itself to make a nice neat roll. Do this from the short side, so you get more curls to the roll and a short fat thick roll rather than a long thin narrow one. I know they get disqualified on Bake Off if the roll cracks, but really, we don’t care, do we? Leave it rolled up in the tea towel like a steamy chocolate scented sausage to cool down on a rack. Make the buttercream icing by beating the soft butter in your mixer, add the coffee or coffee essence and then beat in the icing sugar and cocoa powder on low speed. I find the sugar rises up and covers the kitchen in a thin glittery layer if you don’t cover the mixer with a tea towel. When mixed, it should be light, creamy and quite spreadable. Taste and add more sugar if you think it needs it. When the cake roll is properly cool, carefully unroll it on the sugary tea towel. Spread the icing evenly across the cake and then roll up again, but without involving the tea towel this time. Sprinkle with caster sugar mixed with cocoa powder if you are using the cake as it is. You could of course cover with whipped cream if you aren’t taking it round the neighbourhood in slices.  Juicy meatballs with a mozzarella filling, served with tomato sauce, pasta and garlic bread Mozzarella Stuffed Meatballs in tomato sauce
Meatballs and pasta mean comfort for many people – made for sharing, and with cost-effective ingredients for a family supper. Add a centre of melting mozzarella and they’re even more gorgeous – the stringy melted cheese adds another savoury note and silky texture. The meatballs keep moist and tender in the sauce. You can make the meatballs up to 1 day ahead and keep them part cooked in the fridge, ready to pour the sauce over and place in the oven for the final warm-through. Serve them bubbling in their dish, with heaps of spaghetti and scatterings of grated parmesan. You could add an extra of garlic bread to mop up the sauce and a side salad of lightly dressed rocket leaves. You’ll have a very happy family! Serves 4 Timings – 15 minutes preparation, 20 minutes to pre-cook the meatballs. Final cooking in the oven another 35 minutes.
Drain the mozzarella and then cut the balls of mozzarella into cubes about 1cm square. In a large bowl combine the mince, chopped onion, tomato puree, Worcester sauce, marmite, oregano, mustard powder, chopped parsley with salt and pepper. Mix vigorously with your hands – it’s the only way to combine the tomato puree and marmite properly into the mixture, a spoon just won’t do it. Take a walnut sized lump of the mixture and spread it on the palm of your hand. Plonk a cube of mozzarella onto the meat and smooth the meat up and around so it encloses the cube completely. Place the meatballs on a plate as you complete them. Use up all the mince, and you should use up all the cheese, but if you have a piece or two left over, that’s fine, you can just cut it up and put it in the dish when you finally oven cook. Pour a generous layer of cooking oil – about 1.5cm - into a heavy based frying pan and heat well. Fry the meatballs a few at a time – about half a batch this size goes into my big pan at once. Don’t cram them in too closely as that will cause the oil to cool down too much and you want it hot to sear the outside of the meatballs quickly and not allow the cheese to ooze out. Turn the meatballs as they cook so that they brown all over and remove onto kitchen paper to drain after a few minutes – they only need about 3-4 minutes cooking per batch. Repeat with the next batch until you have cooked all the meatballs. The odd one or two might split, it doesn’t really matter. At this stage, you can keep the meatballs in the fridge for 24 hours. Preheat the oven to 200°C. If using the carton of passata, take out the garlic now. Warm the sauce or passata in a pan. Season if it needs it. Place the meatballs in an oven proof dish that will take them all in one layer. Pour the sauce over, adding any leftover bits of mozzarella. Add a fresh leaf of basil or two. The meatballs should just show through the surface of the sauce. Cover the dish with kitchen foil and cook for 20 minutes. Then remove the foil and continue to cook for another 15 minutes until the sauce is bubbling and you can smell the meat/mozzarella and sauce melding beautifully. Serve with freshly cooked spaghetti, a sprinkling of parmesan cheese and a slice of buttery garlic bread.  Dark salty tapenade on sourdough toast Tapenade – dark as Christmas Night (vegan version)
Salty, deep, dark, garlicky, oily, wicked – tapenade tastes like it looks like it sounds. You can buy it ready made in jars, of course you can. But if you make it yourself, firstly it tastes fresh and spicy and wakeful, and secondly, it’s far more cost effective. I quite often get asked for the recipe, which shows that home-made really tastes different from bought. All you need is a stick blender – the bowl of a main mixer is just too big for this and the blades don’t get right into the sides of the paste. It depends how smooth you want it - it’s a personal thing. I like it smooth enough to spoon onto a small cracker or broken shard of toast, and have it stay there by its own willpower, so it needs to be oily and textured enough to stay in a blob. But I still like the slightly rough woolly-blanket-texture of the olives, not a soupy puree. Maybe I’m hard to please, but the point here is don’t over-liquidise. Stop once the mix has turned into a puree, taste, test and liquidise again if you want to. This is perfect party food – adult, sophisticated and tasting very much of the night. Serve it on little crackers slicked with cream cheese, on that French toast you get in packets (which gives you a surprise sweetish tang too, for another adult kick) or on pieces of broken sourdough for a careless, California vibe. Obviously in these post-Covid days, we don’t offer this as a dip, except in individual ramekins with each-to-his-own plates of dippy things. If you make larger quantities, this makes a superb gift, put into little jars to give to people at Christmas; maybe along with a little bag of sweet treats if you want to be really impressive. Serves 6 as a starter along with other nibbles and snacks. Timings – 10 minutes.
Put all the ingredients in a bowl and blend with a stick blender. Test the texture and either add a tiny bit more olive oil and blend a bit more or leave as it is. It keeps very well stored in a jar in the fridge, so you can make this at the start of Christmas and bring it out when the occasion demands. German Christmas Biscuits There are hundreds and hundreds of types of German Christmas biscuits. Anyone who fancies themselves as a cook has their own recipe and makes tins full of little goodies throughout Advent. Chocolate kisses, gingernut snaps, vanilla crescents, macaroons of all types, peanut cups, everything you can imagine. You can’t go for a cup of coffee at a friend’s house without having to try at least four types, and that’s before you go down to the Christmas market for a mug of gluhwein and a sausage in a roll, or a sweet dumpling with custard all over it or some squishy little noodles fried up with onion and sauerkraut. The Germans take Christmas seriously, and it can seem mainly about food. Having a German husband it is therefore inevitable that I bring out the cookie cutters and get passionate about icing at this time of year. I’m afraid I’m not as energetic as some, and I usually only make one or two types at once. This week I made a huge baking of basic cookies in different shapes and iced differently and a baking of macaroons, which I parcelled up for my Seniors Lunch Club along with a gluhwein-spiced sponge cake as a little extra. This week’s theme at the Lunch Club was Christmas Carols – about which the Germans also know a thing or two. Our favourite was “Oh Come All Ye Faithful” which the 98 year old in our group insisted on warbling out in Latin – of which she remembered at least two full verses. Don’t let anyone tell you that memory loss is inevitable! “Hark the Herald” came a close second – we are obviously a traditional group. We then had a debate if “The Twelve Days of Christmas” actually qualifies as a carol and decided that in contrast to “Frosty the Snowman”, it probably does. Here are my two types of baking, which fit well together as they use the yolks and the whites of the eggs in the two recipes. Jammy Little Iced Biscuits Makes about 60 little biscuits, depending on your cutters etc – I found it made 4 baking sheet-fulls. Timing – about an hour preparation, 10 minutes baking. Time to cool down and then however long it takes you to ice them, depending how complicated you want to make your life.
Put the flour and butter in the mixer with the pastry paddle and combine to a texture like soft breadcrumbs, or rub the butter into the flour with your fingertips. Mix in the icing sugar and then the egg yolk. You might need a little bit of water in addition to make the dough come together. Knead it for only a few seconds just to smooth out the texture, then wrap up the ball in cling film or beeswax wrap and put in the fridge for half an hour. Pre heat the oven to 180°C. Roll out about ¼ of the mixture on floured surface until about 2-3mm thick. Use your Christmas Cookie cutters to cut shapes – I did a mixture of stars, trees and round shapes with the centres cut out. Each biscuit will have a top and a lower part, so if you are doing cut outs, of course you have to do a whole round for the bottom part and the cut out part for the top biscuit. Place the biscuit shapes on greaseproof paper on baking trays and put into the oven. Keep an eye on them and change over the upper and lower trays as needed. You hardly want them browned at all, and they will go from blond to burned in a very short time, so really watch them – they take about 8-10 minutes but that can vary according to position in the oven. As one tray comes out, put the next one in. Slide the paper off the trays onto a cooling rack and the biscuits will come off easily, hardening up as they cool. Leave them all to cool fully. While you are waiting for these biscuits to cool, make the macaroons – see below. Once the little biscuit shapes are cool, you can sandwich them up and ice them. I used heated up redcurrant jelly for the sandwich jam – you just need a little drip of liquid jelly on the lower biscuit to stick the top one on. Let the jelly set before icing. If making cut-out biscuits, get the top and the bottom stuck together with just a little jelly and then drip some more warm jelly into the cut-out shape to get that lovely glossy deep colour. I iced using a straightforward water ice with food colouring – just add drips of water to icing sugar and mix to form a stiff paste. Make a small batch at a time and use a different colour for each batch, to given a nice variety for the biscuits. You can use a small brush to paste the icing onto the top surface of the biscuit to give a nice finish. Add sprinkles, edible glitter, whatever you like as you finish each batch of three or four, any longer and the decoration won’t stick. Leave to set and keep in a sealed tin. The biscuits are not very crisp, because of the jam, but they do keep about a week. You can change up the flavouring of these, adding grated lemon zest, or some Christmas cinnamon spice to the dough if you want. Little Macaroons
In the bowl of your mixer, whip the egg whites until stiff. Add half the sugar and continue to beat. Add the other half of the sugar. Mix in the ground almonds. That’s it. Put the mixture into a piping bag with a star nozzle and pipe squidges of macaroon onto greaseproof paper on a baking tray. They don’t rise, so you can space them closely. I like smaller rather than huge ones, but choose for yourself. Put them in the oven for about 30 minutes, check to see how cooked through they are underneath and give them a bit longer if needed to crisp right through. You can even turn them over to let the undersides get crisp. Cool on a wire rack and keep in an airtight tin. They keep about a week.  Juicy tangy pulled pork, grilled with peppers and served with rice and tortilla chips Mexican Crispy Pulled Pork - Carnitas
Crispy pulled pork? Shouldn’t pulled pork be tender, dripping with sauce, oozing juices? Well, this is that as well, but taken a step further and crisped up after cooking, with the addition of some grilled and charred peppers. It’s spicy, melting meat, with tender grilled peppers, and a tangy Mexican sauce that leaves your mouth feeling like your tastebuds made a new friend. It’s also easy to make in double quantities so you can have it with rice and tortillas one day and serve it in burritos another day. Or in a sub roll with melted cheese. A dish to make your life easier as well as tastier. It’s a sort of adaptation of a Mexican street food I think, which would be slow cooked in a kitchen in the back streets, then brought out on a food cart to be given the final grilling and served on a crispy tortilla or flatbread. Serves 8 Timings – 30 minutes initial preparation, then 6 hours in the slow cooker, 20 minutes final preparation.
Spice rub:
Mix all the ingredients for the spice rub together, get the meat into it, and rub well. Put the meat into a large frying pan with a little oil and start to brown it over a medium heat. The oil will run from the marinade and the sugar will start to brown and caramelise. As the meat fries, slice the onion finely, crush the garlic and chop up one of the peppers into 1cm dice. Take the meat out of the pan, put it into the slow cooker or a deep casserole dish. Add the onion, garlic and peppers to the pan and cook about 3 minutes until tender. Add the can of tomatoes and another half can of water, splash of Worcester sauce and a splash of fruit vinegar. Bring to the boil, stir well and add to the slow cooker or casserole. Tuck the bay leaves into the sauce. Cook on medium heat for 6 hours in the slow cooker or about 3 hours in the oven at 130°C. At the end the meat should be tender and flaking apart. Take the meat out of the sauce and flake apart using two forks. Take any bones out and discard them, also the bay leaves. At this stage, you can divide the meat up into portions and freeze what you are not using today. Mix it with some of the sauce in a freezer dish. (The leftover sauce – which will have tomatoes, peppers, onions and the odd shred of meat in a lovely deep meaty spicy liquid – can be used as the basis for a goulash soup, or used as extra gravy in a meat pie, for instance.) Cut up the other pepper, into thin strips. For the final stage, put the meat you are using into a grill proof dish, mix through the fresh pepper. Drizzle over some of the sauce – but carefully, you are not using the whole lot, you don’t want a liquid mix. Grill under a high heat for a few minutes – taking out and mixing up a few times. The pepper will char and grill, the meat shreds will start to crisp up at the sides. You can also do this in a frying pan, keep turning to get it crispy. Scatter some chopped fresh coriander over and serve with lime wedges, plain rice and warm tortilla chips.  Rich chocolate custard, made in under 10 minutes, ideal for a school holiday lunch for hungry kids! Chocolate Custard – the easy version
You know, like all kids, I didn’t give my Mum much credit for being a good cook. The food appeared; I ate it (being a greedy skinny active child) and ran off to play without thinking about the effort that had gone into the meal. Actually, not much, she liked to keep it simple, especially lunches. This was a dish that we had very often on school holiday lunchtimes – quick to make, easy to eat, non-challenging to the fussy, and made from cheap store-cupboard ingredients. No chemicals, no e-numbers or stabilisers, just cornflour, sugar, milk, eggs and cocoa. Yes, it has sugar, so maybe not the dessert for absolutely every day. Pour it over bananas or poached pears, or grated apple or eat it by itself – we did and called it Chocolate Pudding. It takes 10 minutes to make from scratch and is nice and filling, so feed the little darlings or terrors (whichever mood they are in today) a lunch of baked beans on toast and chocolate custard with bananas and send them out to play in the cold knowing they won’t need a snack before the evening meal – another healthy habit to cultivate while they’re small. It's also comfort food for grown-ups if you need something warm and easy and you can't face another bowl of cornflakes for dinner. Of course, there is a sophisticated version of Chocolate Custard, more suited to the adults and taking more time – I’ll do a recipe for that another day. Serves 4, timing – 10 minutes.
Pour 430ml milk into a pan (use a non-stick if you don’t like washing up) and get it on the heat, reserving the little bit of milk, about 2 tablespoons. Sieve the cornflour and cocoa into a bowl (there are often little gritty bits in the cocoa if it’s a good brand), stir in the sugar, then stir in the egg yolks and the reserved milk. Mix to give a nice thick liquid paste. The milk in the pan should be near to boiling by now. Take it off the heat, pour into the bowl of chocolate paste. Stir well and pour the whole lot back into the pan, scraping out any bits at the bottom of the bowl. Put the pan back on the heat and stir the sauce with a wooden spoon as it thickens – it only takes a couple of minutes. Eat straightaway, poured over whatever fresh or tinned fruit you like or just as it is. Lucky kids! (You can use the egg whites to make meringues or maybe toppings for Little Lemon Meringue Tartlets - see my post from 28th November.) |
Some Changes - April 2022
Thanks to my friends and followers for your patience, and for your encouragement to start blogging again. Archives
April 2022
Categories
All
|


 RSS Feed
