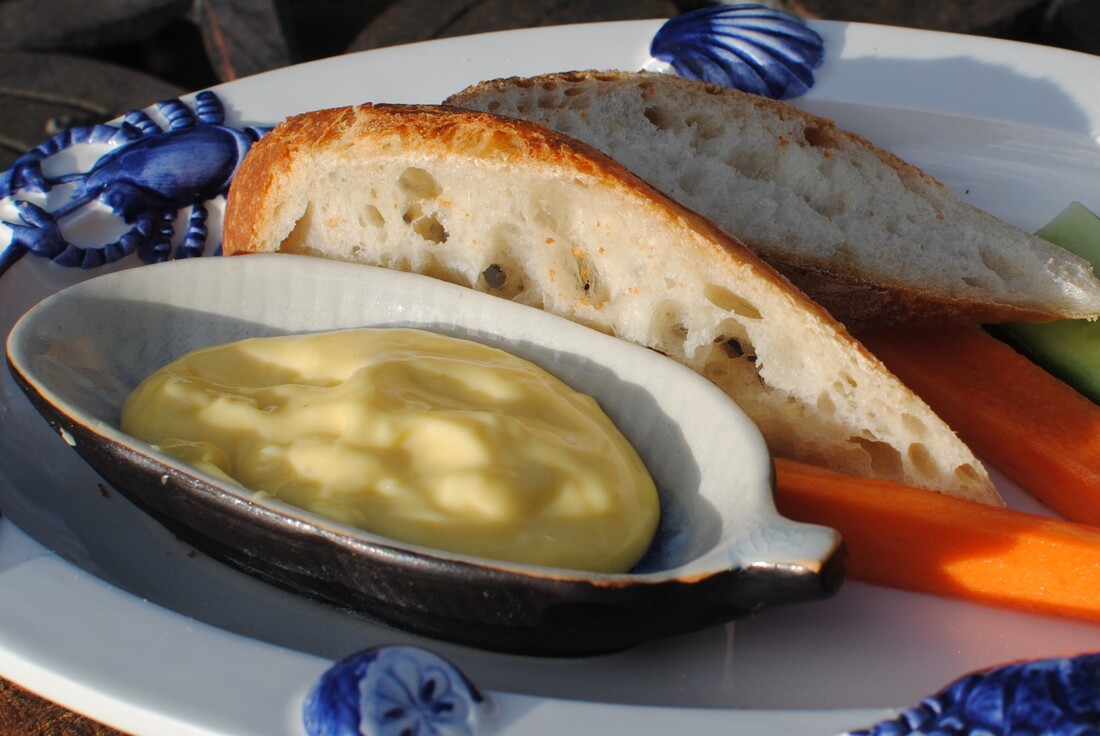
 Spanish Allioli or French Aoli - garlicky, creamy, just right for dipping Allioli or Aioli? A whole yolk’s worth of fun!
Another Spanish tapas, that you don’t even have to order. As soon as you sit down, the waiter brings you the menu, a teensy bowl of this lovely rich oily paste and some pieces of bread. This being the Canary Islands, the bread is unfortunately white, thin and tasteless but the allioli makes up for it. They seem to add herbs, whatever they have around, to make it green and therefore even more attractive. On my recent holiday in Tenerife (very nice thank you) we had allioli speckled with chives or parsley, something I’m pretty sure was dill, and maybe even oregano. But the basics are just egg, garlic, mustard, oil, vinegar and salt. I used to be nervous of making my own mayonnaise. Don’t be. I was worried about all the admonitions to only add the oil one drop at a time, or else dreadful things (curdling? How horrible does that sound?) would happen. Yes, you have to add the oil slowly, but so far, I’ve never yet curdled, and now I’ve made it loads of times. Then some chefs have taken to making it in a food processor, as an “easy” solution to the difficulties of the hand made version. This made me even more nervous, how difficult must it be, if even top chefs recommend using a machine? But the machine needs washing up and also means you have to make quite a large quantity. Half the joy of making your own mayo is that you can make one-egg-yolk’s worth, which is just enough for lunch for 4 people, and nothing left over. You really don’t want to be storing fresh mayo for more than a few hours in the fridge, so what are you supposed to do with all that over-production from using 4 yolks, let along all the dreadful eggy washing up. So, use a tiny tiny whisk, get your oil bottles out (such fun) and take ten minutes to produce the most glorious, glowing, garlicky home made allioli ever seen on this planet. Serve it simply with some good (French sourdough baguette is perfect) bread and some vegetable batons and you have a top class vegetarian lunch. Now we’re coming close to the dreaded school holidays, teach one child and set their task to make mayo every other day. One day as allioli dippers, one day in coleslaw with baked spuds, another day dolloped into a BLT – your lunches will be easy, nutritious and cost effective. As well as teaching your child a life skill and the practice of patience. Teach another child how to make soup and every other day have a different home made soup. Teach another child (if you have another going spare) how to make bread, and you'll have a real lunch time production line going. I’m not giving strict quantities here. Every egg is a little bit different and also you might use other oils or herbs. The only quantity you start off with is one egg yolk. Put one egg yolk in a small bowl. Sprinkle onto it one half teaspoon of sugar. Add one half teaspoon of Dijon mustard or a half teaspoon of English mustard powder. If you are making garlic flavoured mayo (allioli), squash a garlic clove with some fine salt into a paste, and add that to the yolk. If you aren’t making a garlic version, just sprinkle half a teaspoon of salt into the yolk. Beat the yolk up for a bit with your teeny tiny whisk. Now start adding the oil. You can use olive oil (not the very best heavy green oil for the whole thing as that can make it a little bitter) or rapeseed oil, nut oil, or just plain sunflower oil. I like to add a little of each in rotation just for fun and so that the final mayo doesn’t taste too much of any one of them. You add the oil a little at a time and beat each dribble in before adding the next. You will notice the mixture becoming thicker, almost like an oily custard. Keep going until you have about an espresso cup full of mixture, which should be thick and glossy. Taste it. Add a teaspoon of white vinegar, beat it in. Add a little more oil, whisk. Add a teaspoon of lemon juice. Taste it, add more salt or sugar if you need it. Add a dribble of cold water, whisk. Add some chopped herbs if you want or even some tabasco or chilli sauce for a spicy version. Mix well. If you make it half an hour before you want to eat, the garlic and herb flavours will intensify.
0 Comments
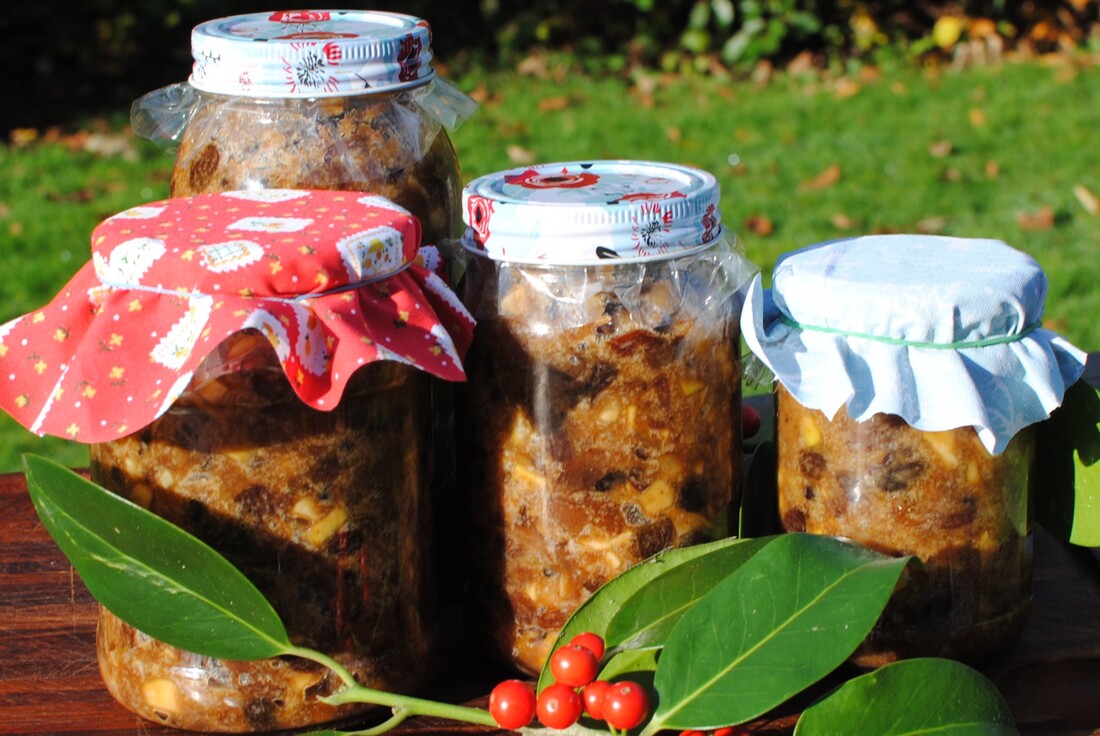 It just says Christmas, doesn't it? Raisins, apples, brandy, spices. All ready for those Mince Pies. Mincemeat You can buy so many versions of mincemeat in jars and most of them are quite good. But once you’ve made your own, you will make it again and again, and then you’ll start giving it to friends as a pre-Christmas present. When you make mince pies with this, people will ask – “are they homemade?” and then they will ask “and did you make the mincemeat too?” if they know what they are tasting. As with all home-made ingredients, one of the best things is to cater exactly to your own tastes. I like the subtle crunch of nuts in mincemeat, so I have more in my recipe than some others, and I also like the fruity appley taste. Too much fresh fruit means it doesn’t keep so well, but I prefer to use my fresh mincemeat up every year and not give it space in the pantry till next Christmas, so I don’t mind if my mincemeat doesn’t keep more than six months. This is loosely based on Delia Smith’s Christmas recipe. I look forward to taking her book from the shelf every year and delving into it. Her tip is that melting the suet through the fruit adds to the keeping quality and is better than just adding it dry to the mixture as you will find in bought jars and some recipes. The melted fat looks quite a lot when you take the dish out of the oven but it coats all the fruit and disappears as the mixture cools. I always use the vegetarian suet you can get at the supermarket. Make your own, try variations of ingredients and flavours, and you’ll end up with something unique to you. You might prefer whisky instead of brandy? You might like more orange flavour or want to add some spoonfuls of marmalade – give it a go! Leave out the peel if you don’t like it and use dried cranberries. Really go wild and add some preserved pineapple and slosh in some rum. Makes about 2kg, 4 medium jars Timings: 1 hour on the first day, overnight soaking then 3 hours slow cook
Chop the apples into small dice and add to a large bowl with all the other ingredients except the brandy. Stir well and leave covered in a cool place overnight for the flavours to mingle and the fruits to absorb the juices. Next day, pre-heat the oven to 120°C and cook the bowl - covered with foil – for about 3 hours until all the suet is melted. Bring it out and let it cool in the kitchen, while you stir it from time to time to keep the fat mixed in. Add the brandy when the mixture is cold. Store in clean jars, tightly sealed. It does keep for a year or more depending on the mixture, but you can surely use it up over this Christmas? Make an extra batch of mince pies and take them round to an elderly neighbour? 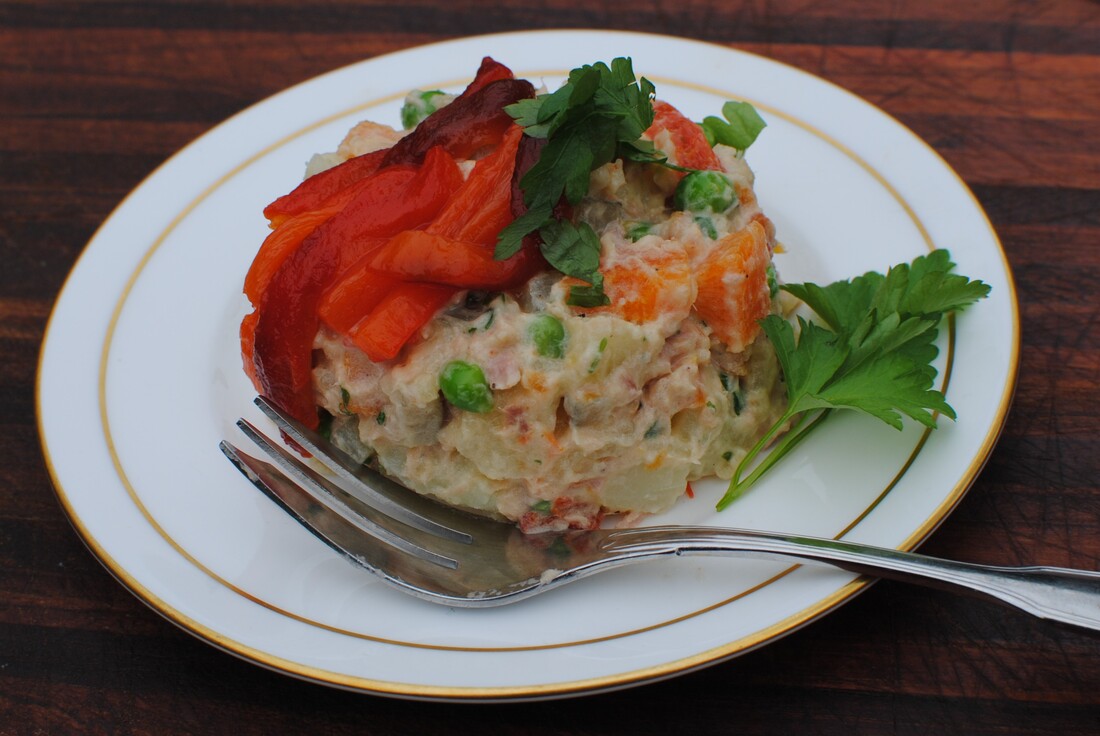 Simple but delicious. Potatoes, carrots, peas, tuna and gherkins in a creamy mayo Ensaladilla (vegetarian options)
Returning to a much-loved place is a joy. Eating the food you first ate there takes you back. I’ve said in this blog before how much I learned from eating in the Canary Islands. “Gourmet” is not the first thing you think about the Canaries, but these days it should be near the top of the list, along with sun, sand and holiday fun. We all adore sharing a table of tapas with friends or family. Everyone chooses a favourite, but you also get the chance to try new things. In Spain, when you sit down with a drink, the bar will also often serve you a little portion of their chosen “tapas de dias” without extra charge. It’s good marketing, encourages you to sit and drink another round, and lets you try home made small portions of local food. Just what I like to do best. You find “Ensaladilla” on the menu at most tapas bars in the Canaries. The proper name is Ensaladilla Russa, or Russian Salad, but who cares? And is it anyway? A Russian chef, Lucien Olivier, is said to have made the first salad of this type in Moscow in the 1860s, but the same recipe exists all over Europe in various forms and they can be quite different, so I don’t see how anyone can lay claim to the “best”, or the “original” or the “genuine” recipe. I’ve eaten a similar dish in the Balkans with chopped ham in it, they sell pots of it in German supermarkets with sausage pieces, I’ve had a very eggy version somewhere on my travels. The main variation in Spain has tuna, so that’s what I’ve gone with here. The basic recipe is cooked potatoes, carrots and other vegetables, bound together with a mayonnaise dressing, and some herbs. For protein you can add chopped ham or other softish processed meat, or eggs or fish. You can add or leave out: chopped pickled cucumber/gherkins, capers, anchovies, red peppers. Some like chopped dill, others prefer parsley. You can layer it attractively or just mix it up and serve it as a scoop. The dressing is usually freshly home-made mayonnaise, but you can use mayo from a jar and you can lighten it a bit with sour cream or plain yoghurt if full-on mayo isn’t for you. Two big no-no rules: no garlic in the mayo and no tomatoes in the mixture. I tried to re-create our favourite versions from Tenerife, but please let me know if you have any favourite family recipes, or other versions you love and I’ll try those too. 8-10 starter portions 30 minutes preparation
Boil the potatoes with their skins on, leave to cool and then peel and dice quite small. This avoids you cooking small peeled cubes of potato which tend to dissolve into mush. However, best to cook the carrots when already diced up, as they don’t peel well once cooked. Grill the peppers until blackened on all sides, then put them in a glass bowl with a plate on top to steam while they are hot, wait until they are slightly cooled and the skin will come off easily. Remove the seeds, stalks and membranes. Cut the flesh into long thin strips with scissors. Cook the peas. If frozen just pour boiling water over them, leave 2 minutes and drain, which keeps them nice and crunchy. If fresh, boil for 2-3 minutes. Drain under cold water. When all the vegetables are cool, add the potato cubes, carrots, peas and chopped gherkins to a bowl. Chop the fresh parsley and add in, and chop half the red pepper and add in. Break up the tuna, add it to the bowl along with the mayonnaise. Mix well, taste and adjust the seasoning. You might need a little salt, maybe a squeeze of lemon juice and a grinding of black pepper. Chill the mixture in the fridge before serving. You can make a nice shape by spooning the ensaladilla into a ramekin and turning out onto a plate; decorate with a couple of the reserved strips of red pepper and a leaf of parsley. 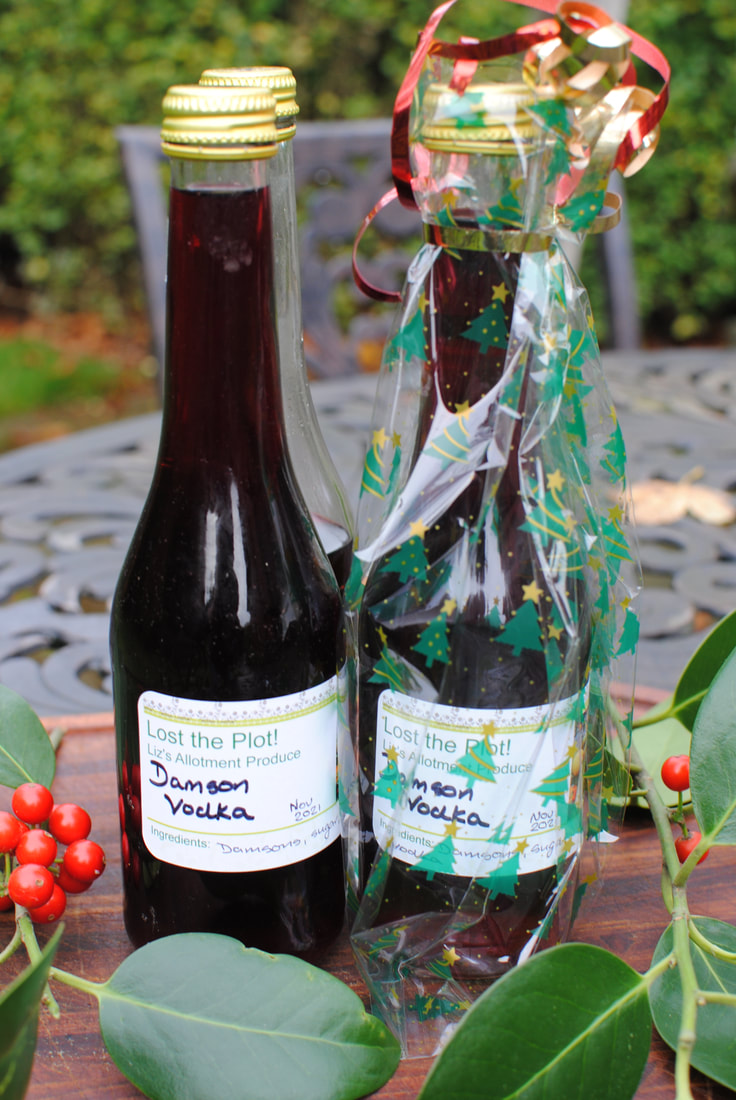 Might it be beginning to feel a bit like Christmas? Time to strain the Damson Vodka. Damson Vodka
Something this easy doesn’t really deserve the name of a recipe, it’s more of a doze while the alcohol and natural fruit does the work for you. But it ends up as something delicious for which you will gain praise, deservedly, because it also needs patience; a virtue in rather short supply. You can make a flavoured vodka out of pretty much any fruit, but the stronger tastes and firmer fruits work best, and can be played with, as they can take extra notes such as cinnamon if you desire. Damson trees have a habit of over producing in some years and making a sweet spirit can be a great way of dealing with the excess, while you use up the very best fruit in crumbles, pies, jams and other preserves. Because damsons have a thick skin and are small, so have little fruit compared to the big fat plums, they do need a good two months marinating with the vodka to get the flavour out. You can assist the flavour migration by spearing the damsons as you throw them into the bottle or by freezing them beforehand which splits the skins and allows the alcohol to penetrate. I never have enough room in my freezer for random bags of fruit, so I just pinch the fruit a bit as I clean it and leave it two months in the vodka. It seems to do the trick. As I said, more of a doze than a recipe. Play with the flavours if you like – add a stick of cinnamon or a couple of star anise to the mixture if you feel you would like a Christmas tinge to your vodka. Having tried one or two variations, I prefer the plainer fruiter version but that’s just me. Makes nearly 3 x 300ml bottles 20 minutes preparation, 2 months in the dark
Place the clean damsons in a container you can seal up – an old coffee jar or kilner jar is ideal. You’ll need 2 x large coffee jars for this quantity. As you put them in, prick them with a skewer or pinch them with your fingernails just to split the skin a little bit. Add the sugar. Pour the vodka over. Seal up your jars and leave them in a cool dark place. For the first 2 weeks try to shake them every day to distribute the sugar and keep the alcohol moving into the fruit. After that, shake them every week or so. You will notice it takes about a month for the sugar to disappear. The vodka will start off clear and gradually take a ruby tinge. It will also evaporate a little if your jars are not quite tight, doesn’t matter. But alcohol does tend to creep a bit so put the jars on a piece of kitchen paper to mop up any sticky spills. After about 2 months, you can strain off the vodka and bottle it. If you bashed your damsons or froze them, you might have to strain the liquid through a muslin cloth to get the fine bits out if you want a crystal clear final result. I just sieved through a normal kitchen sieve because my damsons were still quite intact. The fruit can be de-stoned and eaten over ice-cream, added to a crumble or used in boozy chocolates – recipe for that one to come nearer to Christmas. You are supposed to leave the Damson Vodka for a year to mature. I have never had the willpower to do this so I cannot vouch for how much better it tastes after a year. I really can’t imagine it can be much better than it already is. I stand ready to be corrected however, so all you experienced fruit vodka makers out there can put me right. The Damson Vodka can be drunk by itself over ice as a seasonal aperitif, mixed with prosecco, used in all sort of cocktails, or as a post prandial tipple on its own. Bottoms up! 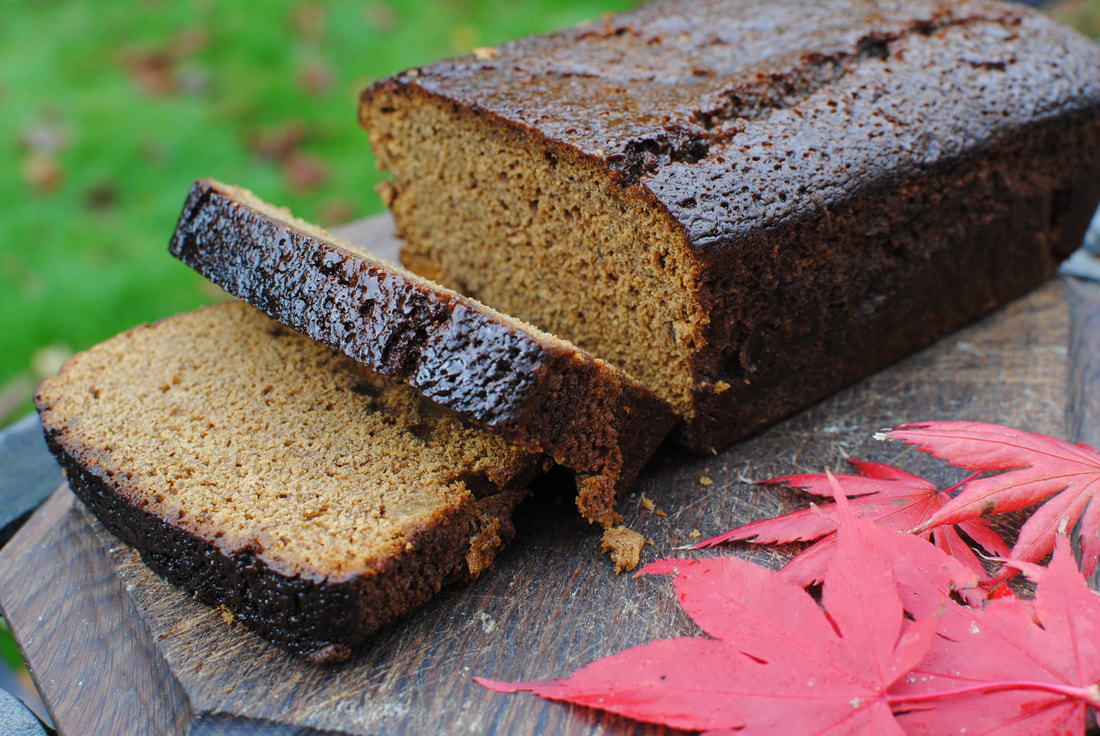 The perfect Autumn party cake, deep and dark and delicious Jamaican Rum & Ginger Cake
When I was young, my Mum would always welcome us home from school with a cup of tea and a piece of cake as a way of fortifying us to do our homework. She was a big believer in the power of cake, although the slices were small. I’ve got one of her old cake tins in my cupboard – it’s tiny and flat compared to the ones I buy now. She used to make two slim vanilla Genoese sponges and sandwich them together with homemade jam, dust the top with icing sugar and serve us a small slice per day. It was certainly sugary and nutritionally empty but it was hardly over-indulgence, coming at the end of an active school day, before playing outside for an hour and in a household where our usual pudding was stewed rhubarb. Sometimes she varied the cake routine and made a ginger loaf, quite like this one although without the rum. I find this cake so very evocative of autumn, cool afternoons, leaves falling and the anticipation of bonfires. I’ve used inspiration from my Mum and also from Hugh Fearnley-Whittingstall’s recipe in River Cottage Everyday which I do indeed, use pretty much everyday. Thanks Hugh, thanks, Mum. Makes 1 loaf, about 12-14 portions
Grease and line a 1lb loaf tin, and pre heat the oven to 180°C. In a pan melt the butter, treacle, syrup and sugar together, stir well and let it cool a little. Chop the ginger into little dice. Sieve the flour and baking powder into a large bowl. When the butter mixture is OK to dip a finger into, beat in the eggs and add the rum. Pour the whole liquid mixture into the flour, mix well and add the preserved ginger. Scoop the rather runny mixture into the baking tin and bake for about 50 minutes until sticky and brown and a skewer comes out clean. Leave to cool in the tin and brush the top with some of the ginger syrup. Wrap well in kitchen foil when cold and it will keep for several days, if you can resist eating it all at once. It’s easy to make double quantities and give some to a friend who needs cheering up. 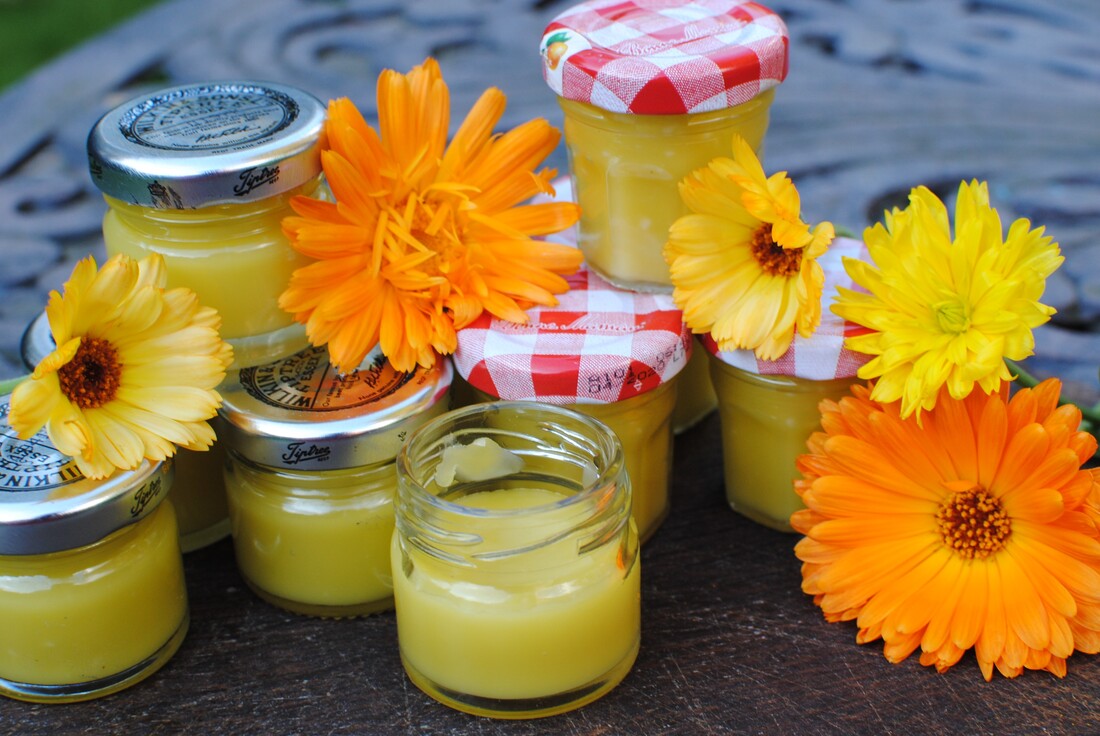 Use flowers from your garden, olive oil and beeswax to make your own pots of soothing skin balm Calendula Hand Balm
No, not a recipe as such, for putting on the table and eating, but still a sort of recipe. Using flowers from the garden, especially ones as exuberant as marigolds/calendulas always seems like a great idea. Calendula allegedly has healing powers, especially for skin problems. I can’t claim miracle cures or anything like that, but this balm feels nice, contains only natural ingredients and keeps your hands nice and soft. I can’t give exact quantities here, weights of flowers don’t really add up. I picked yellow and orange marigold flowers over several weeks and kept stuffing them into two medium sized jars which I filled with lower quality olive oil. I left them in a warm corner of the kitchen and just added more flowers as I picked them. At first, I just picked off the petals and discarded the rest of the flower, but further research told me that the main healing chemicals are found in the flower head where the petals attach, so I then started just throwing the whole flower heads into the jar. You need to bash the flowers down with a wooden spoon to keep them under the oil or they will start to go off. You end up with a bright orange jar of flowers, under the cool amber of olive oil, so they look quite nice. You combine the oil with a solid fat to set it. You can use just beeswax granules or you can add additional fats such as shea butter or cocoa butter – I used organic cocoa butter. You can also add a drop or two of essential oil if you would like more fragrance. Once you think they’ve had long enough to infuse – I left mine about 2 weeks – then strain the mixture. I used an old teatowel in a sieve to let the golden oil run into a bowl. Discard the old petals. Measure your oil. The general rule is to add about 4-7 parts oil to 1-3 parts of beeswax/other solid fat. The quantities depend on how firm you want your balm. I used about 6 parts oil, 1 part cocoa butter and 2 parts beeswax granules. That gave me a firm but very spreadable waxy balm which is solid at room temperature even in warm weather. I might make it a bit firmer if I do it again, I would say these quantities are slightly too oily for using on your lips, for instance, but it rubs nicely into your hands. Melt the beeswax and any other fat together in bowl over hot water, not direct heat. Add the marigold oil a little at a time and keep stirring until all is absorbed. Pour the mixture into clean pots and leave the lids off until the contents have cooled down – you don’t want condensation forming on the inside of the lids and dropping onto the balm. Seal up the pots and keep in a cool dark place until use. They make perfect Christmas presents and will bring a little summer sunshine onto your winter skin. My recipe was: About 6 handfuls of calendula flowers, picked over about 2 weeks, when dry. Steeped in olive oil in glass jars for about 2 weeks. Then sieved out leaving about 200ml infused oil. I melted 7 tablespoons of beeswax granules (they are very light) with 1 tablespoon of shea butter and mixed in the oil gradually. That gave me about 12 little pots of balm. As you can see, I used the little jam pots that you get at some hotels. Sadly, I can’t resist taking, cleaning and saving them, and I’m very pleased to have found a use. 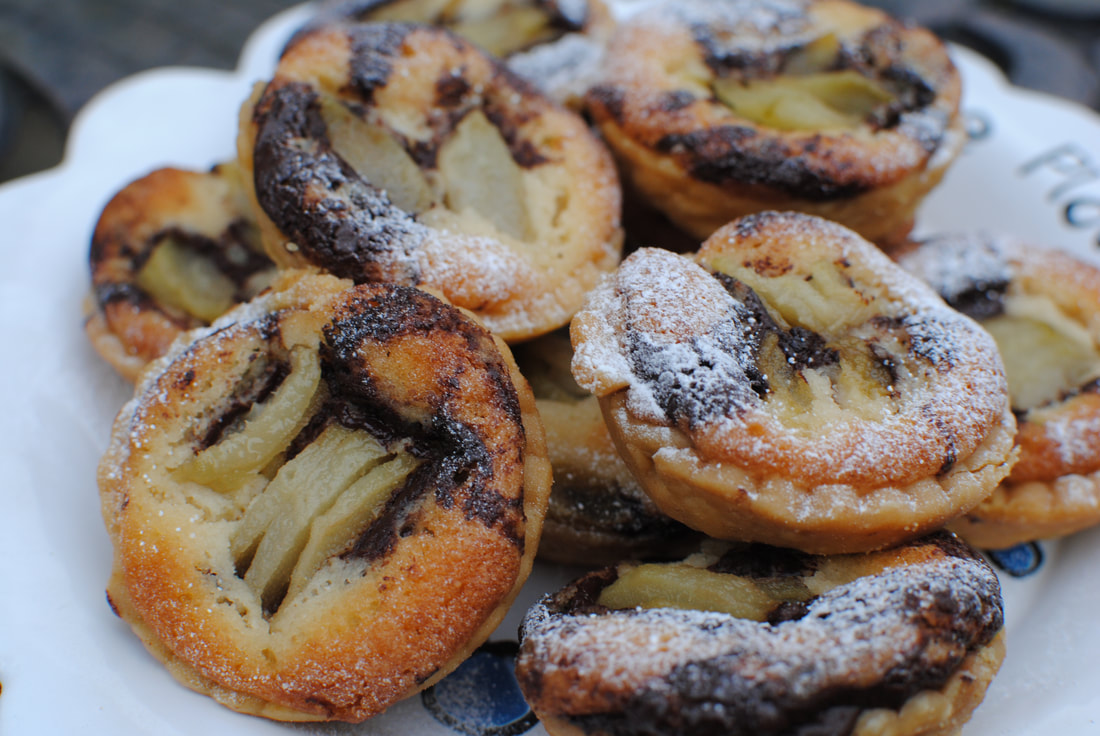 A match made in heaven, pear, frangipane and melting chocolate. Pear, Chocolate and Frangipane Tarts
Delicious buttery little morsels, very melty. The pear and almondy-frangipane is lovely enough, but with a swirl of chocolate adding that extra level of decadence – just delightful. They’re quite easy to make too, and I’ll certainly do more with home made frangipane now I’ve made it once. It’s simple to make and handles like a dream. And you can freeze it for later, so what a versatile thing to have around. There are three stages to making these, which sounds like a lot but you can make all the stages ahead of time and put them together at the end. I like a recipe you can stop and start and fit round nipping out to have your hair cut or going to the post office. I guess you could use other fruits than pears here, but I love the combination of almonds, chocolate and pears, and they are around at this time of year, so very seasonal and cost effective. If you haven’t got time or don’t want to poach pears, you could use a tin of pears, as they are tender from the processing. Makes 36 tartlets Timings: In stages, but all together, about 2 hours
For the pastry:
First stage: poach your pears. Peel them, quarter then and take out the cores; put them into some water with lemon juice added (to stop them turning brown) and simmer for about 15 minutes, then leave to cool in the pan. This can be done a day or two before you make your tartlets. Stage two: make the pastry and the frangipane and set to rest For the pastry: using either your fingertip or the pastry paddle of your mixer, rub the butter into the flour and icing sugar. Add the egg yolks and start to bring the pastry together. Add one tablespoon of cold water and continue to mix to form a smooth ball. You might not need the second spoon of water. Roll into a disc shape, wrap it up and chill for at least an hour but could be overnight. For the frangipane: Whisk the sugar and butter together until becoming creamier and fluffy. Add the ground almonds, then each egg with a couple of spoons of flour, keep whisking. Add the amaretto or other liquid and the final spoons of flour and whisk again – you will have a delicious light almondy buttery mixture. This can keep in the fridge overnight or even be frozen but should be chilled before using to cook. Stage three: make the tartlets. Pre heat the oven to 200°C. Roll out 1/3 of the pastry on a floured surface and cut rounds for the size of your tin – I used a 12-pan bun tin. Handle each round carefully into its tin and put a few baking beans in the bottom of each. Bake blind for 10-12 minutes until the pastry is cooked but still pale, then remove the baking beans and cook again to firm up the bottoms – about another 5 minutes. Remove from the oven, leave the tartlets in their tins and cool for a few minutes. Turn the oven down to 180°C. Take your pears out of the fridge and cut them finely into slices. Put your chocolate in a small bowl over hot water and melt it. Into each tartlet case, put a spoonful of frangipane and drizzle a little melted chocolate over. Stir it in with a skewer, just to swirl it into the frangipane. Add a few slices of pears to the middle of the tart. Bake the whole tray in the oven for 10-15 minutes until the filling is puffed up around the pears and starting to brown. Remove from the oven and cool on a wire rack. Eat with a little icing sugar sprinkled over or maybe a dollop of whipped cream. You could even stir some amaretto into the whipped cream to tip you over the edge into total pleasure-land. 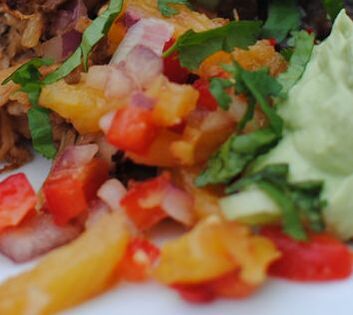 Juicy pineapple, griddled and scorched, combined with spices for that extra flavoured mouthful Charred Pineapple and Red Pepper Salsa
This just makes any meat dish sing out loud. The fresh pineapple, crunchy pepper and tangy lime juice combine to refresh your tastebuds and enhance the meal. A spicy meat really benefits from the contrast with the juicy sweet salsa. Griddling or charring the pineapple adds a slightly smoky depth which makes all the difference. Serve as a side dish to Slow Roast Jerk Pork or to any spicy meaty dish. This relish is part of my Caribbean Christmas menu which will be on my website as a full menu from Cocktails to Cake de Ron in a couple of weeks. Serves 8 Timings: 30 minutes
Peel and core your fresh pineapple and cut it into rings. Melt the butter and brush the rings with it. Fire up your griddle pan and place the rings on the griddle for about 3 minutes a side to get those nice charred stripes and the slightly burned taste. If you don’t have a griddle pan, use a frying pan, you will still get the flavour. Let the rings cool and cut them into slivers, place in a bowl. Peel, de-seed and chop the red pepper into small dice, and peel and chop the red onion to the same size pieces and add them to the pineapple. Squash the garlic with salt, de-seed and chop the chilli and add to the bowl. Stir in the honey and the lime juice, sprinkle over a good teaspoon of salt. Stir and taste, depending on how sweet your pineapple was you might need more honey or more lime juice. Stir to combine the flavour and serve at room temperature. 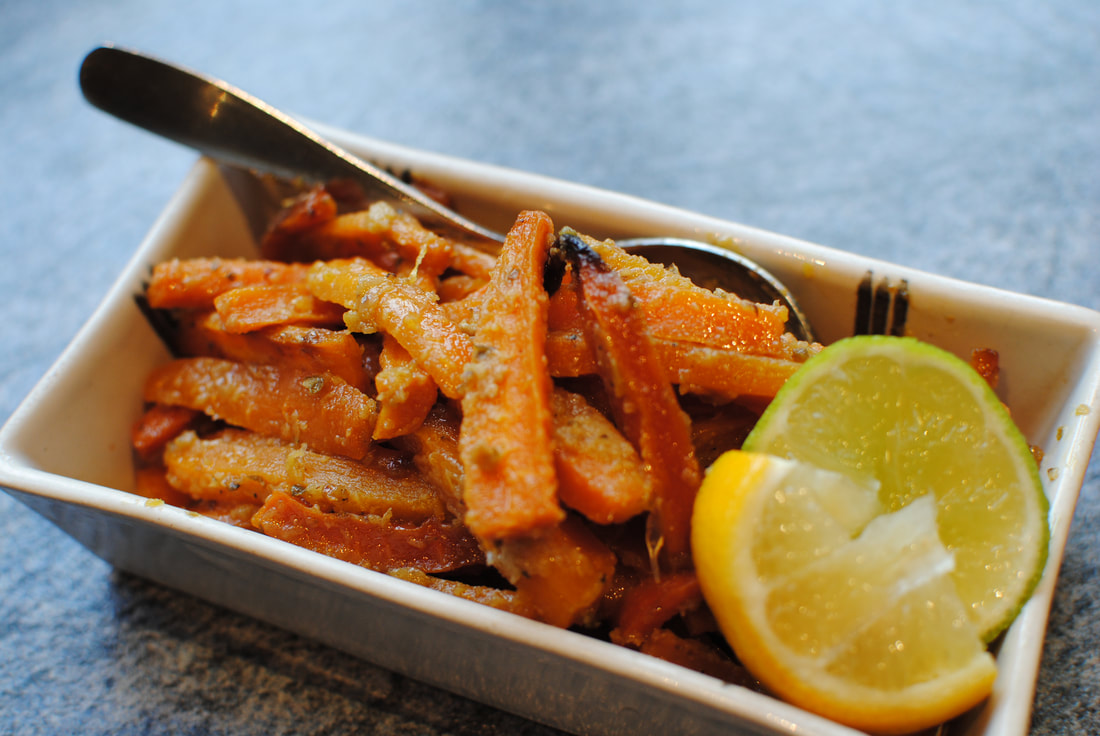 Oven roasted carrots in a citrus glaze Roasted Carrots with Citrus Mojo (vegan)
In the Caribbean, a citrus sauce, or mojo, is used on a lot of vegetables and meats. Plantain is traditional at Christmas, in a citrus mojo. When making up my Christmas in the Caribbean menu, I couldn't easily get plantain in Manchester and thought to try using carrots instead, which are of course traditional in UK at Christmas anyway. Cultural mixing, especially in food, is something I'm very much in favour of. The flavours of orange and carrot match so well. In the Caribbean you would use sour oranges, similar to Seville oranges, which are ripe at Christmas to make the mojo sauce for these carrots. If you can get Seville oranges, use those, but if you can’t, just use normal sweet oranges and add some lemon and lime juices to the mix. Roasted carrots have that lovely slightly burned edge and texture which you don’t get by boiling them, and of course the tray of carrots can go in the oven alongside whatever else you’re cooking for an easy side dish to your roast. Carrots are very tolerant things and you can peel and chop them ahead of time – even the day before you cook if you keep them in a plastic bag in the vegetable drawer of the fridge and also make the mojo ahead of time so you can throw it all together as you need. The only caution I would give is that the carrots cook down to a much smaller portion than you think, so if you have hungry big eaters in your family, add a few more carrots to your bowl! Serves 8 as a side dish Timings: 90 minutes from scratch but preparation can be done ahead
Make the mojo sauce by blending the onion, garlic, spices and juices together until you have a creamy sauce. Mix this with the carrots and spread them out on a metal baking tray. Drizzle lightly with vegetable oil. Pre heat the oven to 180°C. Roast the carrots for 30 minutes, then turn up the temperature to 200°C and roast for another 40 minutes. You need to stir them and turn them every now and then to make sure they roast evenly. Serve them as a side dish to your delicious slow roast jerk pork or to to any other roast meal. |
Some Changes - April 2022
Thanks to my friends and followers for your patience, and for your encouragement to start blogging again. Archives
April 2022
Categories
All
|
 RSS Feed
