|
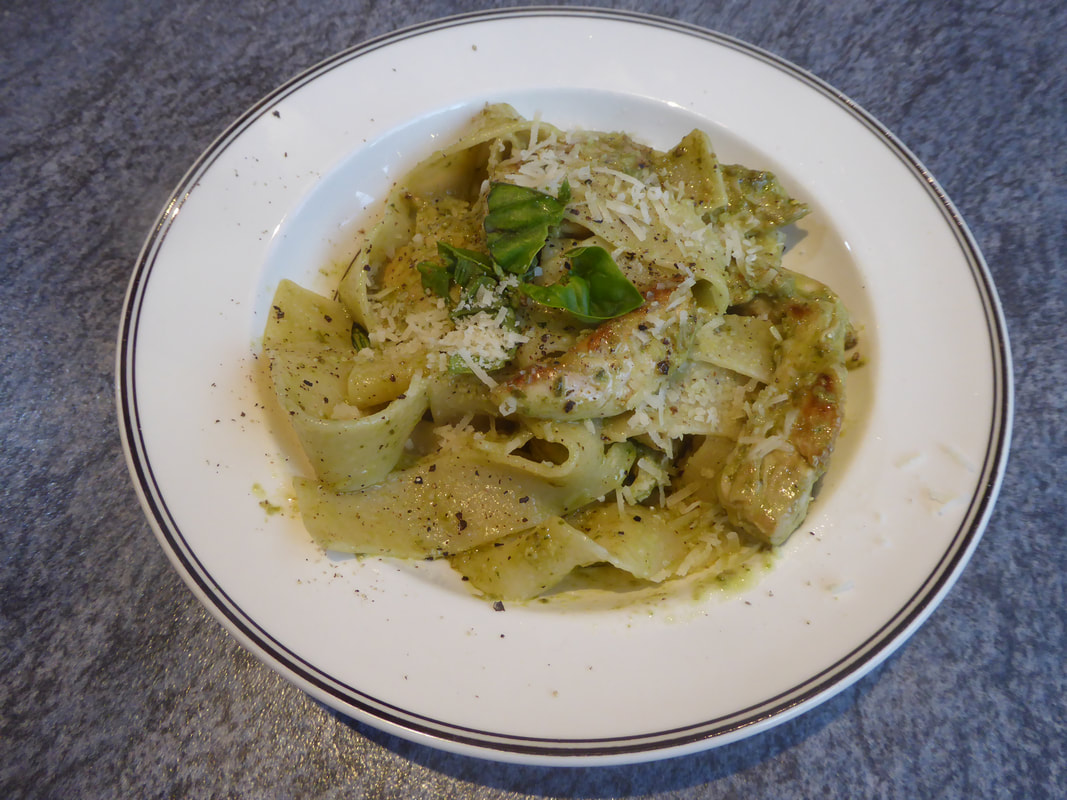
Chicken Pesto Papardelle
Noodles, what’s not to love? Top them with grilled chicken marinated in home made pesto, and a pesto-butter sauce. How could life get better? Or easier? I love pappardelle, the wide ribbon pasta; it goes very well with any rich and well flavoured sauce like this or a deep warm ragu. I can’t forget the most wonderful wild boar ragu with pappardelle we had on a freezing May evening in a hillside town in Tuscany many years ago. The ribbons of pappardelle just held the strong meaty sauce as the mouthfuls slithered down our throats. I’ll have to research a real Italian ragu for the blog, but in the meantime, try this summer-time delight. I tried both grilling and griddling the chicken strips, but the oily marinade made them stick horribly to the griddle and frying gave a much better result as that also contributes to deepening the flavour of the sauce with all the nice juices that come off the chicken. I’ll give the recipe for home made pesto shortly, but you can also buy very good Pesto Genoese – the one made with fresh basil, which is best for matching to the chicken, rather than the kale and walnut based pestos. Serves 4 Timings: Pesto takes about 20 minutes to make, then 4 hours to marinade the chicken. Final dish takes 30 minutes to put together.
Put a pan of water on to boil for your pasta and heat up a large deep frying pan. Fry the chicken strips in a splash of oil as your pappardelle boils for its recommended time. Fry the chicken until nicely browned and cooked quite through, keep turning it to brown on all sides. It only takes a few minutes. Add the butter to the pan, allow it to melt and then add in the additional spoon of pesto. Turn the contents of the pan to mix well and add the squeeze of lemon juice and a grinding of black pepper. Drain your pasta when cooked as you like it (I prefer a touch beyond al dente) and keep a cup of the cooking water. Loosen the sauce in the frying pan with some of the pasta water and add the pasta into the pan. Mix well, scooping up all the pan juices into the noodles. Serve with some torn basil leaves and a sprinkle of grated parmesan. Dive in!
0 Comments
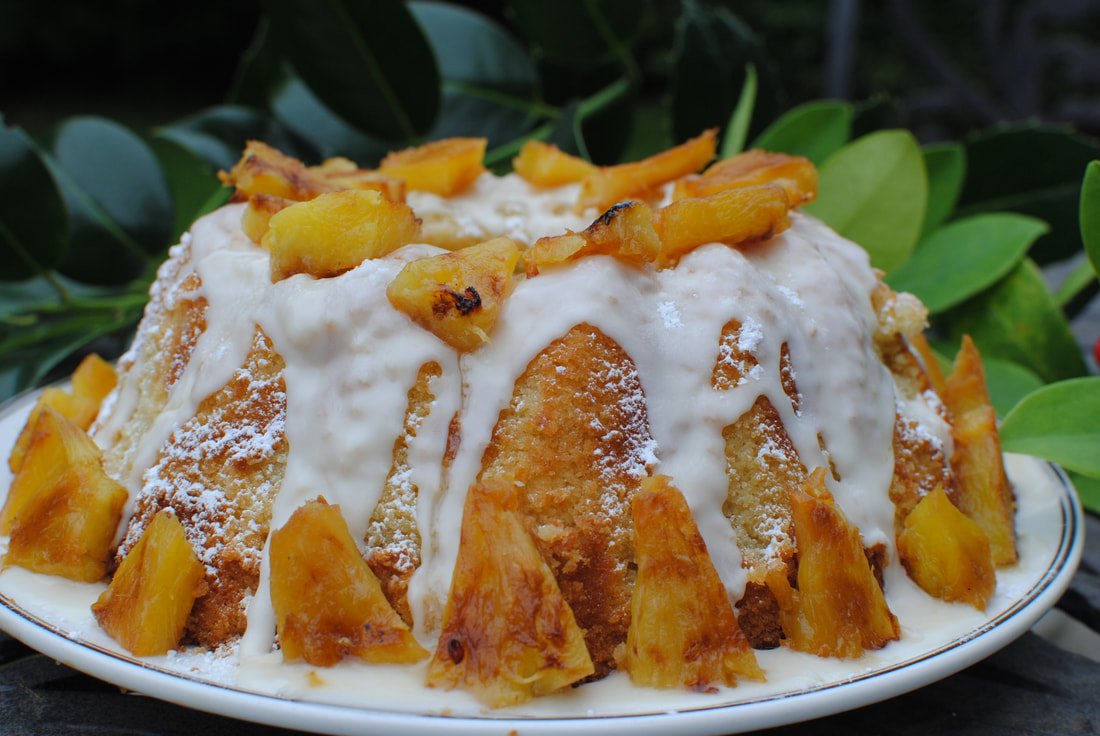
Cake de Ron – Cuban Christmas Rum Cake
Introducing Christmas in the Caribbean – a new feature I’m working on and hope to publicise soon. I know it’s early to be thinking about such things, but how about making your heart glow with some plans to whisk away loved ones to the sunny beaches and lapping waves of your favourite island? Even if we can’t actually visit in person, you can imagine yourself on the sand, hearing the calypso rhythms and sipping a mojito when you cook up a spicy Caribbean Christmas Feast. Give yourself plenty of time to plan the menus, think about the decorations and you can be relaxed on the day and join in the fun. Christmas is special anywhere – from the snowy Tivoli Gardens in Denmark to the freezing German Christmas markets, warmed up by spiced wine and grilled baguettes with sheep’s cheese topping. But in the Caribbean, as you might expect, they go the extra mile. Every island has its own traditions, because they all have their own special background and mix of history, difficult and joyous. Some islands have parades of supernatural beings, some have reggae carol competitions; all have special food and drink just perfect for sharing and making a party go with a zing. Look out for my recipes on the theme of Caribbean Christmas, but for now, try this Cake de Ron. You do have to get yourself for some proper rum and even some banana liqueur, but you can use those in a Banana Dacquirie (recipe coming soon) as well as the cake, so nothing goes to waste. I’ve not come across a cake recipe with double cream in before, it makes the cake very rich and smooth and helps absorb the alcohol. The rum is cooked out in the oven so the taste is quite subtle; even those who are not big fans of rum won’t find it overpowering. If you wanted a stronger rum taste you could soak the cooked cake in a mixture of rum and sugar rather than the syrup, but in that case take the cake out of the tin first before you drizzle as it would loosen the structure. Makes one 23cm bundt cake, or a normal 25cm cake if you don’t have a bundt mould. Makes 10-12 slices. Timings: 90 minutes and then time to decorate
Grilled pineapple, icing sugar and water icing for decoration Pre heat your oven to 180°C and grease your cake tin. If using a bundt tin, grease especially well as they do tend to stick. Sieve the flour and baking powder. Whisk the butter and sugar together until creamy, add the lemon zest. Add in the eggs one at a time with a spoonful of flour each time. Measure the cream, rum and liqueur into a jug and add this a bit at a time into the mixture along with a spoonful of flour each time. Scrape down the sides of the bowl to make sure it’s all mixed well and beat until you get a creamy, slightly fluffy mixture. Spoon this into your cake tin and bake for 50 minutes to an hour until risen, golden on top and a skewer comes out clean. Meanwhile, make the syrup. Melt the butter in a small pan, add the sugar, rum and liqueur and stir to dissolve. It will bubble up. Cook for a few minutes but don’t let it caramelise. Cool. Griddle your pineapple slices or pieces. Brush the pieces with melted butter and place on your griddle pan to get those charred lines. If you don’t have a griddle pan just fry gently until slightly golden. You want a charred outside but still crisp and juicy inside. Remove the cake from the oven and cool on a wire rack for 10 minutes. Poke holes with a skewer, being careful not to go all the way through the bottom of the cake and drizzle the syrup over. Leave 30 minutes to soak in and turn the cake out onto a plate to cool further. When the cake is cool, make a water icing by mixing icing sugar with a couple of spoonfuls of water (or rum if you want that extra flavour) and drizzle over, letting it drip down the sides. Decorate with the pineapple slices and dust with icing sugar. Whipped cream might complete the decadence. The cake will keep in the fridge for a couple of days but is really designed to be eaten that day or the next at a big noisy party. Bircher Muesli- a good way to start the day
Bircher Muesli wasn’t originally for breakfast. The Swiss physician, Dr. Max Bircher-Benner, invented a recipe as a healthy meal starter in 1900. He saw many of his patients suffering from diseases that he felt could be avoided if people ate a better diet. He liked the idea of uncooked grains, more fruit, some nuts and a little dairy. The muesli was actually supposed to be eaten in small portions before each meal, thus leaving less room in the stomach for meat, bread, processed foods and other less nutritious items. His original recipe included sweetened condensed milk and no fruit juice, probably due to the grocery provisions available at the time. Nowadays, the processed version is marketed as a ready-mixed slurry for breakfast combined with sweetened yoghurt. It’s served in German and Swiss hospitals as a breakfast option and it ticks most of the boxes for a healthy diet to enrich and encourage your internal bacteria. The “gut biome” does a lot of the digestion work for you and is now thought to influence mood, mental wellbeing, inflammation including allergic reactions and a whole host of factors that can make you feel good or bad. Encouraging the little blighters to do their work well seems to me a good idea. Life’s too short for a complicated breakfast, except maybe on Sundays. For the weekday morning, the most one seems capable of is scooping something onto a plate and spooning it down in a rush. Bircher Muesli is a perfect solution; you can make up a big bowl of it on Sunday evening and leave it in the fridge to be scooped out, mixed with yoghurt and whatever fruit you have on hand, and you have the healthiest breakfast imaginable on your plate in under 2 minutes. More than that, each batch is different, so you’ve always got a nice surprise for your tastebuds on a Monday morning, a good way to start the week. The bowl lasts a week in the fridge, as the acid in the apple juice preserves the ingredients. (the grated apple goes a bit brown by the last day but that's no matter) I stick to the rule of two in my Bircher Muesli, for simplicity’s sake. Two fresh fruits, two dried fruits, two sorts of seeds, two types of nut; that’s enough. You can swop around the brazil nuts and hazelnuts one week for almonds and walnuts the next, and you can use different seeds as you prefer. Do try to get live yoghurt (or make it…), to further encourage that healthy productive gut. If you can get organic oats, and even nicer, organic muesli base, so much the better. I am very lucky to have my friend Mussarrat at Artisan Nutrition just round the corner where I can buy small quantities of fresh organic grains, nuts and fruit, weighed out into my own containers, so I don’t have to store too many little packets of half consumed things, and can change around the ingredients as I like. But you can buy packets of different nuts, seeds, dried fruits etc and keep them in a large Tupperware container, ready for use. Here’s the one I made last week and is in the picture, with some fruit from my allotment, but as said, please alter the nuts, seeds and fruits to your taste and what you can buy. Makes about 5 servings – one for each weekday morning Timings: 20 minutes on Day 0, then 2 minutes each day after
For the morning: 100ml live plain yoghurt, a handful of blueberries, or a small banana, or a small mango, whatever you have around. At some times of the year you might have several types of berry around and in the spring you might be restricted to bananas – so be it. Put the grain flakes, dried fruit and seeds into a small bowl. Chop the nuts up quite finely, to taste, add to the bowl. Cut up the apple, discard the core and grate it, including the skin. Add to the bowl along with the apple juice. Stir, cover, and leave overnight in the fridge. To eat, spoon about 2 tablespoons out into a small bowl, add about the same amount of live plain yoghurt, one small portion of another fresh fruit, mix and eat. |
Some Changes - April 2022
Thanks to my friends and followers for your patience, and for your encouragement to start blogging again. Archives
April 2022
Categories
All
|


 RSS Feed
