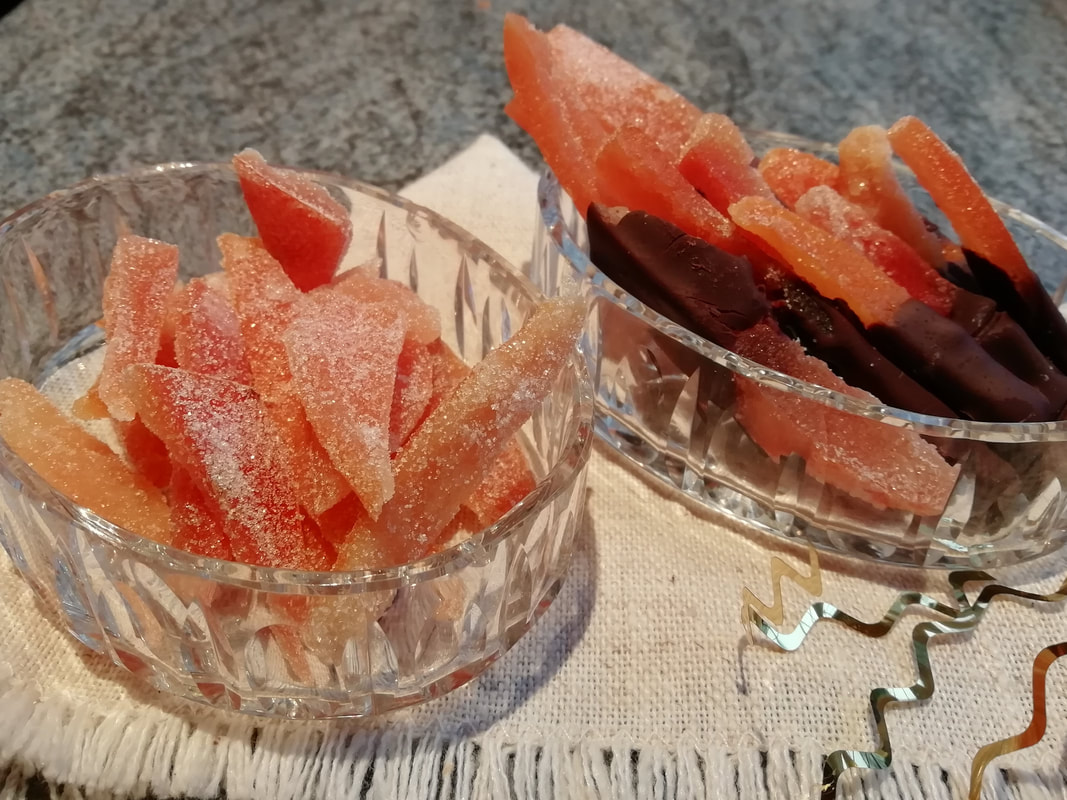
 Tangy candied citrus peels, sweet and bitter. The perfect home-made Christmas gift. Confit Citrus peel – enrobed in Chocolate or Sugar-dredged.
Utterly gorgeous, addictive, un-put-downable. I used to live in London and would sometimes go to Harrods just to buy a few strands of candied orange peel in dark chocolate. I’d come out with a tiny bag that had cost £5 and wonder how it got to be so expensive, then I’d be back again in a couple of weeks for more. Now I know why it’s expensive, it’s only peel that normally would be thrown away, but oh, the faff of making it. It really is a labour of love and you have to be a fan of marmalade to truly appreciate the bitter citrus tangy-sweetness. But for those who are such fans, there is hardly anything nicer. It makes wonderful and very impressive presents, but it doesn’t keep extremely well, so you have to make a batch each week before Christmas if you are making bags for different groups of friends. Beware, once you’ve made some one year as gifts, people will hint next year to try to ask for more! I had planned to publish this recipe next week, but on special request of my brother and from my wonderful friend next door (to whom I gave a bag this week), here it is now, in time for you to make your own batches of loveliness. I can’t give exact quantities, as it depends on your consumption of citrus fruits and the thickness of the peels for which I cannot legislate. For a week, save your citrus peels – oranges, grapefruits, tangerines, satsumas. I haven’t tried it with lemons but I don’t see why you couldn’t. Try to get the peels off in sections and put them in a plastic bag in the fridge to keep their juiciness until you have enough. I’d do a batch of about 12 fruit, about half grapefruit skins and half a mix of the orange ones. Make your syrup with equal weights water and sugar – I used 400g sugar to 400ml water for a 12-fruit peel collection. Put the water and sugar in a pan with a piece of cinnamon stick or cassia bark and 4 cloves – count them in, as you’ll want to count them out again later. Heat up, stir, boil for about 10 minutes to thicken the syrup and then leave to cool with the aromatics in. When cool, take out the cinnamon, cassia and cloves. While the syrup is boiling and cooling, prepare your peels. Taking a small serrated knife, cut pith away from the very thick pithy pieces. Just lay the peel down on a cutting board and run the knife through the pith. No need to be too aggressive, and you might not need to cut any pith from the tangerine skins, for instance, but you probably need to take quite a bit off the grapefruit peels. Cut the peel into strips - ideal is about 3cm long by 1cm wide but you have to go with the shape of the peel you have got off the real fruit, it’s never perfect and you can use the tiny pieces for candy-sugaring rather than chocolate coating. Put all the peels in a pan with cold water and bring to the boil. Boil for 1 minute then drain and then do it again, twice more. This is to fully clean the peel (citrus fruits are sprayed with all sorts of vile chemicals) and to remove some of the bitterness. By this time your syrup is probably ready. Dump the peels into the syrup and boil for about an hour, until the peel is translucent and slippery. Leave to cool in the syrup and then fish the pieces of peel out and lay them on a rack over a tray. I use my fingers for this, as the pieces are quite fiddly and they fall through the bars of the rack and make you swear. There will be some syrup left over, and it is now fully infused with orange flavour. Keep it in a jar in the fridge and use it for fruit salad, for drizzling over baked breads such as Chelsea Buns, or for making more candied peels. Leave the rack out in the kitchen at least overnight for the pieces to dry out a bit and harden a bit. I can’t give exact timings for this as it depends on the thickness of the peel and the temperature and humidity of the kitchen. I have also left the rack in a cool oven for an hour. But if you leave them too long you will have to put them back in the syrup again to re-plump, so keep an eye on them. When some of the syrup has dripped off them and the pieces look shiny and sticky but not runny anymore, probably next day, go to the next stage. If you just want sugared candied peel, put caster sugar on a plate and tumble your pieces of peel to cover. The sugar will stick. I like to cut the peels up into diamonds or pieces about 1cm square. Put in a box or into transparent gift bags and eat within a few days. For the chocolate dipped ones, take the best shaped pieces. Melt good chocolate (Bournville or Dairy Milk or something of that quality - I use organic dark chocolate buttons from Artisan Nutrition in Didsbury) over hot water and just dip one end of each peel into the chocolate, and use a spoon to even out the coating. Leave on a rack to set – about an hour. You can then dredge the non-chocolate ends in caster sugar to make them less sticky to handle. Put into a box or gift bags and eat within a few days. A gift bag with some pieces of each, sugar-dredged and chocolate-dipped, looks wonderful and is a superb Christmas gift for a special and deserving friend. They have to be only your best friends as even a small bag represents quite a lot of your time and effort. Enjoy, and Merry Christmas-Present-Making!
0 Comments
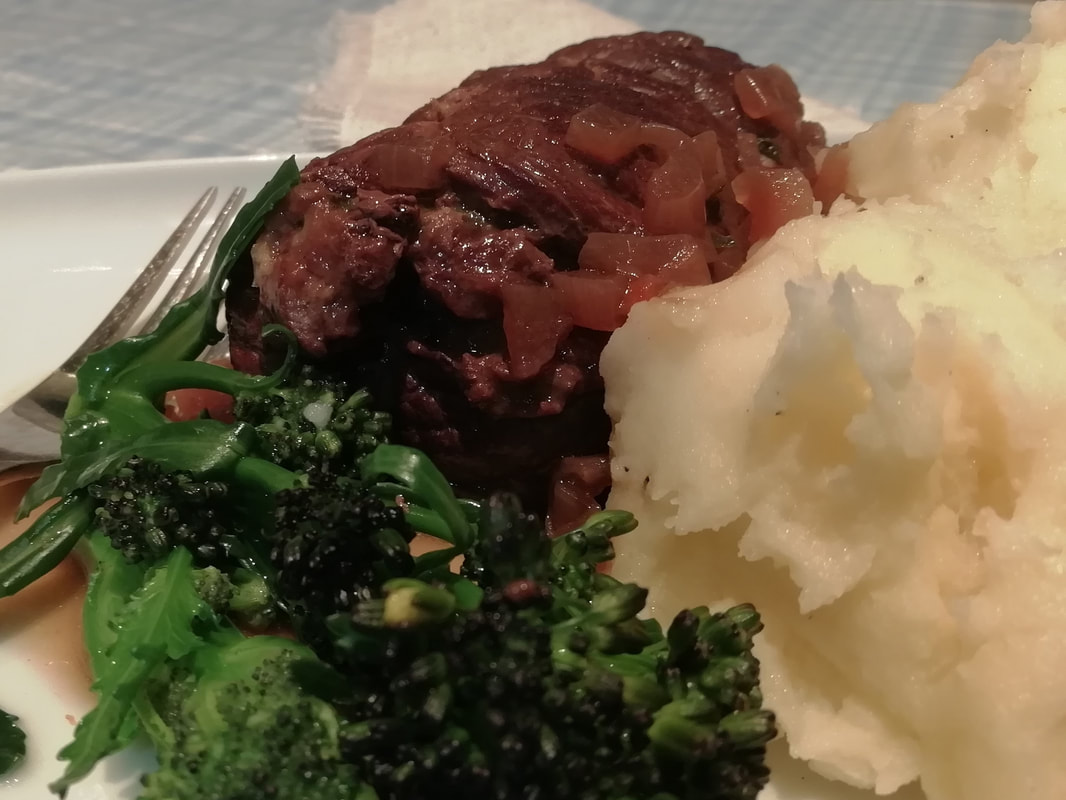 Succulent beef rolled round a herby filling, slowly cooked in a red wine and shallot sauce, served with mash Stuffed Beef Rolls (Beef Olives) in Red Wine and Shallot Sauce
Well, what could be nicer? Food of the gods, as my butcher described it, which he would of course. (Thanks, Mark, from Axons of Didsbury!) Thin slices of beef, wrapped round a herby moist filling, cooked in red wine and shallot sauce, served with mashed potatoes. Really, a meal for the winter tummy, comforting, warming, friendly, and filling. But actually, not too filling, although you couldn’t describe it as low calorie or diet fare. You aren’t eating huge pieces of meat here, a little goes a long way. And it’s nothing to do with olives, whatever the name. This is a highly tolerant dish, you can leave it in the oven a bit longer if you’re waiting for the gang to come home from football. You can make it ahead of time and then put it in the oven with the sauce warmed up when you’re ready to cook. It’s also elegant enough for a dinner party, maybe with lyonnaise potatoes or croquettes to add to the elegance if your party is too posh for mash. (impossible, surely?) Serves 4. Timings: 1 hour preparation, 2 hours in the oven.
For the stuffing:
For the sauce:
Start the sauce: fry the chopped shallots in a heavy saucepan for a few minutes until softened. Add the crushed garlic and fry for another minute, stirring well. Add the red wine, bring the pan to the boil and let it reduce by about 1/3 – should take about 10 minutes boiling. When it has reduced, add the beef stock and marmite, the bay leaves and the sprigs of thyme (you can use ½ teaspoon dried thyme if you don’t have fresh) and boil again for another 10-15 minutes. You should end up with a glossy liquid sauce, not thickened, but with a great deep taste. Meanwhile, get on with the stuffing: In a medium frying pan, fry the bacon pieces till crisp. Put aside on kitchen paper to drain. Add the chopped onions and the stick of celery to the frying pan and fry for a few minutes to soften them. If you are making your own breadcrumbs for the stuffing, put your stale bread in the bowl of your blender with the parsley, and let the blender chop both together. Put the green breadcrumbs in a bowl – or add the breadcrumbs from a packet (proper sized breadcrumbs not the coloured dust in the cardboard drum you get for fish) and add the chopped parsley. Add the bacon to the breadcrumbs. Add the butter to the pan of onions, let it melt and fry a bit more, then scrape the whole contents of the frying pan into the bowl with the breadcrumbs. Add the suet and the mustard powder, season with salt and pepper and mix well. Now assemble the rolls: Lay out each beef slice on a level surface. Cut some cooking string to have ready. You need 3 pieces per beef roll, two shorter pieces to go round the middle of the roll and one longer one to tie top to bottom of the roll. Cut them a bit longer than you think you need, as you can always cut the dangly ends off, but you can’t make them longer! Lay stuffing out thinly on the beef slice – firm it down with a spoon. Don’t put the stuffing too close to the edges as you want to make a sealed parcel. (Well, sealed-ish, there is no such thing as perfection in a tied beef roll, and if you try to achieve it, you might drive yourself mad. Good enough will do!) Then roll up the beef slice from the longest end, tucking in the sides as you go. The beef is quite obliging, and will hold itself together quite nicely. Put the roll down on the pieces of string you have laid out ready and tie up quite firmly. Snip off the flappy end of the strings. Do the same for all your pieces of meat. I tried to get one parcel per person as that makes a nice thick roll which holds together well in the sauce, but if your parcels are smaller because of the way the beef was cut, that’s not the end of the world, you just have a bit more rolling and tying to do. If you have stuffing left over, it will keep in a sealed box in the fridge for a few days until you find a small chicken to use it up in. In the pan where you cooked your onions, put a little more cooking oil and fry the beef parcels until the outside is brown and coloured, don’t overdo it, just a little colour. By this time, your sauce will be done. Taste it and season if it needs it – probably won’t after all that reducing. Put the beef rolls in a casserole dish which takes them all in one layer and pour the sauce over. Remove the bay leaves and the thyme twigs as you go. Cover the dish and place in a low oven, 160°C for up to 2 hours. Just keep it covered so the beef rolls don’t dry out on their topsides. When you want to eat, lift each beef parcel out of the sauce and snip away the string with sharp scissors (not blunt ones like I always seem to struggle with). The parcels will keep their shape now. Serve with creamy mashed potato to go with the rich and glorious sauce, and a plain steamed green vegetable such as purple sprouting broccoli. 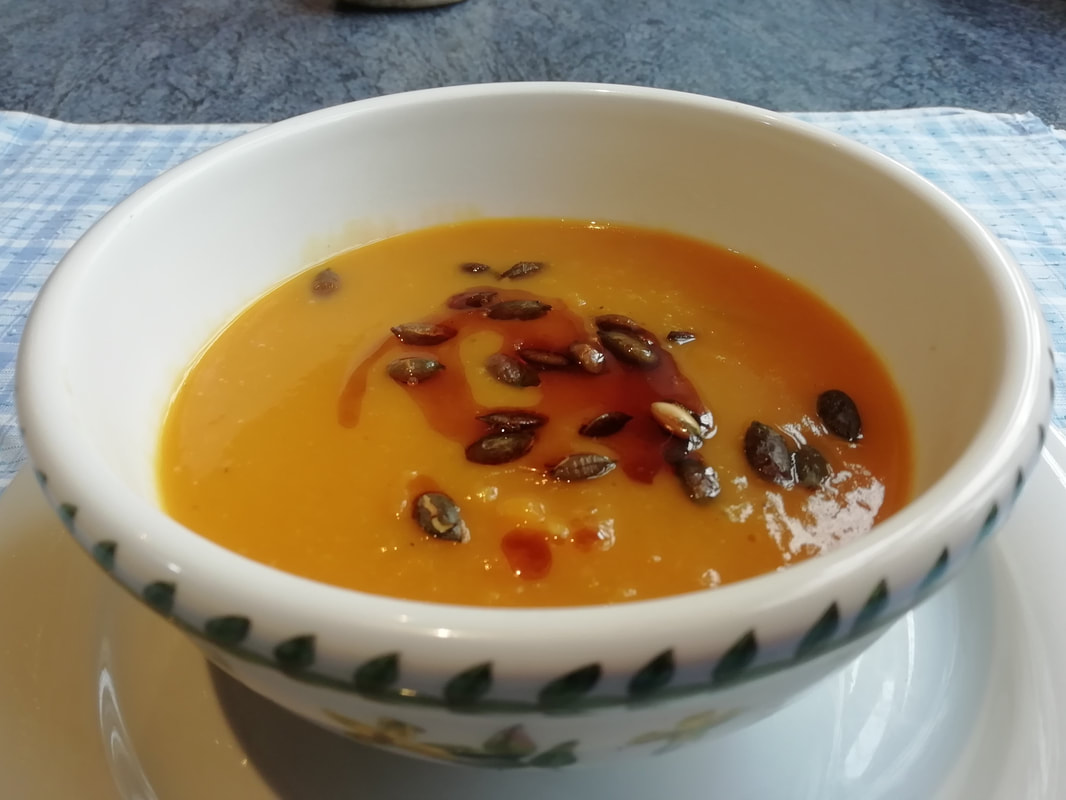 Dreamy squash soup with a tang of ginger, some textured squash and crunchy seed topping Squash and Ginger Soup (vegan)
Squash makes the most wonderful soup anyway, and you can hardly go wrong with the simplest of recipes. This recipe is a take on one I ate in Germany in September (at the Krone in Ulm, thank you!) which has a bit more texture than a simple puree of squash and a bite more fresh ginger. The topping of toasted nutty pumpkin seeds and pumpkin oil is luxurious. I am told there are health benefits from pumpkin seed oil, but I cannot vouch personally for them, I just like using a variety of plant oils in my cooking to give me a wide range of nutrients naturally, and it seems fitting to use pumpkin seed oil on a squash soup. The grated squash gives body to the soup, you could eat this as a meal in itself. With a piece of fresh bread you wouldn’t need anything else. Simple, warming, invigorating. Serves 6, timings 1 hour
Chop the onion and leek finely and fry gently in vegetable oil to soften, in quite a large pan. Peel the squash and cut into 1cm cubes. Add to the pan, stir to soften and begin to cook. Peel the ginger and reserve the best, juiciest part – about ¼ of it. Grate the larger part and add to the pan. If there are stringy bits, chop them finely and add them in too – they will be liquidised later. Add the stock to the pan, bring to a simmer and cook for about 15 minutes until the cubes of squash are softened - you can poke a knife through and feel how soft they are. If the squash needs a bit longer (if you bought ready done cubes in a pack they might not be fully fresh and could be a bit hard) then give them a bit more time. While the soup is cooking, toast the pumpkin seeds gently for a few minutes in a small dry frying pan. Careful, they will spit and crackle. Keep moving them about to avoid burning and when light brown, put on kitchen paper to cool. Grate the reserved slice of pumpkin and grate the nice piece of ginger. Don’t be tempted to use the stringy bits of ginger that remain on the outside of the grater – this ginger will be eaten only very lightly cooked and you don’t want stringy bits in your teeth. When the soup is cooked, let it cool a little and then check the seasoning – add salt, pepper and a dash of Henderson’s Relish. Liquidise the soup to a velvety puree and return to the pan. Add the reserved grated squash and ginger. Bring the soup back to a simmer for 5 minutes, then serve with a swirl of pumpkin seed oil on each bowlful and toasty pumpkin seeds on top. |
Some Changes - April 2022
Thanks to my friends and followers for your patience, and for your encouragement to start blogging again. Archives
April 2022
Categories
All
|
 RSS Feed
