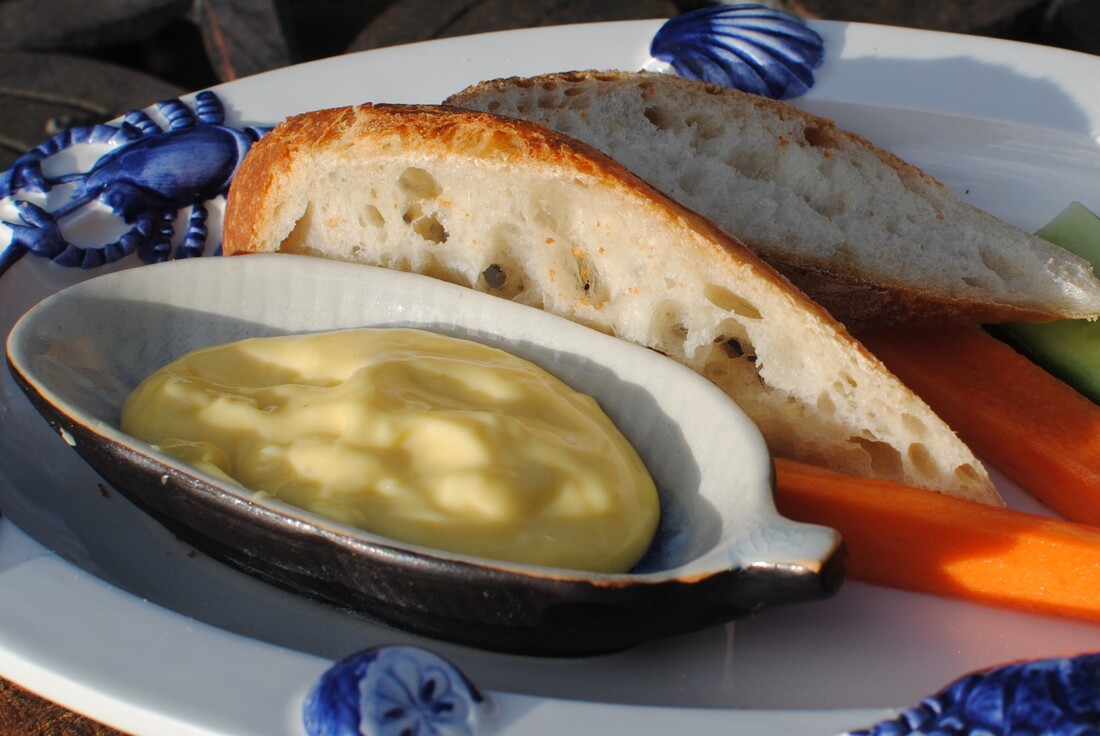
 Spanish Allioli or French Aoli - garlicky, creamy, just right for dipping Allioli or Aioli? A whole yolk’s worth of fun!
Another Spanish tapas, that you don’t even have to order. As soon as you sit down, the waiter brings you the menu, a teensy bowl of this lovely rich oily paste and some pieces of bread. This being the Canary Islands, the bread is unfortunately white, thin and tasteless but the allioli makes up for it. They seem to add herbs, whatever they have around, to make it green and therefore even more attractive. On my recent holiday in Tenerife (very nice thank you) we had allioli speckled with chives or parsley, something I’m pretty sure was dill, and maybe even oregano. But the basics are just egg, garlic, mustard, oil, vinegar and salt. I used to be nervous of making my own mayonnaise. Don’t be. I was worried about all the admonitions to only add the oil one drop at a time, or else dreadful things (curdling? How horrible does that sound?) would happen. Yes, you have to add the oil slowly, but so far, I’ve never yet curdled, and now I’ve made it loads of times. Then some chefs have taken to making it in a food processor, as an “easy” solution to the difficulties of the hand made version. This made me even more nervous, how difficult must it be, if even top chefs recommend using a machine? But the machine needs washing up and also means you have to make quite a large quantity. Half the joy of making your own mayo is that you can make one-egg-yolk’s worth, which is just enough for lunch for 4 people, and nothing left over. You really don’t want to be storing fresh mayo for more than a few hours in the fridge, so what are you supposed to do with all that over-production from using 4 yolks, let along all the dreadful eggy washing up. So, use a tiny tiny whisk, get your oil bottles out (such fun) and take ten minutes to produce the most glorious, glowing, garlicky home made allioli ever seen on this planet. Serve it simply with some good (French sourdough baguette is perfect) bread and some vegetable batons and you have a top class vegetarian lunch. Now we’re coming close to the dreaded school holidays, teach one child and set their task to make mayo every other day. One day as allioli dippers, one day in coleslaw with baked spuds, another day dolloped into a BLT – your lunches will be easy, nutritious and cost effective. As well as teaching your child a life skill and the practice of patience. Teach another child how to make soup and every other day have a different home made soup. Teach another child (if you have another going spare) how to make bread, and you'll have a real lunch time production line going. I’m not giving strict quantities here. Every egg is a little bit different and also you might use other oils or herbs. The only quantity you start off with is one egg yolk. Put one egg yolk in a small bowl. Sprinkle onto it one half teaspoon of sugar. Add one half teaspoon of Dijon mustard or a half teaspoon of English mustard powder. If you are making garlic flavoured mayo (allioli), squash a garlic clove with some fine salt into a paste, and add that to the yolk. If you aren’t making a garlic version, just sprinkle half a teaspoon of salt into the yolk. Beat the yolk up for a bit with your teeny tiny whisk. Now start adding the oil. You can use olive oil (not the very best heavy green oil for the whole thing as that can make it a little bitter) or rapeseed oil, nut oil, or just plain sunflower oil. I like to add a little of each in rotation just for fun and so that the final mayo doesn’t taste too much of any one of them. You add the oil a little at a time and beat each dribble in before adding the next. You will notice the mixture becoming thicker, almost like an oily custard. Keep going until you have about an espresso cup full of mixture, which should be thick and glossy. Taste it. Add a teaspoon of white vinegar, beat it in. Add a little more oil, whisk. Add a teaspoon of lemon juice. Taste it, add more salt or sugar if you need it. Add a dribble of cold water, whisk. Add some chopped herbs if you want or even some tabasco or chilli sauce for a spicy version. Mix well. If you make it half an hour before you want to eat, the garlic and herb flavours will intensify.
0 Comments
Leave a Reply. |
Some Changes - April 2022
Thanks to my friends and followers for your patience, and for your encouragement to start blogging again. Archives
April 2022
Categories
All
|
 RSS Feed
