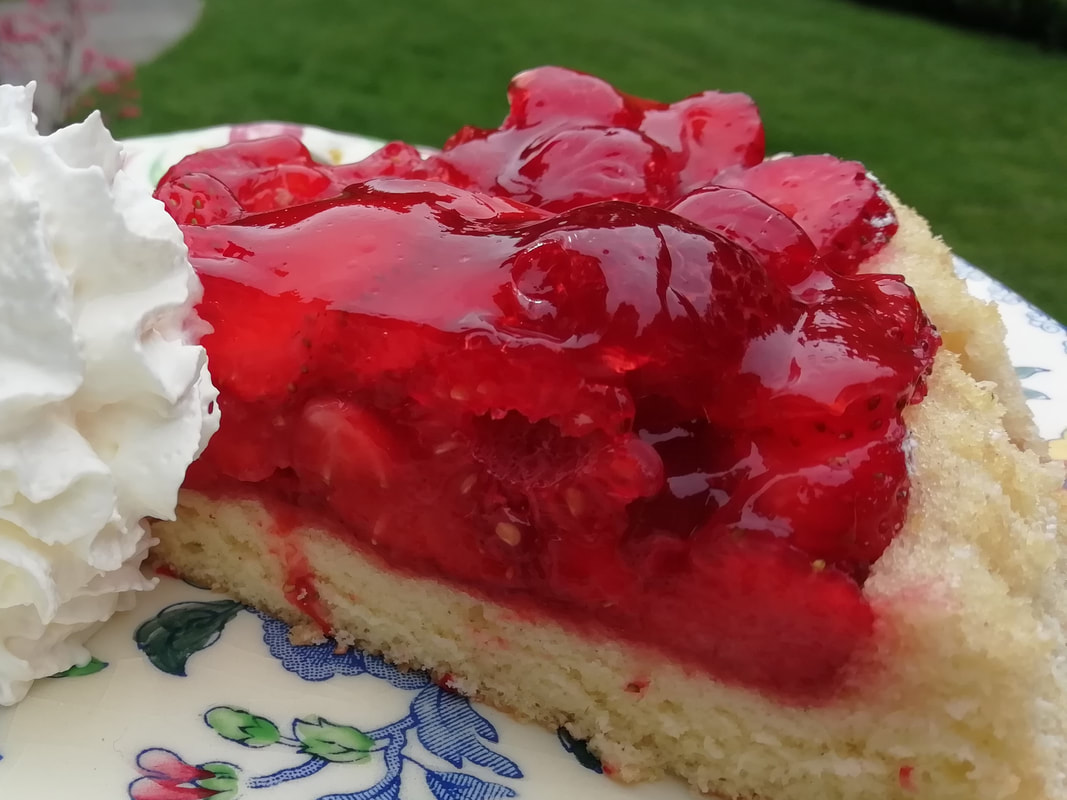
 Fresh fruit, with a jelly glaze on a simple sponge base. The very best cake to eat in the garden on a Sunday afternoon! Summer Fruit Sponge
Is it a flan? Is it a cake? It’s sort of both. This is another German recipe and it uses a jelly-like glaze on top of fresh fruit layered onto a sponge base. The glaze sticks the fruit together as well as giving it a nice shine and helping keep it fresh for a day. Unfortunately, it is not a cooking ingredient found in the baking supplies aisle of your local British supermarket, so you need to make it yourself or order it on-line – look for “tortenguss” which means “cake glaze”. I like the Dr. Oetker one, which is reliable and uses caragheen as a gelling agent, so it’s vegetarian. I wouldn’t ordinarily recommend an ingredient you can only get on-line but in this case I think it’s worth it. It comes in a set of 3 little sachets. You can buy a red-coloured version or a clear version – I like to use the red one for a flan like this with red berries and you would use the clear one for peaches or kiwi fruit. The base is a simple Genoese sponge (the One True Cake recipe). I used a special 28cm flan mould tin, which means the sides are slightly higher than the middle, so you can fill the middle with a mound of fruit. You can buy these sponge cases ready made but as you might expect, home made tastes best. You could make a simple round cake without the special mould tin, and it would be just as good. You top the cake with whatever soft fresh fruit is in season and can keep a day – so I wouldn’t use bananas or anything that might go brown or leak too much juice like a mango but an assortment of strawberries, raspberries, blackberries and blueberries tastes and looks wonderful. Yes, you can see some whipped cream from a can on the side of the cake in my photo. It’s a cheat but it’s the best way to provide whipped cream to my Lunch Group as I don’t like transporting containers of fresh whipped cream around in hot weather. My Seniors Lunch Group this week had a presentation from one of our members who is an enthusiast of military history. He told us all about D Day: the planning, the false trails laid for more likely invasion sites to distract the enemy, the use of floating harbours and the movement of troops on the day. It was fascinating and elicited memories from those who lived through World War II – we have a veteran in our group and many of the members were children or teenagers and remember those times very well. Then we discussed rationing and the difficulty many of the mothers had in providing tasty meals for their families on one egg and a scraping of butter per week. Lots of memories and lots of admiration both for those who went out and fought and those who stayed at home and made do. Serves 12 Timings: 90 minutes and then about 2 hours at least to set
Make the sponge. Preheat the oven to 180°C; and grease your cake tin thoroughly. Whisk the eggs and sugar together until fluffy while you melt the butter. Turn the motor lower and add in the flour and vanilla essence. Turn off the motor and pour the butter onto the mixture and stir through with a metal spoon. Spoon the mixture into the cake tin or flan tin and bake for about 15 minutes. Cool on a wire rack and turn the sponge carefully out of the tin. Leave to cool. When you’re ready to put the fruit onto the sponge, make sure you have the sponge on a cake base and on the dish you are going to use – once the jelly and fruit is on, you really can’t move it onto another plate as the sponge will be soaked with juice and very delicate. Prepare the fruit – hull the strawberries and cut into halves or slices. Clean the rest of the berries but don’t get them all wet, just wipe with a moist cloth. Make up the first packet of tortenguss - you can use water as the liquid or add a dash of fruit cordial to give an extra flavour. Allow it to cool a little then brush the whole jelly over the base of the sponge flan. This gives the first layer of jelly and seals the sponge a bit to protect it from the juice. Make up the next packet of tortenguss - now decorate your sponge base with all the fruit – make concentric rings of sliced strawberries first. Brush each layer of fruit with glaze as you go along, giving a nice shine to the berries. Top with whole raspberries, dot with blueberries or blackberries, whatever you have, and brush the top with glaze also. Put the cake into the fridge to set the glaze. It takes an hour or so in the fridge or a couple of hours in a cool place to set properly. It will keep overnight in a cool place but should be eaten no more than a day after making. Eat it with whipped cream and enjoy your summer Sunday afternoon.
0 Comments
 Soft genoese sponge, mocha buttercream and simple coffee icing on top Coffee Mocha Sponge Cake
Well, who doesn’t like a light coffee sponge with a mocha buttercream filling? Simple, straightforward and great for sharing. It’s the One True Cake recipe I use a lot – a Genoese sponge. You could top it with walnuts for another classic flavour combination, but I didn’t have any in the house so I used chocolate sprinkles. I made this for my Seniors Lunch Club this week and it went down a treat. We had some new members so we did initial introductions and a gossip while we all ate lunch (and cake) and then we played Beetle. We got quite competitive and noisy. Everyone seemed to remember the concept, although several members said they hadn’t played Beetle since their teenage years and Church social occasions. Luckily I have some large dice, so we didn’t have to squint through our glasses, and I brought along plastic boxes to throw the dice into, to save us scrabbling on the floor too much. For those who are not familiar with the game (is there anyone?) you throw a die and according to the score you draw part of a beetle. You have to start with a 6 for its body, and throw a 1 for the head, 2 for eyes, 3 for antennae, 5 for wings and 4 for legs. Of course, it has 6 legs so you have to throw some numbers much more than others, which is fun and takes longer than you think. The first person to draw a full beetle is the winner and you can go on to have several rounds if you have time. Our drawings ended up causing much hilarity – some looked more like birds than beetles and some looked rather grim while others had smiley faces. Our winner took home a small pot of home-made raspberry jam, so the effort was worthwhile. We probably needed another piece of cake when we got home to recover from the shouting! Serves 12 Timings: 30 minutes preparation, 30 minutes cooking, then cooling time, 30 minutes to ice and fill the cake.
For the buttercream filling: 200g salted butter; 1 tablespoon cocoa powder; 1 tablespoon camp coffee essence; 150g icing sugar For the water icing: 150g icing sugar, 2 tablespoons camp coffee essence, 2-3 tablespoons water Pre heat your oven to 180°C. Grease and line two 15cm diameter loose bottomed cake tins. You can make it in one deeper tin and cut through the equator if you prefer. Whisk the eggs and sugar together until light and fluffy. Melt the butter and leave it to cool a bit. Sieve the flour and coffee granules together – you might need to scrape the coffee through the sieve a little to crush it down to a finer powder. With the motor running slowly, add half the flour and coffee into the cake, then the rest. Stop whisking and add the melted butter, stirring in gently with a metal spoon – this helps keep the air in the sponge. Divide the mixture between the two cake tins and bake for 25 minutes, until golden on top and a skewer comes out clean. Remove from the oven, cool on a wire rack, remove from the tins and cool completely before icing. Make the buttercream: whisk the butter until fluffy and add in the icing sugar one spoon at a time with the motor running. You will need to cover your mixer with a teatowel to stop the icing sugar rising up and making the kitchen look as if it has snowed. Add the cocoa powder and the camp coffee essence and keep whisking to a mousse-like consistency. Spread this over the surface of one of the cakes, reserving about 1/3 of the mixture for the outside. Top with the other sponge and smooth the remaining icing round the outside. Make the water icing by mixing the icing sugar, coffee essence and gradually adding water to reach the right consistency – a thick spreadable gooey icing. Spread this on top of the cake and decorate with sprinkles or chocolate curls as you like, or halved walnuts. Leave the cake in a cool place for the icing to firm up before slicing. It will keep up to 3 days in a tin in a cool place. 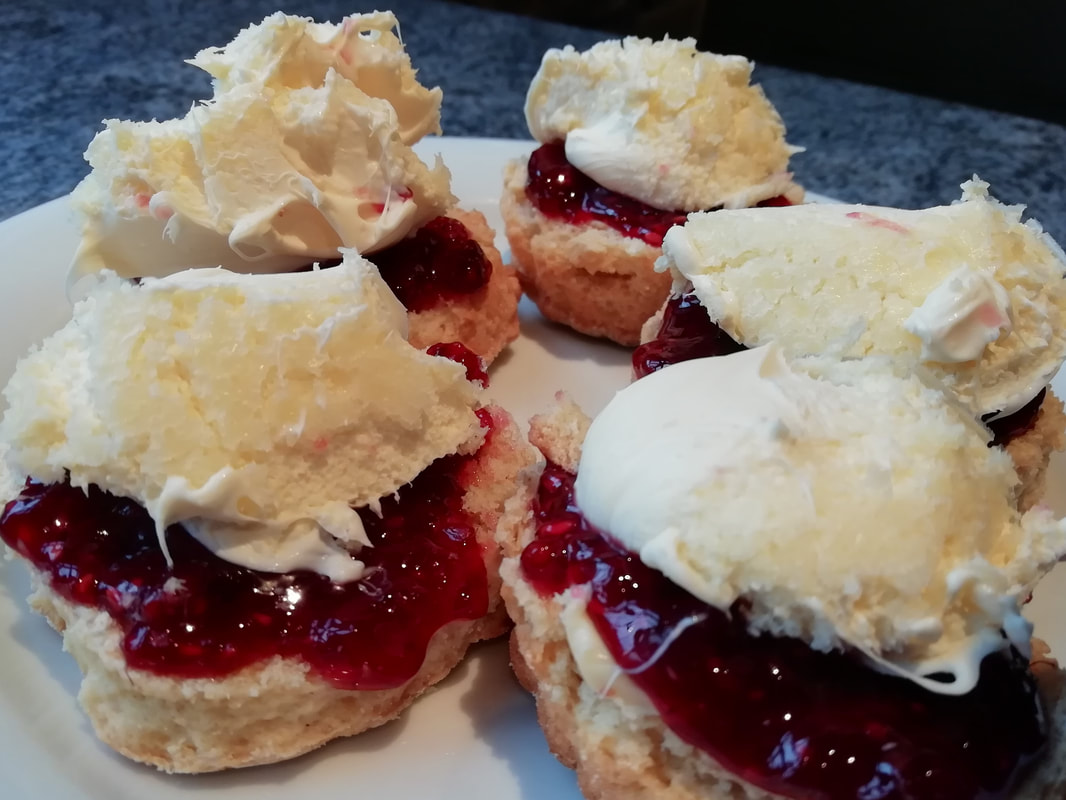 Birthday-Party Scones - make your day a treat Scones with Clotted Cream and Raspberry Jam
Yes, very simple. But sometimes simple is what fits the bill. We had a birthday party at the Seniors Lunch Club this week – mine, and a shared party with the memory of our dear Ruth who died in the Autumn just gone. Last year on the audio conference phone call we had a real shared party for us both. We remembered Birthday Parties we’d had in the past. Ruth herself remembered the Ball she had for her 21st. She grew up in South Africa so her birthday was the middle of winter, being the end of May. She said she drank a glass of fizzy wine, which she’d never tasted before (this must have been in the middle 1940s) and got a little tipsy. Other members had also had memorable 21st parties – one lady was taken to see Tommy Steele at the Palace Theatre in Manchester for her celebration. So, this week, we remembered Ruth: her humour, her love of Africa, her directness, her involvement with everything around her. She was loving and bossy and funny, and we miss her. But we remembered her with love and laughter and we had a simple friendly party for my birthday – sandwiches, sausage rolls, cheesy things on sticks and these scones with jam and cream. They are easy to make, but need to be eaten fresh. The only trick with scones is to avoid kneading the dough, it’s very delicate and you don't want it to turn bread-like. So keep light hands, handle the dough as quickly as possible and cook the scones in a hot oven on a pre-heated baking tray. There are many variations of scones, you can add dried fruit, or make cheese scones. If I am doing the cream/jam route, I prefer them plain, but please yourself. Makes 18 small scones Timings: 30 minutes 450g self raising flour 30g caster sugar 2 teaspoons baking powder 100g softened butter 2 eggs 150ml milk Raspberry jam (or strawberry if you prefer which is more traditional) Clotted cream (or whipped cream) Pre heat your oven to 230°C, and put a flat baking sheet in to warm up. Sieve the flour and baking powder into the bowl of your mixer, add the sugar. Rub the butter into the flour using your fingertips or the pastry paddle of your mixer. Add the egg and milk and mix with a fork to a soft dough. Knead very gently and quickly just to bring the dough together. Roll out on your work surface to about 2cm thick and cut rounds using a fluted cutter. I quite like the smaller scones but make them any size you like. Brush the tops with milk, then get them onto the hot baking tray and back into the oven. Bake for about 8-10 minutes – watch them as they rise. Remove when very lightly browned on top and cook on a wire rack. When cool, split open the scones. I like butter first, then jam (homemade raspberry jam is incomparable, and I will put my recipe on the blog at the appropriate jam-making season) and then clotted cream. 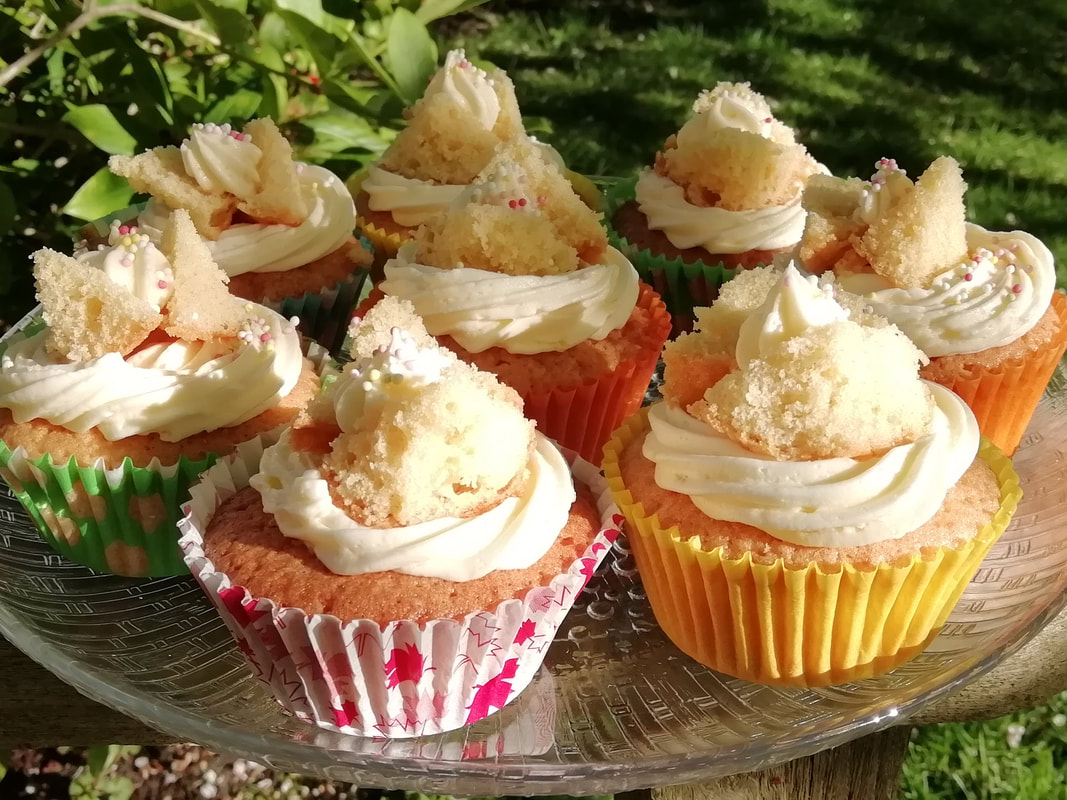 Light lemon cupcakes filled with lemon curd and buttercream. Lemon Curd Butterfly Cupcakes
Pretty as a picture, aren’t they? Tasted good too. My Seniors Lunch Club group were very appreciative. They always are, which is nice, but I have noticed that people as they get a little older seem to enjoy a strong clear taste – and lemon is always popular. We had a game of “Who Am I?” this week – members pick a character’s name out of a bag without looking. This name is then worn on a headband (made out of newspaper stapled together, we aren’t high tech) so the member can’t see it, but everyone else can. The member then has to guess who their character is by asking only Yes/No questions. I usually choose a theme for the “Who Am I?”, and this time the theme was British Royals. Easy you might think, but of course the British royal line goes a long way back and even wanders into legend. Henry VIII was relatively easy to get, as was the late Queen Mother, but King Arthur took 9 guesses, and Anne Boleyn stumped us until a very heavy hint from the member who had played Henry VIII got us over the line. I don’t think anyone would have guessed John of Gaunt so I took his name out of the bag. We had a lot of fun. This is a game you can play at home and it’s also a good game for remote interaction – we played it several times in lockdown on our audio conference calls and it works well. We’ve played it with the themes of “Film Stars”, “Animals”, “Spooky Halloween Characters,” and enjoyed them all. Makes 18 cakes Timing: 60 minutes to make one batch, then cooling time and 30 minutes icing.
Pre heat your oven to 180°C. Beat the sugar and butter together until fluffy, add the eggs in one at a time, adding a spoonful of flour with each one. Turn the mixer to a lower speed and add in the rest of the flour and the lemon zest. Spoon the batter into paper cupcake cups – you want them reasonably filled as you are going to cut the tops off the buns to make the butterflies. I measured one, and I used 45g of batter to make a well filled cup cake. Bake for about 20 minutes until golden and cooked through. Remove from the oven and cool on a wire rack. I prefer to make 2 batches one after the other if you are making more than the 12 in a standard cup-cake tin, as I think they rise better when there’s only one tray in the oven at a time. The batter stands perfectly well as the first batch is cooked. For the icing: beat the butter with the icing sugar, lemon zest and juice until creamy and fluffy. You will need to cover your mixer with a tea towel to stop the icing sugar rising up and dusting the whole kitchen. Scoop the buttercream into a piping bag with a big star nozzle. That of course is optional, you can just dollop spoonfuls of the buttercream onto the cupcakes if you want. Using a sharp knife, cut a pyramid shape from the centre of each cake. Fill the centre of the cake with a teaspoonful of lemon curd, then pipe a curl of buttercream. Cut the piece of cake you removed in half and place it back onto the top of the buttercream to form “wings”. Add a few sprinkles if you like. This process goes quite quickly if you do them all at once. Keep in a cool place until serving and eat within 2 days. 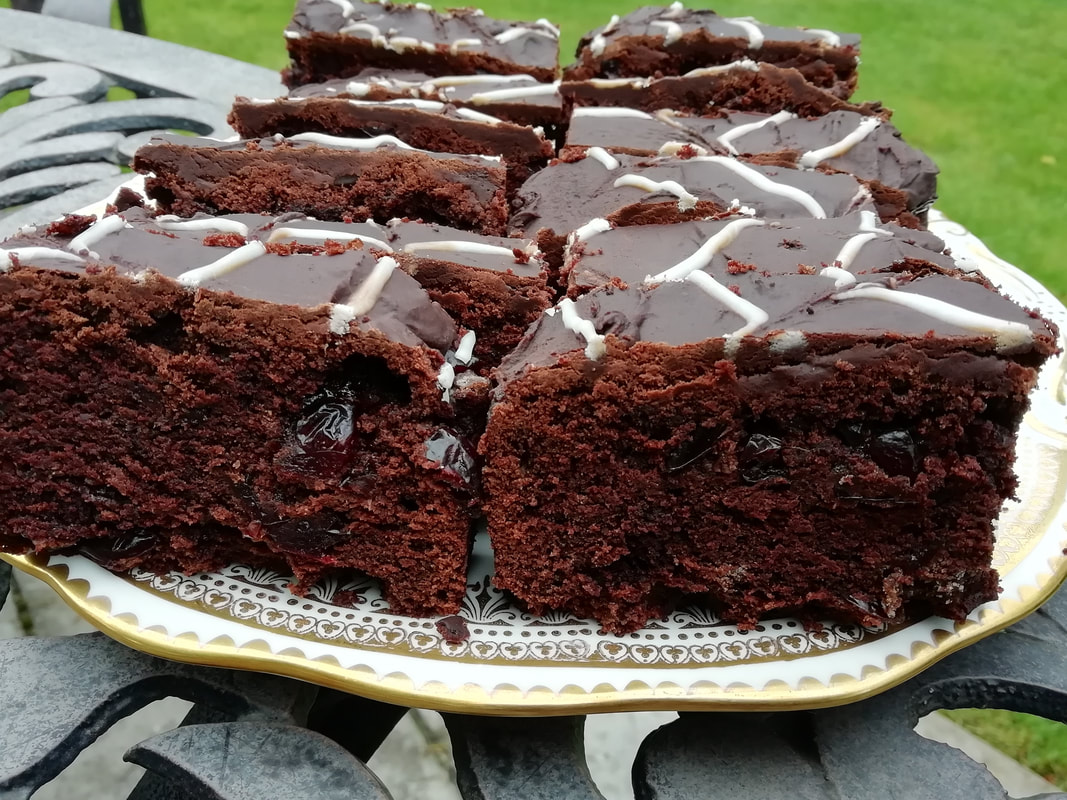 Rich chocolate sponge, studded with glistening cranberries. Australian Chocolate Cake
My friend Bronwyn gave me this recipe. I don’t know if it’s truly Australian or just her own family recipe, but it’s a great cake. Deep and chocolately with an almost brownie-like gooey texture and speckled with juicy pieces of fruit. It’s also very simple to put together, you don’t need a mixer or a whisk. There are no eggs, which makes the sponge more brittle than a Genoese for example – so be careful getting it out of the tin. (My first attempt cracked in several places and I had to repeat.) Leave it to cool in the tin and then turn out gently onto a rack. I iced it with a simple icing-sugar and water icing, but you can leave it plain. Our Senior’s Lunch Group this week was a Farewell Party for one of our volunteers who’s been with us all through our lockdown audio conference call sessions. She’s helped us keep our spirits up in difficult times with her humour and sense of fun – thanks Tricia! We had a lively session of party games – guessing the number of matches in the box, the number of marbles in the jar and the weight of a bag of rice. We then tried to guess the smells in 6 little pots I had prepared – it’s much more difficult than you might think. We recognised lemon, and the smoky smell of whisky, but coffee and vanilla scents stumped us, and so did the fresh smells of chives and mint. Try it yourself, it’s a great group game and quite amazing how you can’t quite name a familiar smell. And a good use for those little hotel pots of jam that you brought home and washed out and now don’t know what to do with. Makes 16 pieces Timings: 90 minutes, then cooling and icing.
Icing: 200g icing sugar, mixed with 1 tablespoon cocoa powder, 1 teaspoon of coffee granules and 3 tablespoons of water Pre heat the oven to 180°C. Grease and line a 22cm square cake tin or other large cake tin. You could also use a loaf tin if you are making a half quantity. Put the water, cranberries, butter, sugar, cocoa and ground spices into a saucepan and heat to boiling. Stir well to combine. Leave to cool to blood temperature – if you take the next steps when it’s too hot, the flour will cook in the hot butter and the cake won’t be so moist. Mix the teaspoon of bicarbonate of soda with the boiling water and stir well to dissolve. Pour this into the chocolate mixture, add the flour, and mix well with a wooden spoon. Add the chocolate pieces and stir again. Spoon the batter into the cake tin and bake about 35 minutes until a skewer comes out clean. Leave to cool in the tin and turn out carefully onto a wire rack before icing. 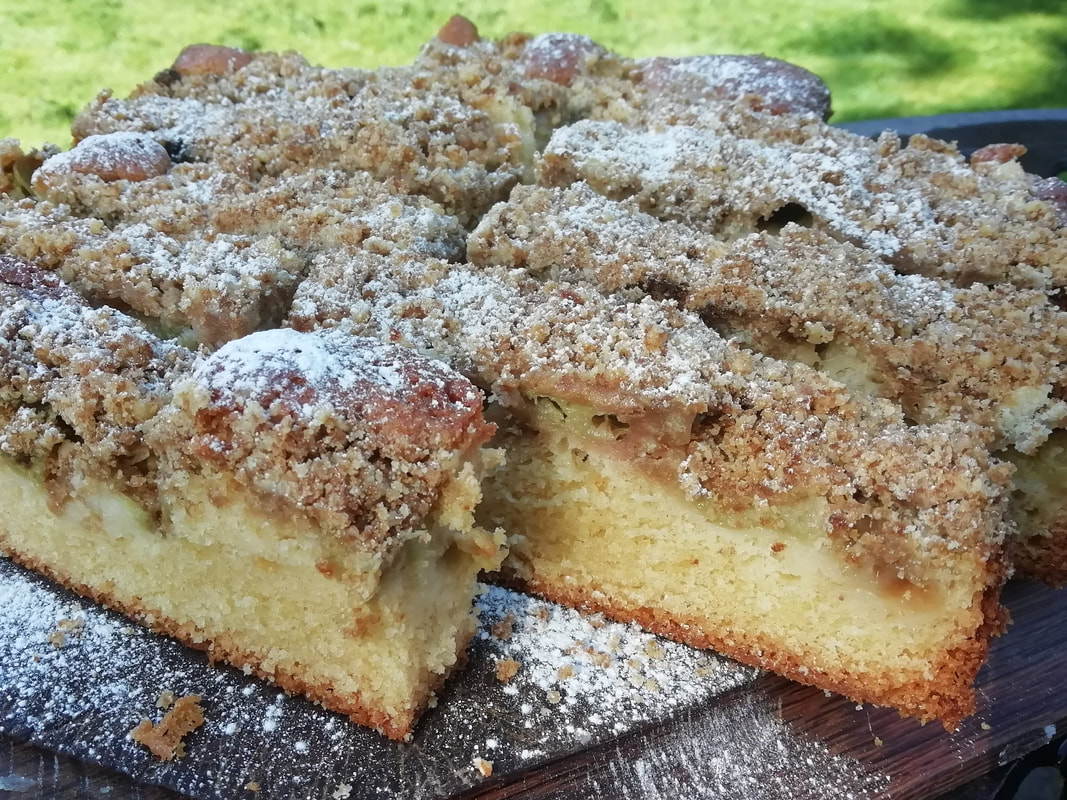 Soft Victoria Sponge, topped with juicy rhubarb pieces and sugary crumble. Rhubarb Crumble Cake
The first fresh rhubarb is now coming up in the allotment. Wonderful sour juicy stalks, just begging to be used in crumbles, cakes, compotes and pies. The Germans have a recipe “streusel kuechen” which is similar to our crumble, and slightly more transportable to take to my Seniors Lunch Club group. The sourness of the rhubarb contrasts beautifully with the vanilla flavoured classic Victoria sponge. The cake has a slightly puddingy texture due to the juice seeping into it, and you need to cook it on a metal tray in case any juice comes out of the bottom of your baking tin. This week’s theme with my Senior’s Group was Space. I must admit, my choice, and not one that greatly inspired the group. Most, but not all, remembered the moon landings, and most have seen recent news clips about the current Mars landings – although were not convinced about the relevance to their own lives. I had to run round the table (on which a vase of flowers was representing the Sun) with a coffee cup (the Earth) showing how the rotation of our planet brings about night and day in Manchester. Exhausting, and I needed the cake to restore my energy. Makes 16 portions Timings: 90 minutes For the crumble:
Prepare the rhubarb: clean the stalks, string them and cut into 1cm lengths. Make the crumble first by rubbing the butter into the flour with your fingertips or using the pastry paddle of your mixer, then stir in the sugar. Leave aside while you make the cake. Beat the butter with the sugar until fluffy, then add the eggs in one by one with a spoonful of flour each time. Add the vanilla flavouring and the rest of the flour. Spoon the mixture into the prepared tin and arrange the rhubarb pieces on top of the cake batter. Strew the crumble mixture over the top. Bake for about 50 minutes and check if done – a skewer will come out clean – leave it another few minutes if needed, it depends a bit on how juicy the rhubarb is. Put the tin on a wire rack and leave the cake to cool in the tin for a few minutes. Serve with some icing sugar sieved over the top or as a pudding with custard or icecream. The cake will keep in a sealed tin for 2 days or so. 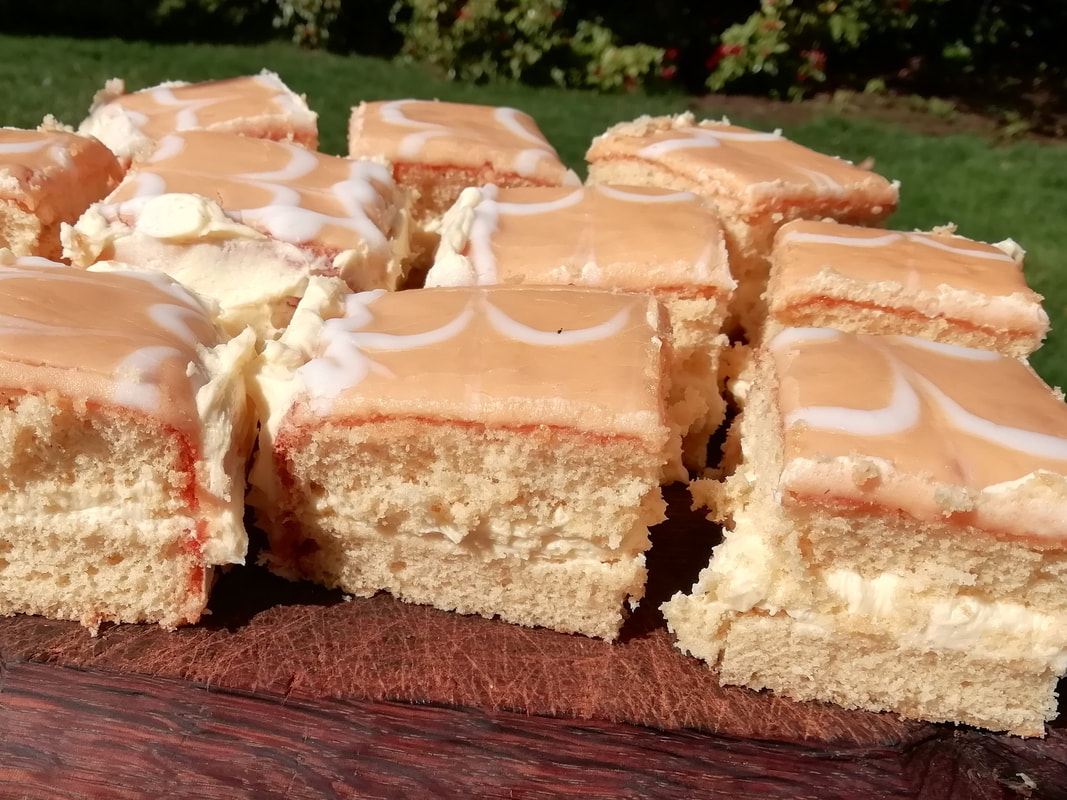 Easy Genoese sponge flavoured with orange and with an orange/mango/white chocolate buttercream filling. Sumptuous. May Cake – Orange and Mango Sponge Cake
For the week we start off in May, I made an orange and mango cake with a bright coloured icing to reflect the sunlight and new feeling of optimism. This is another variation on the One True Sponge Cake – the Genoese sponge which is the only cake recipe you really need to know. My Mum made a 2-egg sized one of these, every few days and baked them in what we would see now as very tiny cake tins. We usually had cake and a cup of tea when we came home from school, but it was a small slice. The buttercream icing I use in the recipe below was reserved for birthdays, so we had four buttercream-iced cakes in the year, and all the rest of the time we had jam in the cake and it was dusted with icing sugar. As always, when using a genoese recipe, I need to acknowledge Pam Corbin, @the_pam_the_jam, in the River Cottage Cakes book of infallible cake recipes. This variation is lightly flavoured with orange in the sponge and has an orange and mango buttercream filling enriched with white chocolate. For the juice used in the filling and icing, I bought a small bottle of mixed orange and mango juice, which had a good flavour of both fruits. Our Seniors Lunch Club had its second week back meeting in person. The members were more confident now they knew what they were doing. We were going to discuss Poetry, as it was Poem in Your Pocket Day this week, but in fact we got into such a nice gossip about what we’d been up to and the new arrangements for meeting up that we never got to the poetry debate. We’ve saved that for another time. People are feeling more positive about meeting friends and relatives but everyone was amazed at how tiring being social again can be – we’re learning to pace ourselves and not do too much all at once. Makes 16 squares. Timings: 1 hour to prepare and bake the cake, another hour to cool and ice.
For the filling: 200g salted butter, 50g white chocolate, 200g icing sugar, 10ml orange/mango juice For the water icing: 200g icing sugar, 10ml orange/mango juice, orange food colouring Pre-heat the oven to 180°C. Prepare a 24cm square cake tin, grease it and line with baking parchment. Make a simple Genoese sponge: whisk the eggs and sugar together either with a mixer or over a bowl of hot water, until thick and creamy texture. This takes only about 3-4 minutes in the mixer. While these are beating up, melt the butter and sieve the flour and grate the orange zest. Turn the mixer down to low and add the flour to the egg/sugar foam gradually, adding the orange zest at the same time. Turn off the mixer and using a metal spoon, stir in the melted butter. Spoon the mixture into the prepared cake tin and bake about 30 minutes till golden on top and a skewer comes out clean. Cool 5 minutes in the tin and turn out onto a rack, remove the parchment. Leave to cool. When cool, cut the cake in half through the equator carefully using your biggest breadknife. The cake will keep fresh in a sealed tin for at least a day at this stage. It also freezes very well wrapped up in cling film, so it can be made well ahead of time. Ice the top of the cake with water icing. Make the orange icing with most of the icing sugar, the fruit juice and the orange food colouring and make up a white icing in a small bowl with the rest of the sugar. Ice the cake with the orange icing and then drizzle lines of white icing vertically. Use a skewer to drag the white icing attractively through the orange and leave to set. For the buttercream icing, start to melt the white chocolate in a bowl above hot water. Whisk the softened butter thoroughly and start to add the icing sugar one spoonful at a time. You will need to cover your mixer with a tea towel to stop the icing sugar rising up in clouds and covering your kitchen. Keep adding the sugar and add a little of the fruit juice. When you’ve added all the sugar, scrape down the sides of the bowl to make sure you’ve got all the butter into the icing and no lumps left on the side. Then pour in the melted chocolate and whisk again. Even the small amount of melted chocolate gives a lovely mousse-y texture to the buttercream. Fill the cake with the buttercream and pat a little round the outside too for decoration. Cut into 16 squares and serve. Eat within 2 days of icing, or keep in the fridge. 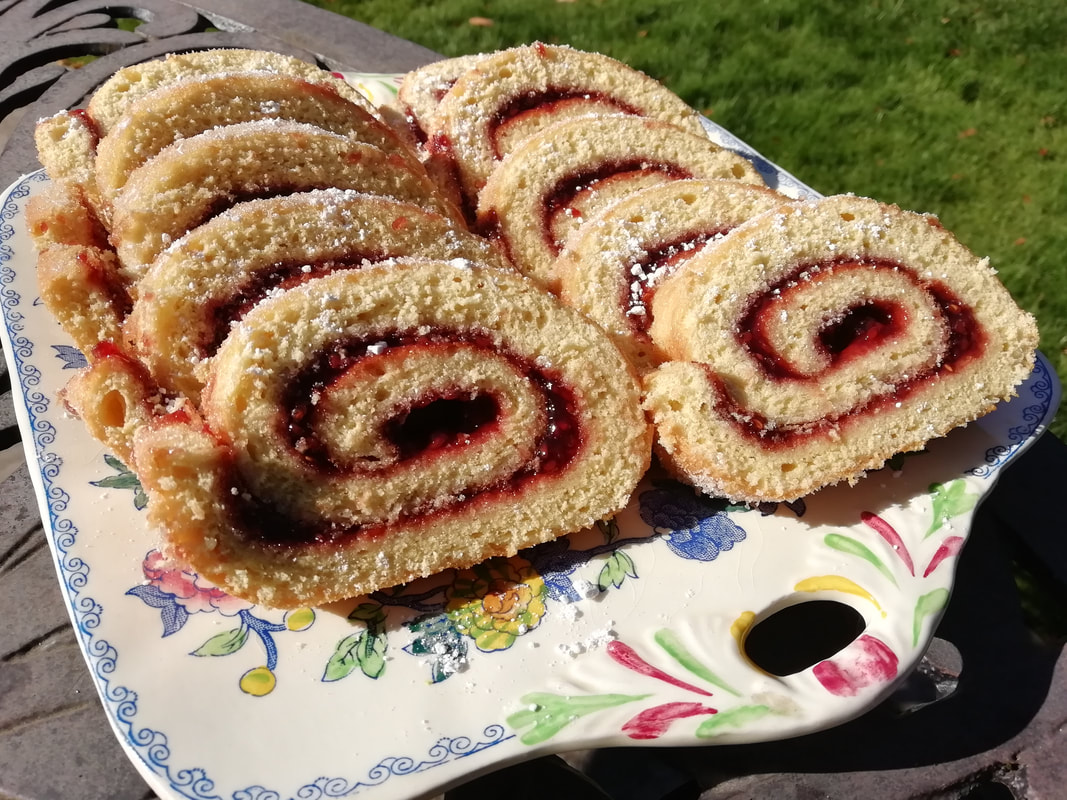 Light fatless sponge, filled with home made raspberry jam. Perfect for your garden party. Swiss Roll
The simple, elegant, refined Swiss Roll. It’s one of the nicest cakes you can make, and it’s practically a health food as it contains no fat. You can fill it very simply with jam (home made tastes best but I would say that) and dust it with icing sugar, or you can fill it with a mousse and cover with buttercream for a much richer version. (see the December archive of this blog for my Yule Log which is a chocolate roll with a mocha buttercream filling). Our Seniors Lunch Club group started back meeting in person again this week, which is why I wanted a simple easy to handle cake for our first week. We have enough to get used to and be concerned about without having a fussy cake to contend with. We had a welcome-back chat, covering how to be safe when meeting other people and we celebrated Shakespeare’s birthday by reading out famous lines from his work and guessing which play they came from and who said them. One of our members gave a most rousing rendition of Henry’s “Band of Brothers” speech before the Battle of Agincourt from the play Henry V. It was quite a demanding quiz but we battled through in true St. George spirit (it’s amazing how much Shakespeare we remember, seventy years after leaving school) and so much enjoyed being back together. Serves 10 Timings – 10 minutes preparation, 10 minutes in the oven, 5 minutes to fill and roll.
Pre heat the oven to 220°C. Put the eggs and sugar in the mixer and beat vigorously until fluffy and creamy-coloured. While that is going on, you can line your shallow baking tray with greaseproof paper. You need to make a shell of paper for the sponge, so cut the paper a bit bigger than your tray and fold up each side, creasing the folds. Cut each corner at an angle so you can fold the paper over the corners to make a nicely edged shell – it doesn’t have to be exact and you don’t have to pin the corners as I was once taught. Once the egg/sugar mixture is light and creamy, turn the motor of your mixer down low and add in the flour. Remove the whisk from the bowl and add in the hot water. Mix carefully with a metal spoon to keep the air bubbles in, and then scrape the mixture into your prepared paper shell. You will get quite a thin layer – spread it carefully with the back of your metal spoon right into the corners of your paper shape. Place it in the oven and watch as the sponge puffs up and rises. It only takes 7-9 minutes as it is a thin layer of cake. While it’s baking, lay out a clean tea towel on your work surface and sprinkle some caster sugar on it. Also, check the consistency of your jam – if it isn’t quite runny, put it into a small pan and warm gently – this will make it much easier to spread. When the sponge is done – nice and springy to the touch but not burned on the edges yet – turn it out front side down onto the tea towel and peel off the greaseproof paper. Immediately spread the whole exposed surface with a thin layer of warm jam. Keeping it in the tea towel, roll up the cake from the short side – so you get a short fat roll with more layers than if you had rolled from the long side. Keep the cake rolled in the tea towel on a wire rack as it cools and then transfer to a sealed cake tin. Just before you serve, dredge over some caster sugar or icing sugar for effect. The Swiss Roll keeps for about 2 days in the tin, but you can also freeze it and use it for trifles or Tipsy Parson (you can find the recipe for that in the April blog or on the Summer of Six menu, from Mexico to Marseille.) 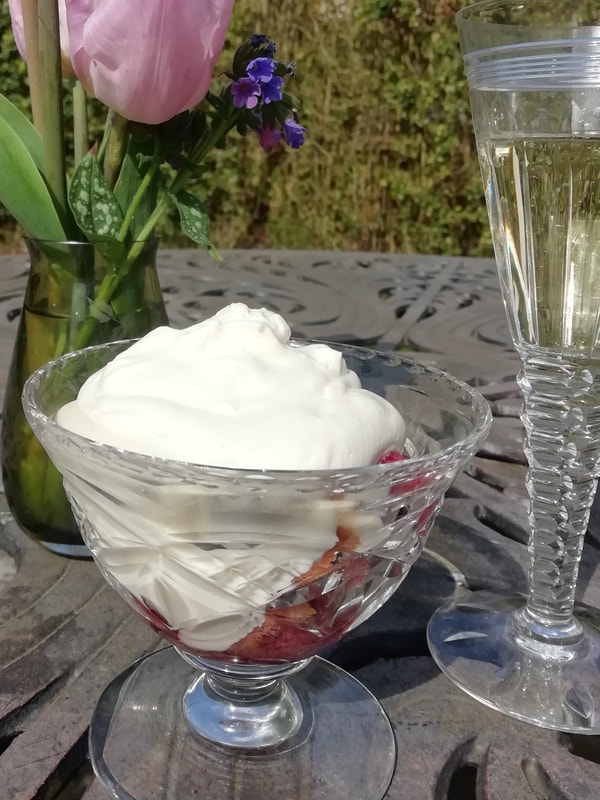 Soft sponge, boozy fruit, sweet custard and cloudy whipped cream - a Scottish pudding dream! Tipsy Parson
A retro dessert from my Scottish heritage. I discovered this pudding in letters sent from my Mum to my Granny in the 1940s when my Mum was on national service in the WRENS. She was stationed in the south of England and was delighted to be invited for an evening meal by some relatives and offered a familiar dish. She mentioned it in her letter home and I did some research. It’s basically an economical wartime take on the traditional Trifle. It uses up the ends of old sponge cakes, some fruit preserved in liqueur, custard and cream. Anyone with a garden in wartime would have tried to preserve fruit in some way, and they might also have kept hens, so ensuring a plentiful supply of eggs to be made into custard. I have re-created it using my own damson vodka (recipe to come at the appropriate time of year) to marinate the fruit and a bought custard rather than home made. I find making a thin spooning-texture crème anglaise style custard, which is what goes best here, rather difficult. I probably don’t have the patience. So I used a bought chilled custard instead, which worked very well. We didn’t have a Seniors Lunch Club round on Thursday as we are “on holiday”, so I didn’t bake a cake. We did meet on audio conference though, and we talked about what we did at Easter. Members saw their families and grandchildren, went to Church, went out for a drive or a walk and enjoyed the bright but cold weather. I made this dessert for a party of six people in my garden this week. We huddled under rugs and cuddled hot water bottles and feasted and drank with great joy. See my new page, The Summer of Six for suggested menus for outdoor parties for six guests. Serves 6. Timings: 1 hour the day before you serve, 20 minutes on the day you eat. For the Genoese Sponge: (you can use bought sponge, for instance a swiss roll, but I find the bought ones are too sweet and often a bit stodgy. Your own will be light as a feather.)
The day before you eat, make the cake. Preheat your oven to 180°C and grease and line a small cake tin. Melt the butter but don’t let it bubble. Whisk the sugar and eggs together until light and fluffy. Sieve the flour and mix it in one spoonful at a time. Stir in the butter carefully and spoon the mixture into the cake tin. Bake for 20 minutes until golden brown and a skewer comes out clean. Cool on a wire rack and keep in an airtight tin. You can also bake this well ahead and freeze. While that’s baking, stone and clean the fruit you are using and mix it with the liqueur and sugar in a bowl. Stir, cover, and leave in the fridge. On the day of serving, whip the cream – this can be done ahead and kept covered in the fridge for 2 hours. When you are about to eat, place some slices of cake in the bottoms of individual bowls. Spoon over the fruit, being generous with the liqueur. Dollop a large spoon of custard over each bowl and then top with whipped cream. 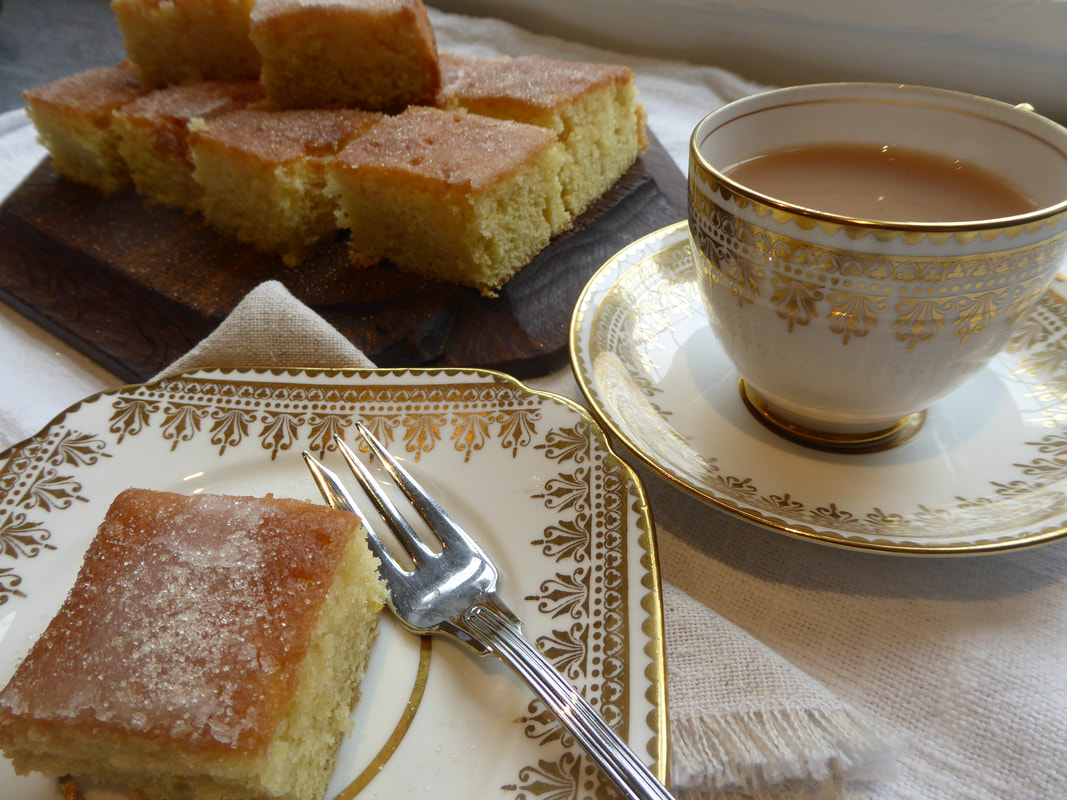 Lemon Drizzle Cake
A favourite with my Seniors Lunch Club group, and one I have reserved for our last ever (we very much hope) round of deliveries and audio conference call. We are having two weeks off for Easter and then meeting in person again from mid April. I will continue to bake and take it along for the meetings, at which we will be able to have a sandwich and a hot drink from our Neighbourhood Centre. We talked about Easter celebrations. People are looking forward to going to church and have booked to attend church services. Our members who gave up a luxury for Lent are anticipating eating chocolate or cake again. Memories of rolling eggs – either hard boiled eggs rolled down a hill (pursued by dogs) or rolling chocolate eggs in the house, to symbolise the rolling of the stone away from the mouth of the tomb. Eggs were painted and eaten or blown and then painted and hung on flowering branches. We also looked back on the last year of meeting as a telephone conference call. I cannot adequately express how proud we are of our group – members and volunteers together have persevered, sustained each other, contributed good sense and good spirits to our weekly meetings and had a great time and a lot of laughs in the process. We’ve enjoyed talking about topics as diverse as Garden Birds, Lighthouses, Art & Design, Australia and Cartoons. We’ve played Who Am I? games, guessing our characters of animals, Christmas personalities and romantic couples. We’ve read out Limericks, Christmas Cracker Jokes and poems about Snow, and we’ve had birthday, Christmas and VE Day parties. We miss our friend Ruth, who passed away in this year, but we’re grateful to have had her in our group. Inspirational people. This recipe is another one from Pam Corbin’s book: Cakes, River Cottage Handbook No. 8. She says that this recipe is “Men Only” Lemon Drizzle, but I can attest that also women can make it with perfect results. Makes 16 squares Timings: 90 minutes
Pre heat your oven to 180°C, and grease and line a 22cm square baking tin. Beat the flour, baking powder, caster sugar, butter, eggs and lemon zest together into a fluffy batter. Spoon it into the tin and bake for 45-50 minutes until risen, golden brown and a skewer comes out clean. Cool in the tin for 10 minutes before turning it out. Mix the lemon juice and the granulated sugar in a small bowl, careful not to stir, you don’t want to dissolve the sugar. Prick the surface of the cake all over with a skewer and drizzle the juice/sugar over, letting it sink in. The cake will keep 5 days wrapped up in an airtight tin, if you don’t give it all away the day you make it. |
Some Changes - April 2022
Thanks to my friends and followers for your patience, and for your encouragement to start blogging again. Archives
April 2022
Categories
All
|
 RSS Feed
