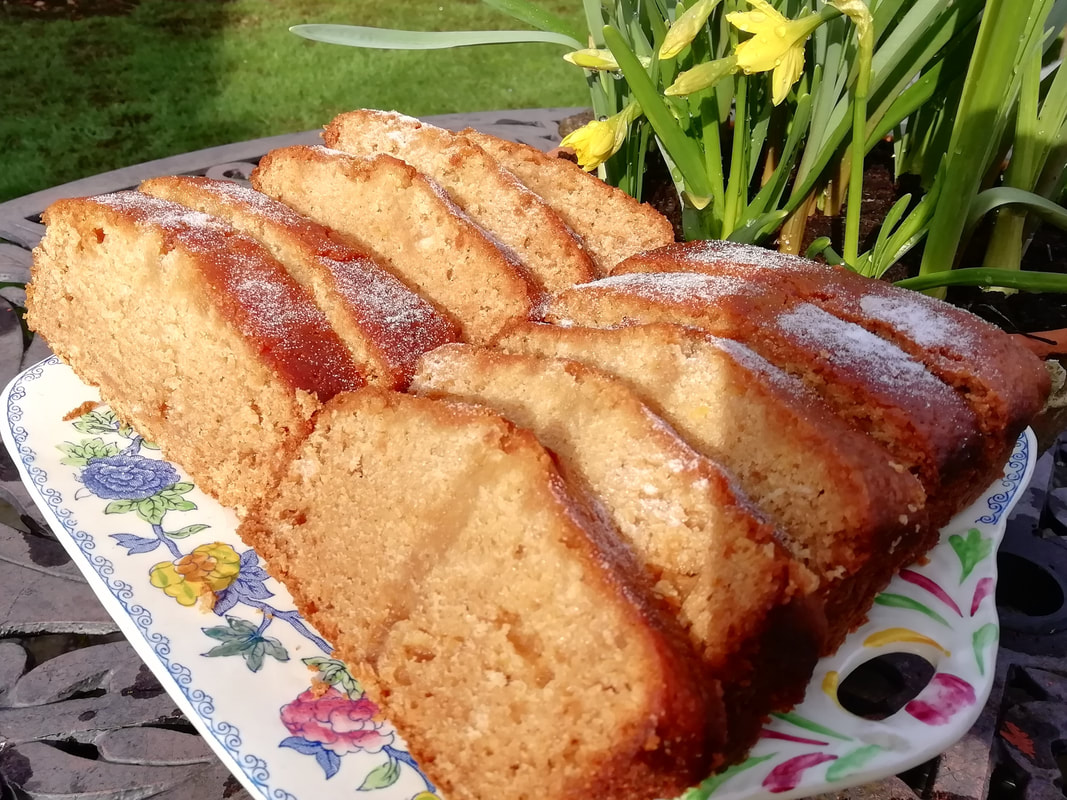
 Golden with sunshine, syrup sponge cake The Optimist’s Cake - Golden Syrup Sponge
A rich, juicy sponge, reminding you of syrup pudding and the best school dinners. Golden syrup lifts the mood, you can’t help feeling cheerful. This is a recipe from Pam Corbin in the River Cottage Handbook # 8. Cakes, and another infallible standby for when you need a straightforward cake, oozing with goodness, of which a little goes a long way. Perfect for school lunch boxes, afternoon tea and taking round to neighbours. It would be a good cake to make if you are selling your house as it fills the kitchen with a welcoming sugary friendly smell which is pretty much irresistible. The theme this week at the Seniors Lunch Club was “Looking after your own Mental Health” as we’ve had a few people saying they feel down, flat, unmotivated recently. It’s a natural and healthy reaction to the year we’ve had, but we thought we’d swop tips for boosting our natural resilience. These are some of the ideas our fabulous bunch came up with:
Serves 8 Timings: 1 hour
Preheat your oven to 180°C and put the 200g of the syrup and the butter in a little pan over medium heat to melt and mix. Grease and line a 1 litre loaf tin. Sieve the flour and bicarb into the mixer bowl and add the breadcrumbs and lemon zest. Remove the pan from the heat and let the butter/syrup mixture cool a little. Resist dipping your finger in. (I can’t). Mix the egg and the yoghurt, and beating on a low speed, mix into the flour. Then add the syrup/butter mix and whisk until you get a glossy liquid batter. Spoon the batter into the cake tin and bake for 40 – 50 minutes until brown on top and a skewer comes out clean. Mix the remaining syrup, a little water and the lemon juice in a small pan and warm through. Add 2 tablespoons of caster sugar but don’t mix. When the cake comes out of the oven, leave it in the tin and prick with a skewer through the cake but not right to the bottom. Make quite a few of these holes. Spoon the warm syrup/juice mixture over the cake, giving it time to dribble into the holes and moisten the cake. The caster sugar will stay on the top and give it a subtle crunch. Leave the cake to cool in the tin, then remove from the tin and wrap in foil. It will keep 4-5 days, if you can stop yourself from eating it all in one go.
0 Comments
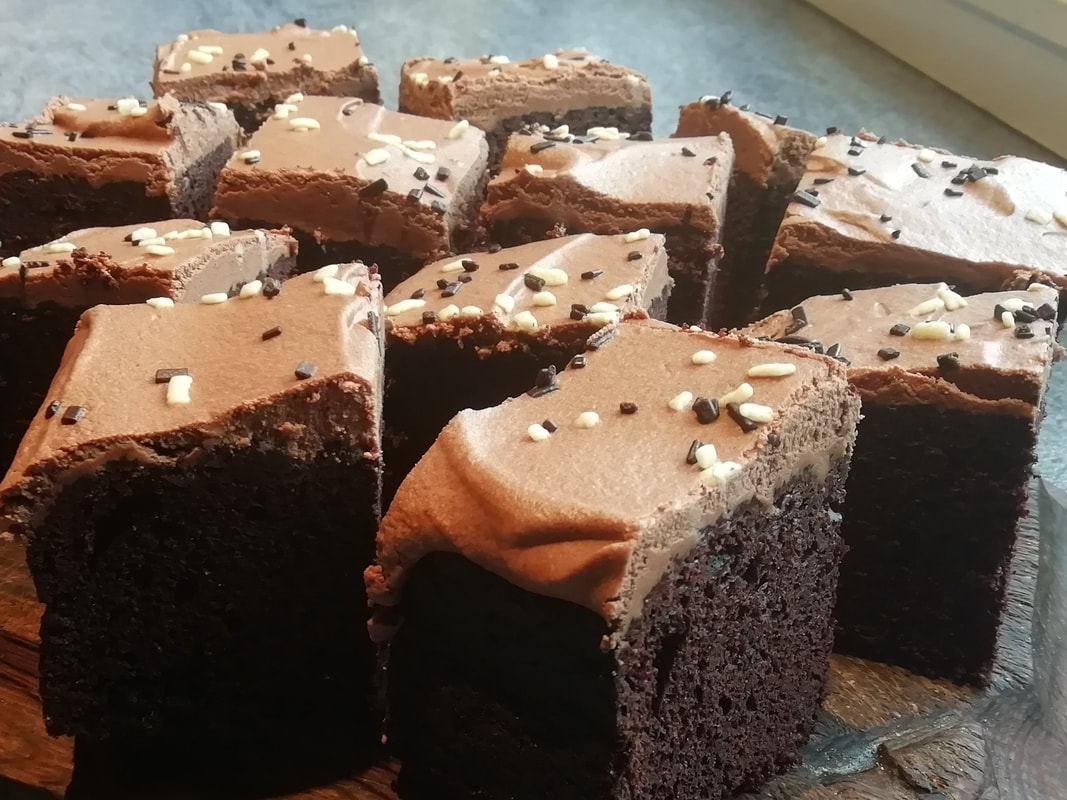 Rich and velvety with a foamy icing - what better for St. Patrick's Day (or any day?) St. Patrick’s Cake – Guinness and Chocolate
What else could I make for the Seniors Lunch Club in St. Patrick’s week than a Guinness Cake? I was a bit wary, having only ever put beer in fruit cakes before, but it turned out utterly gorgeous – deep black sponge with a really good bitter tang of chocolate, very slightly emphasised by the beery background. Not a strong taste of Guinness or alcohol but a very pleasant addition. I topped it with a creamy chocolately Guinness foamy icing, which seemed to match very well indeed. The theme for the Seniors Lunch Club discussion was Ireland. We asked the members where they would like to go in Ireland if they could be magically transported: to kiss the Blarney Stone, to go on the Guinness Tour, to visit the theatres in Dublin, to see the Giant’s Causeway and to see the statue of Molly Malone were all wishes we’d love to grant. Then we each read out a limerick and had a good giggle at the Young Lady from Uttoxeter, the Young Man from Leeds, the Old Man with a Beard and many other odd characters. Simply Recipes and Nigella Lawson and many other people have recipes for Guinness cakes. I have adapted and blended from several sources as I needed a square cake, easy to portion and easy to transport around on my Lunch Club delivery round, and without squidgy middle icing. This one fits the bill – and if you make it, do let me know. Makes 16 squares Timings: 10 minutes preparation for the cake, 1 hour cooking, 1 hour cooling. Icing – about 20 minutes.
Pre heat your oven to 170°C and grease and line a 22cm square cake tin. In a medium pan, melt the butter with the Guinness. Warm just enough to melt and take off the heat. Add the sugar and the cocoa powder and beat with a small whisk to blend all the powdery bits into the liquid. Mix the eggs and the yoghurt together, beating with a fork, and add to the butter/Guinness mix. If using vanilla essence, add this to the pan also. Sieve the flour and bicarb into a larger bowl and add the liquid ingredients. I added them into the mixer bowl with the motor running slowly and it gave a nice fluffy gooey batter. Pour this batter into your cake tin and bake for 50 minutes to 1 hour and until a skewer comes out clean. Remove from the oven and cool on wire rack. When you remove the cake from the tin, be careful, it is more tender than some other sponges and might crack – so put a rack over the tin as you invert it. Cool the cake completely before icing it. To make the icing: Reduce the Guinness by about half by boiling in a small pan, leave to cool slightly. Beat the butter with the icing sugar and the coffee essence until fluffy and add the double cream, it will give you a coffee-coloured buttercream. Now put the chocolate into the warm Guinness and stir thoroughly to melt the chocolate completely – you will need to stir and let the mixture cool. Pour the chocolate mixture into the buttercream icing with the motor running slowly to whisk the chocolate and buttercream together. You will get a light fluffy buttery mousse texture. Spread the mousse icing generously over the top of the cake and leave in a cool place to set – preferably in the fridge. The mousse will soften once you get the cake out of the fridge so keep it in there until nearly time to use it. 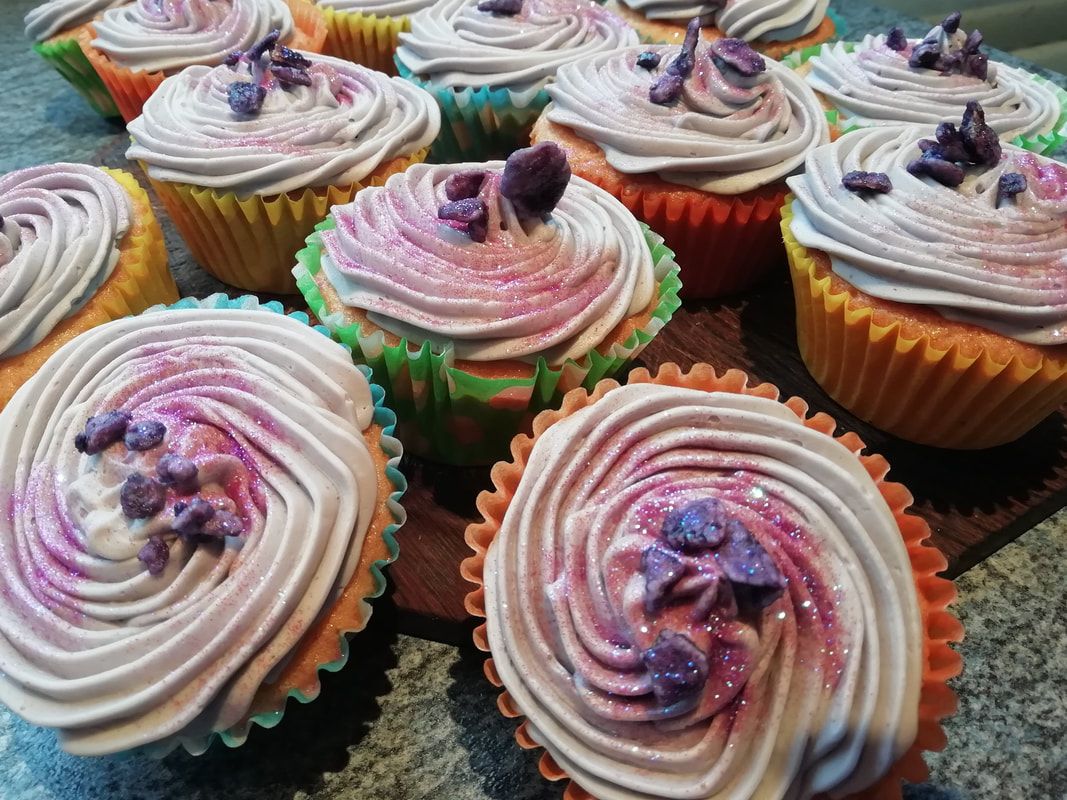 Fluffy tasty cupcakes for some very special women Purple Cupcakes
Something special for International Women’s Day! Poppyseed and lemon cupcakes with a rich violet buttercream icing, to give that purple touch. I happened to have a small bottle of violet liqueur, which I needed to use up, but you could leave it out if you’d rather. I love Parma Violets - they’re the sweet I’ll pick out first from those old-fashioned mixes, but it’s a rather individual taste. The floral scent isn’t too strong, but test as you go and don’t add too much at once. Our Seniors Lunch Club discussion was on the theme of Inspiring Women. Every member of the group chose a special woman to tell us about and gave a piece of advice to a young woman starting out today. We heard about local, international, famous and family – Angela Davis, the US Black Rights and Civil Rights activist; Lucille Ball, actress and producer; Amy Johnson, flying ace; Temple Grandin, animal behaviourist and autism activist; Elsie Inglis, WW1 doctor; Florence Nightingale; Marie Curie; mothers and mothers-in-law who were kind, supportive and strong; female bosses who were challenging and also supportive; local judges and barristers who encourage and mentor the younger lawyers. Our advice to young women comes from those who have lived through war, want and plenty. They’ve raised families, had professional lives, seen difficulties, dangers and great joy. Their advice is typically practical, down to earth, and mixed with the aspirational!
Makes 18 cupcakes Timings: 1 hour for the cupcakes, then cooling time and then 30 minutes for the icing.
For the icing: 250g unsalted butter, 150g icing sugar, 50g white chocolate, purple food colouring, 1 tablespoon violet liqueur Pre-heat your oven to 180°C. Beat the butter or margarine with the caster sugar until fluffy, then add the eggs one at a time with a spoonful of flour each time. Add the sour cream. Tip in the lemon zest and the poppy seeds and then stir in the rest of the flour, either with the mixer running slowly or by hand. Spoon the mixture into cup cake cases and put the tray into the oven. I prefer to make one tray of 12 cupcakes at a time, and then make the next, rather than have to swop trays over from top to bottom halfway, which I think tends to make the cakes fall slightly. The un-used mixture will stand happily for 20 minutes while you cook the first batch. Cook each batch for 15-20 minutes, remove from the oven and cool on a wire rack. To make the icing: beat the butter until fluffy. Melt the white chocolate over a gentle heat. Beat the icing sugar into the butter one spoon at time, then add in the melted chocolate, the violet liqueur, and beat again. I find the addition of chocolate helps hold the fluffiness of the icing. Add the colouring to your preferred level of purple-ness. Ice the cakes using an icing bag with a star nozzle and decorate with candied violet petals and some purple glitter for the final sparkle. 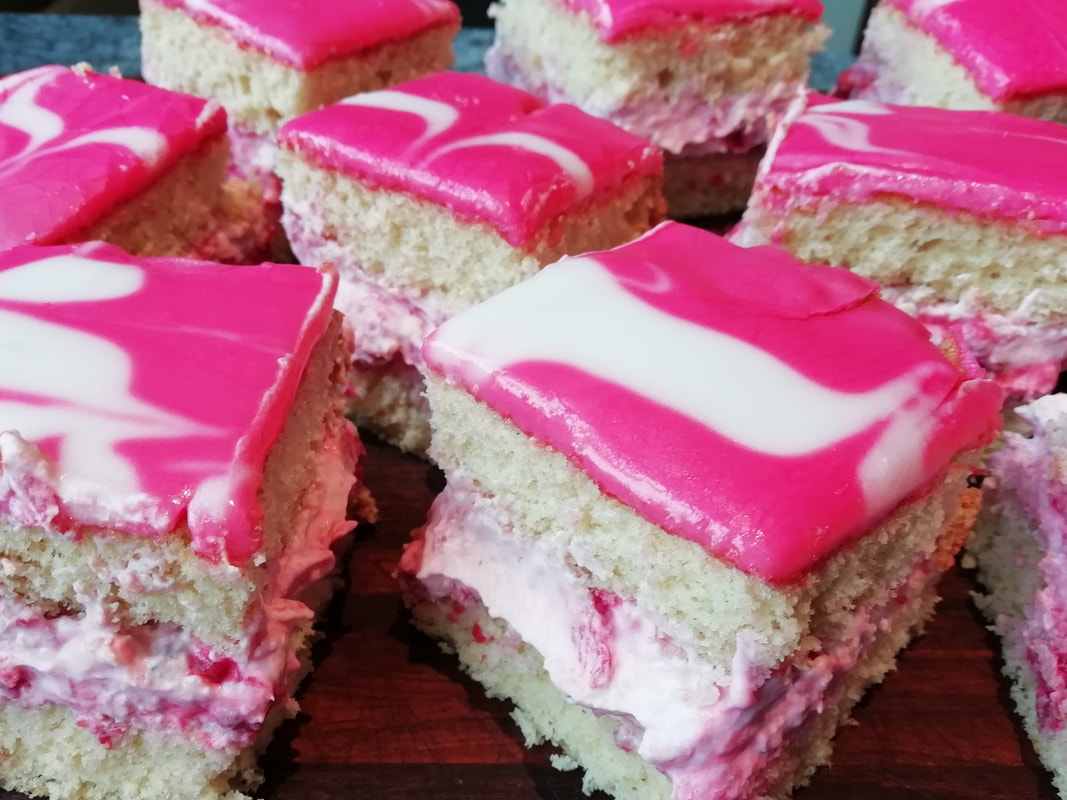 Colourful and creamy - sponge cake with raspberry cream filling March Cake – Raspberry Cream Sponge
I just made this up. So far as I know, nowhere in the Northern Hemisphere is March peak time for raspberries. I could have made Welsh Cakes for my Seniors Lunch Club group as our theme for this week was Wales and St. David but some of our members aren’t too keen on raisins. It was my Mum’s birthday in March, and she always had pink icing on her cake, so I thought I’d do something like that. Then pink icing made me think of raspberries, and there you are. I’m sorry about the food miles, but you could make this with European frozen raspberries, so salve your conscience and do that. This is based on the Genoese sponge that is the One True Cake – the only recipe you really need to know. I made the simplest version possible, flavoured with vanilla – which was the one my Mum always made anyway, so it’s very fitting. I just iced it with pink and white water-icing, and then filled it with whipped cream stirred up with crushed raspberries and caster sugar. Our Seniors Lunch Club discussion was about Wales, and our memories of Wales. As we are based in Manchester and only a few miles from North Wales, we had a lot of holiday reminiscences – beaches, rain, fog, castles, mountains. We’ve loved the scenery, the history, the food, steam railways and climbing Snowdon. Holiday camps, beachside caravans and boarding houses were happy memories – not many of us had the budget to stay in hotels! We disagreed on our memories of the weather. For some, it was only sunshine in byegone Wales, but for others bad weather was to be expected and planned for – cars were packed with books, wellingtons, board games and rainy day projects. Makes 16 squares. Timings: 1 hour to prepare and bake the cake, another hour to cool and ice.
For the water icing: 200g icing sugar, red food colouring Pre-heat the oven to 180°C. Prepare a 24cm square cake tin, grease it and line with baking parchment. Make a simple Genoese sponge: whisk the eggs and sugar together either with a mixer or over a bowl of hot water, until thick and creamy texture. This takes only about 3-4 minutes in the mixer. While these are beating up, melt the butter and sieve the flour. Turn the mixer down to low and add the flour to the egg/sugar foam gradually, adding the vanilla essence at the same time if using. Turn off the mixer and using a metal spoon, stir in the melted butter. Spoon the mixture into the prepared cake tin and bake about 30 minutes till golden on top and a skewer comes out clean. Cool 5 minutes in the tin and turn out onto a rack, remove the parchment. Leave to cool. When cool, cut the cake in half through the middle carefully using your biggest breadknife. The cake will keep fresh in a sealed tin for at least a day at this stage. It also freezes very well wrapped up in cling film, so it can be made well ahead of time. Ice the top of the cake with water icing. Make the pink icing with most of the icing sugar and a little water and the food colouring and make up a white icing in a small bowl with the rest of the sugar. Ice the cake with the pink icing and then drizzle lines of white icing vertically across the pink. Use a skewer to drag the white icing attractively through the pink and leave to set. Just when you are ready to eat the cake, mush up the raspberries with the caster sugar. Whip the cream until fairly stiff and then mix the raspberry slump into the cream. Spread this through the middle of the cake and put the top back on. Keep in the fridge if you aren’t eating it immediately and eat within 1 day of making.  Chewy, crunchy, sweet and satisfying, Millionaire's Shortbread Millionaire’s Shortbread
Yes, I know it’s got about a million calories per piece – which is why it’s called millionaire’s shortbread, yeh? but it is totally delicious, and you can always eat just a small piece, can’t you? As a treat? And then don’t have any more. Until the tin is empty. It’s a bit of a stop-start to make as you have to make the three layers in sequence, so you need to be around and in the kitchen for a few hours off and on but each layer doesn’t take very long so you can do other things in between. I researched a bit before finalising this recipe and I based it mainly on Jane’s Patisserie – Jane has a lovely baking site, so if you want further inspiration, head over to Janespatisserie.com for lots of lovely cakes and sweet things. Our Seniors Lunch Club discussion this week was about Garden Birds. Our favourite birds were blackbirds and robins because of their songs, but there was strong support for starlings due to their cheeky nature and their amazing flocking murmurations. One of our members has a tame blackbird who comes to the back door for his food, but the robin used to steal the worms she fed to her pond-living frogs, so she wasn’t so keen on him. Makes 16 small squares Timings: about 3 hours but with rest/cooling periods in between phases For the shortbread:
For the caramel:
300g chocolate for the topping Pre heat your oven to 180°C. Line and grease a 22cm square cake tin, quite deep. You can use any shape tin you like of course, but to cut even squares, a square tin is best. Make the shortbread: Cream the butter and sugar together, either by hand or in a mixer with the paddle. Add the flour little by little until you have a crumbly dough. Knead very quickly just to bring it together and then press the dough into the bottom of the cake tin. Bake for about 25-30 minutes (depends on the size and depth of your tin) until light brown. Watch out, shortbread can turn from just right to overcooked quite quickly, so be careful. Take it out of the oven, put the tin on a rack and let it cool down. Make the caramel: Put all the ingredients into a heavy bottomed pan – one of those cast iron/enamel pans is good. Stir over a low heat very slowly until the sugar is properly dissolved – you must keep the heat low until the grittiness of sugar is gone. This stage takes a good ten minutes. Now turn the heat up a little and move the pan onto the smallest burner – this is to stop the mixture burning in the corners of the pan. Constant stirring – use a wooden spatula with a flat end to scoop the mixture off the bottom of the pan. Cook and stir for about 7-10 minutes until the mixture has changed to a golden caramel colour, and when you move the spatula through the mixture you can see the bottom of the pan for a second – it’s really getting thicker. Watch out for splashes and bubbles, the boiling sugar mixture is hot. Pour the caramel onto the top of your shortbread and smooth out. Let the tin cool on the worktop and then place it in the fridge to cool down a bit further. Melt the chocolate in a bowl over hot water until smooth, then pour over the top of your set caramel. Leave to cool. If you’re cleverer than I am, melt two colours of chocolate in separate bowls and stir them on top of the caramel – I put them both in the same bowl so there weren’t any swirls of white chocolate in among the dark! Never mind, it tasted great and I’ll know for next time. 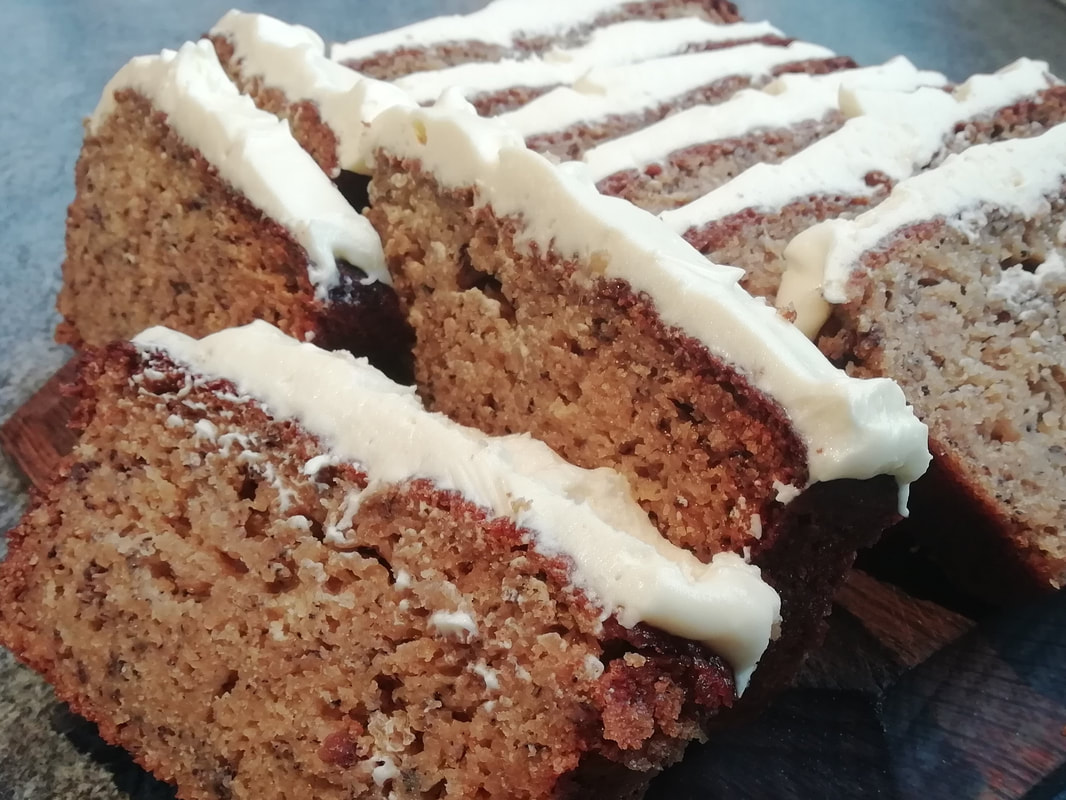 Evocatively delicious banana bread with tangy passionfruit icing Hawai’ian Banana Bread with Lilikoi Cream
Yes, it’s exotic. We holidayed in Hawai’i when my son graduated from Vancouver. Beautiful isolated islands, tropical climate, incredible scenery, great people. The cuisine is very much centred around fish, fruit and vegetables, local and fresh. We did a dive-day – snorkelling round the island of Lainai’i; food included. We had banana bread for breakfast, accompanied by passionfruit (Lilikoi) cream frosting. It was delicious and gave us so much energy, it set us up perfectly for a demanding day snorkelling in progressively more challenging environments. Our last snorkel was over a very deep ridge, pierced by a huge upswelling rock, which made the current flow up and over, bringing nutrients and fish from deep in the Pacific to our wondering eyes. It was like flying through the roof of a cathedral of light, shoals of fish flickering below. The taste of the moist sugary banana bread, with the icing cut through by the tang of passionfruit, brings back Hawai’i to me. I hope it brings you closer to that tropical paradise, too. Our Seniors’ Lunch Group discussion this week was about Lent – and specifically about what we give up, why, and what we really couldn’t give up. Our chocolate-fiend (98 years old) gives up her daily chocolate, and really looks forward to Easter Saturday when she’s allowed to start again – she lines them up two days in advance to anticipate the taste. Chocolate, sherry, and crisps were the most popular self- denials, but we also had the daily news-fix to be renounced, and “biting my fingernails”. What we couldn’t give up included the telephone, the internet, the Saturday crossword and writing a daily diary – one of our members has written her own diary since the mid-1960s, which would be a fascinating social history if we were ever allowed to read it. Makes 10 slices. 30 minutes preparation, 1 hour cooking, 30 minutes for the Lilikoi Cream
For the lilikoi cream: 90g softened butter, 120g cream cheese, juice of 4 passionfruits, 150g icing sugar Pre heat your oven to 180°C. Grease and line a loaf tin. Beat up the oil, sugar, vanilla essence and eggs in a large bowl until fairly fluffy. In another bowl, mash the bananas with the yoghurt, then add them to the oil/sugar/eggs mixture. Sieve in the flour, baking powder, bicarb and salt, mix well and then mix in the hazelnuts. You will have a gloopy delicious mixture. Do taste it thoroughly at this stage; it’s a cook’s prerogative to enjoy the cake mix. Scoop it into the loaf tin and bake for about 50-55 minutes until brown on top and beautifully spongy. Take out and leave to cool on a wire rack for about 10 minutes, then turn out of the tin and leave to cool fully. You don't have to ice this to enjoy it, it's wonderful as it is. To make the icing: soften the butter well – without melting it, but good and soft. Beat the butter well adding a spoonful of icing sugar at a time. I find a hand-held whisk is better at this than a mixer. When you’ve added half the sugar, start adding the juice and the cheese while whisking all the time and adding the sugar in spoonfuls. You will end up with a soft creamy mixture which tastes of fruit with a sharp edge from the cheese. If you can avoid eating the whole lot out of the bowl, just dollop the icing on top of the loaf. Keep somewhere cool until time to serve. Are you on a beach? Listening to the surf? 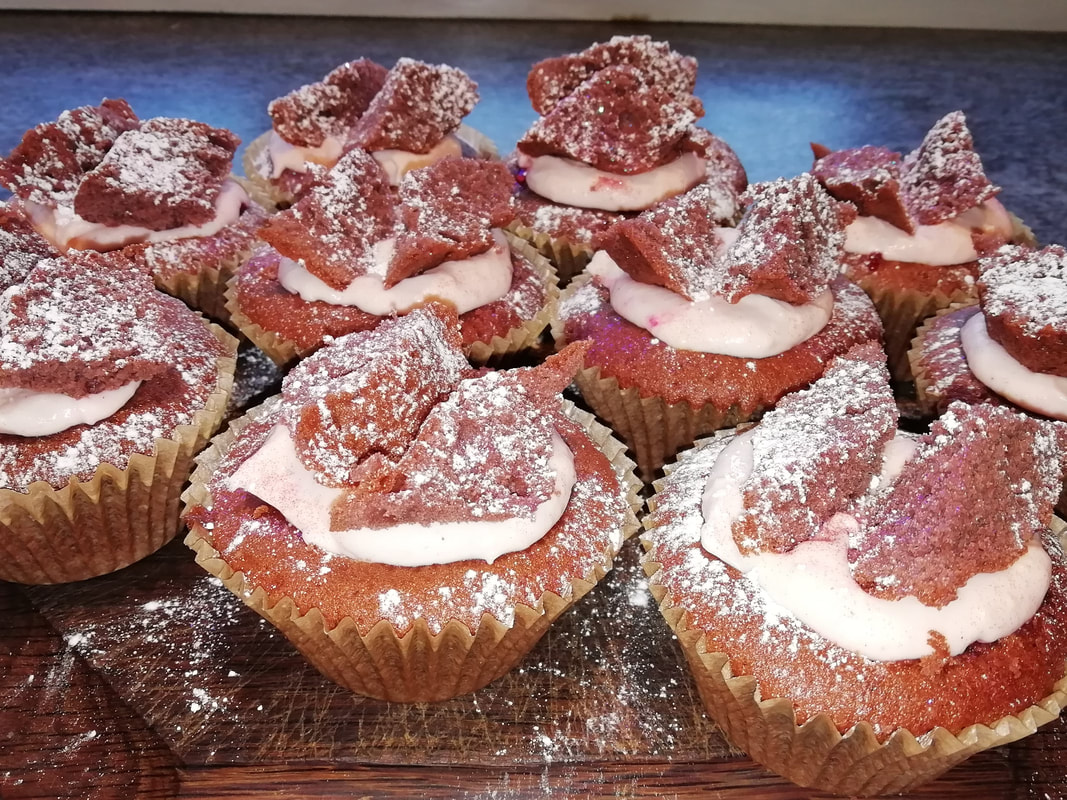 Chocolately, creamy, rich and glittery, most appropriate for Valentine's weekend indulgence Red Velvet Butterfly Cupcakes
Valentine’s recipe for the Seniors Lunch Club: red velvet cake of course! Moist, chocolately and delicious, even romantic. I’ve always hankered to do the proper American-style cream cheese frosting, so I tried it, and I’m afraid I’ve learned we don’t have the right sort of cream cheese in the UK. My cream cheese frosting came out far too runny to ice on top of the buns, but I still wanted to use it, so I made the buns into butterfly-cakes and filled the hole in the cake with the icing, so it didn’t need to hold its shape so much but could still give that tangy salty creamy edge to the sweet cake. It tasted great, so I’m giving the recipe, but I’ll try again with the cream cheese frosting to see if I can make it turn out firmer. Our Seniors Lunch Club audio call game was a Guess Who I am? (Romantic Couples). I provided everyone with a couple-description when I dropped off the newsletter and cake, and we had to ask yes/no questions to find out the romantic pair each member was representing. Tarzan and Jane caused us some problems, Elizabeth Bennet and Mr. Darcy were discovered after a good set of questions and Anthony and Cleopatra were quite easy to guess. For Mark, who wanted to know if my recipes were scaleable if you aren’t cooking for a crowd, yes indeed. Especially this recipe, you can reduce all the ingredients proportionately and get a smaller production. Go by the relative proportion of eggs to other ingredients, which in this recipe is 1 egg to 50g each of flour/sugar/butter. I’d make a 2 -egg mixture with 100g of each of the other ingredients, and you’ll get about 6 buns-worth. Ice and eat 2 immediately, freeze the others and bring them out 2 at a time, ice and eat. A week’s worth of home-made cakes from one easy batch. Makes 18 buns. Timings – 10 minutes preparation, 30 minutes cooking, 15 minutes to ice and finalise.
Pre heat your oven to 180°C. Beat the butter with the sugar until light and creamy, add the cocoa powder and oil with the whisk running. Add in the eggs one at a time, with a spoonful of flour each time (this is said to stop the mixture splitting). Add the food colouring – you will need a lot of red colouring to overcome the brown of the cocoa powder but use as much as you like! Then fold in the rest of the flour carefully and stir in the yoghurt. Spoon the mixture into paper bun cases, filling each about half full, and place the tray in the oven. I like to cook one tray of buns at a time, to avoid having to go in and change them about on the oven shelves, and the mixture will stand quite happily as you do this. Cook for about 30 minutes until risen and spongy. Remove from the oven and cool on a wire rack until ready to fill/ice. You could ice these with a normal water-ice made from icing sugar and water, coloured with food colouring, or make them a bit more decadently into butterfly cakes with a cream cheese icing and jam filling. Make the cream cheese frosting by warming the butter quite well – if you start with cold butter you will get nuggets of butter through the cream cheese, and that isn’t nice. It needs to be soft but not fully melted. Beat the butter with the icing sugar and cream cheese until well blended, adding the vanilla essence and food colouring as desired. You will need to put a tea towel over your mixer while adding the icing sugar or you’ll get a kitchen that looks as if it’s snowed. To make each bun into a butterfly cake – cut out the centre of the bun using a sharp knife in a circular motion – you are cutting out a sort of circular pyramid shape. Spread raspberry jam into the hole, then fill with the cream cheese icing. Cut the little piece of bun you removed into two and place back onto the iced centre of the bun, with the curved sides together and the pointier bits facing out – it only very vaguely looks like a butterfly, but it does look quite nice! Sprinkle with icing sugar and edible glitter. These should be kept cool and eaten within 2 days, because of the creamy frosting. 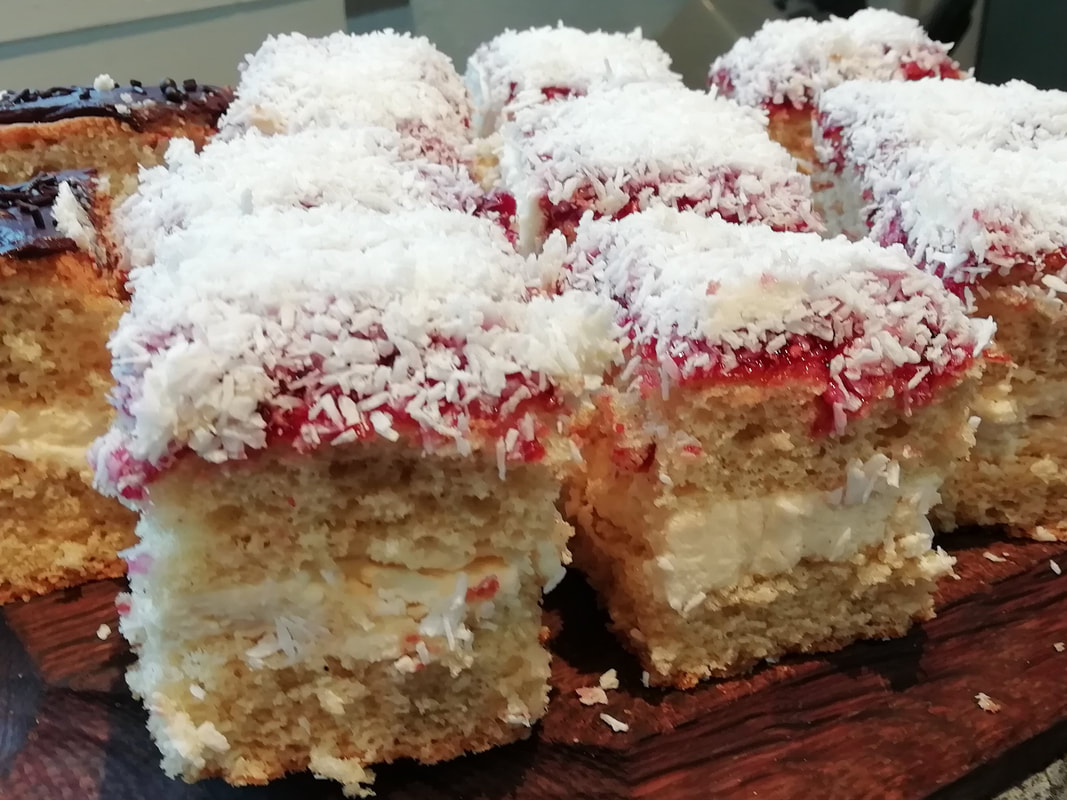 Vanilla sponge, filled with white chocolate buttercream, topped with tangy raspberry jam and coconut - yummy! February Cake
This is for cheering you up in bad weather, giving you something to look forward to. It’s very rich, a little goes a long way, but it’s a great mood-enhancer, so it was a good choice for my Seniors Lunch Club this week – we all needed cheering up after the gloom of floods, frost and pestilence. It’s the same cake recipe as I made a few weeks ago, a vanilla Genoese sponge. This time I filled it with a decadent white chocolate and buttercream fluffy filling and topped it with raspberry jam and desiccated coconut. The jam was just acid enough to take the edge off the extremely sweet filling, but some of my Seniors couldn’t manage their whole piece in one sitting and had to split it over two days – double the pleasure really, so why not? We discussed what we like about the month of February – for such a dark dank month, there’s actually quite a lot to appreciate: many birthdays, Valentine’s Day, pancake Day, Chinese New Year, the garden bulbs starting to come up and the birds starting to sing. Our Australian volunteer gave us a word-picture of February in Australia – extremely hot, insects humming a low background note, wearing sandals to school – feels like more than half a world away. I don’t think the icing in this cake would survive a Sydney February, so keep it for the British winter, and let it warm you through. Genoese Sponge – makes 16 portions. Timings – 15 minutes preparation, 25 minutes cooking, 1 hour to cool down, and 15 minutes to fill and ice.
Filling – 200g butter, 200g icing sugar, 100g white chocolate melted. Topping – 100g raspberry jam, warmed up, and 6 tablespoons desiccated coconut. Pre heat your oven to 180°C. In your mixer, beat the eggs and sugar until fluffy – takes about 5 minutes. At the same time melt the butter in a small pan – then take it off the heat - and weigh out and sieve the flour. Grease and line a cake tin – for this amount I use a 22cm square tin, which makes a cake that is also easy to portion out. When the eggs/sugar mix is beaten up, add the flour gradually, beating on a lower speed. Spoon the butter on top and mix up the whole thing gently with a metal spoon – this keeps the air in the mix better than the rather coarser effect of a wooden spoon. Scoop the batter into the cake tin and place in the oven for about 20 minutes until the cake is risen, golden on top and springy to the touch and a skewer comes out clean. Take it out, and leave to cool on a wire rack, then turn it out of the tin, peel off the paper, turn right way up again and leave to cool completely. At this stage, you can wrap it well in greaseproof paper and freeze it if you like. Make the filling: beat the butter in your mixer until turning fluffy and add the icing sugar one spoonful at a time – you will need to put a teatowel over your mixer while doing this to avoid sugar-dusting the whole kitchen. Melt the white chocolate in a bowl over hot water, and when melted, pour straight into the mixer, keeping the whisk running. You will notice the already fluffy butter/sugar mixture take on an almost mousse-like texture. Slice the cake through the equator carefully with a bread knife and fill with the white chocolate buttercream. Top with the warm raspberry jam and immediate sprinkle on your desiccated coconut so that it sticks nicely. Eat within 2 days, and if you take a piece round to a friend, recommend that they keep it in the fridge to ensure the icing doesn’t run! 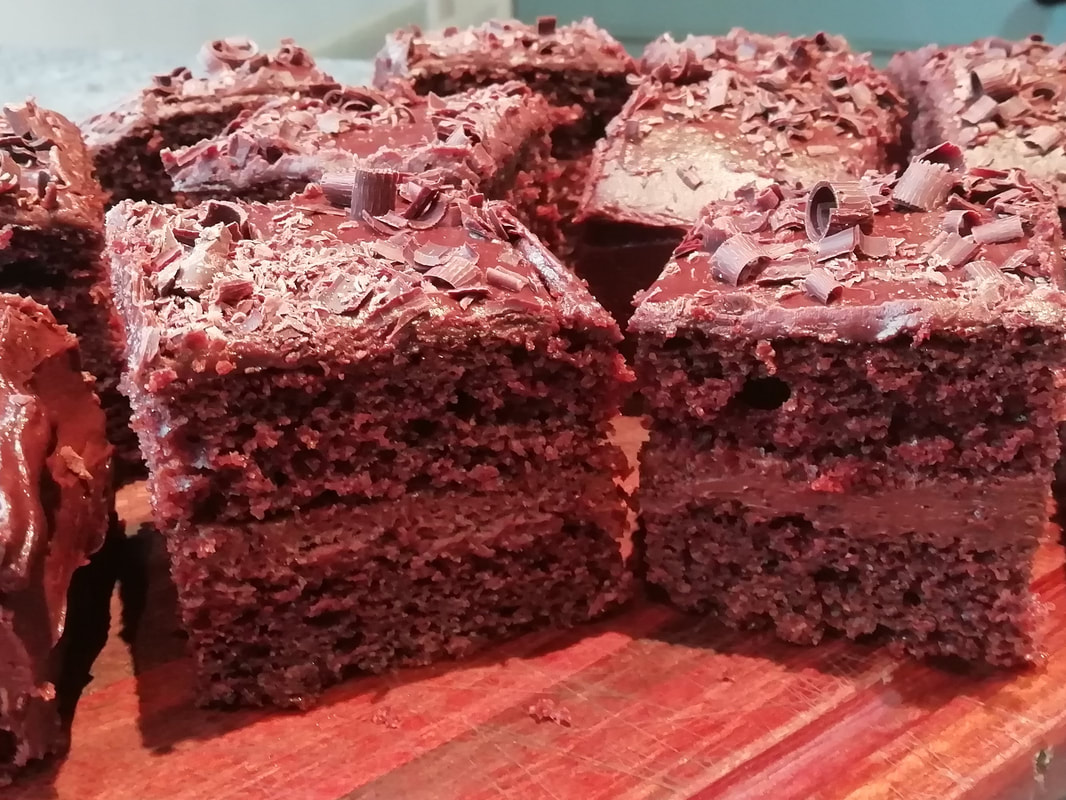 A real indulgence, rich chocolate cake with a fluffy buttercream filling Rich Chocolate Birthday Cake
There are occasions in life when only a huge gloopy chocolate cake will do, and a special birthday is one of them. It’s our oldest member’s birthday in the Seniors Lunch Club this weekend, (98) and she is chocolate fiend anyway, so what else could it be? This recipe is again based on Pam Corbin’s Chocolate Cake from the River Cottage Handbook No. 8, Cakes. My Seniors Lunch group in particular owe a lot to Pam Corbin and her infallible recipes, many of which I have cooked several times over. This one is a classic. The addition of the ground almonds and the yoghurt/milk mixture to the usual eggs/butter/flour/sugar just makes it particularly rich and spongy. I iced my cake with a rich buttercream filling – but not the mousse icing recommended as I didn’t want to use uncooked egg yolks for my elderly group. I made a buttercream icing and used some fresh cream and some melted chocolate for extra gloopiness, and it was just right – fluffy and creamy but not too sweet. I kept the top simple with a straightforward water-based chocolate icing – makes it easier to transport around wrapped up in foil packets. As a tribute to our birthday girl we played “This is Your Life.” I had provided all the other members (there are 12 of us on the audio conference call) with a leading question, along with their newsletter, so they could ask her specific questions about her life to which I knew the answers – having consulted her daughter earlier on special events, talents, funny anecdotes and things to be avoided! She was born in 1923 in the North of England, brought up strictly, knew her own mind, trained to be a pediatric nurse, did war work in a Birmingham factory, was a medal-winning talented dancer, learned the piano but gave up the violin, had two daughters, had a brother in the Royal Navy who was sunk twice in the war but survived both. What a life! It’s a privilege to know her, and we’re looking forward to celebrating her next birthday in person round the table in our Neighbourhood Centre where we normally meet. No doubt it will be chocolate cake again next year. Rich Chocolate Cake – makes 16 portions
For the buttercream icing: 200g salted butter, 100g icing sugar, 100g dark chocolate melted, 100ml double cream, 20g cocoa powder, 1 tablespoon Camp Coffee Essence For the water-icing: 200g icing sugar, 20g cocoa powder, 1 tablespoon Camp Coffee Essence Chocolate curls to decorate Preheat the oven to 180°C and grease and line a 22 x22xcm baking tin Whisk the butter until fluffy, adding the sugar as you go. Put the cocoa powder and drinking chocolate powder in a glass and add a tablespoon of boiling water, mix to a paste. Add this to the butter/sugar, with the whisk running. Add the eggs one at a time, and a spoonful of the flour with each, then add the rest of the flour slowly. Beat in the yoghurt/milk with the final spoons of the flour with the whisk running, then add the ground almonds, slowly. Scrape the mixture into the tin and bake 45 minutes, until lightly browned and a skewer comes out clean. Cool in the tin for a few minutes then turn out onto a rack and leave to cool completely before slicing and icing. I just sliced it once through the equator to give two halves, which I sandwiched together with buttercream icing. Buttercream icing: beat the butter until creamy and getting fluffy. Add in the icing sugar (put a tea towel over the mixer as you do this to stop the whole kitchen getting covered in icing sugar wafting out) and the cocoa powder and the coffee essence. Melt the chocolate in a bowl over hot water, pour into the mixture with the whisk running and add the cream in. Keep whisking and you will get a light fluffy mix that holds together quite well. Use this to fill the middle of the cake and smooth it round the outsides too. Water icing: Mix the coffee essence with the icing sugar until you get the right consistency – not too thin. Add a little hot water if you need to. Ice the top of the cake with this and sprinkle with chocolate curls or other decorations of your choice. This cake will keep iced for a couple of days in a cool place. Stick a few candles in (but not 98 unless you want a serious conflagration) and enjoy! 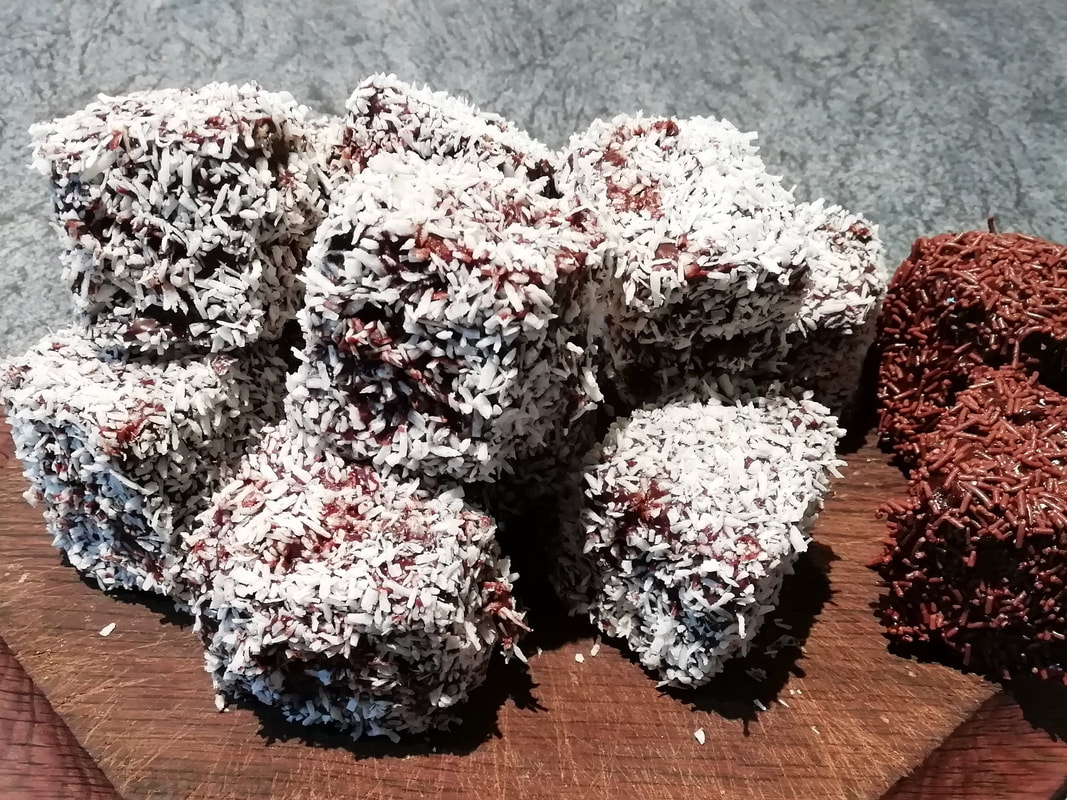 Aussie specialities, coated in coconut, or alternatively in chocolate sprinkles Lamingtons
Australia Day! These little cubes of deliciousness are in tribute to our Aussie friends who celebrate their national day on 26th January. They’re named after a former Governor of one of the states, who presumably loved to eat them or maybe invented them. They are rich, chocolately, coconutty and really addictive. I’ve never seen them for sale in the UK but you can buy them in packs in the supermarket in Australia, and most bakeries have their fresh version. Some recipes add raspberry jam in the centre of each cube but it isn’t necessary so keep it simple. I’ve made them before, for my Seniors Lunch Club and have always had a nightmare coating a sponge cake in thick chocolate icing – the cake gets all crumby and starts to disintegrate. This year I used Kate Young’s recipe, from The Little Library Cookbook and adapted it a bit, which uses a much denser sponge that holds together better – Kate is Australian and knows about these things. Thanks, Kate, they came out great! (see Kate's blog on: http://thelittlelibrarycafe.com/) This isn’t a quick operation – the cake needs to cool down overnight (some recipes say freeze it to add to the stability) and it takes a long time to coat in icing and then roll in coconut – but you do get 25 pieces of rich cake and something very impressive and unusual. I made a choice of coatings – either coconut or chocolate sprinkles as there are some people who don’t like the chewy texture of desiccated coconut, or the way it gets in your teeth. We discussed all things Australian in our Seniors conference call, led by our Aussie volunteer. We started by making the Acknowledgement of Country, which pays respect to the original inhabitants, their ownership of the land and their connection to the environment. We asked how many islands there are (many!), about the animal life, we whistled the theme tune to Skippy and sang along to Waltzing Matilda. We listened to Olivia Newton John and Dame Edna. Many of the group have relatives there, making a new life in the sunshine. If we can’t travel these days, this was the next best thing! Sponge Cake: Makes 25 cubes – timings 20 minutes preparation, 1 hour cooking. Then overnight cooling and about 1 hour making the icing and decorating the squares.
For the icing:
Preheat the oven to 180°C and grease a 22x22cm baking tin, line it with greaseproof paper. Melt the butter while you measure out the flour, sugar, vanilla and yoghurt into your mixing bowl. Add the melted butter into the bowl and beat until it turns creamy, then add in the eggs one at a time with a spoonful of flour after each one. Add in the rest of the flour and mix briefly. You will end up with a thick creamy batter rather than a fluffy one. Pour into the tin and cover the top with foil. Bake 40 minutes, remove the foil and bake for another 15 minutes until cooked. It doesn’t rise very much, and it won’t look very brown. Leave to cool completely in the tin, and best if you leave it overnight, covered. For the icing: In a small bowl, add a tablespoon of milk to the cocoa powder, mix to a thick paste, adding more milk if needed. Heat the rest of the milk with the sugar in a pan and add the cocoa paste to it – this stops the cocoa powder clumping and having to be whisked in. Bring to simmering point. Put the solid chocolate in another bowl and pour the hot milk onto it, stirring to melt. You should get a thick gloopy chocolate liquid. It stays quite liquid as long as it is warm – when it starts to cool it will thicken of course, so if the next stage takes a while you can warm up the bowl of icing again with a brief blast in the microwave – only 20 seconds and a good stir will keep it liquid. Now lay out a shallow tray or wide bowl with some coconut in it. At the end of the row, have a wire rack with either paper or another tray under it – the chocolate icing will drip off the cake and there will be quite a mess. Cut the cake using a bread knife into even squares – I got 5 rows across and 5 down so I had 25 squares, of course it depends on what cake tin you use. The squares do not want to be too big, as the cake is rich and so is the icing. Using a fork and spoon, dip a square into the icing and smooth the icing over the sides, not letting too much cling but making sure each surface is covered. Drop the square into the coconut and roll it around to cover all the sides, pressing the desiccated coconut onto the chocolate icing. Then put the square onto the rack at the end. Keep on going – it’s easiest if you have one person doing the dipping and another doing the coconut but you can do it all yourself, it just takes a while. Keep on until all 25 are covered. Leave the squares on the rack to cool down and set – takes an hour or so, then put into a tin. Now impress your friends and relatives! |
Some Changes - April 2022
Thanks to my friends and followers for your patience, and for your encouragement to start blogging again. Archives
April 2022
Categories
All
|
 RSS Feed
