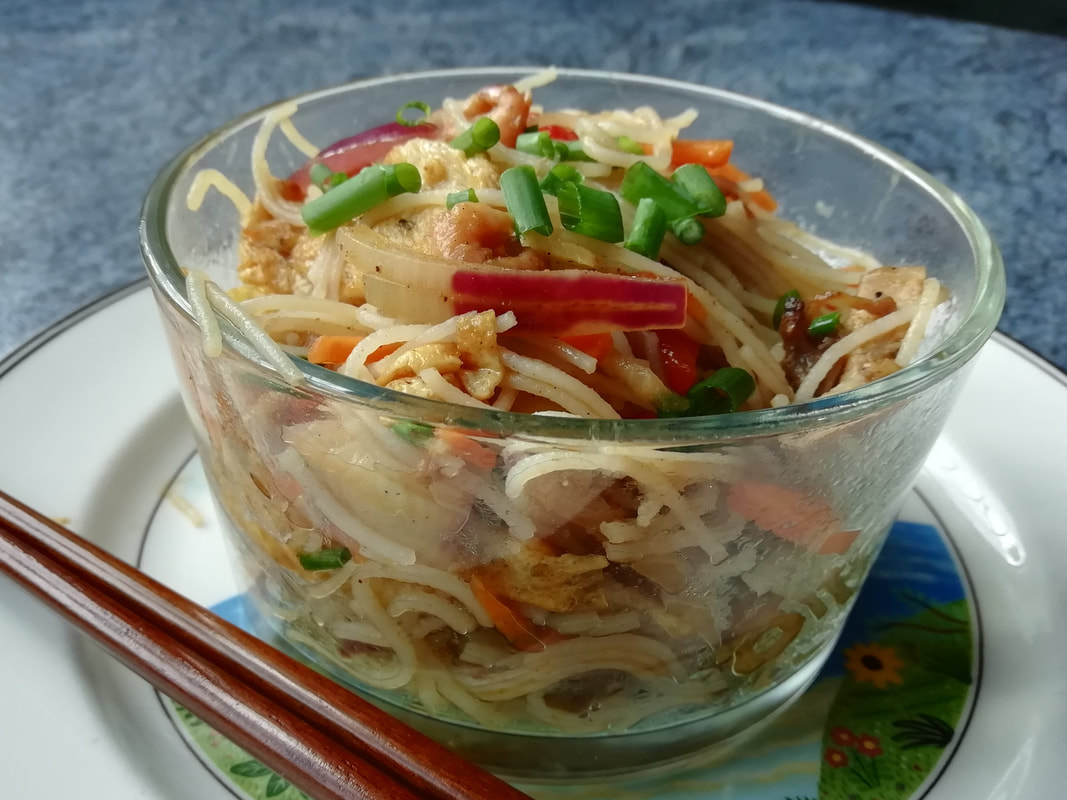
 Mild curry spice, delicious pork and prawns, juicy noodles - a real comfort dish Singapore Noodles
Noodles are a world staple, and a comfort food for many. A mild curry-spiced noodle dish using whatever protein you have to hand is a very useful recipe to have up your sleeve. You can make this as complicated or easy as you choose, and it’s very tasty whatever you use. The traditional protein to include with Singapore Noodles are: chicken, for its soft texture; Char Siu pork for its barbeque tang and interesting red colour; and little shrimps for that added salty sea taste. You can make it with only chicken or only seafood if you prefer, just adjust the quantities accordingly and add some hoisin sauce to the noodle mixture for the barbeque sweetness. I left out the chicken in the recipe below as I felt that the pork and shrimps were quite enough. For a special treat, I made the Char Siu pork myself – which is quite straightforward to do and gives you several meals worth of meat which freezes very well so it’s all extremely convenient. You can buy Char Siu from Chinese groceries, but I’d rather trust my familiar butcher and know that my meat comes from well raised pigs on local farms. Some recipes add red food colouring to the marinade for extra intensity, I’d rather not but it’s up to you. To make the char sui pork: Timings: 10 minutes then overnight marinade, then 1 hour in the oven 700g pork shoulder in one piece – makes enough for 8 portions of Singapore Noodles and a bit extra for adding to stir fries etc. You could make a smaller quantity but doing it this way and freezing the extra is highly economical. Marinade:
Mix the marinade ingredients together in a bowl that will fit in your fridge. If you need to, cut the pork into two long strips which should each be about 6cm wide. Massage the marinade into the pork, cover the bowl and leave overnight in the fridge. Next day, pre heat the oven to 180°C. Wrap the pork pieces in kitchen foil and roast on a baking tray for about 20 minutes. Take them out, baste with some of the marinade, wrap again and roast for another 20 minutes. Take them out again, remove the foil, baste with marinade again and roast for another 20 minutes. Ensure your pork is cooked through, it should be pink but cooked inside and a bit sticky on the outside from the baked-on marinade. Brush the pork pieces with the honey and water glaze and put under a hot grill for a few minutes to set the glaze. Leave the pork to come down to room temperature before slicing. Slice finely along the grain of the meat so you get round slices which are coloured on the outside. You will also be left with a few scratty bits and pieces which you can bag up and freeze for adding to stir fries. To freeze the slices, lay them on greaseproof paper and cover with another layer of greaseproof paper. You can fold the paper over itself to give several layers of pork and slide the whole package into a freezer bag. Doing it this way means you can take out just a few slices of frozen meat whenever you want them and leave what’s left for another day. For the recipe below for 4 people you will need about half the pork slices. To make the Singapore Noodles: Timings: 30 minutes if using ready cooked pork
Cook the noodles according to the pack instructions. Depending on the thickness some just need to have boiling water poured over them and others need to be brought to the boil and simmered for 2-3 minutes. Drain and drizzle over a little sesame oil. Leave in the colander. Mix the chilli in oil, soy sauce, fish sauce and rice vinegar together, set aside. In your wok, quickly fry the ginger, garlic and chilli. Push to the side of the wok, add a little more oil and fry the pepper, carrot and spring onions briefly. Add the cooked pork and prawns, and cook for just a minute or so, then add in the drained noodles. Pour over the mixed sauce, and sprinkle over the curry powder. Mix and cook for only a minute or two to warm through and allow the sauce to permeate the meat and noodles. Serve immediately, maybe adding a sprinkle of spring onions if you like.
0 Comments
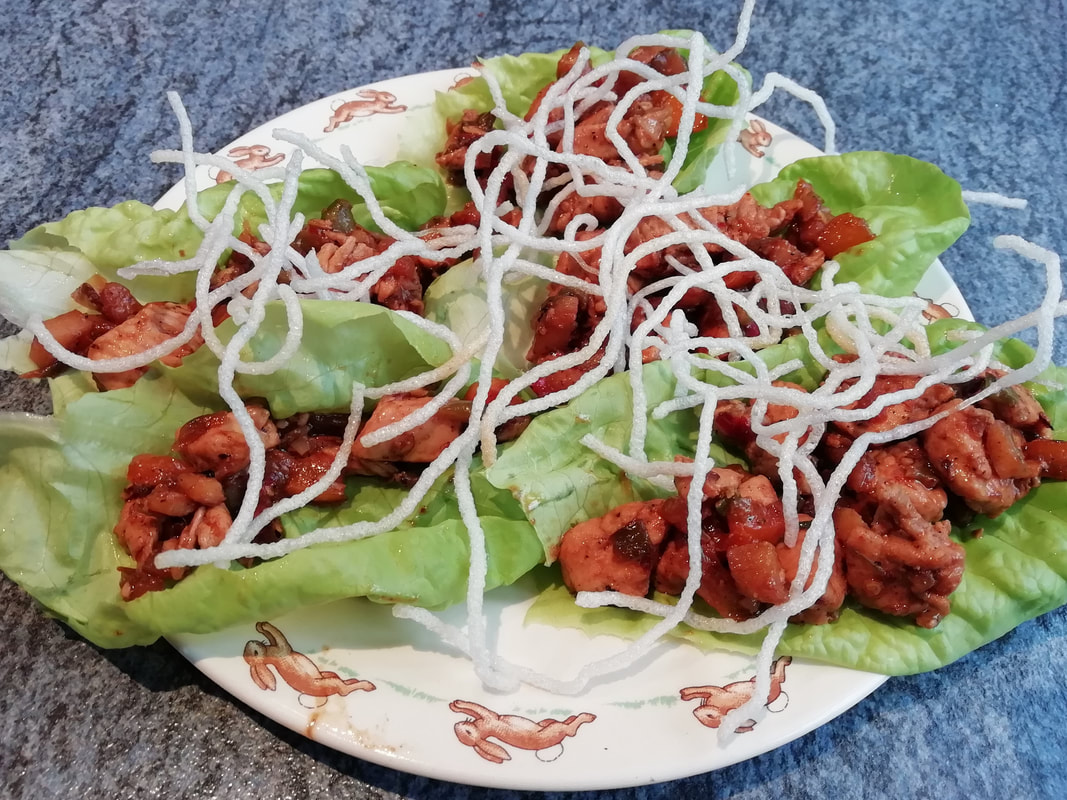 Light, spicy and crunchy. Chicken pieces, wrapped in lettuce leaves with crispy vermicelli topping. Chicken Yuk Sung - lettuce leaf wraps
Light, fresh and tasty, these are ideal for a make-it-yourself starter (always the most relaxed way to begin a meal) and even for a light low-carb lunch. Yuk Sung comes from the Chinese word for “fluffy meat” and describes the almost shredded texture of a dried meat you can buy which is used for topping a rice porridge or tofu dish. This recipe has moved a long way from there, and the only fluffy thing about it is the crispy rice vermicelli, which impart a fabulous crunch to the mouthful. I have used preserved Chinese vegetable in the recipe, which gives a deep sour salty background and a slightly squeaky texture. You buy this in packs from a Chinese grocery or on line, and you can use it in a lot of Chinese food. If you can’t get it, substitute some well chopped firm fresh white cabbage, and soak it in salted water for 10 minutes. I have based the filling on a recipe from the always reliable Kwoklyn Wan, (kwoklynwan.com) with a few additions from other sources. It went down a treat with my family and we made it into a main course and served rice alongside too. Serves 4 Timings: 60 minutes – which is mostly vegetable chopping, the cooking only takes 10 minutes
Wash the lettuce well and separate the leaves but keep them whole. You can leave the lettuce in cold water to crisp up while you fry. Combine the sauce ingredients and set aside in a small bowl. Put about 2cm of oil in your wok, heat up well and deep fry the vermicelli a few at a time. They will puff up instantly and turn brown nearly as quickly, so scoop them out and put them on kitchen towel to drain. You can salt them lightly. Remove most of the oil from the wok and start to stir fry. Fry the ginger, garlic and chilli for 30 seconds to release the aromas, then add the chicken. Stir fry for 5 minutes or more until the chicken is cooked through and the juices have evaporated and concentrated back into the meat. Set aside on a plate. Fry the onions, carrot, pepper, water chestnuts and preserved vegetable briefly to soften them. Add the sauce to the wok and cook for a couple of minutes to start to concentrate it. Add the chicken mixture back in, stir and cook. There shouldn’t be liquid in the bottom of the wok, you are looking for a fairly dry mix. Remove the wok from the heat and let cool a couple of minutes while you drain and spin the lettuce and get the vermicelli on the table. Let everyone make their own parcels of delicious delight, wrapping the filling of spicy chicken and vegetables and a pinch of crunchy vermicelli in the tender lettuce.  Lemon and spice marinated chicken, coated in crumbs and fried - melting and delicious Crispy Lemon Chicken
Chicken Drumsticks – everyone’s favourite finger food. Chicken has a mild flavour, so it’s perfect for adding spices, tangy tastes and other extras. Marinate overnight for the best effect, and spike holes into the chicken pieces with a knife to let the lemon and spices permeate through the meat. The drumsticks are simmered in the marinade for tenderness and flavour, and then cooled, coated and quickly fried. So, you can make these well in advance and fry at the last minute for that crispy coating, knowing they are already cooked through. Easy to get on the table with some oven cooked home-made chips. If you serve a big basket of these, provide plenty of napkins for your guests to wipe the lovely juices from their faces! Serves 6 Timings: 20 minutes, then marinade overnight. 1 hour cooking on the stove, then about 20 minutes final cooking. 6-8 chicken legs, separated into drumsticks and thighs - leave the bone in. You could do this with just drumsticks if you want, and they would be easier to eat with your fingers if you’re planning an outdoor event. Either way, allow 2-3 pieces per person. Marinade:
Mix the marinade ingredients together and grind some black pepper over the bowl. Spike the chicken pieces with a sharp knife, add to the bowl, mix well and leave covered overnight to marinate in the fridge. Melt the butter in a large heavy pan (I use my large Le Creuset dish as it keeps the heat and it’s nice and steady) and gently fry the chicken pieces for a couple of minutes. Tip the rest of the marinade into the pan and simmer for 40 minutes until the chicken is tender and cooked through. Leave to cool. At this stage you can leave the chicken in the fridge for 1 day. Remove the chicken from the remaining marinade (which is an amazing spicy lemon flavour you can use as the base for a simple lentil soup, for instance). Have two bowls ready, one with the beaten eggs and the other with breadcrumbs. Roll the chicken pieces first in the eggs and then in the breadcrumbs. Place on a wire rack to set the coating for a few minutes. Put 1cm of oil in a deep frying pan - doesn’t have to be a deep fryer but you can use one if you have one - and heat up to medium hot. Carefully fry the chicken pieces a few at a time, turning frequently to brown them evenly. They don’t need much time in the oil as they are already cooked and you are just crisping the coating. Remove from the oil when they are browned on all sides and keep warm while you finish the batch. Serve with simple oven chips or a potato salad. 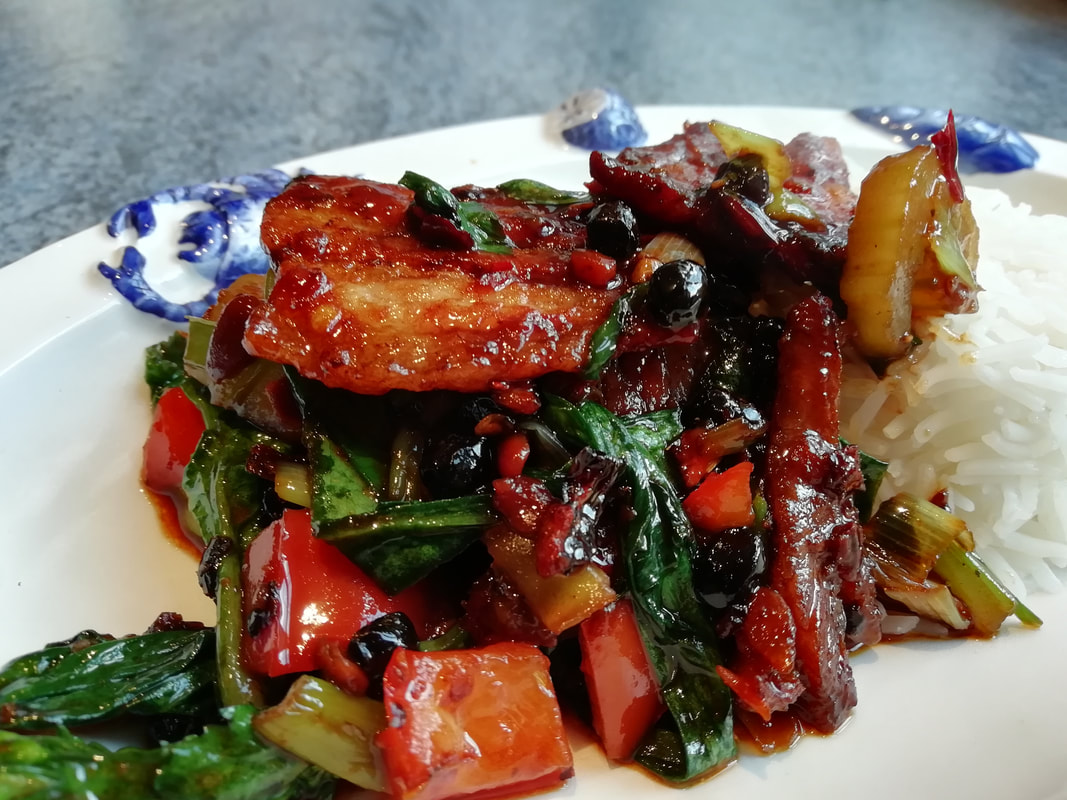 Belly pork simmered and then fried with wild garlic and vegetables. Easy and satisfying. Twice Cooked Pork – Tender Stir-Fry Pork with Wild Garlic
Oh, this is so good. I’ve got lots of friends who say “I’m not that keen on Chinese food” and that’s because they’ve only eaten the high calorie, often fried, maybe too spicy version that some restaurants serve. If you only ate a particular food from a takeaway outlet (apart from the honourable exception of fish and chips and possibly pizza which are both the ultimate street food dishes) do you think you would like it? Give the home cooked, made with love, made with care, made with fresh ingredients version a go. It’s also a high-vegetable low-meat cuisine, which should suit our new attitude to food. Something that puts UK home cooks off Chinese food is the use of authentic ingredients. I understand that. I’m lucky to live near the UK’s best Chinatown (biased, me? Maybe) and can get my ingredients from the Manchester Chinatown supermarkets. But if you don’t live near a genuine store run by Chinese people, you can get a lot of this online. You can also carefully substitute some British ingredients. For instance, this recipe is often made in China with a green vegetable called “garlic shoots” – like a spinach that tastes of garlic. So use the European Wild Garlic foraged from your hedgerow, and hey presto, fusion cooking at its best. Honestly, try this one. It’s easy to make the main parts ahead while you’re doing something else so you can finalise the dish in minutes when you get home from that swimming lesson and you need something on the table right away. Thanks again, Fuchsia Dunlop, for the base recipe and the history. Serves 6 Timings: Day 1 - 10 minutes preparation, 1 hour simmering. Day 2 – 30 minutes (which is mostly prepping the veg)
Day 1: Simmer the pork belly piece in water with the simmering spices added. Cover the pork with cold water, bring to the boil and simmer for about 40 minutes until it is cooked through. Leave to cool in the cooking water and then remove from the liquid and put in the fridge overnight. Day 2: Remove the skin from the top of the pork – leaving as much of the fat as you can. Genuine Chinese cooks leave on the skin, which does contain lots of gelatine for healthy hair and skin, but it may not suit British tastes. Remove any bones or gristle from the underside of the piece. Slice the cold pork as finely as you reasonably can. Each slice will have a generous top of fat and then a meaty part further down. If you don’t need all the pork in one meal, you can freeze the slices in layers on greaseproof paper and then wrapped in a bag – so you can cook them straight from frozen another day and save all the simmering and cutting time. Heat some oil in your wok. Quickly fry the garlic, chilli and ginger to release their flavours. Push to the side of the wok and drop in the slices of pork. Fry them briefly – they will sizzle and release their lovely spicy fatty flavour. Turn them once or twice in the oil to be sure they are well cooked and a bit crisp, then push them to the side of the wok. Stir fry the spring onions, celery and red pepper quickly, then push them to the edge of the wok too. Spoon the yellow bean paste into the middle of the wok and fry briefly. Add the black beans and crispy chilli in oil and mix in. Bring the meat and the fried vegetables back into the centre of the wok and mix well. Add the handfuls of green leafy vegetables and stir very briefly to heat them and cook through quickly. Add the soy sauce. Taste and adjust – you might need a little more soy. Serve with plain steamed rice or over lightly cooked noodles.  Spicy chipotle chicken, layered with guacaomole and cheese, deep and delicious. You'll need a napkin. Chicken Tinga Wraps
Mexican food is spicy but not necessarily dramatically so. The use of a variety of chillies and sauces gives a subtle warmth and sweetness to the dishes and is a reason why the cuisine is so popular. Chipotle in Adobo sauce is a special preparation of jalapeno chillies which are dried (after which they are called chipotles) and then canned in a sauce made from tomatoes, herbs and spices. The heat from the chillies merges with the sweetness of the sauce over time. A little goes a long way, but they are great ingredient to make your meals taste genuinely Mexican. My son gave me a tin of these for Mother’s Day, an unusual present but very welcome. I had to make some his favourite meals of course, in return, and like all youngsters, he loves a wrap with layered ingredients. The Chicken Tinga itself would also go beautifully with rice and re-fried beans or on a Tostada or in a crispy taco shell with some shredded lettuce. Serves 6 Timings: 2 hours for the Chicken Tinga, which can be done 2 days ahead. 20 minutes to make up the wraps. For the Chicken Tinga:
For the wraps:
Make the Chicken Tinga: In a large heavy pan (I use my Le Creuset here), fry the chicken thighs in a little vegetable oil until browned on all sides. Take them out of the pan and use the same oil to fry the onions and garlic until tender and translucent, about 5 minutes. Add the oregano, celery salt and cumin powder, stir to release the fragrance. Add the tin of tomatoes and the chipotles in adobo and the Worcester sauce. Simmer for a few minutes to blend the flavours, then allow to cool a little and then liquidise the sauce in a blender. Return the sauce to the pan, add the chicken stock and put the chicken thighs back in. Simmer for about an hour, with the lid partly ajar. The sauce is quite thick and it will bubble and spit. Keep an eye on it, and don’t let it catch on the pan. After an hour, check how well cooked the meat is – if it is falling apart, remove the meat from the pan and tear it up with two forks. Reduce the sauce by simmering for another 10 minutes – you will get a very thick spicy coating sauce. Return the meat to the pan and stir well. At this stage, you can allow the Chicken Tinga to cool and it can be portioned and frozen or kept cool in the fridge for up to 2 days. To assemble the wraps: Warm the tortillas in a frying pan for a few minutes – keep moving them up and down the stack to be sure they all get a bit of heat. This is much better than warming them in an oven as they stay moist, which you need to roll them properly. Splodge the chicken tinga onto the lower half of your wrap, sprinkle with cheese to taste, add a spoonful of avocado cream and a feathering of coriander. Fold the edges towards the centre and then roll up your wrap tucking the ends in as you go. Eat with your hands, but you’ll need a napkin.  Goat chops, oven cooked in a tangy masala sauce Amme’s Chops – Punjabi Masala oven cooked chops
This is a recipe from my friend and neighbour. Her mother, Amme, was originally from a Punjabi family who came to India in the partition, among great distress and difficulty. The few things they could bring included their traditions of food. I am privileged to have it passed on to me, over the garden wall. The masala sauce recipe has vinegar in it, which gives a real tang and depth to the flavour as you slow cook the chops. It’s almost a curry/barbeque mixture as it has that sweet and sour background to the tomato and onion sweetness. A truly delicious recipe, and very easy to prepare. You can make the masala sauce ahead of time, then just pour it over the chops as you put them in the oven. You can also freeze the cooked dish and re-heat. Serves 6 Timings: 1 hour for the sauce, 1 ½ hours cooking – which can be done later
Cook the onions for about 15 minutes in a little oil – you are looking for them to become transparent and start to brown slightly – not so mildly cooked as if you were caramelising them. Add the garlic and ginger and stir to release the aromas. Put the ground spices in a small glass and add water to make into a paste, mix, then add the paste to the pan. This is to avoid burning dry spices and is a technique I learned in India. Stir and cook. Add in the vinegar, tomatoes and ketchup. Simmer for about 10 minutes to cook the masala properly. Test the seasoning and add salt. You may need a squeeze of lemon to bring the flavour up. At this stage, you can cool the masala and it will keep in the fridge for 2 days. You can also freeze it. Pre heat your oven to 190°C. Brown the chops in a hot pan for a few minutes in a little oil and transfer them to a metal baking tray where you can lay them all down in one layer. Pour the sauce over the chops and cover the tray with kitchen foil, tucking it down well to make a good seal. Cook in the oven for an hour. Test the chops with the point of a knife – they should be tender. Turn them over to coat them in the sauce, remove the foil from the baking tray and cook at 200°C for another 15 minutes to reduce the sauce. You should end up with a very thick sauce. If you still have quite a liquid sauce - which can depend on the amount of juice the chops release – then keep the chops warm and reduce the sauce on the hob for a few minutes to boil off the extra liquid. The end result should be quite thick and with delicious brown bits where it has started to catch. Add the chops back in and stir to coat them with the tangy meaty sauce. Serve with roti, rice or Bombay potatoes, and some fresh relishes and chutneys. 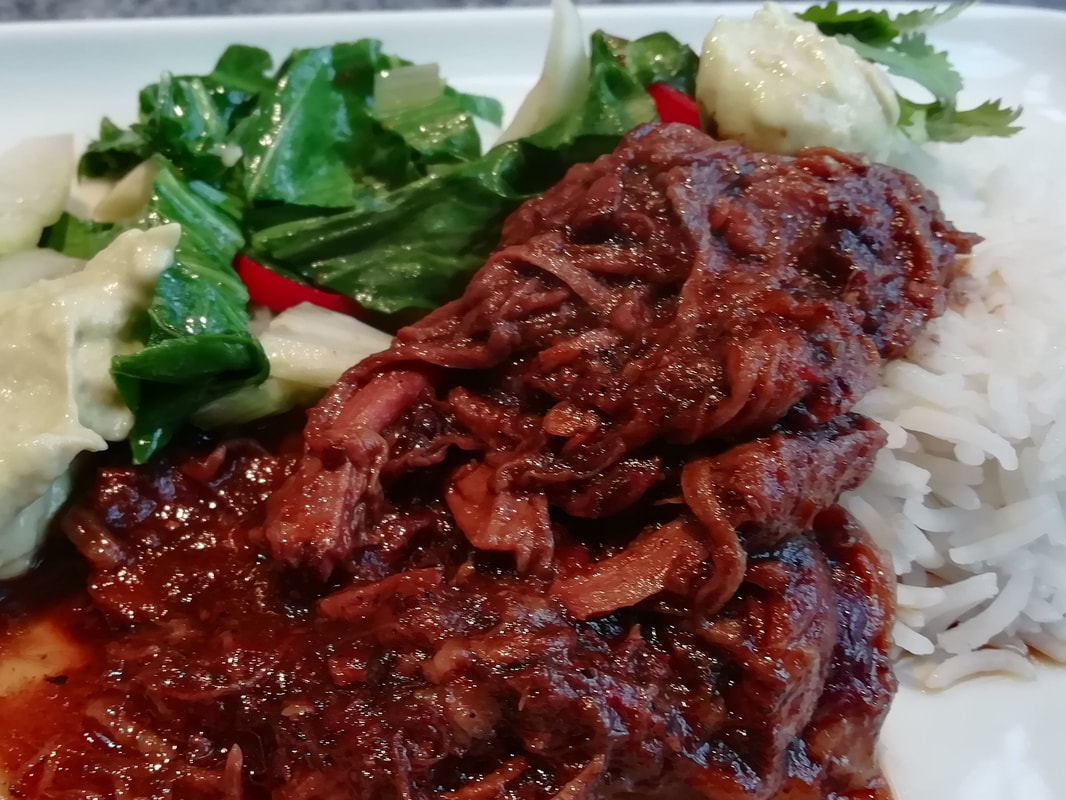 Slow cooked beef in original barbeque sauce, using chipotles in adobo sauce for that deep spicy punch Barbacoa Beef
It sounds like the word “barbeque” and in fact is the original recipe from which all other barbeques are derived. It’s a Caribbean technique of slow cooking fatty meat with chillies and spices in a rich sauce. The technique made its way to Mexico and picked up additional chillies on the journey. The meat falls off the bone, the bones are discarded and the resulting meaty stew is then eaten with rice, on tacos, or stuffed into wraps of some kind. The genuine flavour is much enhanced if you use genuine ingredients, of which the most important are the chillies. Try to get chipotles in adobo sauce (which are dried jalapeno, smoked then canned in a tomato based sauce) and dried ancho chillies if you possibly can. They are worth it, and the sauce is sensational, so I can promise you will make it again for your family and friends. Serves 8 Timings: 1 hour preparation, 4-5 hours slow cooking, 1 hour final preparation
In a large heavy pan – a cast iron or Le Creuset pan is ideal, dry roast the dried ancho chilli for a few minutes, it will char slightly. Remove it to a small saucepan with the 500ml chicken stock and simmer as you cook the other items. Take off the heat as you start to cook the onions in the list below. If there is a large stalk on your ancho, remove it. The rest of the chilli will have become quite soft with the simmering. In the heavy pan, brown the oxtails in some vegetable oil. Remove from the pan. Brown the pieces of shortrib on all sides, remove from the pan. Add the chopped onions, fresh chilli and garlic to the pan and fry gently to soften – don’t let them brown. Add the dried and powdered spices, stir to release the fragrance. Add the chipotle and sauce and cider vinegar. Stir up and allow to cool slightly before transferring to a blender along with the fish sauce and the ancho chilli and chicken stock. Blend the sauce until smooth. Add the sauce to the meat either in a slow cooker or in a large oven casserole and tuck in the bay leaves. Cook on a low heat for 4-5 hours until the meat is very tender. Allow to cool slightly, remove the meat pieces from the sauce one by one on to a plate. Use two forks to remove all meat from the bones, including the oxtail bones, and tear the meat into strings. Discard the bones. The sauce in the casserole dish should be simmered for some minutes to reduce by half – to leave a thick spicy sauce. Return the meat to the pan, stir and warm through. The meat can be portioned and frozen for later, and once cooked, it keeps a couple of days in the fridge. 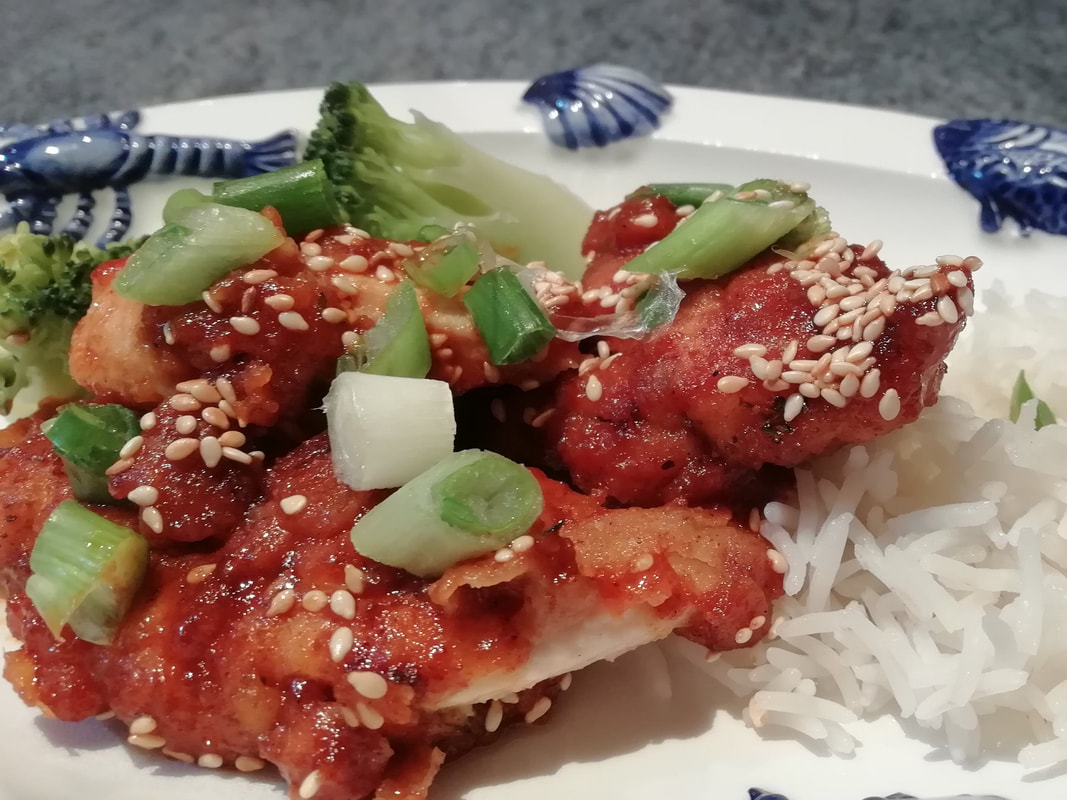 Deep fried chicken fillets in a spicy Korean Gochujang sauce Korean Spicy Fried Chicken
Tender strips of chicken, coated in seasoned flour which puffs up into a crispy batter when deep fried, then warmed with a spicy Korean chilli and salty sauce – the definition of yummy. The sauce uses gochujang paste, which is a Korean staple of fermented rice, chillies, soybeans and other pungent edibles. It’s lovely and gives the genuine smoky taste and deep fermented flavour. It keeps ages in the fridge and can be used in a lot of recipes. My son gave me a tub of it for Mother’s Day – an unusual but very thoughtful present; also a big hint. I had a good look for recipes and have slightly adapted one from Nicky at Kitchen Sanctuary for this dish, she has some gorgeous, tasty-looking and speedy recipes to offer, thanks Nicky. So, this is what I made for him, street food from Seoul. Serves 4 Timings: 2 hours (or more to marinade), 30 minutes to cook
Mix the marinade ingredients with the cut-up chicken and leave in the fridge for at least 2 hours and up to overnight. Make the sauce by putting all the ingredients in a small pan and warming through, mixing well as the sugar and honey dissolve. Taste and add more soy or orange juice as you like. You are looking for a thin sweet, sour, salty, spicy coating sauce. Let it cool down and leave while the chicken marinates as this will also intensify the garlic and ginger flavours. When you are ready to cook, first heat up your oven to 170°C. Mix the flour and batter ingredients together in a deep dish. Take the strips of chicken out of the marinade and coat well with the flour, putting each strip onto a plate or baking tray when done. I found you have to coat each strip twice as they are quite moist from the buttermilk and the moisture leaks through the first coating quite quickly. It’s the depth of flour on the chicken strip that makes the lovely crispy batter so it’s worth double dipping. Heat up the oil in the deep fryer or pan. Start to warm up the sauce now too in a large pan. Fry the chicken strips in the hot oil for only a few minutes, turning in the pan. Don’t put too many in the pan at once or the oil will cool down too much, so fry a few at a time and keep the completed ones warm in the oven on a baking tray. When they are all done, tip them into the pan with the sauce and stir quickly to coat. Sprinkle with the chopped onions and sesame seeds. Serve with plain rice and maybe spicy pak choi or other oriental vegetable. Credit to Nicky Corbishley at Kitchen Sanctuary.com  Thick fluffy bread dough topped with infused passata and whatever toppings you like - easy party food Roman Street Pizza (vegetarian optionally)
You’ll also find this recipe on my Summer of Six menu, from Rome to Rouen – have a look at the other recipes on the menu if you’re thinking about entertaining outside. Girls’ trip to Rome – and to the best pizza place in the city. We ate standing up outside; quick fast food, coming out of the kitchen continuously on sizzling trays, cut into slabs, thrown onto paper plates and gobbled at speed. Roman street pizza is different from Napolitan – it’s thicker, fluffy and more bready. Highly satisfying to eat and to make. Perfect food for kids, great for parties, easy for school holiday or working at home lunchtimes. Adaptable for all diets and one of the healthiest fast meals, who doesn’t love a home made pizza? Pizza keeps and re-heats so well that it’s worth making a larger quantity than you need on the day, and somehow dough comes out better done in a bigger batch than tiny ones. Makes 10-12 portions, 2 roasting trays full. Timings: 30 minutes initial preparation, then 90 minutes prove, then 10 minutes work and another 90 minutes prove, then 20 minutes to cook - about 5-6 hours altogether. For the dough:
At least 5 hours before you want to eat, start your dough. Mix all the dough ingredients and turn out onto your worktop to knead. Knead well for about 5 minutes and then leave the dough under a bowl on your worktop for about 10 minutes. Knead again for 5 minutes. You will have a shiny, springy dough which you can already see starting to fluff. Leave to prove covered in a warm place until roughly doubled in size – about 90 minutes to 2 hours depending on the temperature. Prepare your tins – I use metal roasting trays or deep square cake tins to cook this. Grease each tin and line with greaseproof paper on the bottom. Take it out of the bowl, knock it back but don’t knead it much, then put it into your prepared tins, stretching it so that it fills the tin about 2cm deep. Leave covered in a warm place to rise again. I like to put the tins into a big plastic bag which you blow up at the neck and then seal with a clip. This keeps the dough protected from draughts and happy in its work. At this stage, you can play with the timings – if you want to leave it to rise more slowly, just leave it in a cooler place. You should leave it for about another 90 minutes in a warm place at least, and it will again double in size and become very puffed up. About 30 minutes before you are ready to cook, start to heat your oven to 240°C. You need to give it good time to warm up so the whole oven is hot – like a real pizza oven. Of course, if you have a real pizza oven, fire it up! Remove the garlic and the basil from the passata. Get the tins of pizza dough and handle them carefully so as not to depress the dough. Carefully spread the passata all over the top of each pizza dough, right to the edge. Whack them straight into the oven for 10-15 minutes until the passata is starting to crust round the edges. Bring them out, and scatter on your other toppings. I would recommend not too much fresh tomato, as it is quite liquid and you don’t want the dough getting soggy with the juice. These pizzas are not supposed to be too deeply topped, so try not to go overboard. Back in the oven for 10-15 minutes to melt the cheese and crisp the toppings. Bring them out and let them cool for just a few minutes before portioning and serving.  Tangy garlicky buttermilk ranch dressing, wild garlic chicken, crispy bacon and croutons - salad heaven! Buttermilk Ranch Salad with Wild Garlic Chicken, bacon and wild garlic croutons
Wild garlic a-go-go! Using the wild garlic butter you made from your foraged harvest, pan cook a chicken breast which you then slice up on top of a Ranch dressed crisp green salad. Add some wild garlic croutons and crispy bacon – Saturday family lunch time heaven. Buttermilk is not so common in the UK and if you can’t get it, mix a small pot of plain yoghurt with the same volume of milk and whisk well, and you will have the right texture, although not quite the sour-dairy tang. Serves 4 for lunch Timings: 30 minutes, if using already prepared wild garlic butter, and you can roast the chicken ahead and keep cool in the fridge.
First pan roast your chicken meat in the wild garlic butter. Put a good spoonful of butter in a small frying pan over a medium heat and gently fry your chicken, spooning the hot butter over it, and turning it over now and then. A breast will cook in about 8-10 minutes, and a boned thigh will take a little less. The generous butter keeps the meat lovely and moist. Leave the meat to cool and absorb more butter. You can also wrap a piece of chicken in kitchen foil and add some garlic butter to the parcel and just put the parcel in the oven for 20 minutes if you have the oven on for something else. Take it out, let it cool, keep in the fridge until you are ready to use it. Make the croutons – fry the cubes of bread in the frying pan you used for the chicken, adding a bit more wild garlic butter as you go. The leaves of the wild garlic will fry and sizzle and go black but the taste of the croutons is spectacular. They take about 5 minutes, keep moving them around in the pan and then scoop out onto kitchen paper to cool and crisp. Wipe out the frying pan and cook your bacon until crisp, drain on kitchen paper. Make the ranch dressing in your largest salad bowl. Mix the dressing ingredients together well, even whisk with a small whisk if you have one. Taste and adjust the seasoning – you might want a little more salt or a squeeze of lemon juice or a teaspoon of sugar. The dressing should have a nice tang but it doesn’t taste strongly of buttermilk. You can do all the above in advance and keep cool in the fridge for several hours. Wash your lettuce thoroughly and dry or spin. Tip the lettuce into the bowl with the dressing and mix well. (I believe it was Anna del Conte who taught me that a salad should be tossed at least 25 times to coat the leaves properly with the dressing, which is after all, the reason for a salad’s existence.) Top with the sliced chicken, crumbled bacon and crispy croutons. |
Some Changes - April 2022
Thanks to my friends and followers for your patience, and for your encouragement to start blogging again. Archives
April 2022
Categories
All
|
 RSS Feed
