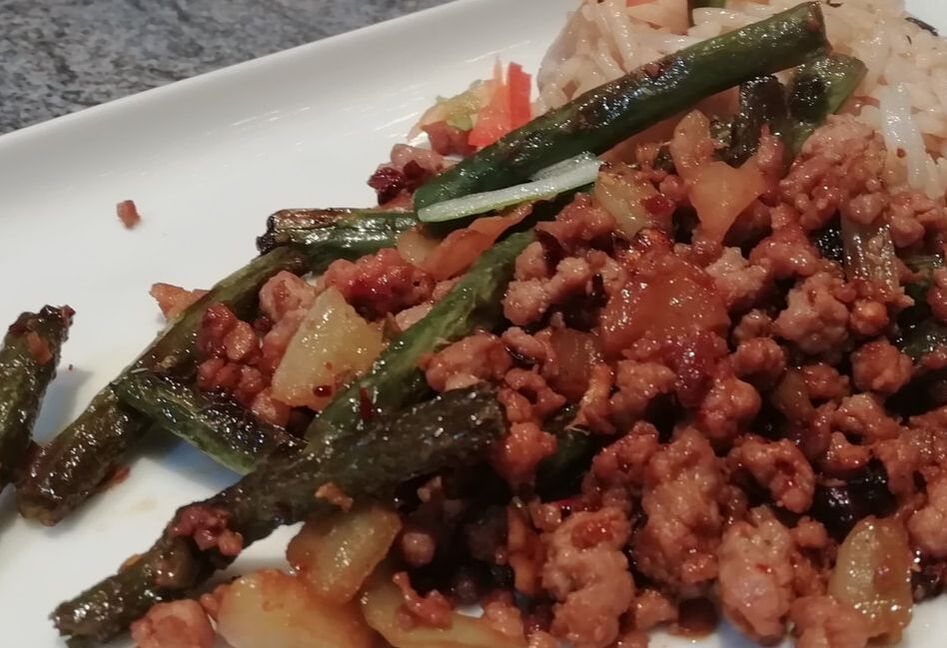
 Charred green beans cooked with Chinese spices and crispy pork mince - tasty and tempting Sichuan Green Beans with Crispy Minced Pork
We ate this at the Jumbo Floating Restaurant in Hong Kong’s Aberdeen Harbour a few years ago. It was the wish of a lifetime for me to visit Hong Kong and I loved every minute of it. I dragged my poor jetlagged husband into all the food experiences I could find – eating in back street canteens, Michelin-starred cafes, and this iconic floating restaurant. We ordered some familiar dishes and then asked for a recommendation from the waiter, who came back with this – charred green beans with a scattering of spicy pork mince. It was wonderful; it’s a Hong Kong classic, available in many forms and as street food as well as in high end restaurants. It’s typical Chinese – well balanced between meat and vegetables, making a little meat go a long way, and adding flavour with sparkles of taste from carefully chosen spices. If you possibly can, for really good Chinese food at home, do invest in a few genuine Chinese ingredients. I’m lucky to have some excellent Chinese groceries in Manchester’s Chinatown not far away, but you can also buy specialist ingredients on the internet. For this dish, you do need Sichuan pepper – which looks like red peppercorns but is in fact quite a different spice and not related to pepper. It has a unique taste, almost like a floral explosion on your tongue and overused, it can make your mouth go numb! Keep the use of it sparing, until you know how much you like it, but don’t leave it out. The other less common ingredient that most classic recipes for this dish use is Pickled Mustard Greens – which is a bit like a Chinese version of kimchi. I did get some, but I really think you could substitute kimchi, or even fresh cabbage chopped up and cooked in salted water, as it’s the chopped vegetable texture and salty-fermented taste you mainly get from it. Many recipes leave it out. I learned a lot about this dish from searching the internet, and I think my version is closest to Maggie’s, from OmnivoresCookBook.com – thanks Maggie! I cooked it with egg fried rice and another Chinese dish with a little more sauce (beef with black bean sauce) and it was perfect for my family – we scraped the dishes clean. Serves 4 Timings – 30 minutes
In a bowl, marinate the pork mince with the Shaoxing wine, soy sauce, garlic and ginger – put them all in together, mix well and leave to the side as you cook the beans. In a large frying pan, cook the beans with a little oil over a medium heat until they are looking a bit charred and blistered – they will lose their firmness and volume. This takes about 15 minutes, keep moving them about. Take the beans out of the pan and keep them aside. Dry fry the Sichuan pepper for about 1 minute, to warm it up and release the fragrance. Crush it in a mortar if the pieces are big and put it back in the pan. At this time, if you are accompanying with egg fried rice, start to fry your rice. Add the pork mince to the pan and fry it, breaking up the pieces with your spatula. This takes about 10 minutes, the pork releases fat to fry itself and will end up quite browned and crispy. You will smell the ginger, garlic and Sichuan pepper in a delicious combination. Add the pickled vegetable, stir well and add the beans back in again. Stir again and mix. Taste; add a splash of soy sauce, a little sugar or a little water – this should not be totally dry although it is not a dish with a lot of sauce. Serve with your egg fried rice and let the Sichuan Pepper dance a tango on your tastebuds….
0 Comments
 Not just a fried egg and bacon - enclose your egg in a round of yellow pepper - tasty and practical Prairie Breakfast
At the other side of the world, on the Sunshine Coast of British Columbia, looking over the sound to Vancouver Island, is the arty little town of Lund. The Lund Seaside Inn perches on an island in the harbour. You can sit on the rocks, the Pacific breathing slow and deep around you, watching seals, herons, gulls, even a whale if you’re lucky. The owners, Gord and MaryAnne, are the perfect hosts, and boy, can they cook! They used to run educational expeditions for youngsters in central Canada and have all sorts of practical tips for cooking great meals under canvas. This recipe moved with them from camping to inn-keeping. Gord’s cooked breakfast is one of the most satisfying culinary experiences I have had in a lifetime of pursuing fabulous food around the world; I learned a lot and would love to go back and follow him around learning even more. This is Gord’s recipe for a Prairie Breakfast by which he means easy to prepare when camping with a group. You can cook the potatoes the night before and then everything is done in one pan, quite quickly. He used a slice of Canadian smoked salmon instead of bacon or black pudding – use whatever you like. Canadian salmon is hot smoked, rather than transparently cold-smoked as we are used to, and it is sweet glazed, so using maple-cured bacon gives a similar sweet taste which complements the peppers. Serves 4 – Timing 10 minutes if you are using cooked potatoes.
Slice the pepper into thin rounds, removing the seeds and membranes but keeping the rounds intact. You need as many rounds as you are cooking eggs. Fry the potatoes in a large frying pan in some bacon fat for a few minutes until crispy and golden, with the bacon and black pudding. When they are all cooked, move them to the side of the pan to make room. Add the pepper slices to the pan and cook until softened, just a few minutes. Break an egg into the centre of each round of pepper and cook for a few minutes until done how you like them – spooning some hot fat over each egg to set the white, leaving the yolk runny. Serve, with some toast if your campfire can run to it. 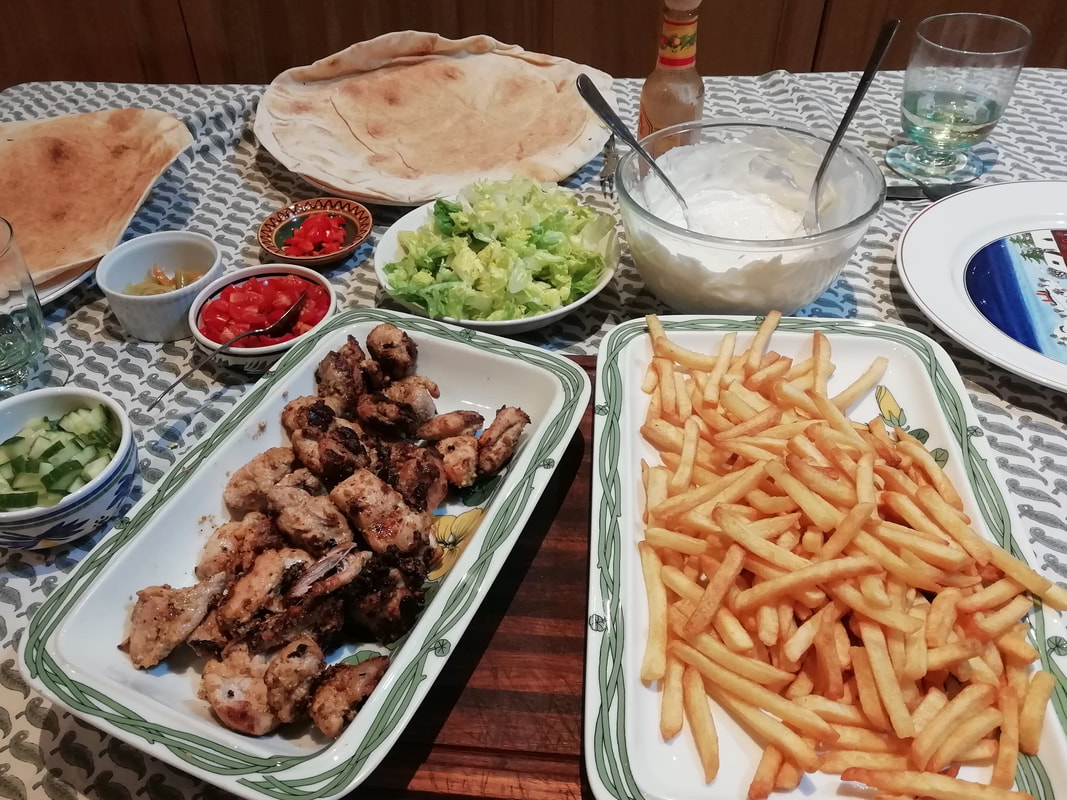 Tender marinated chicken, grilled and served with flatbreads, chips, salads and sauce Chicken Shawarma – mildly spiced grilled meat and tasty sauce There are ton of recipes out there for this traditional middle Eastern dish. I’ve eaten it all over Southern Europe and had a particularly memorable version in Athens. Writer-Son, who studied in Canada, longs for the Shawarma served from food trucks in Vancouver. We searched around for the best recipes and based this on one we found on CafeDelites, which is a great foodie website, and I hope Karina doesn’t mind my adaptation. It’s a lovely easy comforting family dish, you can serve it just with flatbreads for a simple lunch, or with chips and even rice for a bigger dinner meal. The essential thing is the garlic/yoghurt/tahini sauce, so make sure you get a good tahini, and if you have the choice of light or dark tahini, use the light one. I'd say this meal is great for all the family but for some reason, teenagers especially seem to like a) grilled things and b) a meal they can assemble themselves. So let them roam free, stuff their flatbread with whatever they like in whatever order they like and save yourself at least one argument. Serves 4 Timings: 10 minutes preparation, overnight marinade, then 20 minutes cooking. For the marinade:
600g boneless chicken – I like thigh meat as it has a fuller flavour but breast also works Shawarma sauce:
Sides: A salad made of chopped tomatoes, chopped cucumber and spring onions; red onions lightly pickled in white wine vinegar; chopped radishes; iceberg or other crunchy lettuce, pomegranate seeds. Large soft flatbread and/or rice, chips, whatever carbohydrate your heart desires. Mix all the ingredients for the marinade in a bowl, add the chicken chopped into bite sized pieces. Mix well, cover and leave overnight in the fridge. Heat the grill to maximum, when you are ready to eat and have decided on your flatbreads/chips/rice and started to prepare that. Thread the chicken on to metal skewers and grill under a strong heat until cooked through, turning with tongs to get all the surfaces cooked. This will take about 10-12 minutes. The marinade will catch and char, which is part of what gives the dish its lovely flavour, but it can set off your fire sensor, so be aware! Traditionally of course this is cooked on a spit in front of a hot radiant grill but in a domestic setting I find the oven grill is the best. I’ve tried it on a cast iron griddle pan and whatever you do to it, the marinade sticks horribly to the pan and starts to burn. When all the chicken is grilled through, take off the skewers and put it all in a dish – you can keep it warm at this point if you are still cooking the sides. Make up the salads. The choice is very flexible but I think the lightly pickled red onions are a must – just slice up the onions into a shallow dish of white wine vinegar with a teaspoon of sugar and a sprinkling of salt. They are ready to eat in a minute. A mixed salad of tomatoes/cucumbers and spring onions gives a fresh crunch as does a dish of thinly sliced radishes – whatever’s fresh in the market. A scattering of pomegranate seeds adds a fantastic texture and that little pop of sourness to bring everything alive. Mix the sauce ingredients together and whisk lightly to add a little creaminess. Loosen the sauce with a little oil if you need to, depending on the texture of the yoghurt you used. Warm the flatbreads very gently if using. To serve – lay the table out and let people choose their options – a wrap in a flatbread, some chunks of chicken with chips and salad, juicy chicken on fluffy rice, and dripping with the fragrant garlic/tahini sauce.  Juicy meatballs with a mozzarella filling, served with tomato sauce, pasta and garlic bread Mozzarella Stuffed Meatballs in tomato sauce
Meatballs and pasta mean comfort for many people – made for sharing, and with cost-effective ingredients for a family supper. Add a centre of melting mozzarella and they’re even more gorgeous – the stringy melted cheese adds another savoury note and silky texture. The meatballs keep moist and tender in the sauce. You can make the meatballs up to 1 day ahead and keep them part cooked in the fridge, ready to pour the sauce over and place in the oven for the final warm-through. Serve them bubbling in their dish, with heaps of spaghetti and scatterings of grated parmesan. You could add an extra of garlic bread to mop up the sauce and a side salad of lightly dressed rocket leaves. You’ll have a very happy family! Serves 4 Timings – 15 minutes preparation, 20 minutes to pre-cook the meatballs. Final cooking in the oven another 35 minutes.
Drain the mozzarella and then cut the balls of mozzarella into cubes about 1cm square. In a large bowl combine the mince, chopped onion, tomato puree, Worcester sauce, marmite, oregano, mustard powder, chopped parsley with salt and pepper. Mix vigorously with your hands – it’s the only way to combine the tomato puree and marmite properly into the mixture, a spoon just won’t do it. Take a walnut sized lump of the mixture and spread it on the palm of your hand. Plonk a cube of mozzarella onto the meat and smooth the meat up and around so it encloses the cube completely. Place the meatballs on a plate as you complete them. Use up all the mince, and you should use up all the cheese, but if you have a piece or two left over, that’s fine, you can just cut it up and put it in the dish when you finally oven cook. Pour a generous layer of cooking oil – about 1.5cm - into a heavy based frying pan and heat well. Fry the meatballs a few at a time – about half a batch this size goes into my big pan at once. Don’t cram them in too closely as that will cause the oil to cool down too much and you want it hot to sear the outside of the meatballs quickly and not allow the cheese to ooze out. Turn the meatballs as they cook so that they brown all over and remove onto kitchen paper to drain after a few minutes – they only need about 3-4 minutes cooking per batch. Repeat with the next batch until you have cooked all the meatballs. The odd one or two might split, it doesn’t really matter. At this stage, you can keep the meatballs in the fridge for 24 hours. Preheat the oven to 200°C. If using the carton of passata, take out the garlic now. Warm the sauce or passata in a pan. Season if it needs it. Place the meatballs in an oven proof dish that will take them all in one layer. Pour the sauce over, adding any leftover bits of mozzarella. Add a fresh leaf of basil or two. The meatballs should just show through the surface of the sauce. Cover the dish with kitchen foil and cook for 20 minutes. Then remove the foil and continue to cook for another 15 minutes until the sauce is bubbling and you can smell the meat/mozzarella and sauce melding beautifully. Serve with freshly cooked spaghetti, a sprinkling of parmesan cheese and a slice of buttery garlic bread. 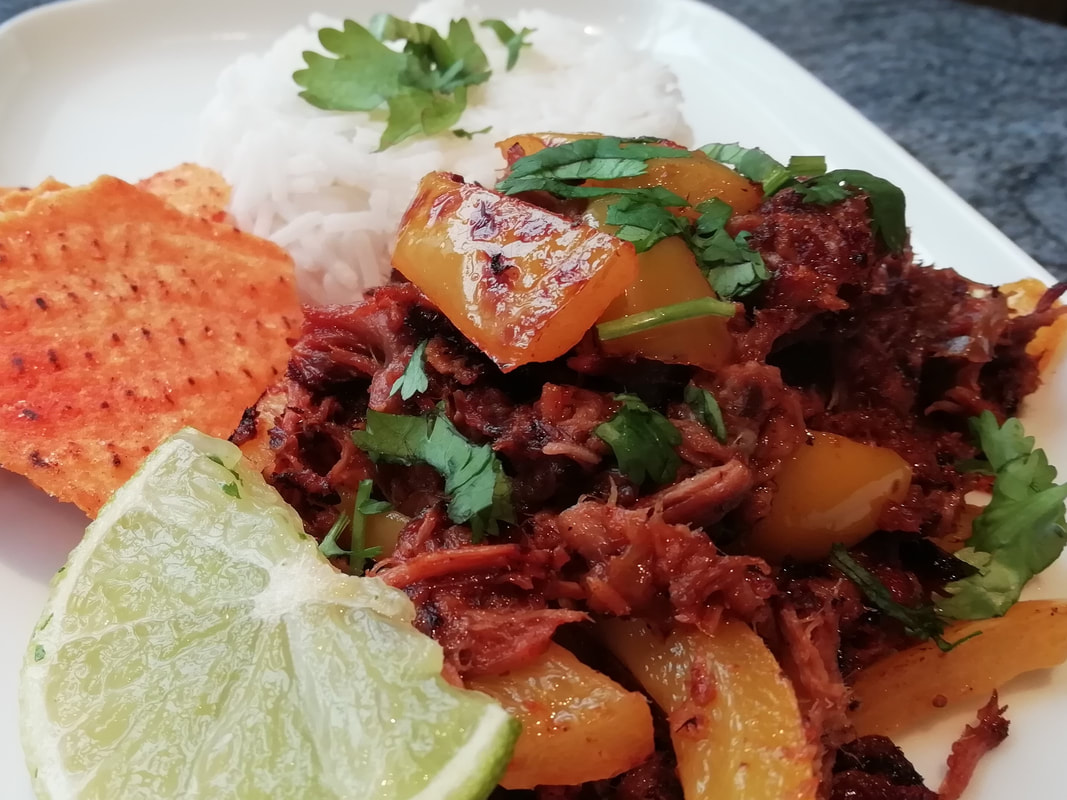 Juicy tangy pulled pork, grilled with peppers and served with rice and tortilla chips Mexican Crispy Pulled Pork - Carnitas
Crispy pulled pork? Shouldn’t pulled pork be tender, dripping with sauce, oozing juices? Well, this is that as well, but taken a step further and crisped up after cooking, with the addition of some grilled and charred peppers. It’s spicy, melting meat, with tender grilled peppers, and a tangy Mexican sauce that leaves your mouth feeling like your tastebuds made a new friend. It’s also easy to make in double quantities so you can have it with rice and tortillas one day and serve it in burritos another day. Or in a sub roll with melted cheese. A dish to make your life easier as well as tastier. It’s a sort of adaptation of a Mexican street food I think, which would be slow cooked in a kitchen in the back streets, then brought out on a food cart to be given the final grilling and served on a crispy tortilla or flatbread. Serves 8 Timings – 30 minutes initial preparation, then 6 hours in the slow cooker, 20 minutes final preparation.
Spice rub:
Mix all the ingredients for the spice rub together, get the meat into it, and rub well. Put the meat into a large frying pan with a little oil and start to brown it over a medium heat. The oil will run from the marinade and the sugar will start to brown and caramelise. As the meat fries, slice the onion finely, crush the garlic and chop up one of the peppers into 1cm dice. Take the meat out of the pan, put it into the slow cooker or a deep casserole dish. Add the onion, garlic and peppers to the pan and cook about 3 minutes until tender. Add the can of tomatoes and another half can of water, splash of Worcester sauce and a splash of fruit vinegar. Bring to the boil, stir well and add to the slow cooker or casserole. Tuck the bay leaves into the sauce. Cook on medium heat for 6 hours in the slow cooker or about 3 hours in the oven at 130°C. At the end the meat should be tender and flaking apart. Take the meat out of the sauce and flake apart using two forks. Take any bones out and discard them, also the bay leaves. At this stage, you can divide the meat up into portions and freeze what you are not using today. Mix it with some of the sauce in a freezer dish. (The leftover sauce – which will have tomatoes, peppers, onions and the odd shred of meat in a lovely deep meaty spicy liquid – can be used as the basis for a goulash soup, or used as extra gravy in a meat pie, for instance.) Cut up the other pepper, into thin strips. For the final stage, put the meat you are using into a grill proof dish, mix through the fresh pepper. Drizzle over some of the sauce – but carefully, you are not using the whole lot, you don’t want a liquid mix. Grill under a high heat for a few minutes – taking out and mixing up a few times. The pepper will char and grill, the meat shreds will start to crisp up at the sides. You can also do this in a frying pan, keep turning to get it crispy. Scatter some chopped fresh coriander over and serve with lime wedges, plain rice and warm tortilla chips. 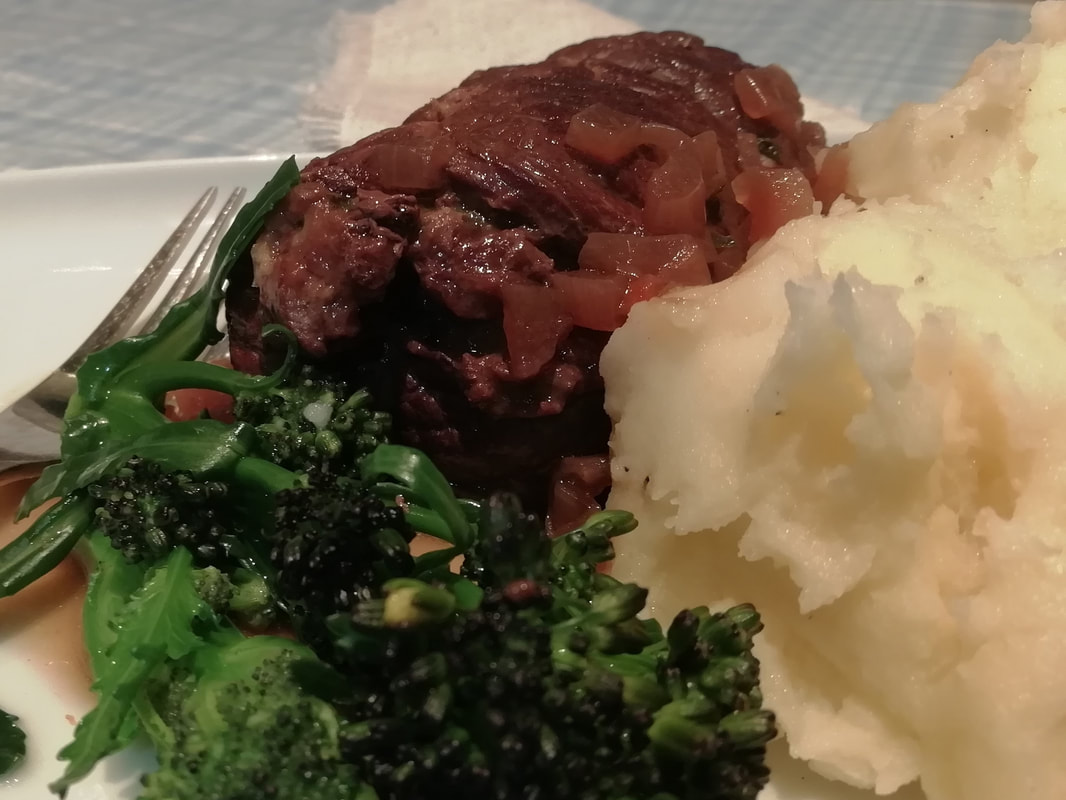 Succulent beef rolled round a herby filling, slowly cooked in a red wine and shallot sauce, served with mash Stuffed Beef Rolls (Beef Olives) in Red Wine and Shallot Sauce
Well, what could be nicer? Food of the gods, as my butcher described it, which he would of course. (Thanks, Mark, from Axons of Didsbury!) Thin slices of beef, wrapped round a herby moist filling, cooked in red wine and shallot sauce, served with mashed potatoes. Really, a meal for the winter tummy, comforting, warming, friendly, and filling. But actually, not too filling, although you couldn’t describe it as low calorie or diet fare. You aren’t eating huge pieces of meat here, a little goes a long way. And it’s nothing to do with olives, whatever the name. This is a highly tolerant dish, you can leave it in the oven a bit longer if you’re waiting for the gang to come home from football. You can make it ahead of time and then put it in the oven with the sauce warmed up when you’re ready to cook. It’s also elegant enough for a dinner party, maybe with lyonnaise potatoes or croquettes to add to the elegance if your party is too posh for mash. (impossible, surely?) Serves 4. Timings: 1 hour preparation, 2 hours in the oven.
For the stuffing:
For the sauce:
Start the sauce: fry the chopped shallots in a heavy saucepan for a few minutes until softened. Add the crushed garlic and fry for another minute, stirring well. Add the red wine, bring the pan to the boil and let it reduce by about 1/3 – should take about 10 minutes boiling. When it has reduced, add the beef stock and marmite, the bay leaves and the sprigs of thyme (you can use ½ teaspoon dried thyme if you don’t have fresh) and boil again for another 10-15 minutes. You should end up with a glossy liquid sauce, not thickened, but with a great deep taste. Meanwhile, get on with the stuffing: In a medium frying pan, fry the bacon pieces till crisp. Put aside on kitchen paper to drain. Add the chopped onions and the stick of celery to the frying pan and fry for a few minutes to soften them. If you are making your own breadcrumbs for the stuffing, put your stale bread in the bowl of your blender with the parsley, and let the blender chop both together. Put the green breadcrumbs in a bowl – or add the breadcrumbs from a packet (proper sized breadcrumbs not the coloured dust in the cardboard drum you get for fish) and add the chopped parsley. Add the bacon to the breadcrumbs. Add the butter to the pan of onions, let it melt and fry a bit more, then scrape the whole contents of the frying pan into the bowl with the breadcrumbs. Add the suet and the mustard powder, season with salt and pepper and mix well. Now assemble the rolls: Lay out each beef slice on a level surface. Cut some cooking string to have ready. You need 3 pieces per beef roll, two shorter pieces to go round the middle of the roll and one longer one to tie top to bottom of the roll. Cut them a bit longer than you think you need, as you can always cut the dangly ends off, but you can’t make them longer! Lay stuffing out thinly on the beef slice – firm it down with a spoon. Don’t put the stuffing too close to the edges as you want to make a sealed parcel. (Well, sealed-ish, there is no such thing as perfection in a tied beef roll, and if you try to achieve it, you might drive yourself mad. Good enough will do!) Then roll up the beef slice from the longest end, tucking in the sides as you go. The beef is quite obliging, and will hold itself together quite nicely. Put the roll down on the pieces of string you have laid out ready and tie up quite firmly. Snip off the flappy end of the strings. Do the same for all your pieces of meat. I tried to get one parcel per person as that makes a nice thick roll which holds together well in the sauce, but if your parcels are smaller because of the way the beef was cut, that’s not the end of the world, you just have a bit more rolling and tying to do. If you have stuffing left over, it will keep in a sealed box in the fridge for a few days until you find a small chicken to use it up in. In the pan where you cooked your onions, put a little more cooking oil and fry the beef parcels until the outside is brown and coloured, don’t overdo it, just a little colour. By this time, your sauce will be done. Taste it and season if it needs it – probably won’t after all that reducing. Put the beef rolls in a casserole dish which takes them all in one layer and pour the sauce over. Remove the bay leaves and the thyme twigs as you go. Cover the dish and place in a low oven, 160°C for up to 2 hours. Just keep it covered so the beef rolls don’t dry out on their topsides. When you want to eat, lift each beef parcel out of the sauce and snip away the string with sharp scissors (not blunt ones like I always seem to struggle with). The parcels will keep their shape now. Serve with creamy mashed potato to go with the rich and glorious sauce, and a plain steamed green vegetable such as purple sprouting broccoli. 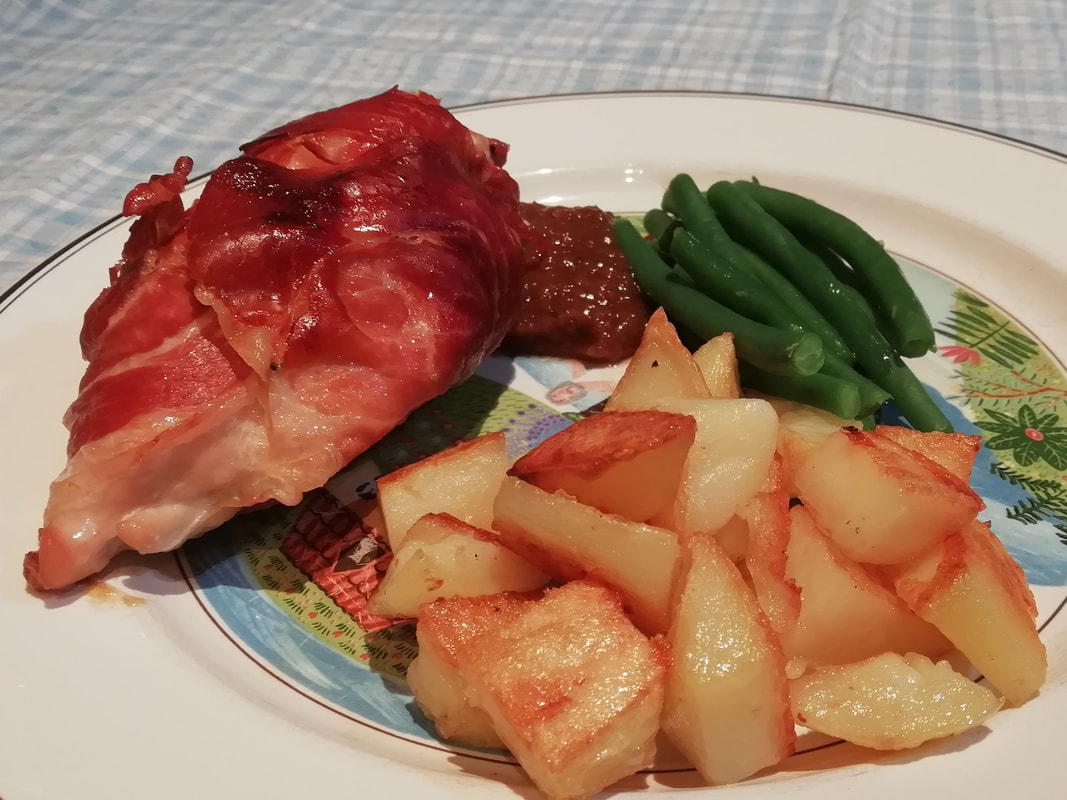 Salty wrapped chicken, sweet apricot puree, crispy potatoes and simple green beans - a deceptively simple meld of texture and flavour Prosciutto-Wrapped Chicken Breast on a bed of spiced apricots, with Crispy Parmentier Potatoes
This was a competition recipe, a long time ago. I entered the Observer Cookery Competition for which one had to come up with a menu from a list of ingredients. The top six entrants were then invited to come and cook their food at what I believe was the Leith School of Cookery – although merciful forgetfulness has descended and I don’t remember a lot about the whole affair or who came to judge it, probably not the great Prue herself. I think I came last out of the six finalists, although we weren’t given a formal grade. However that may be, this recipe is one that seemed to impress. It’s easy and tasty and goes down well for a relaxed family dinner. You can put the world to rights while it’s cooking itself in the oven. Serves 6 Timings: 20 minutes preparation, 50 minutes in the oven.
Pour the hot black tea onto the apricots and leave to soak while you prepare the other parts of the meal. (You can do this in the morning if you have tea left in the tea pot, they won’t harm if they stand all day in the tea). Pre heat the oven to 210°C and put some fat in a roasting tray in the oven to heat up. Cut up the potatoes into cubes about 1 ½ cm on a side. I prefer to leave the skins on – for the extra texture and for the nutrition, but that does mean they can be a bit uneven – peel them if you want perfection! By the time you’ve cut them up, the fat will be nice and hot, so tip the potatoes into the roasting tin and stir up a bit to avoid sticking. Sprinkle with salt and pepper. Put them back in on the top shelf of the oven. Lay a piece of prosciutto flat on a plate and put a chicken breast on top. Wrap the prosciutto around it and fold it over to make a wrapped parcel. Do the rest of them like that and place them all on a roasting tray. They can now go on the lower shelf of the oven for 40 minutes. The apricots should have plumped up and absorbed all the liquid. Snip them up more if they need it and put them in a small pan with the spices. Cook over a low heat and simmer down into a puree as they absorb the warmth of the spice, about 10 minutes. Taste and adjust the seasoning – you don’t need salt as the point of the dish is the contrast between the salt prosciutto and the sweet apricots but you might need a stronger spice or some pepper. Remove the cardamom pods and puree the fruit using a stick blender to give a smooth velvety fruity cream. Every now and then take the tray of potatoes out of the oven and turn over the cubes with a spatula – at first the wet sides of the potato will stick on the bottom of the tray but soon they will start to crisp up. You don’t need to turn the chicken pieces at all or do much to them, they don’t even need basting. When the potatoes are golden and crunchy and the chicken breasts are done – the meat should be moist but cooked through and the prosciutto will be crisp – serve the breasts on a spoonful of apricot puree with a scoop of potatoes alongside and maybe some simple steamed green beans. If you have some potatoes left over, my son informs me these are the absolute best “breakfast potatoes” – warmed through in a frying pan next morning and served with a fried egg - it might be worth making extra just for that. 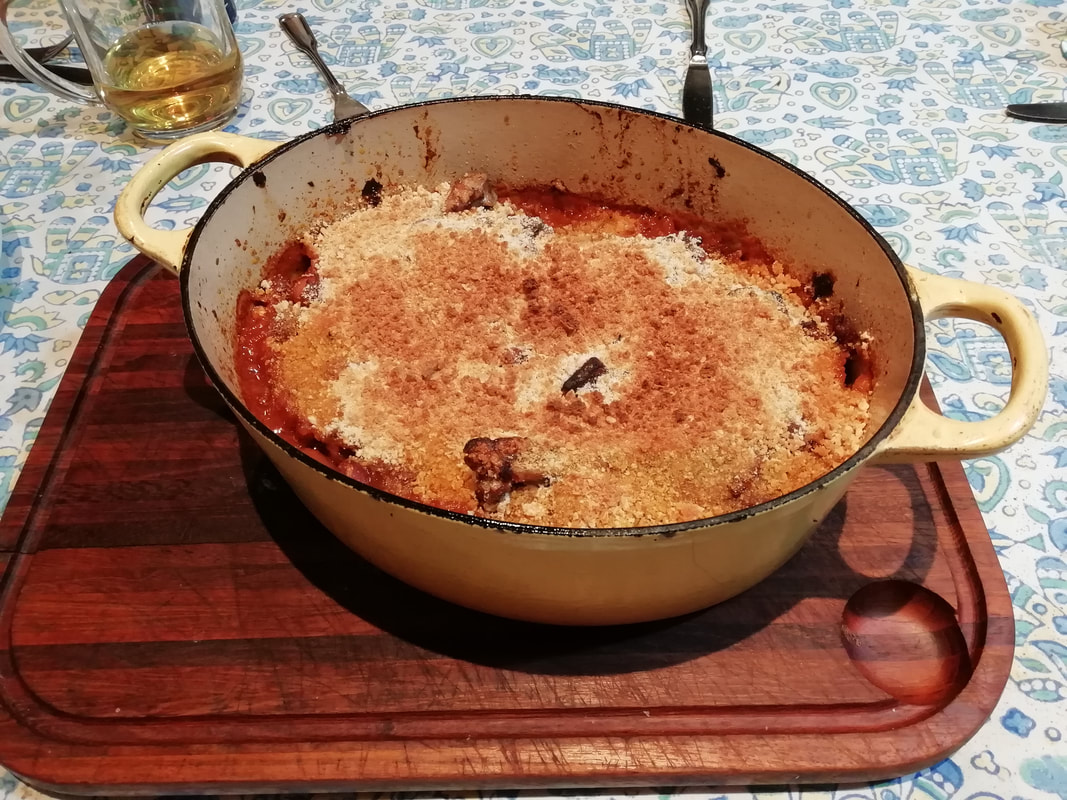 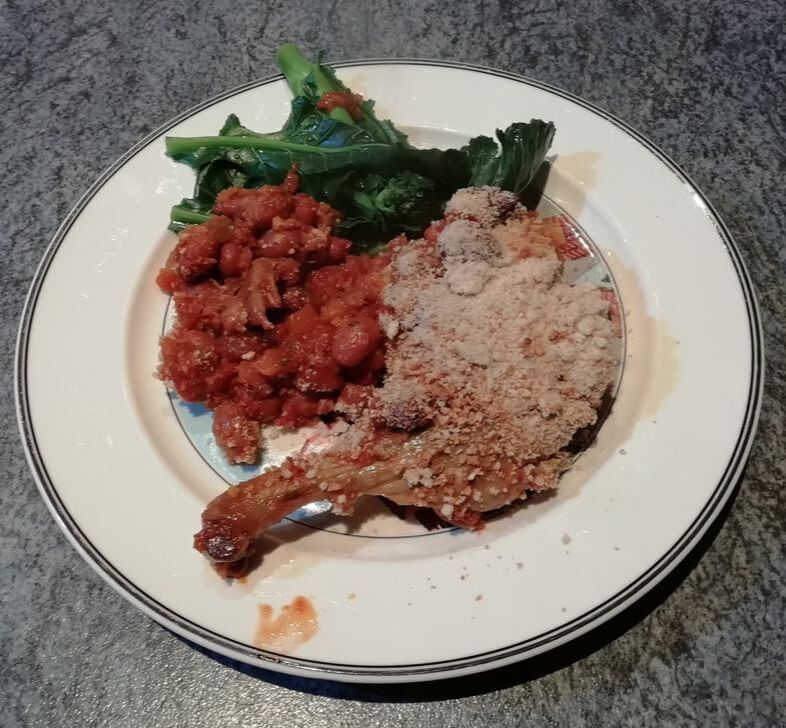 Cassoulet with Confit Duck
“A car full of young adults, come in, come in!” – a tactful and charming greeting from our hosts in the Dordogne, France. Our teenage sons fell straight in love with the scenery, ancient history, our relaxed but precisely perfect B&B and of course the food. What teen would not adore confit duck – melting flesh, crispy salty skin, always served with chips? Life only got better when they discovered cassoulet – confit duck, and sausage, combined with baked beans? Heaven. This is a time consuming dish, but all the parts can be done well ahead, and also done while you are doing other things – the preparation itself isn’t that onerous, it’s the long slow cooking you have to leave time for. But on a wet weekend in November (having remembered to salt the duck the night before), get out the slow cooker, put the oven on low, challenge the family to a Monopoly afternoon, and let the Cassoulet cook itself, tempting you with friendly scents until you can all sit down together and reward yourselves. You can serve the beans as a cassoulet without the duck and sausages, but with some vegetarian sausage for a vegan version, or just the beans in sauce with breadcrumbs on top. I sometimes do it for parties, in a meat-version and vegan alternative, and it goes down a storm. Serves 6 Confit Duck: Timings - overnight salting, 4 hours slow cooking.
The night before you want to cook the duck, salt it. Just put the legs in a shallow metal dish – a baking tray is ideal, as you can use the same tray all the way through - and rub the salt all over the skin and the flesh. Prick the skin very well using a metal skewer, and rub the salt in. Leave the legs in the fridge overnight to salt, and let the juices run. In the morning, take the legs out, wipe dry with kitchen towel, clean out the baking tray and put the legs back in. Smear the goose fat all over the legs, cover the tray with cooking foil and put into the oven at 130°C for a long time – about 4 hours. You don’t need to pre-heat the oven. The fat will melt, cover the legs, and cook them gently until they are very very tender. Just check every now and then and maybe turn them over if the fat doesn’t completely cover them. Leave to cool in the tray. At this point you can keep the duck in the fridge covered in fat for several days before using. Try to resist picking bits off. (you can’t) When you use the duck, scrape off the fat and keep it for cooking roast potatoes or other frying, it keeps in a pot in the fridge for a couple of weeks at least. Beans in sauce: (vegan option, leave out the bacon and use Henderson’s Relish instead of Worcester sauce). Timings - 30 minutes preparaton, 5-6 hours slow cooking.
Fry the bacon pieces in fat until crispy and brown. Put aside. Fry the celery, onions, and carrots until softened in the same fat – about 5 minutes, stirring to avoid catching. Add the crushed garlic and oregano and stir to cook. Add the can of tomatoes and another half can of water, then add the beans, marmite, and a good dash of Worcester sauce. Season with salt and pepper. Put the lot into the slow cooker on high for about 4 hours, or in the oven on 130°C (can sit alongside the duck) for 5-6 hours. At this stage, the beans can be kept in the fridge for up to 3 days, or frozen. They freeze beautifully and can be used as a vegetable or alongside other meals such as pork chops. They are technically not quite the same as home-made baked beans as they are more tomatoey and less vinegary, but gorgeous, and good for you, nonetheless. To assemble the Cassoulet: Timings - 15 minutes preparation, 50 minutes in the oven
Preheat the oven to 200°C Fry the sausages until browned, set into a large casserole dish. Fry the duck legs on their skin side until the skin is crispy and brown. Fight off the teenagers trying to eat all the skin. Put the duck legs into the casserole dish. Scoop in the beans in sauce to cover the meats – add a little more liquid if you need to, as the beans can absorb some sauce while they sit, if you’ve left them overnight in the fridge before assembly. Top with breadcrumbs and put in the oven covered for about 30 minutes, then remove the cover and brown the breadcrumbs for 20 minutes to give a crunchy crust. The meat is all cooked, so the dish just needs warming through and to allow the flavours a final melding. Serve as it is, giving everyone a sausage and a duck leg and a helping of the fragrant wonderful beans. I wouldn’t serve garlic bread or any other carb alongside, as it is already rich, but a simple lightly dressed green salad maybe with some bitter endive and rocket leaves either as a starter or after would be a suitable nod to the French origins and an enlivening palate cleanser. Family joy!  Juicy and warming beef curry with potatoes and spinach - winter walk food One Pot Beef Curry with Potato and Spinach
I know this isn’t a very genuine recipe, as you hardly get beef in India, for obvious reasons. You could also make a very similar curry with lamb or goat, which my butcher sometimes has and is worth looking out for. This is an adaptation of my own, just right when you want something spicy and warming, easy to make ahead of time and ready to dig into. The long slow cooking gives you a beautiful depth of flavour and brings out the richness of the beef. The meat curry freezes very well without the potatoes in it, and it also keeps in the fridge for a few days, so can be made well ahead and just heated up when you come home from a long walk in the woods (or from having a bonfire). If you normally dry fry your spices when making a curry sauce, have a think about doing it my way or rather Mrs. Singh’s way. I had a cooking lesson in Jaipur and learned that while whole spices should be dry fried, ground spices should be mixed with water before adding to the pan, so that they don’t scorch and add bitter flavours. Give it a go. And to make your life easy, feel free to use a good mixed curry powder if you haven't got all the individual spices. Serves 6 Timings: 1 hour preparation, 4-5 hours slow cooking, 1 hour finish.
Coat the meat in the seasoned flour and fry in batches, to brown each side. Tip the meat into your casserole dish or slow cooker. Wipe the frying pan. Peel and chop the onions, de-string the celery and chop into small pieces. Fry gently in the oil. Chop the chillies and ginger and squish the garlic with salt. Add to the pan. Fry for a few minutes more. Put the curry powder or your spice mix into a small glass and add water to make a paste. Tip the paste into the pan with the onions etc. and stir to cook. Add the tin of tomatoes and another tin full of water. Stir up and continue to heat until it simmers. Add several dashes of Worcester sauce, a good squeeze of lemon juice, 2 teaspoons of marmite and 2 teaspoons of sugar. Stir up, taste and adjust the seasoning – you might need more salt. Tip the whole sauce mixture into your casserole dish or slow cooker. Cook on high for 2 hours and medium for another 2 hours, or in a very low oven for 3-4 hours. The sauce should be thick and tasty but still quite juicy and the meat will be tender. Tip the potato cubes into the casserole and mix in. Cook for another 30 minutes on a higher heat, as the sauce needs to be simmering now to cook the potatoes. If using the slow cooker, at this point you might need to transfer what you are going to eat today to a casserole dish and add the potatoes, putting the other portion aside for freezing. About 5 minutes before the end, stir in the spinach. Serve with rice, if you need extra carbohydrate, or maybe some buttered naan bread. Have some fresh relishes on the side – cucumber and yoghurt and chopped tomato with red onion to zing up your tastebuds, perhaps some lovely sweet mango chutney. |
Some Changes - April 2022
Thanks to my friends and followers for your patience, and for your encouragement to start blogging again. Archives
April 2022
Categories
All
|
 RSS Feed
