 Tangy garlicky buttermilk ranch dressing, wild garlic chicken, crispy bacon and croutons - salad heaven! Buttermilk Ranch Salad with Wild Garlic Chicken, bacon and wild garlic croutons
Wild garlic a-go-go! Using the wild garlic butter you made from your foraged harvest, pan cook a chicken breast which you then slice up on top of a Ranch dressed crisp green salad. Add some wild garlic croutons and crispy bacon – Saturday family lunch time heaven. Buttermilk is not so common in the UK and if you can’t get it, mix a small pot of plain yoghurt with the same volume of milk and whisk well, and you will have the right texture, although not quite the sour-dairy tang. Serves 4 for lunch Timings: 30 minutes, if using already prepared wild garlic butter, and you can roast the chicken ahead and keep cool in the fridge.
First pan roast your chicken meat in the wild garlic butter. Put a good spoonful of butter in a small frying pan over a medium heat and gently fry your chicken, spooning the hot butter over it, and turning it over now and then. A breast will cook in about 8-10 minutes, and a boned thigh will take a little less. The generous butter keeps the meat lovely and moist. Leave the meat to cool and absorb more butter. You can also wrap a piece of chicken in kitchen foil and add some garlic butter to the parcel and just put the parcel in the oven for 20 minutes if you have the oven on for something else. Take it out, let it cool, keep in the fridge until you are ready to use it. Make the croutons – fry the cubes of bread in the frying pan you used for the chicken, adding a bit more wild garlic butter as you go. The leaves of the wild garlic will fry and sizzle and go black but the taste of the croutons is spectacular. They take about 5 minutes, keep moving them around in the pan and then scoop out onto kitchen paper to cool and crisp. Wipe out the frying pan and cook your bacon until crisp, drain on kitchen paper. Make the ranch dressing in your largest salad bowl. Mix the dressing ingredients together well, even whisk with a small whisk if you have one. Taste and adjust the seasoning – you might want a little more salt or a squeeze of lemon juice or a teaspoon of sugar. The dressing should have a nice tang but it doesn’t taste strongly of buttermilk. You can do all the above in advance and keep cool in the fridge for several hours. Wash your lettuce thoroughly and dry or spin. Tip the lettuce into the bowl with the dressing and mix well. (I believe it was Anna del Conte who taught me that a salad should be tossed at least 25 times to coat the leaves properly with the dressing, which is after all, the reason for a salad’s existence.) Top with the sliced chicken, crumbled bacon and crispy croutons.
0 Comments
 Balanced and beautiful - fresh celery and squash soup, a light lunch Celery and Squash Soup (vegan)
Sometimes an accidental combination just sings out loud. A few sticks of celery and half a butternut squash are denizens of the Monday fridge, leftovers from the weekend. But rejoice! The lightness and slight bitterness of celery balances the sweetness and creaminess of the squash and the two flavours meld like cheese in an omelette. It’s even good enough to make on purpose. It’s a great lunch time soup with a simple salad and some good bread. Serves 4 Timings: 30 minutes
Gently fry the onion and celery in a little vegetable oil until tender, 5 minutes. Add the cubes of squash and stir around. Add the vegetable stock, relish, and a little grind of pepper. You probably don’t need salt as the stock is salty enough but taste and adjust to your liking. If you have had the oven on and you know you’re going to make this soup, you could also roast the squash cubes for 30 minutes in a medium oven with a little oil, but I wouldn’t put the oven on just for that. Simmer for 20 minutes, then cool and liquidise. You can add the reserved celery leaves before you blend or hold them back for a garnish. Check the seasoning and serve. 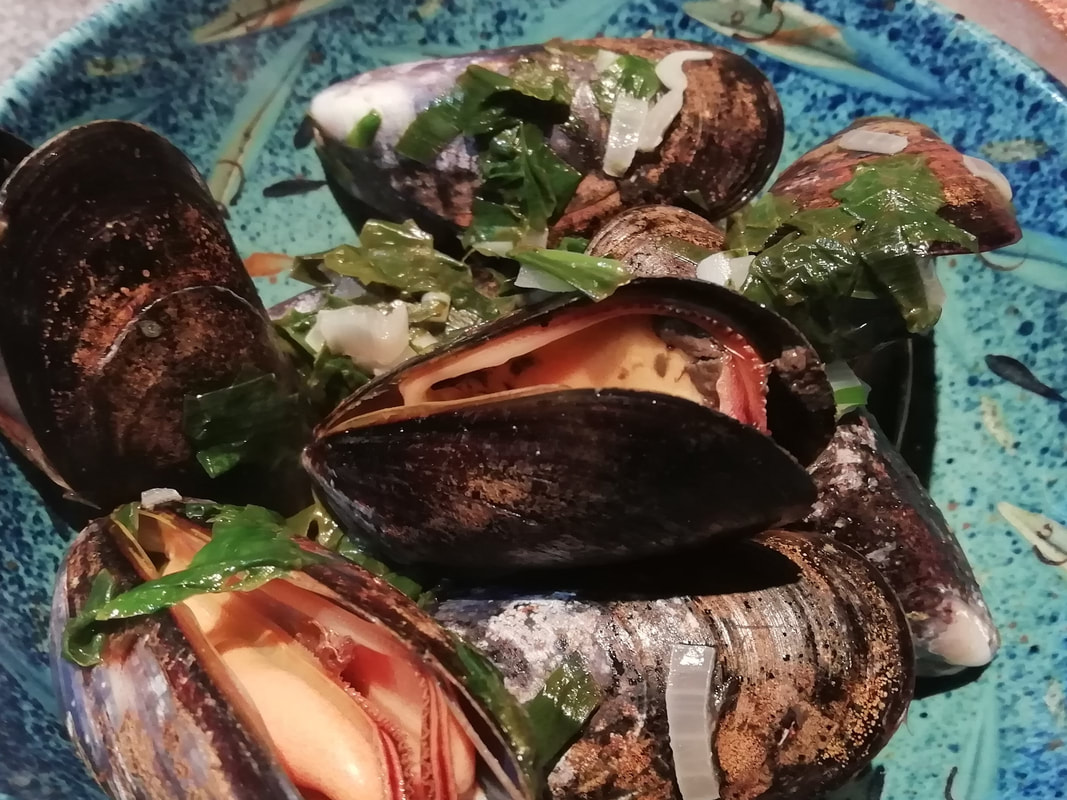 Fresh, juicy and garlicky - who could resist? Paddy’s Mussels – Mussels with Wild Garlic
Well, if St. Patrick didn’t eat this, I’d be surprised. Both ingredients are found in abundance in Ireland and it’s a super-delicious combination. The new leaves of wild garlic, or ramsons, are the culinary harbingers of Spring, poking up in the woodland or hedgerows, growing into aromatic clumps with the white drumstick flowers held above. Gorgeous to look at and to eat. Please pick sensibly: from clean patches where dogs don’t squat, and never take all the leaves from one plant or denude an entire patch. Do check you’re picking the right plant – you can’t mistake the garlic scent when a leaf is crushed. I’ve never seen it for sale in the UK, but it’s sold in Europe as “bear-leeks”, and eaten everywhere, in soup, sauces and salads. Don’t be nervous about cooking fresh mussels – they’re as simple as 1,2,3. If you’ve enjoyed them in a restaurant, do try them at home. Oddly, children often like them very much – maybe it’s the messy fun of scooping them from the shells. Or maybe it’s that they go with chips so brilliantly. Marry the light garlic savour with fresh salty mussels in a white wine and shallot broth; scoop up the juices with good bread, serve a plateful of crisp chips on the side and enjoy while you toast St. Patrick’s Day. Serves 4 Timings: 30 minutes
Prepare and clean your mussels. Wash under running cold water – discard any that don’t close when tapped or after handling. Scrub them well and pull out any stringy beardy bits. Leave in a sieve until ready to cook. Fry the shallots gently in a little vegetable oil or butter in a large pan until soft, about 5 minutes. Add the white wine and let it bubble down and cook down to about half the volume, takes only a couple of minutes. Add the wild garlic to the pan, let it cook for only a few seconds and add the mussels. Put the lid on the pan and let the natural juices steam-cook the mussels for 3-4 minutes until they are all open and have absorbed the garlic taste. Scoop into bowls and eat with good tangy sourdough bread or some chips, or both. 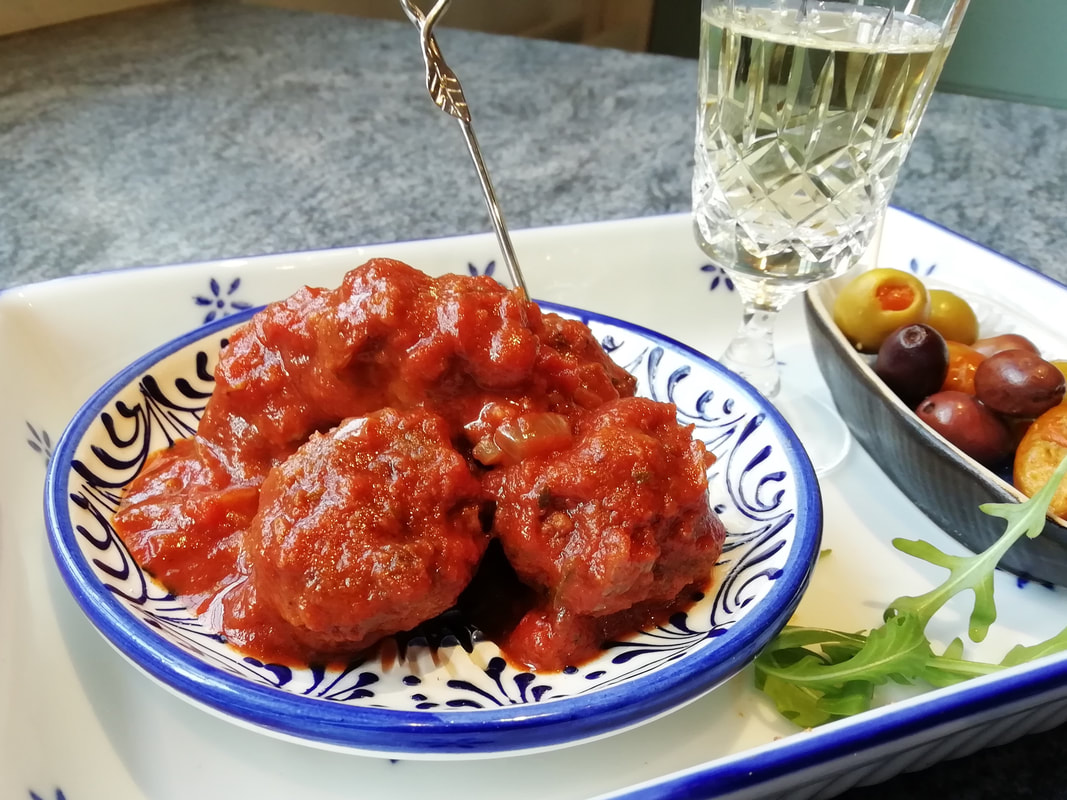 Food for sharing - a plate of succulent Albondigas, pork and beef meatballs Albondigas – Spanish meatballs
A wonderful thing about Spanish cuisine is its versatility; that and the fact that it’s just made for sharing. Make these little lovely meatballs ahead and you can serve them as part of a tapas spread, serve them in a roll like a meatball sub (perfect, says writer-son), or as a main course alongside a hefty portion of patatas bravas and a simple salad. I’ve had these in many a tapas bar in Spain. I think the very best were in the old market in Malaga. After marvelling at the counters of fish, we failed to find a seat inside and sat on a street corner next to the roaring traffic. We tucked into meatballs in rich spicy tomato sauce, jamon, croquetas, olives and some great bread. Albondigas are warm with paprika and cumin; the texture is quite firm as you are supposed to be able to pick them up with a little fork without them disintegrating. They’re friendly little things to eat, perfect for enjoying with loved ones and a dry sherry or a Spanish beer. This recipe makes quite a lot – 60 meatballs, although they are small. It’s worth making a large quantity as they freeze really well, so just pop half of them in the freezer before frying and you can bring them out in a month or so with most of the work done. The sauce can also be divided and frozen for later. Makes 60 little meatballs – about 8 portions. Timings: 30 minutes for the sauce, 30 minutes for the meatballs, then 30 minutes in the oven. All can be done ahead and re-heated.
First, start the sauce, as it needs time to cook down and meld all the flavours. Gently fry the onion in vegetable oil until softened. Add the cumin seeds, oregano and the garlic and stir to cook. Add in the powdered spices and stir again. Tip in the tomatoes, passata and red wine. Cook gently over a low heat for about half an hour – test the seasoning and add salt and pepper as needed. For the meatballs: combine all the ingredients in a big bowl and mix with your hands, work thoroughly to make sure it’s all mixed properly. Make small balls of the mixture – a bit smaller than a ping pong ball. Roll the balls in the seasoned flour and put them on a tray. At this stage you can freeze the ones you don’t want to use straight away – put them in the freezer on a tray until hard, then put them in a plastic bag and seal up. Heat 1cm of oil in a frying pan and fry the meatballs until browned all over – they aren’t very big so it only takes about 5 minutes. Scoop them out and place on kitchen paper. Now you have your cooked meatballs and your sauce – they can be kept for up to a day in the fridge before finally cooking. Preheat your oven to 180°C. Combine the meatballs and sauce in an oven proof dish and place in the oven, covered, for about half an hour to warm right through. If there are leftovers, unlikely, I know, but it sometimes happens, you can warm them up again in a pan with a little additional water. They go beautifully in a bread roll for a hot lunch, maybe with a little melted mozzarella in there as well to add that salty curdy backnote. 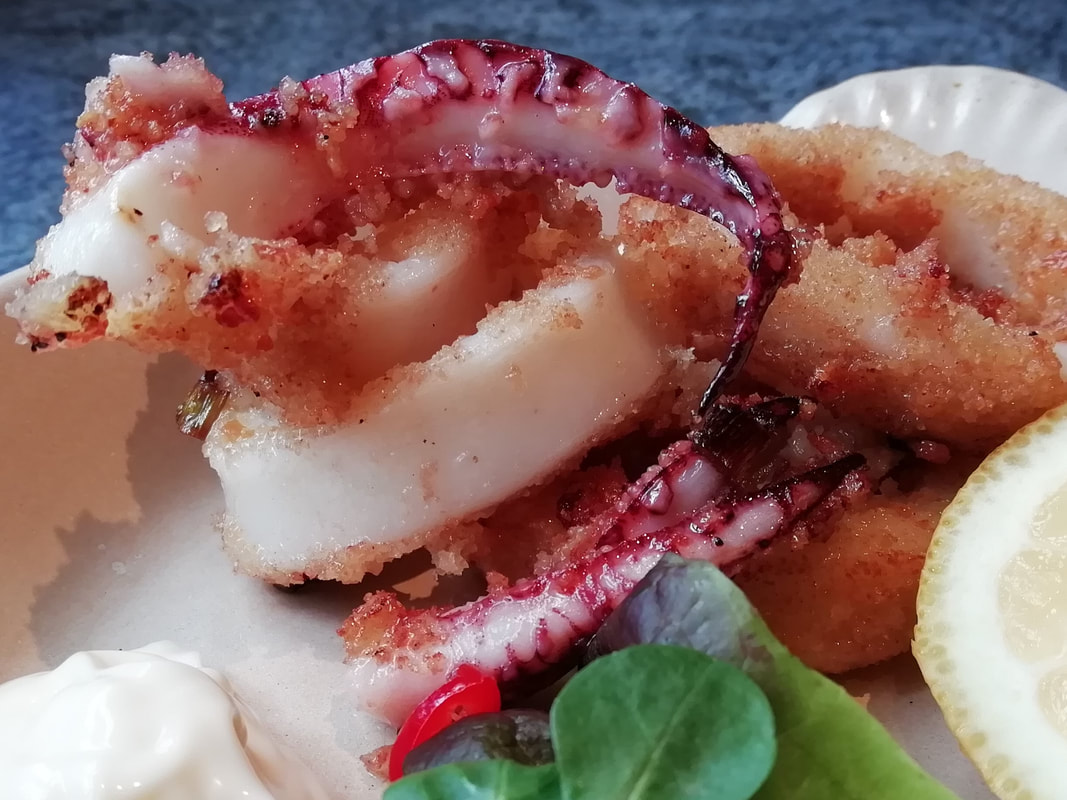 Fresh and delicious, straight out of the pan, crispy squid Crispy Chilli Squid
Although happy to eat calamari in a restaurant, we can be wary of cooking squid; it’s unfamiliar and quite expensive. But it is very easy, there are two rules: fast or slow, but nothing in between. If you cook it fast and hot, deep fried, you get that lovely chewy texture with a crisp coating and a subtle flavour. If you have a good fishmonger, you can get fresh Cornish squid, which is sustainable and low environmental impact. Tastes great and good for the planet, how can you get better than that? Just watch out with the frying – the squid can spit in the hot oil, so I use a splatter shield on my frying pan, as I don’t have a deep fat fryer. Serves 2 as a light lunch Timings: 10 minutes preparation, 5 minutes cooking
Clean up the squid, removing any membranes. Dip the squid into the egg and then into the breadcrumbs, patting them on. Place the pieces on a baking tray to dry slightly – they can be left like this for an hour or so. Heat up the oil. I use a deep sided frying pan and have about ½ cm oil in it – you need to get all the pieces of squid in one layer if possible. If you are cooking for more people, then cook in batches and keep the cooked squid in a warm oven until the final batch is done. When the oil is shimmering, add the spring onions and chilli pieces, stir, then add the squid. Add the rings first, give them a minute and turn them over, then add the more tender tentacles. Fry for another 2-3 minutes turning the pieces over and watching out for the spitting oil. Scoop out onto kitchen paper and serve straight away with some nice bread, garlic mayonnaise, a lemon quarter to squeeze over and a simple green salad.  Glowing with health and warmth, give yourself a treat with a bowl of beetroot soup Beetroot Soup (vegetarian/vegan)
Sometimes the simple things are the best, especially for lunch. Beetroot soup is sweet, earthy, friendly and really good for you. All sorts of things are said to lower blood pressure, but I understand that beetroot is among the few things to be proved to do so, other than prescribed medicines. A straightforward vegetable soup, it’s easy to make, cheap and cheerful – who can resist eating something of such an amazing colour? Be warned, it can turn your urine pink – nothing to be worried about, just shows you have an efficient set of kidneys doing what they should do and filtering your blood. You can cook your beetroot in a number of ways – wash the roots, remove any fibrous rooty bits and any tops and leaves (you can cook those separately like spinach), and then boil, or microwave. I prefer to roast mine when I have the oven on for something else – just wrap the beetroots individually in kitchen foil, and put them on a small roasting tin in the oven at whatever temperature you are cooking, for about 1 ½ hours, so if you are roasting a chicken, they will take about the same time. If you are making toad in the hole, just leave the beetroot in the oven for a bit after you take out the Yorkshire puds. I leave the beetroot in the oven to cool down after I put the oven off, it just makes sure they are fully cooked through and totally tender. When cool (and you can do this the day or so after) take off the foil, rub off the skin, and then use the cooked beetroot. Serves 6 Timings: 20 minutes if using cooked beetroot.
Fry the onion gently in a little oil until tender – about 5 minutes. Add the garlic and cook for another 5 minutes. Add the beetroot cubes and the stock and simmer for about 5 minutes. Allow to cool slightly and then liquidise. You don’t need to strain through a sieve as there are no fibrous bits in beetroot (unless it's the last harvest from the allotment, in which case do please strain it!). Warm through and adjust the seasoning – you may need to add some salt and pepper. Serve with a swirl of sour cream if you like or plain yoghurt and some good bread. 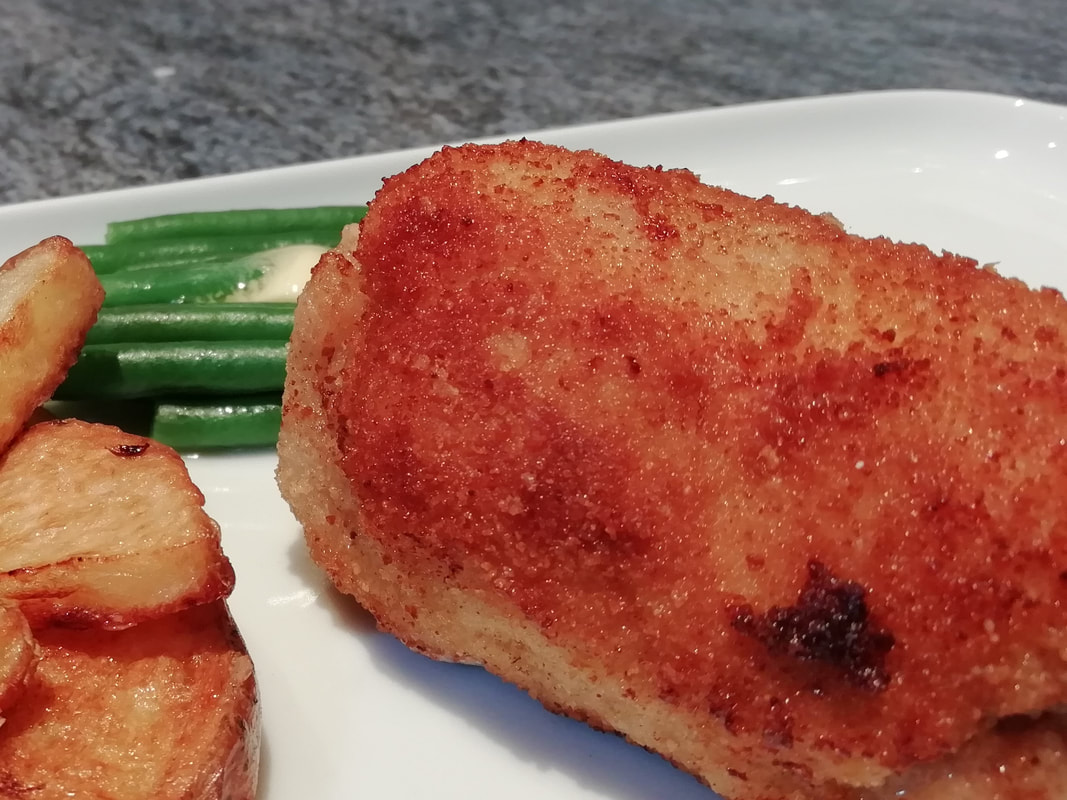 "Little Flamenco Dancers" - Spanish tapas pork rolls, filled with cheese and ham Flamenquin Cordobes
I’ve got a thing for Spanish food – well, haven’t we all? Tapas snacks, eaten in a noisy bar, shouting to be heard above the jokes, the laughter, waiters ordering plates of food from the kitchen, dry sherry glittering on your tongue. Simple tapas – a dish of olives and some slices of jamon, or tapas creations, local specialities: try a different one in every bar – marinated anchovies, stuffed egg-halves, new types of cured meat, or one of the fried ones such as these lovely rolls of pork, ham and cheese. As the name suggests, they are local to Cordoba – city on the banks of the Guadalquivir, where you can find the world famous Mezquita, chequerboard mosque. Lose yourself in the winding streets, admire the decorated Spanish patios, dripping with flowers, do a bit of high-end shopping, but don’t neglect your tummy. Stop at one of the many bars, choosing a shady outdoor table, order a glass of sherry and a plate of “little Flamenco dancers” and enjoy. We ate a juicy portion waiting for the Holy Week parade of shrines to pass by in the streets of Cordoba – a magical evening. Silver shrines being shouldered tenderly through the streets by burly suited men, priests ringing bells, church bells pealing, and Jupiter watching brightly from above. We can’t currently go there, so luckily the flamenquin are easy to make at home, and you can transport your family through taste and texture. These are great for a Spanish themed lunch – add some chips (I did roasted oven chips) and a salad, or go all-out and do a selection of Spanish starters – some cold meat, some manchego cheese, a sliced tomato and onion salad, maybe some marinated anchovies. Serves 4 as a light meal or as part of a selection. Timings – 30 minutes, although you can make and roll them ahead of time and cook only when you want to eat.
Lay your pork pieces out on a flat board – it doesn’t matter how big each one is, you can make the flamenquin quite small if you want them as tapas style bites. Spread a little mustard on each slice. Lay some ham onto the pork, then a thin layer of cheese. Roll up each piece of pork with its filling quite tightly, tucking the ends in as you go. I find that the rolls will stay rolled, they don’t need to be fastened with a cocktail stick or anything. Do all the rolling up first, then lay out the flour, beaten egg and breadcrumbs in bowls in a row along your worktop. Dip the pork rolls first in flour, then in egg, then in breadcrumbs, patting the breadcrumbs on quite firmly. Ideally, at this point, chill the rolls for half an hour in the fridge to set the breadcrumbs. When ready to eat, heat up your deep fat fryer or a good depth of oil in a heavy frying pan – about 1.5cm depth. Fry the flamenquin a few at a time, turning once or twice, until evenly browned and the coating is crisp. They take about 5 minutes. Remove from the oil and keep warm in the oven until you have fried them all. Can you feel the Spanish sunshine? Can you hear the bells?  Crispy outside, creamy and salty inside, delicious and warming: Spanish Croquetas Spanish Croquetas - Smoked Haddock or Crispy Ham (vegetarian optional as choice of filling)
In Spain, they serve a variety of croquetas as part of your tapas spread – salt cod, spinach, mushroom, ham flavours. Take yourself to Malaga, looking at the sea, sipping your cold sherry and eating these lovely creamy-but-crispy bites. They are actually quite substantial, due to the rich bechamel and generous filling, so you could certainly have them for a good warming lunch alongside some green salad and zingy lemon mayonnaise. A tapas or starter portion would be one of each type, a lunch portion might be two of each type – so this recipe makes enough to feed quite a few people. Once you’ve got a feel for the consistency of the bechamel required, you can make these in smaller quantities and using pretty much anything for the filling – leftover chicken, cooked vegetables (but make sure they aren’t watery at all), something spicy? Makes 12-14 croquetas of each type. Timings – 30 minutes on Day 1, 60 minutes on Day 2.
For each type you will need an additional 40g butter, 40ml olive oil and 65g plain flour
First, make your fillings: Poach the haddock fillet in the milk and water with the bay leaf for about 10 minutes until the fish is cooked. Let it cool for a few minutes, then take out the fish and strain the liquid into a jug – you will use this for the sauce later. Remove the skin from the fish and flake the flesh well with a fork, taking out any bones you see. Keep the fish in a bowl. Fry the pancetta in a little oil until crispy, drain on kitchen towel. Cut the prosciutto finely with a sharp knife. Make each bechamel in the same way – I did one after the other in the same pan, as you need a fairly heavy bottomed saucepan. Melt the butter and the oil together, add the flour and stir over a gentle heat, cooking the flour without letting it burn. Add the liquid and keep stirring. It will thicken as you stir, and keep adding the liquid to make a very thick bechamel sauce. You need to keep stirring and cooking for a while to make sure any flouriness is cooked out, and the sauce is creamy. Add the filling and taste for seasoning. Add the grated nutmeg to the ham one. You probably don’t need to add salt to either of these, although you would if you were making spinach or mushroom croquetas. A generous grinding of pepper lifts the flavour. Line a container with cling film – I try to avoid using cling film these days but I have tried other things and the sauce sticks and you waste a lot, so I do use cling film for this. Pour the bechamel into your container and wrap the cling film over the top to stop a hard skin forming. Place in the fridge for 24 hours to chill thoroughly and set firm. Make the second bechamel if you are making two flavours of croquetas and do the same, so you have both flavours chilling overnight. Next day, prepare a flat bowl with beaten egg and another one with breadcrumbs. Working on a floured baking tray, take a dessert spoonful of the set bechamel mixture and roll it in the flour, using flour to stop your hands sticking too. Form it into a cylinder about as long as your thumb and a bit thicker. Make all the croquetas of one type to this stage in one go. Then drop two at a time into the egg mixture, then into the breadcrumbs, firmly pressing the breadcrumbs onto the eggy surface. They should stick and make a firm dry coating. Put the completed croquetas on a plate to set again, while you do the other flavour. It is fiddly, and it takes a while – it might be easier if you have a production line of helpers assisting you with this. When the croquetas have had a few minutes to set, heat 2cm of oil in a heavy pan, or fire up your deep fat fryer. Fry the croquetas quite briefly in medium hot oil – the filling is already cooked, so you just want to warm it up and brown the breadcrumbs. Remove from the hot oil and serve as soon as you can – they do keep warm in the oven quite nicely if you are doing one flavour followed by another. Eat with a simple green salad, a lemony mayonnaise for the fish one, and a tomato relish for the ham one, and imagine you're in Seville, sitting in a sunny courtyard.  Simple, crunchy, tasty - just yummy! Crispy Chinese Chicken Wings
“Restaurant quality” my son announced, licking sticky spicy sauce off his chin. These are so easy and so good, although they do require watching as the fat is very hot. The secret is a light cornflour batter and double-frying, but they don’t take long. Perfect for a lunch time meal, eaten with your fingers or made more substantial with a bit of rice on the side. I got the idea from Kwoklyn Wan (www.kwoklynwan.com) and have adapted his wonderful recipe a little. Thanks, Kwoklyn, I love your cooking! Making your own sticky barbeque sauce is the work of a moment too, and so much better than the sugary salty gloop from the standard takeaway or the stuff in a bottle. Give these a go, your family will appreciate them! You don’t need a wok or any complicated equipment at all. Serves 4 as a light meal or a starter. Timings – 20 minutes.
For the sauce:
Make the sauce first, in a large pan – you are going to tip the wings in later. Gently fry the crushed cloves of garlic, the ginger and the chillies for about a minute until they start to soften, but not deep fry. Add the rest of the ingredients, taste for seasoning, adjust, and leave on the side. Toast the sesame seeds in a small frying pan with no oil for about 5 minutes until golden, tip onto kitchen paper. Using a deep frying pan – or a deep fryer if you have one – heat up the oil till quite hot. Sorry, I don't use an oil thermometer, I just look at how the oil is behaving. For this, it's not quite smoking but you can see the oil moving about in the heat, and the wings will sizzle as they go in. Mix the cornflour, salt and pepper in a bowl, add the wing pieces to the bowl and rub the cornflour into the wings, pressing the flour onto the skin. Fry a few pieces at a time, don’t crowd the pan or you won’t keep the oil hot enough to make them crispy. The pieces take about 3 minutes per side, you want them cooked and light golden but not brown at this stage. Keep the cooked ones warm on kitchen paper in the oven and keep going until you have done all the wings once. Now start all over again and cook each batch of wings another time for about 8 minutes per batch. Take each batch out and keep warm as you do them. When you’ve done them all, tip the whole lot into the pan with the sauce and mix well. Scatter the sesame seeds over and serve. Everyone can tear the wings apart with their fingers, enjoying the spicy sweet sauce. You could serve simple flatbreads or a little salad, or maybe some plain rice.  Three perfect little quichelets with different fillings and some crispy seaweed garnish - impress your friends Trio of “Quichelets” with Crunchy Seaweed
In 1991 I entered the Observer cooking competition. As far as I remember you had to generate a three-course menu from a list of provided ingredients and write about it. I was a finalist and along with five others, attended a venue in central London – I think it was Leith’s School of Food and Wine although I don’t remember seeing the famous Prue! We all cooked our meals in the school kitchen and served them to the judges – I’m very sorry, I don’t remember and didn’t record who they were. I was so very frightened, I hardly took anything in. We were given comments on our dishes, and the winner was chosen but the rest of us weren’t ranked - although I strongly suspect I came sixth! However, the experience inspired me to enter other competitions and I also became a finalist in the Sunday Times competition in 1992 which was held at the Turnberry Hotel. This recipe of three little quiches with different fillings accompanied by crispy deep-fried cabbage – otherwise known as seaweed - was my starter offering for the Observer competition. I liked it then and I like it now and quiches are a great and versatile offering for a gathering of friends, especially if they have mixed diets. Anyone but a vegan can eat at least some of these. If you want a vegan alternative, veganhuggs.com (no relation to my site) has some very good vegan pastry and quiche filling recipes. Makes 24 little quiches – 8 servings. Timings 90 minutes. For the pastry:
Fillings:
Egg Filling: 3 eggs beaten, 2 tablespoons double cream, salt & pepper Deep fried crunchy “seaweed”: Use a loose leafed cabbage – one of the spring greens or sweetheart cabbage, not a tight white or red one. Take four big outside leaves and clean them, de-rib them and shred into the thinnest shreds you can make - using a scissors or sharp knife. This will give you about 100g of shredded cabbage which is adequate for 8 portions. Make your pastry and let it chill. Place the flour and butter in your mixer with the pastry paddle, mix for about 1 minute until the texture is like fine breadcrumbs, then lower the speed and break the egg into the mixer. You might want to add another tablespoon of cold water – depends on how thirsty your flour is. If not using a mixer, rub the butter into the flour with your fingertips to the breadcrumb texture, then add the egg and water and mix carefully. Take the pastry out of the bowl, knead briefly to even out the dough, wrap up in beeswax paper (or cling film if you still use it) and keep in the fridge to chill while you make the fillings. Note, if you don’t chill the pastry, it can shrink in the oven – this doesn’t really matter if you expect it and plan for it, so go according to your own timings. Pre heat the oven to 180°C. Roll out the pastry to about the thickness of a 10p piece and cut circles with your pastry cutter to a little larger than the cups in a 12-cup bun tin. Grease the bun tin and place the pastry circles in the cups. If you have baking beans you can use them to keep the bottoms of the quiches from bubbling up. Place the empty pies in the oven for about 8 minutes to cook – this will help to keep the bottoms crisp. Remove the pies from the oven and let them cool. If the pastry has bubbled up, you can push it back flat with the back of a teaspoon. Now fill the cups – I liked to fill one line of 4 with one filling, then the next line of 4 with the next filling and so on, as that keeps it even, and you can make two 12-cup trays with this amount. Filling 1 – fry the bacon until crisp, remove and keep on kitchen paper. Fry the mushrooms in the fat from the bacon until cooked, with a sprinkle of dried thyme. Distribute evenly between the quichelets. Filling 2 – spread the mustard over the bottom of the quichelets, sprinkle grated cheddar, about a teaspoonful, then add 4-5 pieces of cut up sundried tomatoes and a sprinkle of chopped parsley. Filling 3 – fry the finely chopped onions in vegetable oil for about 30 minutes until caramelised (this is why I said start the fillings once you’ve got the pastry chilling) and golden brown. Chop the goat’s cheese slice into little pieces. Spoon a large teaspoon of gloopy onion into each quichelet and top with a couple of pieces of goat’s cheese. Turn up the heat on the oven to 200°C. Now beat up the eggs with the cream, salt and pepper. Using a soup ladle, portion out the eggy filling into each little quiche. You will drip a bit but it doesn’t matter. Bake the trays of quichelets in the oven for 15 minutes until puffed up and starting to go golden brown. Serve at room temperature – and they are best on the day you make them although they do keep in the fridge overnight and warm up quite well too. To fry the “seaweed” – put about 1cm of oil into a frying pan, heat up to sizzling, and put about a handful of shredded cabbage in at a time. The oil will fizz up and settle back – stir around a bit and take out onto kitchen paper after about 90 seconds. You will have crispy shredded seaweed, onto which you can sprinkle a little sea salt. Keep going until you use up all the cabbage you have shredded. Serve one of each type of quichelet on a plate with a small handful of crispy seaweed. They look very sweet and appealing. |
Some Changes - April 2022
Thanks to my friends and followers for your patience, and for your encouragement to start blogging again. Archives
April 2022
Categories
All
|
 RSS Feed
