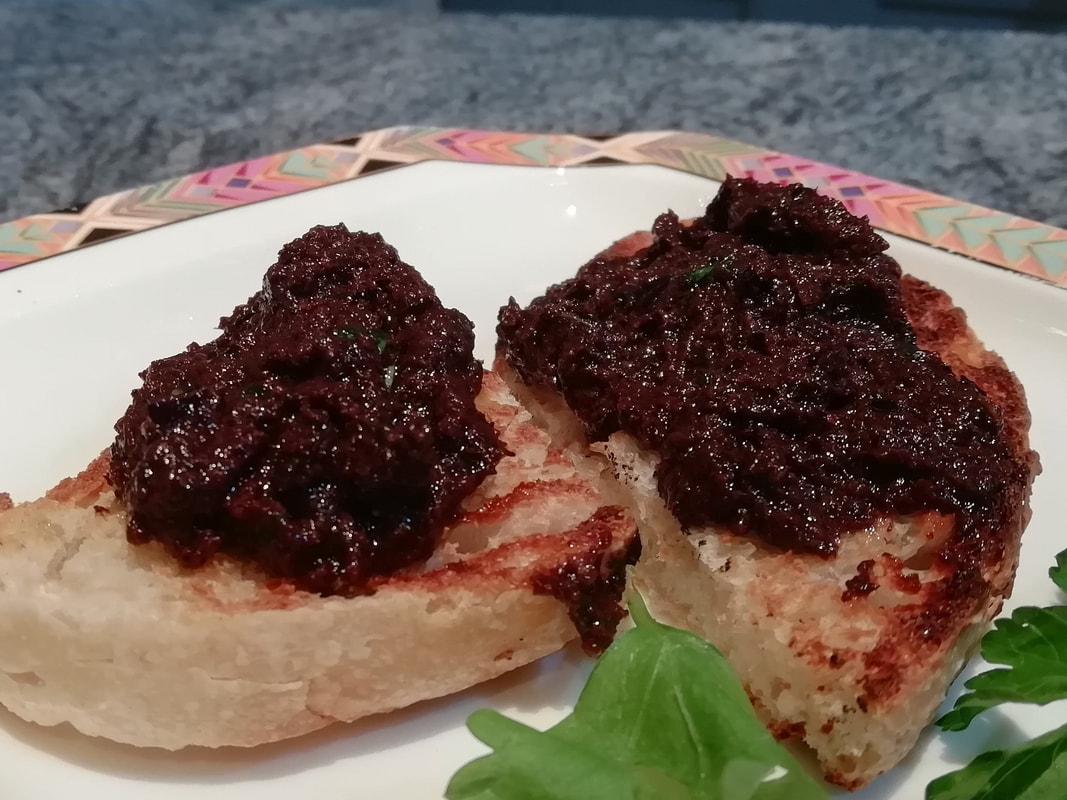
 Dark salty tapenade on sourdough toast Tapenade – dark as Christmas Night (vegan version)
Salty, deep, dark, garlicky, oily, wicked – tapenade tastes like it looks like it sounds. You can buy it ready made in jars, of course you can. But if you make it yourself, firstly it tastes fresh and spicy and wakeful, and secondly, it’s far more cost effective. I quite often get asked for the recipe, which shows that home-made really tastes different from bought. All you need is a stick blender – the bowl of a main mixer is just too big for this and the blades don’t get right into the sides of the paste. It depends how smooth you want it - it’s a personal thing. I like it smooth enough to spoon onto a small cracker or broken shard of toast, and have it stay there by its own willpower, so it needs to be oily and textured enough to stay in a blob. But I still like the slightly rough woolly-blanket-texture of the olives, not a soupy puree. Maybe I’m hard to please, but the point here is don’t over-liquidise. Stop once the mix has turned into a puree, taste, test and liquidise again if you want to. This is perfect party food – adult, sophisticated and tasting very much of the night. Serve it on little crackers slicked with cream cheese, on that French toast you get in packets (which gives you a surprise sweetish tang too, for another adult kick) or on pieces of broken sourdough for a careless, California vibe. Obviously in these post-Covid days, we don’t offer this as a dip, except in individual ramekins with each-to-his-own plates of dippy things. If you make larger quantities, this makes a superb gift, put into little jars to give to people at Christmas; maybe along with a little bag of sweet treats if you want to be really impressive. Serves 6 as a starter along with other nibbles and snacks. Timings – 10 minutes.
Put all the ingredients in a bowl and blend with a stick blender. Test the texture and either add a tiny bit more olive oil and blend a bit more or leave as it is. It keeps very well stored in a jar in the fridge, so you can make this at the start of Christmas and bring it out when the occasion demands.
0 Comments
German Christmas Biscuits There are hundreds and hundreds of types of German Christmas biscuits. Anyone who fancies themselves as a cook has their own recipe and makes tins full of little goodies throughout Advent. Chocolate kisses, gingernut snaps, vanilla crescents, macaroons of all types, peanut cups, everything you can imagine. You can’t go for a cup of coffee at a friend’s house without having to try at least four types, and that’s before you go down to the Christmas market for a mug of gluhwein and a sausage in a roll, or a sweet dumpling with custard all over it or some squishy little noodles fried up with onion and sauerkraut. The Germans take Christmas seriously, and it can seem mainly about food. Having a German husband it is therefore inevitable that I bring out the cookie cutters and get passionate about icing at this time of year. I’m afraid I’m not as energetic as some, and I usually only make one or two types at once. This week I made a huge baking of basic cookies in different shapes and iced differently and a baking of macaroons, which I parcelled up for my Seniors Lunch Club along with a gluhwein-spiced sponge cake as a little extra. This week’s theme at the Lunch Club was Christmas Carols – about which the Germans also know a thing or two. Our favourite was “Oh Come All Ye Faithful” which the 98 year old in our group insisted on warbling out in Latin – of which she remembered at least two full verses. Don’t let anyone tell you that memory loss is inevitable! “Hark the Herald” came a close second – we are obviously a traditional group. We then had a debate if “The Twelve Days of Christmas” actually qualifies as a carol and decided that in contrast to “Frosty the Snowman”, it probably does. Here are my two types of baking, which fit well together as they use the yolks and the whites of the eggs in the two recipes. Jammy Little Iced Biscuits Makes about 60 little biscuits, depending on your cutters etc – I found it made 4 baking sheet-fulls. Timing – about an hour preparation, 10 minutes baking. Time to cool down and then however long it takes you to ice them, depending how complicated you want to make your life.
Put the flour and butter in the mixer with the pastry paddle and combine to a texture like soft breadcrumbs, or rub the butter into the flour with your fingertips. Mix in the icing sugar and then the egg yolk. You might need a little bit of water in addition to make the dough come together. Knead it for only a few seconds just to smooth out the texture, then wrap up the ball in cling film or beeswax wrap and put in the fridge for half an hour. Pre heat the oven to 180°C. Roll out about ¼ of the mixture on floured surface until about 2-3mm thick. Use your Christmas Cookie cutters to cut shapes – I did a mixture of stars, trees and round shapes with the centres cut out. Each biscuit will have a top and a lower part, so if you are doing cut outs, of course you have to do a whole round for the bottom part and the cut out part for the top biscuit. Place the biscuit shapes on greaseproof paper on baking trays and put into the oven. Keep an eye on them and change over the upper and lower trays as needed. You hardly want them browned at all, and they will go from blond to burned in a very short time, so really watch them – they take about 8-10 minutes but that can vary according to position in the oven. As one tray comes out, put the next one in. Slide the paper off the trays onto a cooling rack and the biscuits will come off easily, hardening up as they cool. Leave them all to cool fully. While you are waiting for these biscuits to cool, make the macaroons – see below. Once the little biscuit shapes are cool, you can sandwich them up and ice them. I used heated up redcurrant jelly for the sandwich jam – you just need a little drip of liquid jelly on the lower biscuit to stick the top one on. Let the jelly set before icing. If making cut-out biscuits, get the top and the bottom stuck together with just a little jelly and then drip some more warm jelly into the cut-out shape to get that lovely glossy deep colour. I iced using a straightforward water ice with food colouring – just add drips of water to icing sugar and mix to form a stiff paste. Make a small batch at a time and use a different colour for each batch, to given a nice variety for the biscuits. You can use a small brush to paste the icing onto the top surface of the biscuit to give a nice finish. Add sprinkles, edible glitter, whatever you like as you finish each batch of three or four, any longer and the decoration won’t stick. Leave to set and keep in a sealed tin. The biscuits are not very crisp, because of the jam, but they do keep about a week. You can change up the flavouring of these, adding grated lemon zest, or some Christmas cinnamon spice to the dough if you want. Little Macaroons
In the bowl of your mixer, whip the egg whites until stiff. Add half the sugar and continue to beat. Add the other half of the sugar. Mix in the ground almonds. That’s it. Put the mixture into a piping bag with a star nozzle and pipe squidges of macaroon onto greaseproof paper on a baking tray. They don’t rise, so you can space them closely. I like smaller rather than huge ones, but choose for yourself. Put them in the oven for about 30 minutes, check to see how cooked through they are underneath and give them a bit longer if needed to crisp right through. You can even turn them over to let the undersides get crisp. Cool on a wire rack and keep in an airtight tin. They keep about a week. 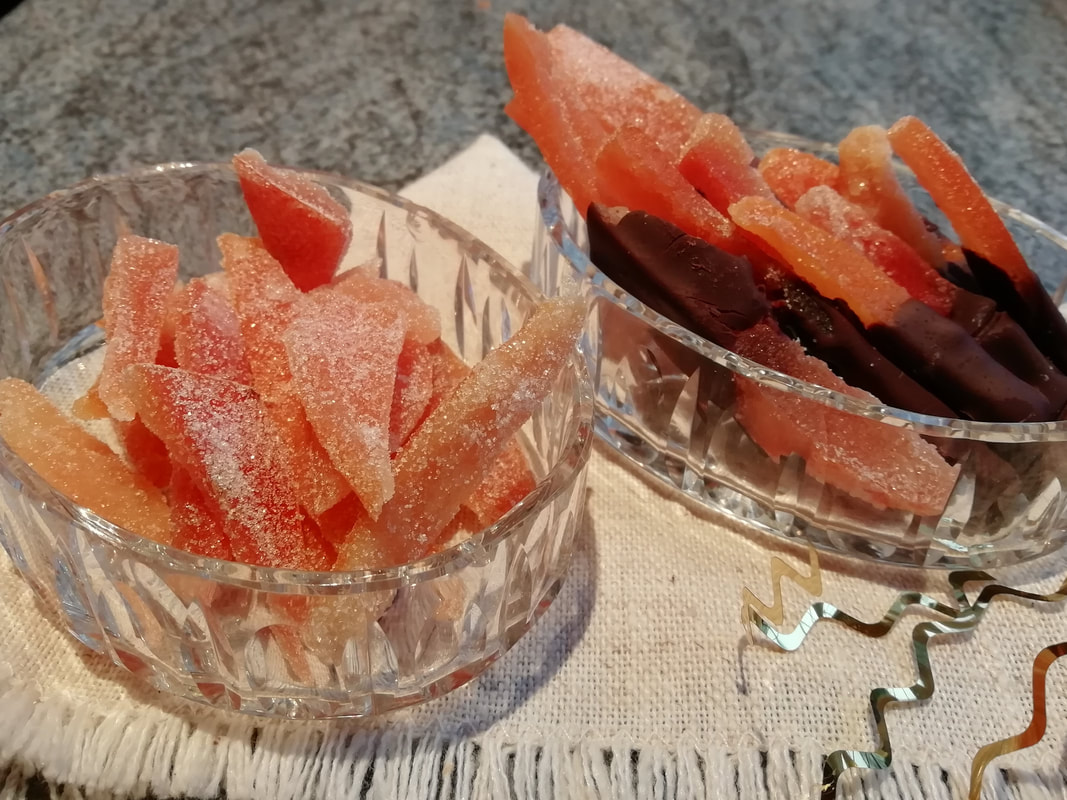 Tangy candied citrus peels, sweet and bitter. The perfect home-made Christmas gift. Confit Citrus peel – enrobed in Chocolate or Sugar-dredged.
Utterly gorgeous, addictive, un-put-downable. I used to live in London and would sometimes go to Harrods just to buy a few strands of candied orange peel in dark chocolate. I’d come out with a tiny bag that had cost £5 and wonder how it got to be so expensive, then I’d be back again in a couple of weeks for more. Now I know why it’s expensive, it’s only peel that normally would be thrown away, but oh, the faff of making it. It really is a labour of love and you have to be a fan of marmalade to truly appreciate the bitter citrus tangy-sweetness. But for those who are such fans, there is hardly anything nicer. It makes wonderful and very impressive presents, but it doesn’t keep extremely well, so you have to make a batch each week before Christmas if you are making bags for different groups of friends. Beware, once you’ve made some one year as gifts, people will hint next year to try to ask for more! I had planned to publish this recipe next week, but on special request of my brother and from my wonderful friend next door (to whom I gave a bag this week), here it is now, in time for you to make your own batches of loveliness. I can’t give exact quantities, as it depends on your consumption of citrus fruits and the thickness of the peels for which I cannot legislate. For a week, save your citrus peels – oranges, grapefruits, tangerines, satsumas. I haven’t tried it with lemons but I don’t see why you couldn’t. Try to get the peels off in sections and put them in a plastic bag in the fridge to keep their juiciness until you have enough. I’d do a batch of about 12 fruit, about half grapefruit skins and half a mix of the orange ones. Make your syrup with equal weights water and sugar – I used 400g sugar to 400ml water for a 12-fruit peel collection. Put the water and sugar in a pan with a piece of cinnamon stick or cassia bark and 4 cloves – count them in, as you’ll want to count them out again later. Heat up, stir, boil for about 10 minutes to thicken the syrup and then leave to cool with the aromatics in. When cool, take out the cinnamon, cassia and cloves. While the syrup is boiling and cooling, prepare your peels. Taking a small serrated knife, cut pith away from the very thick pithy pieces. Just lay the peel down on a cutting board and run the knife through the pith. No need to be too aggressive, and you might not need to cut any pith from the tangerine skins, for instance, but you probably need to take quite a bit off the grapefruit peels. Cut the peel into strips - ideal is about 3cm long by 1cm wide but you have to go with the shape of the peel you have got off the real fruit, it’s never perfect and you can use the tiny pieces for candy-sugaring rather than chocolate coating. Put all the peels in a pan with cold water and bring to the boil. Boil for 1 minute then drain and then do it again, twice more. This is to fully clean the peel (citrus fruits are sprayed with all sorts of vile chemicals) and to remove some of the bitterness. By this time your syrup is probably ready. Dump the peels into the syrup and boil for about an hour, until the peel is translucent and slippery. Leave to cool in the syrup and then fish the pieces of peel out and lay them on a rack over a tray. I use my fingers for this, as the pieces are quite fiddly and they fall through the bars of the rack and make you swear. There will be some syrup left over, and it is now fully infused with orange flavour. Keep it in a jar in the fridge and use it for fruit salad, for drizzling over baked breads such as Chelsea Buns, or for making more candied peels. Leave the rack out in the kitchen at least overnight for the pieces to dry out a bit and harden a bit. I can’t give exact timings for this as it depends on the thickness of the peel and the temperature and humidity of the kitchen. I have also left the rack in a cool oven for an hour. But if you leave them too long you will have to put them back in the syrup again to re-plump, so keep an eye on them. When some of the syrup has dripped off them and the pieces look shiny and sticky but not runny anymore, probably next day, go to the next stage. If you just want sugared candied peel, put caster sugar on a plate and tumble your pieces of peel to cover. The sugar will stick. I like to cut the peels up into diamonds or pieces about 1cm square. Put in a box or into transparent gift bags and eat within a few days. For the chocolate dipped ones, take the best shaped pieces. Melt good chocolate (Bournville or Dairy Milk or something of that quality - I use organic dark chocolate buttons from Artisan Nutrition in Didsbury) over hot water and just dip one end of each peel into the chocolate, and use a spoon to even out the coating. Leave on a rack to set – about an hour. You can then dredge the non-chocolate ends in caster sugar to make them less sticky to handle. Put into a box or gift bags and eat within a few days. A gift bag with some pieces of each, sugar-dredged and chocolate-dipped, looks wonderful and is a superb Christmas gift for a special and deserving friend. They have to be only your best friends as even a small bag represents quite a lot of your time and effort. Enjoy, and Merry Christmas-Present-Making! |
Some Changes - April 2022
Thanks to my friends and followers for your patience, and for your encouragement to start blogging again. Archives
April 2022
Categories
All
|


 RSS Feed
