|
Oktoberfest Gingerbread Hearts
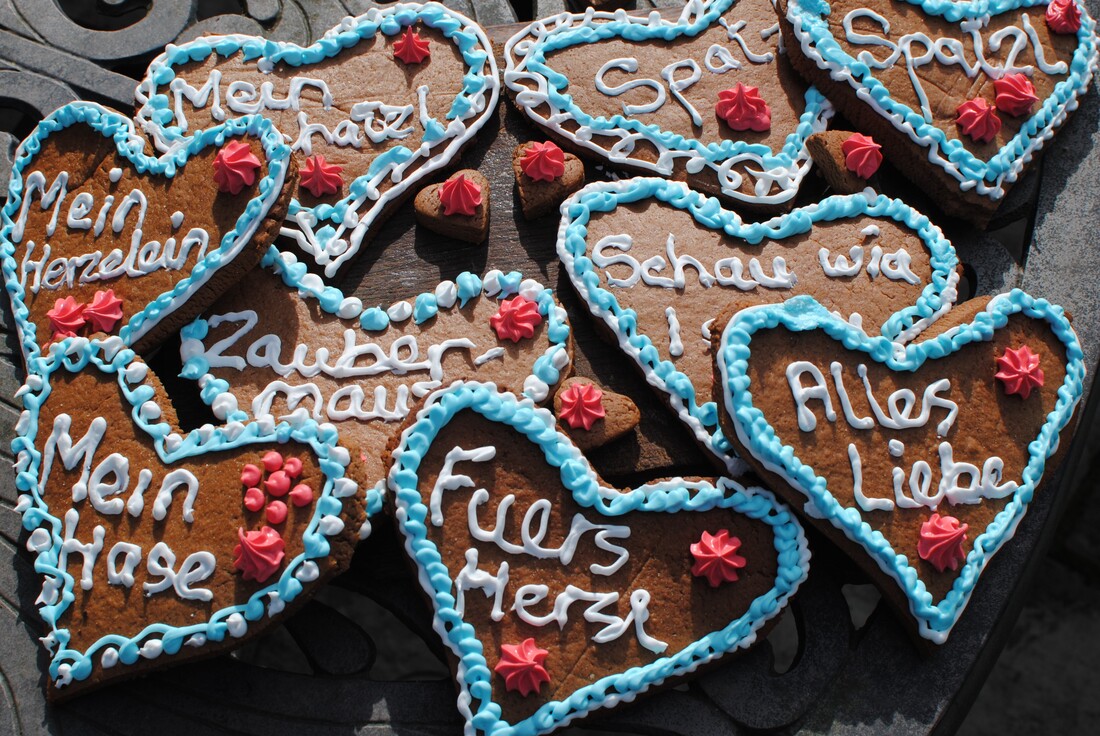
Yes, it’s only September, but the Oktoberfest would normally be starting soon in Munich. It’s the world’s biggest annual fair, with over 6 million visitors normally. As well as beer, which is the central theme of the fair, visitors can indulge in local food, fabulous rides, sports competitions and goggle at the amazing traditional costumes being paraded. This year it’s been cancelled for the second time, so people are looking forward to next year and maybe having their own Oktoberfests in their gardens. We had our Oktoberfest at the Seniors Lunch Club this week and I made these traditional iced gingerbread hearts. We had fun translating the silly endearments and thinking what we’d put on an English version. (cuddly bunny? How’aeer pet?) We ate roasted sausages and German potato salad and tried some German beer and a revolting mixture of cola and orangeade much loved by Germans, called “spezi”. Some regional specialities deserve to be more widely known – such as the potato salad - and some deserve to languish in obscurity, such as spezi, but it’s quite fun to try once! This is a true “construction grade” gingerbread and not really meant to be eaten by those with less than perfect teeth and the ability to crunch. It’s the same recipe I will use for the gingerbread house near to Christmas. The hearts decorate many stalls at the real Oktoberfest, and I’ve never seen one being eaten. They’d keep well at least until Christmas, so long as you don’t get the icing damp. You need to make your own template for the hearts - or whatever shape you are making. I used a cardboard shape cut into a heart shape about 15cm across, about the size of my hand. You need it large in order to ice words onto it! I also made some Bavarian buns so we could actually eat something but everyone got one of these hearts to take home. You can ice whatever you like onto the gingerbread, so you could put names on instead of funny sayings if you were having a party. Makes 24 hearts Timings: 30 minutes preparation, 4 hours resting, then 1 hour to roll and cook, 1 hour to decorate For the hearts:
For the royal icing: 3 egg whites, 600g icing sugar, 1 teaspoon liquid glucose, 1 teaspoon lemon juice, food colouring. Put the butter, honey, sugar, cocoa powder and spices into a small pan and melt over a low heat. Stir well to dissolve the sugar and blend in the spices. Allow to cool a bit. Sieve the flour and baking powder together. Break in the eggs and pour in the cooled mixture. Mix well with a wooden spoon, turn out and knead a few times with your hands to ensure a smooth dough. You aren’t making bread, so don’t stretch and knead the dough but you do want a smooth mixture. Place in a bowl, cover it and leave in the kitchen for at least 4 hours and up to overnight. When ready to cook, pre heat your oven to 180°C and line some flat baking sheets with parchment. Take about 1/3 of the dough and roll it on a sheet of baking paper with another sheet on top – this means you can get it thinner and more even than just rolling it on the worksurface. You want a layer a bit less than 1/2cm thick, and as even as you can get it. Use your template and cut round it with a sharp knife. The heart shape will come out smoothly; place each one onto your prepared baking sheets. Roll up the left over bits and roll them out again. Note, if you want to make a hole to pass a ribbon through, do it at this stage. The hearts are traditionally hung up on ribbons before sale and then hang round your neck at the fair. You can fit the shapes quite close to each other as they hardly spread on the baking sheets. Bake for 12-15 minutes – you might want to change the position of the trays in the oven. I had to cook 2 batches of 3 trays to cook all 24 hearts. They should not be obviously browned when cooked. Take each tray out of the oven and place the hearts on a wire rack to cool and firm up. Keep in an airtight container until you want to ice them. For the royal icing: whisk the egg whites until soft peaks form, then add in the icing sugar with the whisk running. It looks a lot but keep going. Add in the glucose and the lemon juice and beat again until very firm peaks form. Divide the icing into three bowls (or more if you want to use more colours) and cover two of them with cling film – you don’t want the surface to dry out and start to set or it will form hard lumps in the icing bag which will make your life impossible. Colour your bowls of icing as you like. Scoop each colour of icing into a bag in turn and use them to ice the biscuits. I used white for the writing then white, blue and pink for decoration, but knock your socks off and use whatever! If baking for a bonfire party (as I well might) I could use orange, purple and green icing to draw rockets and sparklers and make up some rude firework-based mottoes to pipe on. Leave to set for about 3 hours before placing carefully in an airtight container. Don't store them in the fridge as that will soften the icing.
0 Comments
Leave a Reply. |
Some Changes - April 2022
Thanks to my friends and followers for your patience, and for your encouragement to start blogging again. Archives
April 2022
Categories
All
|

 RSS Feed
