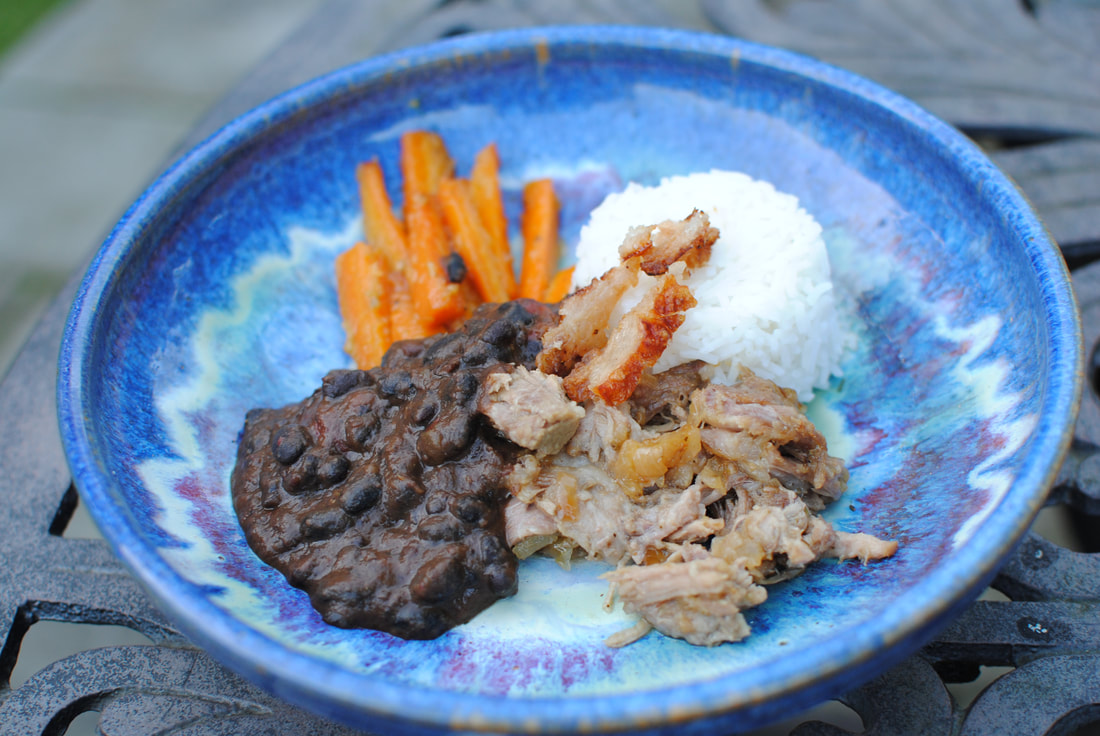
 Lechon Asado - Cuban Style Slow Roasted Pork with Citrus Flavours
In Cuba and in much of South America, the Caribbean Jerk flavours and heat shade away to more subtle and softer spicing, often mixed with a tang of citrus to perk up fatty meat. Slow cooking is a great way to get the best value out of a cheaper cut and is also highly convenient for the chef. The dish can be made ahead and warmed up to feed your multitude on a special occasion. You would find Cubans eating this at Christmas or New Year as part of their festive feasting, along with black beans and yucca cooked in mojo sauce. Serves 8 Timings: overnight marinade, then 4 ½ hours slow cooking
If the pork is tied up, snip the strings and unroll the meat. If the rind and skin are on the meat, slice it off, but leaving a good layer of fat. Blend the ingredients for the mojo marinade until you get a creamy light sauce. Reserve about 1/3 of this and use the other 2/3 to rub into the meat. Marinate the meat in the fridge overnight, turning occasionally. Pre heat the oven to 160°C. Place the meat in a roasting tin and cover well with foil. Cook the meat for about 2 hours at 160°C and then turn up the heat to 180°C and roast for a further 2 hours. Every now and then pour off some of the dripping from the meat, baste, and re-cover the pork. About an hour from the end of cooking, use some of the fat from the meat drippings to start frying the sliced onions. Fry until softened and transparent but don’t let them brown or catch, you need them quite softly cooked. When cooked, let them cool a little and then blend them up with the reserved mojo. After about 4 hours cooking, remove the meat from the oven. Pour off any excess cooking liquid but leave a few spoonfuls. Shred the meat with two forks, tearing it apart and tearing it off the bones. Take out the bones. You will be left with a pile of lovely tender cooked aromatic pork meat. Now mix the mojo and onion sauce through the meat, turn with another spoonful of pan drippings and put back in the oven for the final half hour at 200°C. If you leave the meat uncovered, you will get some crispy bits around the edge and the sauce will cook down, or you can leave it covered for a juicier result. Mix again before serving and eat with plain rice, black beans and maybe some carrots cooked in citrus glaze.
0 Comments
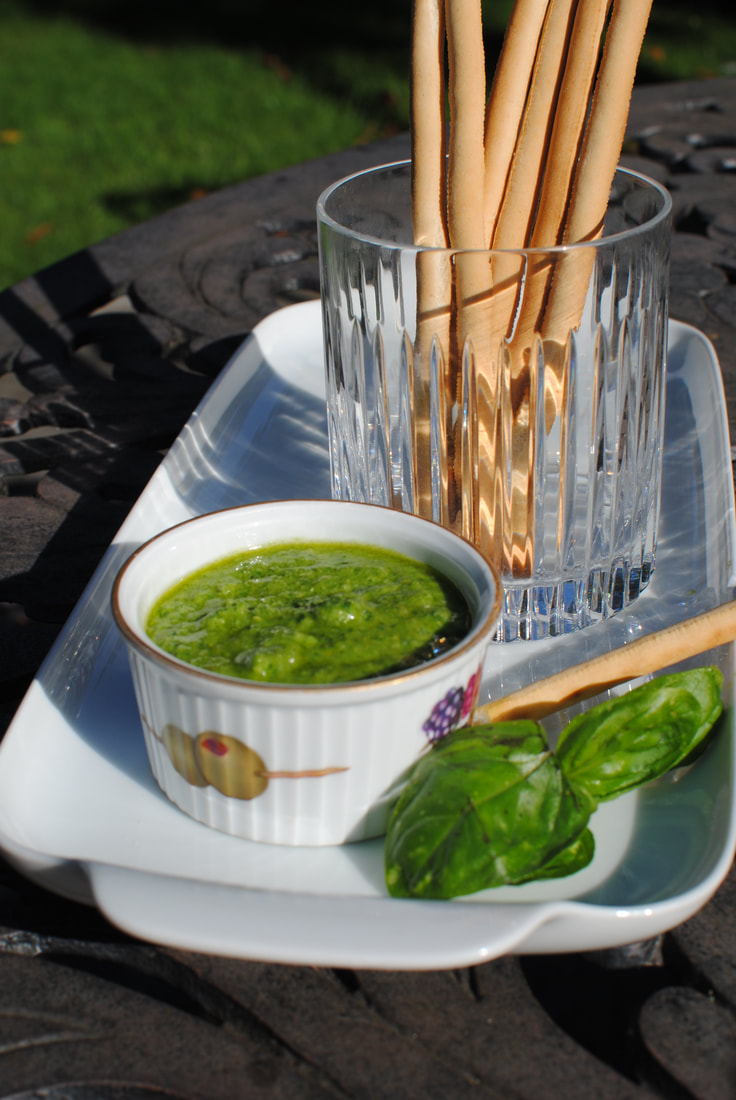 Green and gorgeous! Fresh basil pesto. Fresh Basil Pesto – Pesto Genoese (vegetarian and vegan options)
Fresh basil: aniseedy, aromatic, tempting and prolific. If you can find the right spot for it, in a warm corner of the garden away from slugs, it grows perfectly in a pot. All you have to do is buy one of those supermarket pots of forced basil, for which I always feel very sorry, and take each little plantlet out, carefully separating them each from their too-close mates, and plant them in your pot in rich compost. Basil likes sun, warmth, lots of food and water, and it will reward you with the most amazing vibrant harvest. Keep taking the tops off the plants to avoid them going to seed and you will get beautiful big juicy leaves all the way into September. Even if you don’t grow it yourself, you can often get big bags of leafy basil from grocers which are very good value. Home made pesto is by far and away better and different from the shop-supplied stuff. Bought pesto is perfectly good but try making your own and you won’t look back. You can adjust the garlic and lemon to your exact taste too, but there’s something about the freshness of the basil coming through. It’s quick to make and keeps in the fridge for weeks so you can keep a fresh pot going from July onwards and have enough to give away too. Vegetarian parmesan is available which seems to taste fine, so that’s a good alternative if you prefer to avoid parmesan. For a vegan version you can leave out the cheese altogether and add a teaspoon of nutritional yeast for the umami feel. Pesto is so versatile; it deserves a superlative. Here are just a few uses for it
Pine nuts are not cheap but they are worth it. You don’t need a lot, and if you buy a pack you can always use up the rest on a salad for lunch, they are wonderful lightly fried and salted. Makes 2 small jars or one marmite jar, enough for about 8 portions of pasta or to marinade 8 chicken breasts Timings: 20 minutes
Put everything together in a large straight container and process with a stick blender until smooth and creamy. Add a little more salt and lemon juice to taste, and a grind of black pepper if you like. Test the texture, the end of season basil has more structure than the early leaves so you might need a bit more olive oil and lemon juice in your last batches of the year. Spoon into your clean small jars and then dribble a layer of olive oil on top, which helps keep it fresh. Keeps in the fridge for at least 2 weeks, if you replace the olive oil when you take a spoonful out.  Crisp gingerbread hearts, iced with saucy sayings - you don't have to write in German! Oktoberfest Gingerbread Hearts
Yes, it’s only September, but the Oktoberfest would normally be starting soon in Munich. It’s the world’s biggest annual fair, with over 6 million visitors normally. As well as beer, which is the central theme of the fair, visitors can indulge in local food, fabulous rides, sports competitions and goggle at the amazing traditional costumes being paraded. This year it’s been cancelled for the second time, so people are looking forward to next year and maybe having their own Oktoberfests in their gardens. We had our Oktoberfest at the Seniors Lunch Club this week and I made these traditional iced gingerbread hearts. We had fun translating the silly endearments and thinking what we’d put on an English version. (cuddly bunny? How’aeer pet?) We ate roasted sausages and German potato salad and tried some German beer and a revolting mixture of cola and orangeade much loved by Germans, called “spezi”. Some regional specialities deserve to be more widely known – such as the potato salad - and some deserve to languish in obscurity, such as spezi, but it’s quite fun to try once! This is a true “construction grade” gingerbread and not really meant to be eaten by those with less than perfect teeth and the ability to crunch. It’s the same recipe I will use for the gingerbread house near to Christmas. The hearts decorate many stalls at the real Oktoberfest, and I’ve never seen one being eaten. They’d keep well at least until Christmas, so long as you don’t get the icing damp. You need to make your own template for the hearts - or whatever shape you are making. I used a cardboard shape cut into a heart shape about 15cm across, about the size of my hand. You need it large in order to ice words onto it! I also made some Bavarian buns so we could actually eat something but everyone got one of these hearts to take home. You can ice whatever you like onto the gingerbread, so you could put names on instead of funny sayings if you were having a party. Makes 24 hearts Timings: 30 minutes preparation, 4 hours resting, then 1 hour to roll and cook, 1 hour to decorate For the hearts:
For the royal icing: 3 egg whites, 600g icing sugar, 1 teaspoon liquid glucose, 1 teaspoon lemon juice, food colouring. Put the butter, honey, sugar, cocoa powder and spices into a small pan and melt over a low heat. Stir well to dissolve the sugar and blend in the spices. Allow to cool a bit. Sieve the flour and baking powder together. Break in the eggs and pour in the cooled mixture. Mix well with a wooden spoon, turn out and knead a few times with your hands to ensure a smooth dough. You aren’t making bread, so don’t stretch and knead the dough but you do want a smooth mixture. Place in a bowl, cover it and leave in the kitchen for at least 4 hours and up to overnight. When ready to cook, pre heat your oven to 180°C and line some flat baking sheets with parchment. Take about 1/3 of the dough and roll it on a sheet of baking paper with another sheet on top – this means you can get it thinner and more even than just rolling it on the worksurface. You want a layer a bit less than 1/2cm thick, and as even as you can get it. Use your template and cut round it with a sharp knife. The heart shape will come out smoothly; place each one onto your prepared baking sheets. Roll up the left over bits and roll them out again. Note, if you want to make a hole to pass a ribbon through, do it at this stage. The hearts are traditionally hung up on ribbons before sale and then hang round your neck at the fair. You can fit the shapes quite close to each other as they hardly spread on the baking sheets. Bake for 12-15 minutes – you might want to change the position of the trays in the oven. I had to cook 2 batches of 3 trays to cook all 24 hearts. They should not be obviously browned when cooked. Take each tray out of the oven and place the hearts on a wire rack to cool and firm up. Keep in an airtight container until you want to ice them. For the royal icing: whisk the egg whites until soft peaks form, then add in the icing sugar with the whisk running. It looks a lot but keep going. Add in the glucose and the lemon juice and beat again until very firm peaks form. Divide the icing into three bowls (or more if you want to use more colours) and cover two of them with cling film – you don’t want the surface to dry out and start to set or it will form hard lumps in the icing bag which will make your life impossible. Colour your bowls of icing as you like. Scoop each colour of icing into a bag in turn and use them to ice the biscuits. I used white for the writing then white, blue and pink for decoration, but knock your socks off and use whatever! If baking for a bonfire party (as I well might) I could use orange, purple and green icing to draw rockets and sparklers and make up some rude firework-based mottoes to pipe on. Leave to set for about 3 hours before placing carefully in an airtight container. Don't store them in the fridge as that will soften the icing.  Breadcrumbed strips of chicken, served with warm spicy rich Gochujang dipping sauce Chicken Scrunchers with Gochujang Dipping Sauce
A family favourite, deservedly so. Easy to do either in a frying pan or in the air fryer if you have one. I have recently acquired one and I love it for the substitution of deep frying with healthier lighter air frying. You can whip this up for an easy kids’ lunch in 20 minutes. I have written previously about my son’s fondness for Korean spicy flavours and his Mother’s Day gift of a tub of gochujang paste. We’ve used the spicy salty paste a lot and it’s still in the fridge and going strong. A little goes a long way. You can tone down the spices as suits your own family’s taste but this combination of sweet, salt and spice is a winner. I think we based the sauce recipe on Joshua Weissman’s (joshuaweissman.com) sauce for wings, but you can use it on any crunchy finger-type food. Serve with a platter of vegetable batons alongside the chicken for extra dipping and you have a great healthy meal. Serves 4 for a light meal Timings: 30 minutes
Gochujang sauce:
Vegetables for dipping: red or yellow pepper, carrots, celery etc. Whatever’s fresh and to your taste. Dip the chicken strips into the beaten egg and then into the breadcrumbs to coat and leave them on a baking tray in the fridge to set the coating. In a small saucepan, warm the oils together and briefly fry half the garlic and all the ginger until sizzling, but don’t brown them. Add in the soy, vinegar, rice wine, sugar and gochujang paste. Stir and simmer to blend. In a cup, mix the cornflour with 2 tablespoons water, then dip up a spoonful of the simmering sauce, mix into the cup, then tip the whole cupful back into the saucepan. Stir and bring to a simmer as it thickens. Let it cool a bit but keep warm. Fry the chicken pieces either in a frying pan with a small amount of oil or in the air fryer until cooked through and the coating is browned and crisp. Prepare the vegetable batons. Serve the chicken, vegetables, and the sauce together and allow everyone to dip to their heart’s content. 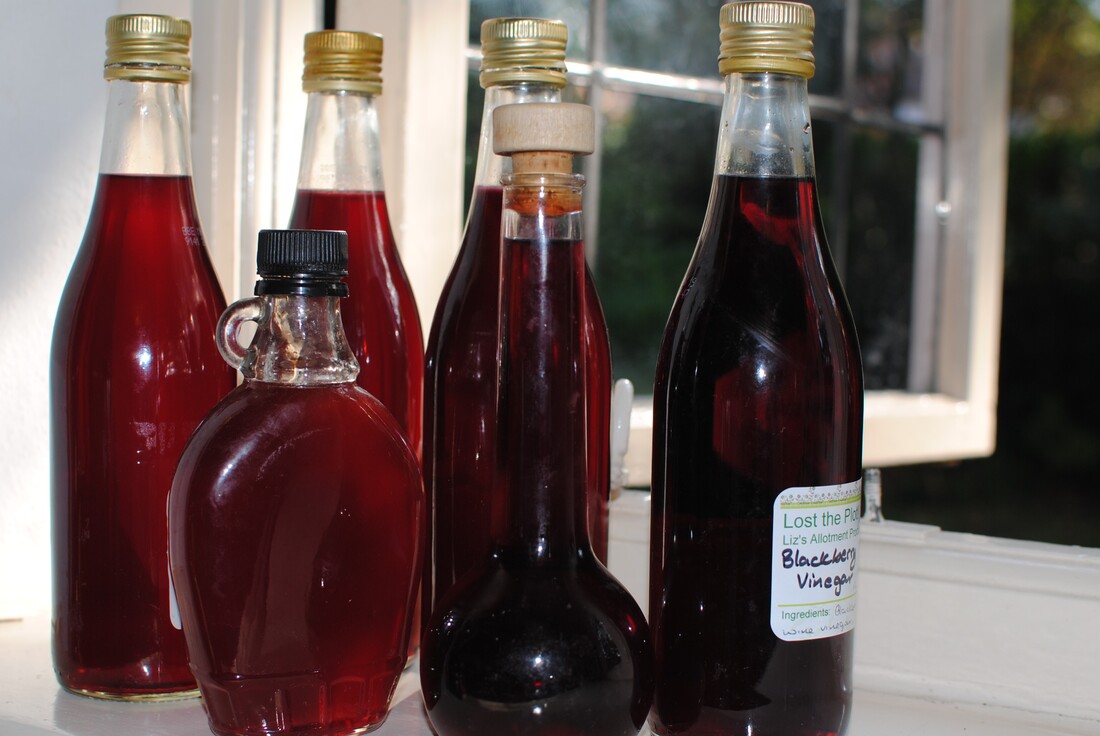 Sweet vinegary nectar - for the very best salad dressings Blackberry Vinegar
I always wonder what to do with all of nature’s bounty, and blackberries are one of the most worrying crops. They fruit so generously, although the plants are perfectly capable of sending out runners and reproducing that way, they don’t really need to make fruits and seeds. But they do, and we benefit, along with all the animals and birds that depend on the fruit and the shelter from the bushes. By the way, don’t worry about taking the fruit, you aren’t depriving the animals, as I’ve sometimes heard people comment when blackberry picking. Like any fruiting plant, the blackberry will make more ripe fruit the more that are picked. If you didn’t pick the first ones, the later berries wouldn’t ripen, so it’s not greedy to make your own harvest and then leave the later ones for nature. When picking, I have two tubs. I separate out the “breakfast quality berries” for us to eat right away and have the larger tub for “processing berries” which go into jams, pies, crumbles and make large quantities of fruit vinegar. Fruit vinegar is an incredible substance. If you haven’t tried it yet in a salad dressing, you will be amazed at the difference it makes. Like balsamic vinegar only more so. It’s sweet, tasty, fruity and irresistible. It enhances your cooking in multiple ways. Every salad dressing is the better for a splash of it; add it to sauces when you’re reducing to add that touch of sweetness and shine; add it to deep flavoured soups to give that extra lift; add it to meat gravy when stirring up the juices from the bottom of the pan; de-glaze a pan of fried mushrooms with it; and you can even drink it diluted with hot water or fizzy water for a healthy and (allegedly) cold-curing cordial. Really, what more could you ask? I think you can tell I’m a convert. You can use other berries and fruits for fruit vinegars, but not the very fleshy ones like plums, as their juice would dilute the vinegar too much and affect the keeping properties. It’s the perfect Christmas gift for cooking-interested friends. You can’t buy fruit vinegars easily in the shops and a homemade present is eagerly received. Do save up some pretty bottles for gifts, the ones that maple syrup comes in are nice, or some swing-top lemonade bottles. I have to thank Pam Corbin and her River Cottage Handbook # 2, Preserves, for the basic recipe, but it also comes from many home cooks and older fashioned collections. The basic proportions can be multiplied many times to use up your harvest. Makes about 3 x 600ml bottles Timings: picking, 3-4 days pickling and then 30 minutes to finish and bottle
Put your berries in a container with a lid. I prefer not to leave food in touch with plastic for long periods, so a large saucepan is ideal if you know you don’t need to use it for some days. Cover the berries with the vinegar and mash them down a bit with a wooden spoon to release the juices. Cover and leave for 3-4 days. If your cover is not tight enough, the fruity vinegar will attract all the fruit flies in the neighbourhood so do make sure it’s well covered. After the 3-4 days, drain the liquid from the berries by placing in a jelly bag overnight. If you don’t have a jelly bag, you can make one from an old teatowel securely tied up into a bag shape with string and then suspend it from a kitchen cabinet handle or some other method of letting the juice drain out into a large bowl. Discard the fruit. Measure your liquid. Place in a large pan and add 450g of sugar to each 600ml of liquid. Bring to a boil, simmer briefly and skim off any scum if it rises. Cool a little and bottle into clean decorative bottles. It keeps for over a year in a cool dark place but you can give most of it away at Christmas with a glow of pride.  The delicious taste of Autumn! Blackberry and Apple Pies
Warm weather, harvest of juicy blackberries and windfall apples. What better than to make pies for the Seniors Lunch Club? Crisp golden pastry, a slightly tart but sweet filling, and easy to pack up and portion out. Great for lunch boxes too or wrapping up in a picnic to make the most of the Autumn sunshine. Our theme this week in the Seniors Lunch Club was “September Memories”. We remembered Autumn pastimes – shuffling through fallen leaves, playing conkers, collecting for Harvest Festival. We loved the smell of bonfires and the bright colours of the Autumn leaves and flowers. The time for going back to school was remembered with surprising fondness – everyone said they’d always enjoyed the start of the new term. Seeing friends again after the summer break, writing your name in a clean new exercise book, meeting your new teachers. And looking forward to the events of the term: Hallowe’en, Bonfire Night, planting hyacinths for the school bulbs competition, and Christmas at the end of it. Makes 12 pies Timings: 1 hour For the pastry:
For the filling:
Make the filling in advance: peel and core the cooking apples. Slice into small pieces and put in a pan with a tiny amount of water, the clean blackberries and the sugar. Bring to a simmer and cook for about 5 minutes until the apples are soft but not disintegrated. Taste and add a little more sugar or a squeeze of lemon juice if needed – you want this slightly tart as the pastry is sweet. Leave to cool. You can eat this just as a compote, lovely with plain yoghurt at breakfast. Pre-heat your oven to 200°C and grease a 12-cup pie tin Mix the flour and butter together in your mixer with the pastry paddle or rub the butter into the flour with your fingertips until it is like fine crumbs. Add the ground almonds and icing sugar and mix lightly. Add one egg and keep mixing slowly. Add cold water a teaspoon at a time until the pastry binds together – don’t make it too dry or it will crack when you roll it out. Knead very quickly to bind the pastry together and then you can wrap it up and keep it in the fridge. You don’t have to chill this, as the pies are too small to shrink much. Beat the second egg in a bowl. Roll out the pastry on a floured surface to 2-3mm thick and cut bottoms and tops – this makes just enough for the 12 pies. Put the bottom parts into the pie tins and brush round with beaten egg. Spoon the blackberry/apple mixture into the pies – a goodly mound of filling is required as it doesn’t rise; put on the tops and press round with a fork to seal. Brush the tops with beaten egg and sprinkle a little bit of demerara sugar on top to give a crunch. Using a knife cut a little slit in each pie top for steam to escape. Bake in the oven for 12-15 minutes until crisp and golden. Cool on a wire rack and keep in an airtight tin for 3-4 days. Serve with a dusting of icing sugar and a swirl of whipped cream. Enjoy the taste of Autumn.  Ready Made Puff Pastry rounds baked with cheddar cheese and cayenne pepper - the definition of more-ish! Puff Pastry Cheesy Bites
So extremely more-ish you probably have to make two batches. And if you’re serving them as a starter then don’t blame your guests for not having much appetite for the main course. You can use puff pastry to wrap up all sorts of things: anchovies with parmesan, parma ham, plain ham with mustard, whatever. I find that this combination of salty tangy cheese and the spice hit of cayenne pepper is the best but do try whatever suits your own tastes. The cheese melts out in a delicious crispy way and the cayenne just perks your appetite for another bite. They’d also be good for a quick school holiday lunch, served with a green salad and a chopped tomato salsa. Makes 26 rounds Timings: 40 minutes
Pre heat your oven to 190°C fan or 200°C circulation. Have ready three flat oven trays lined with greaseproof paper. Unroll the pastry on its own paper wrapping. Sprinkle the cheese evenly all over the surface and sprinkle the cayenne pepper on top. Roll the pastry up again and cut it into rounds about ½ cm thick. Place the slices on the trays, leaving enough space to expand – you can get about 8 on a tray. Place in the oven for about 20 minutes until the cheese has melted and the pastry is puffed and golden. Slide them onto a wire rack to cool a bit and sprinkle with sea salt crystals. Eat them while still warm.  Grilled marinated chicken strips with wide pasta ribbons and a home made pesto sauce. Chicken Pesto Papardelle
Noodles, what’s not to love? Top them with grilled chicken marinated in home made pesto, and a pesto-butter sauce. How could life get better? Or easier? I love pappardelle, the wide ribbon pasta; it goes very well with any rich and well flavoured sauce like this or a deep warm ragu. I can’t forget the most wonderful wild boar ragu with pappardelle we had on a freezing May evening in a hillside town in Tuscany many years ago. The ribbons of pappardelle just held the strong meaty sauce as the mouthfuls slithered down our throats. I’ll have to research a real Italian ragu for the blog, but in the meantime, try this summer-time delight. I tried both grilling and griddling the chicken strips, but the oily marinade made them stick horribly to the griddle and frying gave a much better result as that also contributes to deepening the flavour of the sauce with all the nice juices that come off the chicken. I’ll give the recipe for home made pesto shortly, but you can also buy very good Pesto Genoese – the one made with fresh basil, which is best for matching to the chicken, rather than the kale and walnut based pestos. Serves 4 Timings: Pesto takes about 20 minutes to make, then 4 hours to marinade the chicken. Final dish takes 30 minutes to put together.
Put a pan of water on to boil for your pasta and heat up a large deep frying pan. Fry the chicken strips in a splash of oil as your pappardelle boils for its recommended time. Fry the chicken until nicely browned and cooked quite through, keep turning it to brown on all sides. It only takes a few minutes. Add the butter to the pan, allow it to melt and then add in the additional spoon of pesto. Turn the contents of the pan to mix well and add the squeeze of lemon juice and a grinding of black pepper. Drain your pasta when cooked as you like it (I prefer a touch beyond al dente) and keep a cup of the cooking water. Loosen the sauce in the frying pan with some of the pasta water and add the pasta into the pan. Mix well, scooping up all the pan juices into the noodles. Serve with some torn basil leaves and a sprinkle of grated parmesan. Dive in! 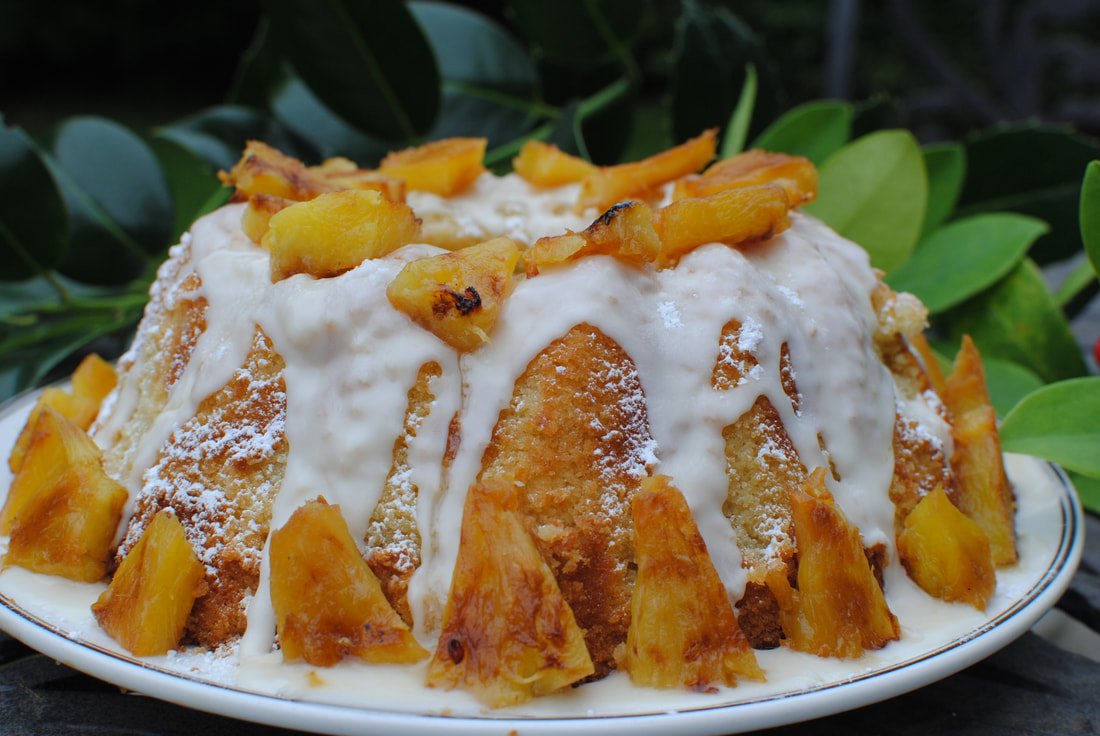 Rum infused cake, soaked with rum and banana liqueur syrup, topped with drizzly icing and charred pineapple - perfect for a party! Cake de Ron – Cuban Christmas Rum Cake
Introducing Christmas in the Caribbean – a new feature I’m working on and hope to publicise soon. I know it’s early to be thinking about such things, but how about making your heart glow with some plans to whisk away loved ones to the sunny beaches and lapping waves of your favourite island? Even if we can’t actually visit in person, you can imagine yourself on the sand, hearing the calypso rhythms and sipping a mojito when you cook up a spicy Caribbean Christmas Feast. Give yourself plenty of time to plan the menus, think about the decorations and you can be relaxed on the day and join in the fun. Christmas is special anywhere – from the snowy Tivoli Gardens in Denmark to the freezing German Christmas markets, warmed up by spiced wine and grilled baguettes with sheep’s cheese topping. But in the Caribbean, as you might expect, they go the extra mile. Every island has its own traditions, because they all have their own special background and mix of history, difficult and joyous. Some islands have parades of supernatural beings, some have reggae carol competitions; all have special food and drink just perfect for sharing and making a party go with a zing. Look out for my recipes on the theme of Caribbean Christmas, but for now, try this Cake de Ron. You do have to get yourself for some proper rum and even some banana liqueur, but you can use those in a Banana Dacquirie (recipe coming soon) as well as the cake, so nothing goes to waste. I’ve not come across a cake recipe with double cream in before, it makes the cake very rich and smooth and helps absorb the alcohol. The rum is cooked out in the oven so the taste is quite subtle; even those who are not big fans of rum won’t find it overpowering. If you wanted a stronger rum taste you could soak the cooked cake in a mixture of rum and sugar rather than the syrup, but in that case take the cake out of the tin first before you drizzle as it would loosen the structure. Makes one 23cm bundt cake, or a normal 25cm cake if you don’t have a bundt mould. Makes 10-12 slices. Timings: 90 minutes and then time to decorate
Grilled pineapple, icing sugar and water icing for decoration Pre heat your oven to 180°C and grease your cake tin. If using a bundt tin, grease especially well as they do tend to stick. Sieve the flour and baking powder. Whisk the butter and sugar together until creamy, add the lemon zest. Add in the eggs one at a time with a spoonful of flour each time. Measure the cream, rum and liqueur into a jug and add this a bit at a time into the mixture along with a spoonful of flour each time. Scrape down the sides of the bowl to make sure it’s all mixed well and beat until you get a creamy, slightly fluffy mixture. Spoon this into your cake tin and bake for 50 minutes to an hour until risen, golden on top and a skewer comes out clean. Meanwhile, make the syrup. Melt the butter in a small pan, add the sugar, rum and liqueur and stir to dissolve. It will bubble up. Cook for a few minutes but don’t let it caramelise. Cool. Griddle your pineapple slices or pieces. Brush the pieces with melted butter and place on your griddle pan to get those charred lines. If you don’t have a griddle pan just fry gently until slightly golden. You want a charred outside but still crisp and juicy inside. Remove the cake from the oven and cool on a wire rack for 10 minutes. Poke holes with a skewer, being careful not to go all the way through the bottom of the cake and drizzle the syrup over. Leave 30 minutes to soak in and turn the cake out onto a plate to cool further. When the cake is cool, make a water icing by mixing icing sugar with a couple of spoonfuls of water (or rum if you want that extra flavour) and drizzle over, letting it drip down the sides. Decorate with the pineapple slices and dust with icing sugar. Whipped cream might complete the decadence. The cake will keep in the fridge for a couple of days but is really designed to be eaten that day or the next at a big noisy party.  A mix of oat flakes, seeds, nuts and fruit, mixed with apple juice and yoghurt. Makes you feel healthy just looking at it! Bircher Muesli- a good way to start the day
Bircher Muesli wasn’t originally for breakfast. The Swiss physician, Dr. Max Bircher-Benner, invented a recipe as a healthy meal starter in 1900. He saw many of his patients suffering from diseases that he felt could be avoided if people ate a better diet. He liked the idea of uncooked grains, more fruit, some nuts and a little dairy. The muesli was actually supposed to be eaten in small portions before each meal, thus leaving less room in the stomach for meat, bread, processed foods and other less nutritious items. His original recipe included sweetened condensed milk and no fruit juice, probably due to the grocery provisions available at the time. Nowadays, the processed version is marketed as a ready-mixed slurry for breakfast combined with sweetened yoghurt. It’s served in German and Swiss hospitals as a breakfast option and it ticks most of the boxes for a healthy diet to enrich and encourage your internal bacteria. The “gut biome” does a lot of the digestion work for you and is now thought to influence mood, mental wellbeing, inflammation including allergic reactions and a whole host of factors that can make you feel good or bad. Encouraging the little blighters to do their work well seems to me a good idea. Life’s too short for a complicated breakfast, except maybe on Sundays. For the weekday morning, the most one seems capable of is scooping something onto a plate and spooning it down in a rush. Bircher Muesli is a perfect solution; you can make up a big bowl of it on Sunday evening and leave it in the fridge to be scooped out, mixed with yoghurt and whatever fruit you have on hand, and you have the healthiest breakfast imaginable on your plate in under 2 minutes. More than that, each batch is different, so you’ve always got a nice surprise for your tastebuds on a Monday morning, a good way to start the week. The bowl lasts a week in the fridge, as the acid in the apple juice preserves the ingredients. (the grated apple goes a bit brown by the last day but that's no matter) I stick to the rule of two in my Bircher Muesli, for simplicity’s sake. Two fresh fruits, two dried fruits, two sorts of seeds, two types of nut; that’s enough. You can swop around the brazil nuts and hazelnuts one week for almonds and walnuts the next, and you can use different seeds as you prefer. Do try to get live yoghurt (or make it…), to further encourage that healthy productive gut. If you can get organic oats, and even nicer, organic muesli base, so much the better. I am very lucky to have my friend Mussarrat at Artisan Nutrition just round the corner where I can buy small quantities of fresh organic grains, nuts and fruit, weighed out into my own containers, so I don’t have to store too many little packets of half consumed things, and can change around the ingredients as I like. But you can buy packets of different nuts, seeds, dried fruits etc and keep them in a large Tupperware container, ready for use. Here’s the one I made last week and is in the picture, with some fruit from my allotment, but as said, please alter the nuts, seeds and fruits to your taste and what you can buy. Makes about 5 servings – one for each weekday morning Timings: 20 minutes on Day 0, then 2 minutes each day after
For the morning: 100ml live plain yoghurt, a handful of blueberries, or a small banana, or a small mango, whatever you have around. At some times of the year you might have several types of berry around and in the spring you might be restricted to bananas – so be it. Put the grain flakes, dried fruit and seeds into a small bowl. Chop the nuts up quite finely, to taste, add to the bowl. Cut up the apple, discard the core and grate it, including the skin. Add to the bowl along with the apple juice. Stir, cover, and leave overnight in the fridge. To eat, spoon about 2 tablespoons out into a small bowl, add about the same amount of live plain yoghurt, one small portion of another fresh fruit, mix and eat. |
Some Changes - April 2022
Thanks to my friends and followers for your patience, and for your encouragement to start blogging again. Archives
April 2022
Categories
All
|
 RSS Feed
