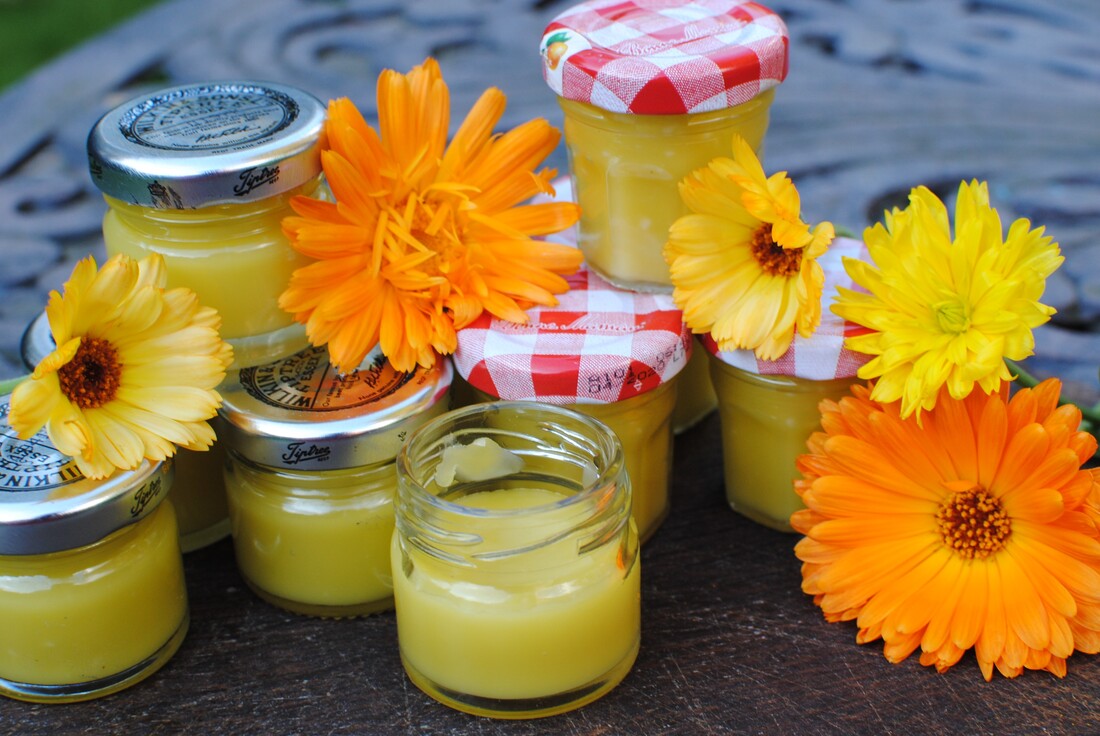
 Use flowers from your garden, olive oil and beeswax to make your own pots of soothing skin balm Calendula Hand Balm
No, not a recipe as such, for putting on the table and eating, but still a sort of recipe. Using flowers from the garden, especially ones as exuberant as marigolds/calendulas always seems like a great idea. Calendula allegedly has healing powers, especially for skin problems. I can’t claim miracle cures or anything like that, but this balm feels nice, contains only natural ingredients and keeps your hands nice and soft. I can’t give exact quantities here, weights of flowers don’t really add up. I picked yellow and orange marigold flowers over several weeks and kept stuffing them into two medium sized jars which I filled with lower quality olive oil. I left them in a warm corner of the kitchen and just added more flowers as I picked them. At first, I just picked off the petals and discarded the rest of the flower, but further research told me that the main healing chemicals are found in the flower head where the petals attach, so I then started just throwing the whole flower heads into the jar. You need to bash the flowers down with a wooden spoon to keep them under the oil or they will start to go off. You end up with a bright orange jar of flowers, under the cool amber of olive oil, so they look quite nice. You combine the oil with a solid fat to set it. You can use just beeswax granules or you can add additional fats such as shea butter or cocoa butter – I used organic cocoa butter. You can also add a drop or two of essential oil if you would like more fragrance. Once you think they’ve had long enough to infuse – I left mine about 2 weeks – then strain the mixture. I used an old teatowel in a sieve to let the golden oil run into a bowl. Discard the old petals. Measure your oil. The general rule is to add about 4-7 parts oil to 1-3 parts of beeswax/other solid fat. The quantities depend on how firm you want your balm. I used about 6 parts oil, 1 part cocoa butter and 2 parts beeswax granules. That gave me a firm but very spreadable waxy balm which is solid at room temperature even in warm weather. I might make it a bit firmer if I do it again, I would say these quantities are slightly too oily for using on your lips, for instance, but it rubs nicely into your hands. Melt the beeswax and any other fat together in bowl over hot water, not direct heat. Add the marigold oil a little at a time and keep stirring until all is absorbed. Pour the mixture into clean pots and leave the lids off until the contents have cooled down – you don’t want condensation forming on the inside of the lids and dropping onto the balm. Seal up the pots and keep in a cool dark place until use. They make perfect Christmas presents and will bring a little summer sunshine onto your winter skin. My recipe was: About 6 handfuls of calendula flowers, picked over about 2 weeks, when dry. Steeped in olive oil in glass jars for about 2 weeks. Then sieved out leaving about 200ml infused oil. I melted 7 tablespoons of beeswax granules (they are very light) with 1 tablespoon of shea butter and mixed in the oil gradually. That gave me about 12 little pots of balm. As you can see, I used the little jam pots that you get at some hotels. Sadly, I can’t resist taking, cleaning and saving them, and I’m very pleased to have found a use.
0 Comments
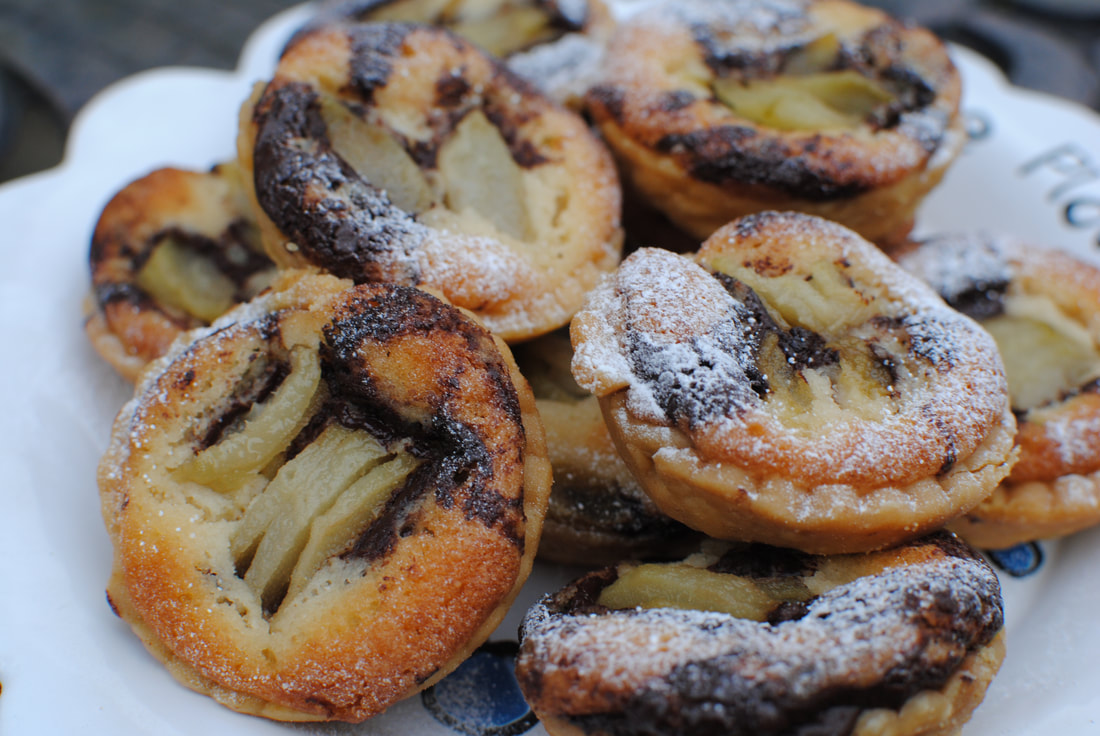 A match made in heaven, pear, frangipane and melting chocolate. Pear, Chocolate and Frangipane Tarts
Delicious buttery little morsels, very melty. The pear and almondy-frangipane is lovely enough, but with a swirl of chocolate adding that extra level of decadence – just delightful. They’re quite easy to make too, and I’ll certainly do more with home made frangipane now I’ve made it once. It’s simple to make and handles like a dream. And you can freeze it for later, so what a versatile thing to have around. There are three stages to making these, which sounds like a lot but you can make all the stages ahead of time and put them together at the end. I like a recipe you can stop and start and fit round nipping out to have your hair cut or going to the post office. I guess you could use other fruits than pears here, but I love the combination of almonds, chocolate and pears, and they are around at this time of year, so very seasonal and cost effective. If you haven’t got time or don’t want to poach pears, you could use a tin of pears, as they are tender from the processing. Makes 36 tartlets Timings: In stages, but all together, about 2 hours
For the pastry:
First stage: poach your pears. Peel them, quarter then and take out the cores; put them into some water with lemon juice added (to stop them turning brown) and simmer for about 15 minutes, then leave to cool in the pan. This can be done a day or two before you make your tartlets. Stage two: make the pastry and the frangipane and set to rest For the pastry: using either your fingertip or the pastry paddle of your mixer, rub the butter into the flour and icing sugar. Add the egg yolks and start to bring the pastry together. Add one tablespoon of cold water and continue to mix to form a smooth ball. You might not need the second spoon of water. Roll into a disc shape, wrap it up and chill for at least an hour but could be overnight. For the frangipane: Whisk the sugar and butter together until becoming creamier and fluffy. Add the ground almonds, then each egg with a couple of spoons of flour, keep whisking. Add the amaretto or other liquid and the final spoons of flour and whisk again – you will have a delicious light almondy buttery mixture. This can keep in the fridge overnight or even be frozen but should be chilled before using to cook. Stage three: make the tartlets. Pre heat the oven to 200°C. Roll out 1/3 of the pastry on a floured surface and cut rounds for the size of your tin – I used a 12-pan bun tin. Handle each round carefully into its tin and put a few baking beans in the bottom of each. Bake blind for 10-12 minutes until the pastry is cooked but still pale, then remove the baking beans and cook again to firm up the bottoms – about another 5 minutes. Remove from the oven, leave the tartlets in their tins and cool for a few minutes. Turn the oven down to 180°C. Take your pears out of the fridge and cut them finely into slices. Put your chocolate in a small bowl over hot water and melt it. Into each tartlet case, put a spoonful of frangipane and drizzle a little melted chocolate over. Stir it in with a skewer, just to swirl it into the frangipane. Add a few slices of pears to the middle of the tart. Bake the whole tray in the oven for 10-15 minutes until the filling is puffed up around the pears and starting to brown. Remove from the oven and cool on a wire rack. Eat with a little icing sugar sprinkled over or maybe a dollop of whipped cream. You could even stir some amaretto into the whipped cream to tip you over the edge into total pleasure-land.  Juicy pineapple, griddled and scorched, combined with spices for that extra flavoured mouthful Charred Pineapple and Red Pepper Salsa
This just makes any meat dish sing out loud. The fresh pineapple, crunchy pepper and tangy lime juice combine to refresh your tastebuds and enhance the meal. A spicy meat really benefits from the contrast with the juicy sweet salsa. Griddling or charring the pineapple adds a slightly smoky depth which makes all the difference. Serve as a side dish to Slow Roast Jerk Pork or to any spicy meaty dish. This relish is part of my Caribbean Christmas menu which will be on my website as a full menu from Cocktails to Cake de Ron in a couple of weeks. Serves 8 Timings: 30 minutes
Peel and core your fresh pineapple and cut it into rings. Melt the butter and brush the rings with it. Fire up your griddle pan and place the rings on the griddle for about 3 minutes a side to get those nice charred stripes and the slightly burned taste. If you don’t have a griddle pan, use a frying pan, you will still get the flavour. Let the rings cool and cut them into slivers, place in a bowl. Peel, de-seed and chop the red pepper into small dice, and peel and chop the red onion to the same size pieces and add them to the pineapple. Squash the garlic with salt, de-seed and chop the chilli and add to the bowl. Stir in the honey and the lime juice, sprinkle over a good teaspoon of salt. Stir and taste, depending on how sweet your pineapple was you might need more honey or more lime juice. Stir to combine the flavour and serve at room temperature. 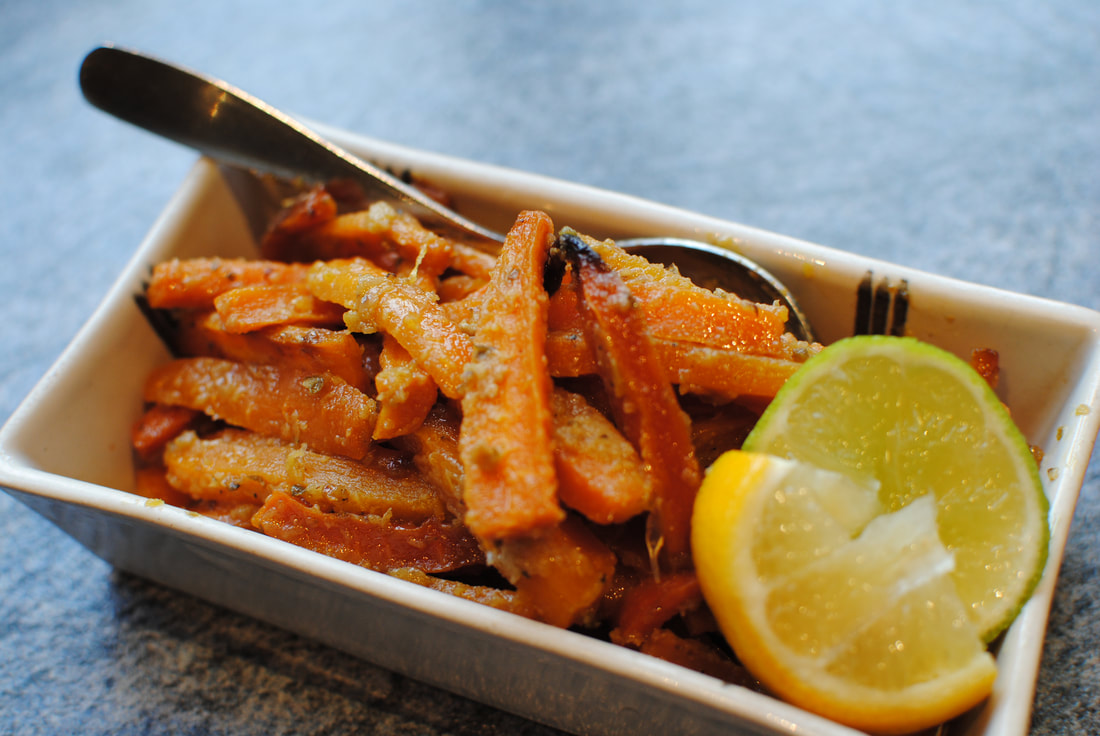 Oven roasted carrots in a citrus glaze Roasted Carrots with Citrus Mojo (vegan)
In the Caribbean, a citrus sauce, or mojo, is used on a lot of vegetables and meats. Plantain is traditional at Christmas, in a citrus mojo. When making up my Christmas in the Caribbean menu, I couldn't easily get plantain in Manchester and thought to try using carrots instead, which are of course traditional in UK at Christmas anyway. Cultural mixing, especially in food, is something I'm very much in favour of. The flavours of orange and carrot match so well. In the Caribbean you would use sour oranges, similar to Seville oranges, which are ripe at Christmas to make the mojo sauce for these carrots. If you can get Seville oranges, use those, but if you can’t, just use normal sweet oranges and add some lemon and lime juices to the mix. Roasted carrots have that lovely slightly burned edge and texture which you don’t get by boiling them, and of course the tray of carrots can go in the oven alongside whatever else you’re cooking for an easy side dish to your roast. Carrots are very tolerant things and you can peel and chop them ahead of time – even the day before you cook if you keep them in a plastic bag in the vegetable drawer of the fridge and also make the mojo ahead of time so you can throw it all together as you need. The only caution I would give is that the carrots cook down to a much smaller portion than you think, so if you have hungry big eaters in your family, add a few more carrots to your bowl! Serves 8 as a side dish Timings: 90 minutes from scratch but preparation can be done ahead
Make the mojo sauce by blending the onion, garlic, spices and juices together until you have a creamy sauce. Mix this with the carrots and spread them out on a metal baking tray. Drizzle lightly with vegetable oil. Pre heat the oven to 180°C. Roast the carrots for 30 minutes, then turn up the temperature to 200°C and roast for another 40 minutes. You need to stir them and turn them every now and then to make sure they roast evenly. Serve them as a side dish to your delicious slow roast jerk pork or to to any other roast meal. 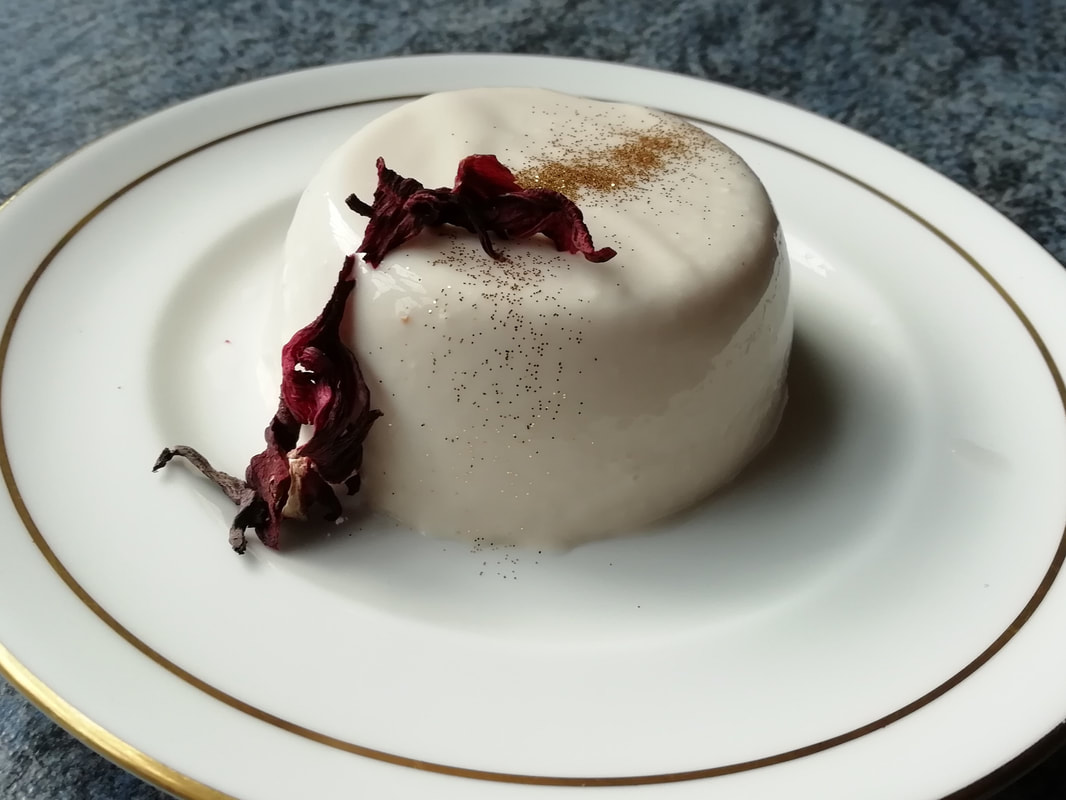 Simple pannacotta with delicate rose flavour Rose and Hibiscus Pannacotta, the taste of late summer
For those who love the summery taste of roses and the blush pink of hibiscus. Do be careful with the rosewater flavouring, less is certainly more when it comes to floral flavours. I have dressed the finished dessert with some edible gold powder and one or two extra dried hibiscus blooms but some rose petals in season would also be pretty. This is not vegetarian, due to the use of gelatin which is an animal product. I have tried with the vegetarian alternatives and have not yet come up with the right recipe, so far they have all given a much harder set than the perfect wobble. I will keep on trying and post it on the blog when I find the right mix! Or please let me know if you have some hints and tips. Serves 4 Timings: 30 minutes and 3 hours to set
Place the gelatine leaves in cold water for 5 minutes to soften. In a small pan heat the hibiscus flowers, cream, sugar, vanilla and milk to simmering, but don’t boil. Take the gelatine out of the water and slide them into the hot cream, they will dissolve as they go in. Leave the mixture to cool and then add the rosewater and the yoghurt, stirring well, even using a small whisk so it ends up smooth. Strain the mixture into a jug and pour into whatever moulds you are using. Metal moulds are easiest to un-mould but you can also use ramekins or whatever you have. To serve: if you want to unmould, dip your mould in hot water and then upturn over the plate. The pannacotta should plop satisfyingly out. Decorate the pannacotta with some gold glitter and a hibiscus flower or perhaps some fresh rose petals if you have them in your garden from the last flowering before Autumn blows them down. 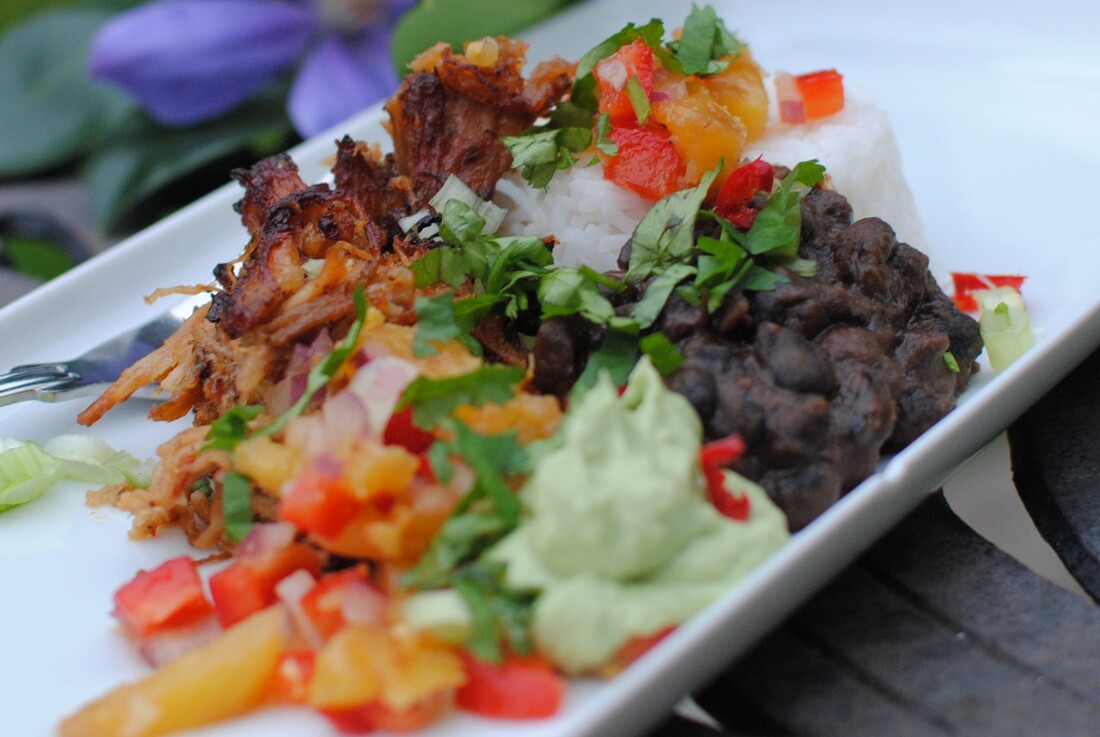 Juicy, spicy, tender pulled pork, alive with Caribbean flavours Caribbean Slow Roasted Jerk Pork
A real party centrepiece and an ideal dish for a celebration! A Caribbean breath of allspice and nutmeg rises from the roasting tin along with the hot tingle of chilli. Guests serve themselves to the tender spicy meat, enjoying the rich aroma. Spoon the meat over freshly cooked rice, add a scoop of black beans, a dollop of charred pineapple salsa and a dab of creamed avocado and you have a meal to please all the crowd. You can make the pork up to two days ahead, warm it up in the oven when you need it. It’s very tolerant of standing for an hour if covered, so there’s no last-minute dash or standing over a hot stove while your guests drink all the Mojitos. This recipe is another one from my Christmas in the Caribbean menu which will be on the website in a couple of weeks as a fully worked out party menu suggestion, from cocktails to Cake de Ron. Serves 10 Timings: Overnight marinade, then 4-5 hours cooking
Put all the marinade ingredients in bowl and blend to a paste. Cover the pork with the paste, massaging into the flesh, and in the gaps of the rind. You might want to wear cooking gloves to do this or be sure to wash your hands extremely well afterwards as you’ll regret touching your eyes with hands that have been peeling Scotch bonnets. Place the pork in a dish (you can cut it in two if it makes it easier) and leave overnight in the fridge, turning occasionally. But you don't have to get up in the night to turn it, just do it before you go to bed. Pre heat the oven to 165°C. Place the pork in a roasting tray, skin upwards, and cover with kitchen foil. Roast for 90 minutes, then turn up the heat to 180°C. Roast for another 2 hours. Every now and then pour off the cooking juices into a jug - there will be quite a lot and it will separate into the fatty part and the meat juices which carry a lot of flavour. Take the cover off the meat and roast for another hour to let the skin start to cook down into the meat. Take the roasting tray out of the oven, drain away the juices and carefully separate the skin away from the pork. Remove the skin and discard. (You can separately sizzle up the crackling later by frying in deep fat if you like.) Pull the bones and any cartilage parts out of the soft and tender meat and tear the meat into shreds with two forks. Place back in the oven while you make the sauce. Separate the meat juices from the fat. Pour the juices into a pan and boil down until reduced by at least half – taste as you go along and experience how the flavour deepens. Add the chilli sauce and sweet chilli sauce and the balsamic vinegar. Continue to simmer for a few minutes. When you have a glossy sharp-smelling sauce, pour it over the meat in the roasting tin and mix well. Roast for a further 30 minutes, turning every now and then so the sauce is absorbed and the meat is starting to char at the edges of the tin. You can add a shake of Tabasco and a sprinkle of salt and pepper before serving if you think it needs extra spice. The meat in its sauce keeps warm in the oven if covered, so you can leave it now until your guests arrive and get on with the other things, or make it a day or so ahead and warm up as needed.  Traditional Caribbean Black Beans - cooked with green peppers and garlic Traditional Caribbean Black Beans - cooked with green peppers and garlic Black Beans with peppers and garlic (vegan) A traditional part of the Caribbean Christmas table, a dish of tasty black beans is also a great vegan offering for a party gathering. They’re even better and deeper flavoured made it ahead of time and they freeze well too. It’s worth using dried black beans rather than a tin, they have a stronger flavour, but you could certainly use a tin or two if you’re short of time. A tin of the little darlings is a great storecupboard standby for a quick dish of beans when unexpected visitors land on you. This recipe is part of my Caribbean Christmas menu, which will be on the website as a full menu from cocktails to Cake de Ron in a couple of weeks. I don’t usually have leftovers from this, but if you do, add them to a ratatouille to change it into a bean stew, with all the goodness and flavour from all those wonderful vegetables. Serves 8 with some leftovers Timings: overnight soaking, 4 hours cooking – can be done ahead of time and warmed up or frozen
Soak the black beans overnight in plenty of water. De-seed and de-stalk the green peppers by cutting round the stalk and pulling out the centre, wash to get rid of the seeds. Peel the garlic cloves and pop them into the green peppers. Place the beans and the garlic filled peppers in a large saucepan and add cold water to cover the beans by about 2cm. Add the bay leaves. Bring the pan to the boil, and simmer over a low heat until the beans are softened – about 3 hours. You could do this in the slow cooker and it would take about 6 hours. While the beans are cooking, grill the red peppers until the skins blister and char all over, then place them in a glass bowl with a plate on top to steam and cool. When cool, you can rub off the skin very easily and remove the centres and seeds. Set aside. When the beans are cooked, let the pan cool for 10 minutes. Take out the green peppers and garlic – the garlic should have stayed inside the peppers but search through the beans to make sure you’ve got them all. Put the green peppers, garlic, half the red peppers and a cupful of beans with their water in a blender with the relish and ground spices and 2 tablespoons of olive oil. Blend up to a thick paste and add back into the pan of beans along with the remaining red peppers, chopped up into small strips. Stir into the beans and taste. Add a slug of olive oil and more lemon juice, more salt if needed and a good grind of black pepper. Traditionally, they shouldn’t be too spicy, just a friendly warmth. Re heat the beans, adjust the seasoning as you like, and then allow to cool a bit before you serve – they will thicken as they cool and you want that slightly thicker texture. They go like a dream with simply steamed white rice and are the perfect side to a slow roast pulled pork.  Rustic and delicious, home made chocolate macaroons Rustic Chocolate Macaroons
These are clearly macaroons, the slightly raffish Italian older cousin of the sophisticated French macaron. A confection of whipped egg white with sugar and ground nuts has been around for a long time, and the idea was allegedly brought to France with the entourage and cooks of Catherine de Medici in the mid 1500s. In France they refined and formalised the original recipe to produce the riot of coloured macarons you can buy today: smooth and elegant, with various flavours and strong (mainly artificial) colours. A macaroon/macaron is different from the classic meringue in that you leave it for a while after whipping the egg whites and mixing with the sweet stuff, so that it forms a slight crust on the top surface. The crust bakes to a chewy texture, contrasting with the fluffy softness inside. The usual filling is a rich ganache, which seeps into the inner surface of the macaron, adding another even gooey layer. These taste just as good and have that chewy nutty texture but you don’t have to faff around with a piping bag to get the flying saucer perfection. If you want to make French macarons, I will bring some recipes onto the blog well before Christmas, so you can make them as pretty presents. My friend Freddie Sykes is a great baker and made a batch of these for my recent birthday. He based his recipe on the You-Tuber Adam Ragusea’s version, so thanks to both these young men. Makes 10 Timings: 90 minutes
Beat the egg whites until fluffy, then beat in the granulated sugar until the mixture is glossy and you get floppy peaks. Put in the almond flour, powdered sugar, cocoa powder, and half a pinch of salt. Fold the dry ingredients into the eggs until you get a mousse-like consistency. Cover a sheet pan with parchment paper and spoon the batter on in about 20 dollops. Let them sit and dry for a half hour. Heat the oven to 180°C and bake until the meringues start to crack, about 15 minutes. Cool completely before filling. To make the ganache, combine as little as 2 tbsp of cream with an equal quantity of chocolate by volume. Microwave until just bubbling, let it sit for a minute, then stir until smooth. Cool the ganache down to get it to a spreadable consistency. Spread ganache onto the bottom of a macaron, then sandwich it with one of roughly equal size.  Mint, rum, sugar - the classic Mojito Mojito
Simple and sophisticated all at once. Mint, rum, limes and sugar, that’s all you need. And ice. To serve a crowd, you will need either a bartender working full speed or make up a whole jug of Mojito ahead of time and have someone ready to stir and pour, although the genuine cocktail is made carefully each in its own glass, taking the time to muddle the mint into the syrup. I quite like to set up a cocktail station and hand the task over to a guest who I know can be a bit shy – giving them something to do and keep their hands busy is a great ice-breaker and there’s the bonus of being extremely popular as people taste the cocktail and shower the creator with compliments. You will also need to assign a “runner” to the cocktail station to fetch more mint or crush more ice on command. This recipe is one from my Caribbean Christmas series which will be on the website as a full menu very shortly. Makes one Mojito. (but you'll want more than one...)
Place the rum, syrup, lime and several sprigs of mint in the bottom of quite a large heavy glass and “muddle” them with a proper muddling tool or with the end of a wooden spoon. You should take your time over the muddling; you aren’t smashing or pureeing it. Add crushed ice to the brim of the glass, then top up with sparkling water. Serve with a straw so your guests can choose how to mix up the layers – strong rummy sweet minty liquid at the bottom or lighter icy sparkle at the top. Garnish with another sprig of mint and maybe a jaunty slice of lime. 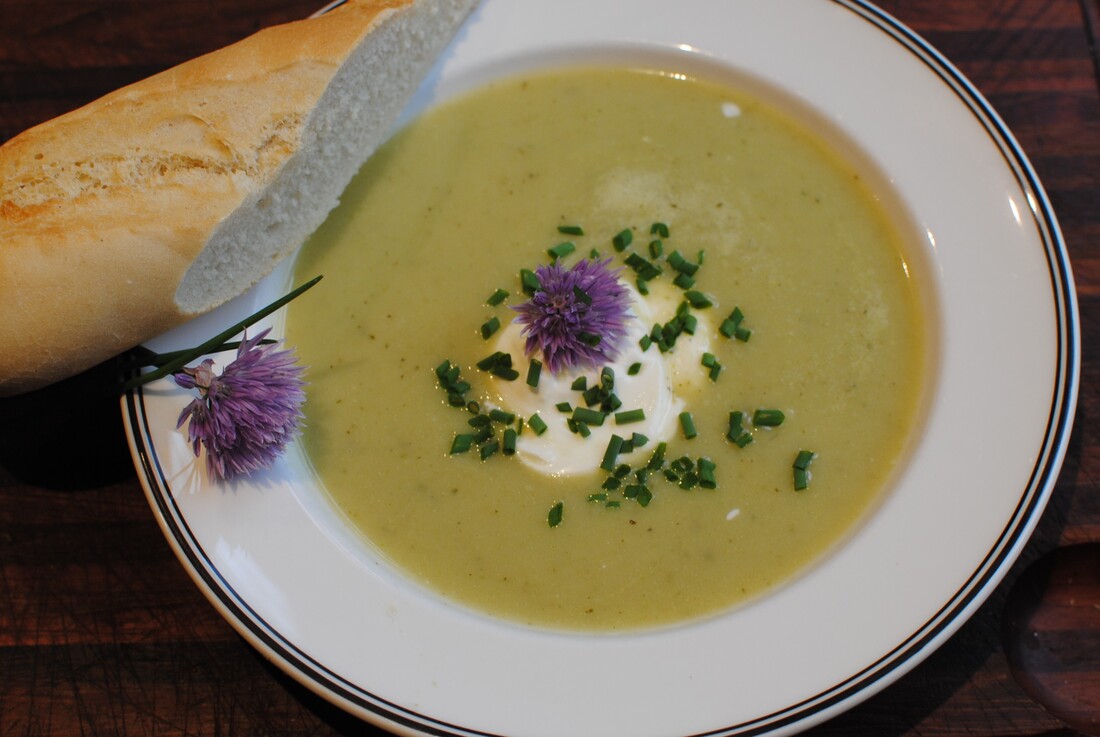 Elegant, simple. Leek & potato soup. Leek and Potato Soup – Vichyssoise
The sign of a real classic is how many versions you can find. I’ve eaten so many different takes on what sounds such a simple vegetable soup, and they’re all good. Like a good trench coat, it can be posh, it can be practical, it can be dressed up or slobbed down, treated like a valuable possession or just wheeled out when needed without fanfare to do a job quietly and efficiently. You can:
This is what I do for a lunchtime soup beloved by all the family. I like to use a chicken stock as the base but use vegetable stock if you prefer. I use bones from any chicken that we eat (and some fresh vegetables and herbs too, of course) to make a basic stock in the slow cooker so I always have a good chicken stock in the freezer, which adds a richness and fattiness to any mainly vegetable soup. Serves 6 Timings: 1 hour, then time to cool and re-warm
Gently fry the onions in some oil until tender, add the rings of leek and fry again until you can see the green becoming brighter. Add the stock and tip in the potatoes. Bring the soup to a mild simmer and cook for 10 minutes. Leave to cool in the pan as this will finalise the cooking of the potatoes right through. When cold, liquidise, adding the milk or cream. Taste for seasoning and adjust – you will probably need some salt and pepper unless you used a stock cube which is already quite salty. Eat cold if you like, or warm up carefully (don’t boil because of the milk in it) and eat with fresh bread or with your chosen toppings. |
Some Changes - April 2022
Thanks to my friends and followers for your patience, and for your encouragement to start blogging again. Archives
April 2022
Categories
All
|
 RSS Feed
